 Dallon Avery
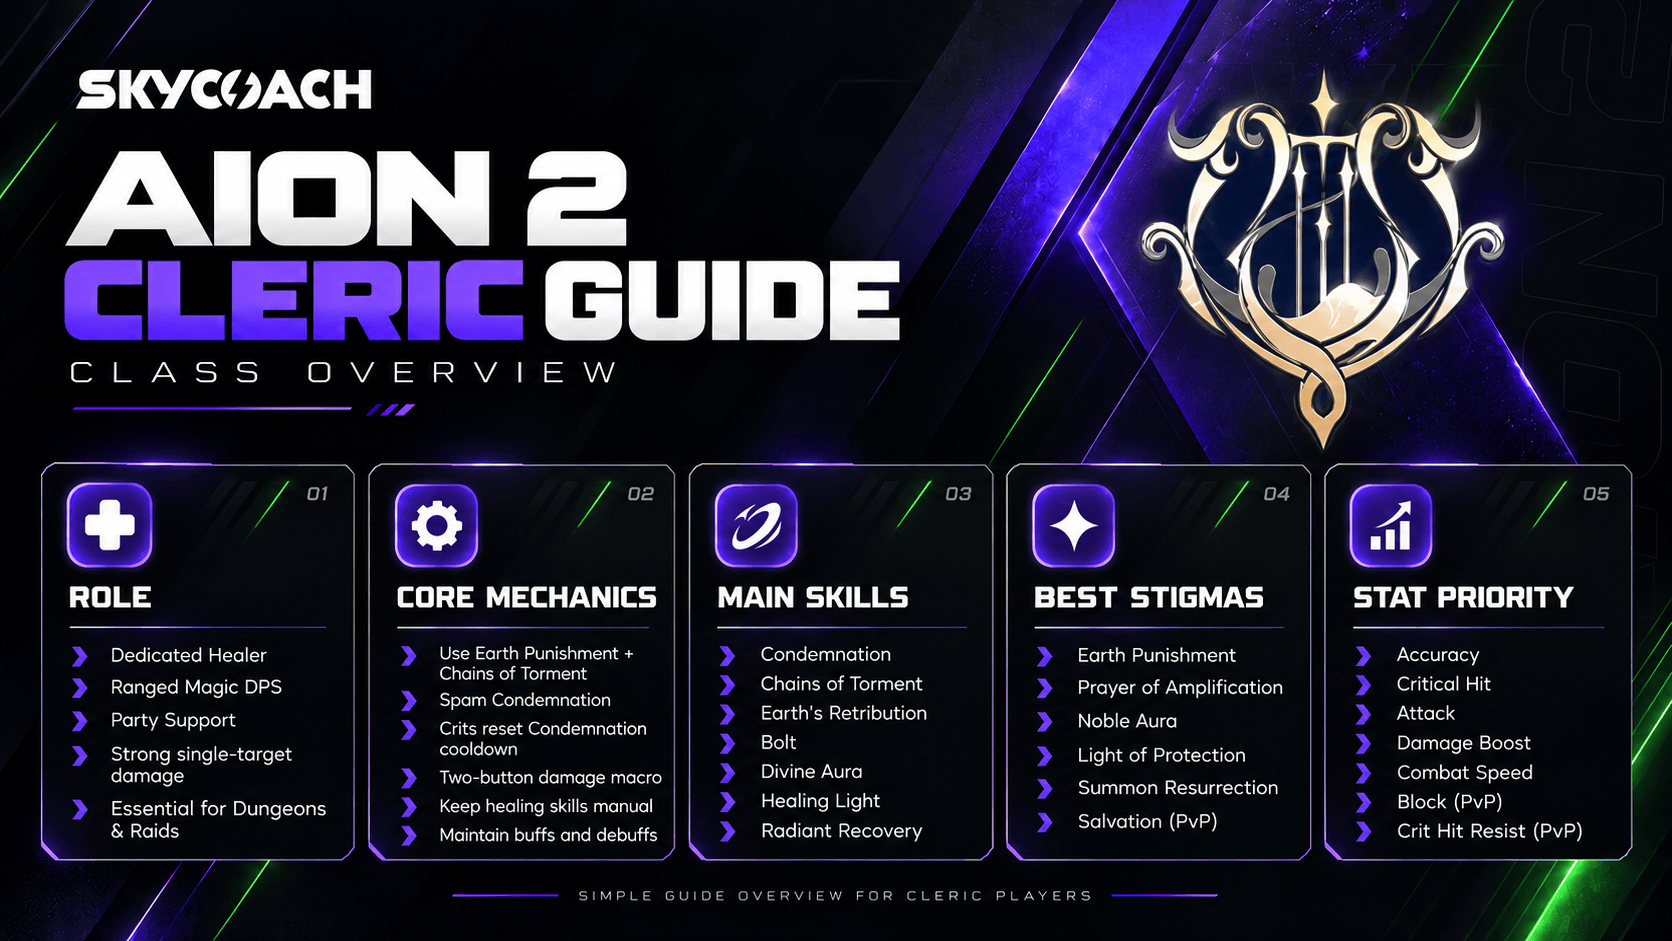
AION 2 Cleric Guide Quick Summary:
- Cleric is the only dedicated healer in the game.
- Condemnation is your main DPS button in the macro.
- Earth Punishment is your most important Stigma.
- Clerics usually use a macro to deal damage, but they use healing skills manually
- Accuracy, Critical Hit, Attack, Damage Boost, and Combat Speed are the best stats for this class.
Need help leveling up and gearing your Cleric? Buy AION 2 Powerleveling service at Skycoach and get your character to any desired level with optional completion of all horizontals on the map which lets you get that much needed gear score!


Read closely 
Browse our hottest Aion 2 Boosting services








AION 2 Cleric Class Overview
Every class in the game has some kind of sustain option, whether it is a simple heal, a block, or a life-steal buff. Despite that, the game does have two support classes: one of which is a buffer that provides useful bonuses to the team and debuffs enemies, and a healer. Cleric is a dedicated healer and, honestly, he is much needed in Expeditions and other instanced content. And rest assured, once the raid comes out, Clerics will be practically hunted down.
That said, the primary function in every class in AION 2 is dealing damage. All classes are built around that, and Cleric is no exception. Truth be told, it is actually insane the kind of damage he deals. By the way, despite wielding a mace and a shield, Cleric is actually a ranged caster, like Sorcerer.
If there’s one thing you need to know about how Cleric deals damage, it’s that it's a class that’s much better at dealing single-target damage because the way his combo works is you have to first apply a few debuffs on a target, and then the damage numbers go up. So, you can’t really do that with multiple targets. Although when leveling, weak enemies will be dying in packs, there’s no problem with that. It’s not like you have to do this for every mob in a pack. That’s more for instanced content and PvP.
|
Category |
Cleric |
|
Primary role |
Healer / Support |
|
Secondary role |
Magic DPS |
|
Weapon |
Mace |
|
PvE strengths |
Healing, cleansing, single-target DPS, party buffs |
|
PvP strengths |
Survivability, sustain, defensive buffs, sustained damage |
|
PvE weaknesses |
Limited AoE damage and dependence on debuff uptime |
|
PvP weaknesses |
Enemy cleansing can interrupt your main damage combo |
|
Difficulty |
Moderate, with additional depth when maximizing DPS |
If you’re thinking of picking up Cleric, you should know that you will always be welcome in group content. But don’t think that you can just stand behind and heal. You’re expected to deal damage to the bosses in dungeons and raids. Besides, if players fail boss mechanics and die, that’s on them. There’s no way you can outheal every mechanic in the game, so don’t worry about it.
Best AION 2 Cleric PvE Build

For PvE, you want to be using a macro that handles basically all of your damage skills. You aren’t going to be using a lot of healing while leveling up. Still, the idea is to keep your damage in one macro, and your heals and buffs on separate quick access buttons. I’ll explain how everything works next.
The entire build revolves around three skills: Chains of Torment,
Earth Punishment, and
Condemnation. Once you understand how they interact, the rest of the build makes considerably more sense.
Here's how it works:
Chains of Torment is a debuff that lets you use
Condemnation (main, big damage skill).
Earth Punishment guarantees that
So, this simple combo lets you spam Condemnation and deal lots of damage.
On its own, Condemnation has a pretty short cooldown. But because
Earth's Punishment guarantees the critical hits needed to reset it, you're essentially turning it into a rapid-fire damage skill for the duration of the combo. That’s why you want to level up
Condemnation - other damage skills actually give you less DPS if you test it.
Best Cleric Skills and Specialties
Below you’ll see each skill that you will unlock as you level up, as well as which Specialties you should use. Specialties unlock at levels 8, 12, and 16. You get 3 specialties at level 8, and then one more at the other two levels. The numbers in the table represent their number in the list, as in “2” refers to the specialty that unlocks at level 12.
The 3 slots for specialties are unlocked at skill level 8, 12, and 20.
| Icon |
Skill |
In-game effects and mechanics |
Recommended Specialties |
|
Condemnation |
Attacks enemies affected by Chain of Torment. A critical hit can reset its cooldown through Specialty 4. |
2: Up to +12% damage when fewer targets are hit. 4: Resets cooldown on a Critical Hit. 5: Multi-Hit on hit. |
|
|
Earth's Retribution |
Basic attack chain that progresses through Thunder and Lightning to Discharge. |
2: +20% Discharge chain trigger chance. 4: -7s Bolt cooldown on landing Discharge. |
|
|
Bolt |
Three-stage charge attack dealing 987–2,963 Wind damage at level 1. Hits up to four enemies and deals 20–35 Stagger Gauge Damage. |
3: +30% Skill Speed. 4: Up to +20% damage when fewer targets are hit. 5: Critical Hit on hit. |
|
|
Chain of Torment |
At level 1, deals 138 Earth damage, applies a 10-second damage-over-time effect, and reduces enemy PvE Damage Tolerance by 5% and PvP Damage Tolerance by 2.5%. |
2: +3s Damage over Time. 4: +10% PvE Damage Tolerance reduction and +5% PvP Damage Tolerance reduction. |
|
|
Divine Aura |
Summons a stationary aura for 5 seconds that periodically attacks a target within 20m, dealing 394 Earth damage at level 1. |
3: +50% Divine Aura attacking speed. 4: +3s duration. 5: -10s cooldown. |
|
|
Debilitating Mark |
Applies a damage-over-time debuff and reduces the enemy's offensive effectiveness. Its base debuff reduces PvE Damage Boost by 5% and PvP Damage Boost by 2.5%. |
2 and 4: Recommended debuff-enhancing effects. Exact current wording still requires confirmation. |
|
|
Judgment Thunder |
Magic attack that chains into Divine Punishment. Primarily useful for AoE farming and PvP in this build. |
2: Increased damage. 5: Additional Divine Punishment use. Exact current numerical wording requires confirmation. |
|
|
Lightning Strike Scattershot |
Situational attack against staggered enemies. |
3: Changes to a mobile skill. 4: Multi-Hit on hit. 5: -1s to all skill cooldowns on hit. |
For Condemnation, you gotta go for the cooldown reset alongside the increased damage against fewer targets. At level 20, add Multi-Hit as the third Specialty.
For Bolt, I would get Specialties 3 and 4 at level 12, then switch to 3 and 5 at level 16 for that guaranteed critical-hit effect. At level 20, you can equip all three.
For Divine Aura, use 3rd and 4th initially. Once you reach level 16, I would consider switching to 3 and 5, especially if you prefer having the aura available more frequently. At level 20, you can run 3, 4, and 5 together.
For AoE farming, the second specialty makes Divine Aura an AoE. Meaning the thing that you summon deals AoE damage. This is worth swapping to when you're killing packs of weaker enemies.
Healing and Defensive Skills
Here you have 4 skills for your support role. 3 of them are heals, and the other one removes CC effects, which is super useful for idiots that catch every boss mechanic.
| Icon |
Skill |
In-game effects and mechanics (Lv. 1) |
Recommended Specialties |
|
Healing Light |
Restores 200–220 HP to the caster and the party member with the lowest HP within 40m. Instant Cast. Cooldown: 6s. MP Consumed: 50. |
1: +2 consecutive uses. 4: +2% HP restored. 5: -2s cooldown. |
|
|
Radiant Recovery |
Restores 379–417 HP and removes 1 debuff for the caster and party members within 40m. Instant Cast. Cooldown: 12s. |
1: Removes up to 2 debuffs. 3: -3s cooldown. 5: +5% HP restored. |
|
|
Light of Regeneration |
Restores 616–739 HP every 2s for 30s to the caster and party members within 40m. Cooldown: 30s. |
1: +5% Defense while healing. 4: +5% Move Speed during healing. 5: +5% PvE Damage Tolerance and +2.5% PvP Damage Tolerance during healing. |
|
|
Defiance |
Removes Stun, Knockdown, Airborne, Grab, Frost, and Fear from the caster and grants Tenacity for 5s. Tenacity grants Status Effect Immunity. Unaffected by cooldown reduction effects. Cooldown: 60s. |
1: Adds [Blessing of Regeneration] Chain Skill. 3: Restores 10% HP on using [Defiance]. 5: +50% PvE Damage Tolerance and +25% PvP Damage Tolerance for Tenacity duration. |
Radiant Recovery's second Specialty was changed to an additional consecutive use in the September 16 skill update. That is one reason I wouldn't retain older tooltip wording without checking the current Global entry.
Which Cleric skills should you level first?
While leveling up, it’s best to go for damage skills, because it will be a while before you get your toes wet in instanced content. That said, when you reach a certain GS, you’re going to want to start farming Vakron Expedition on Conquest difficulty to get your GS even higher. And while this dungeon can be cleared without any heals as long as everyone knows what to do, getting those healing skills leveled up will earn you gratitude.
| Icon |
Priority |
Skill |
Reason |
|
1 |
Condemnation 20 |
Main DPS source; adds Multi-Hit without giving up essential Specialties |
|
|
2 |
Bolt 16 |
Unlocks the guaranteed critical-hit effect |
|
|
3 |
Radiant Recovery 20 |
Better healing, cooldown management, and cleansing |
|
|
4 |
Earth's Retribution 12+ |
Improves Discharge frequency and Bolt cooldown reduction |
|
|
5 |
Divine Aura 16–20 |
Improves sustained damage and offers AoE farming options |
|
|
6 |
Judgment Thunder 16 |
Useful for AoE farming and PvP |
The idea is to make it so that it is easier to level up and reach the max level and then continue farming. What I’m trying to say is that your healing skills aren’t for yourself; they’re more for group content. And the proportion of group content to solo content that you will be doing in this game is like 60/40 in the endgame.
Best Cleric Passive Skills
Cleric has several extremely useful passives, and most of them contribute to either damage, survivability, or healing. But there are a few of them that you can genuinely ignore. Besides, you likely won’t have enough skill points to invest in all of them. So, just follow this priority list.
| Icon |
Passive |
Effect (Level 1) |
Priority |
|
Radiant Benediction |
Restores 384–461 HP to the caster and party members within 40m on landing an attack. Cooldown: 5s. |
Highest |
|
|
Empyrean Lord's Grace |
Increases the caster's Critical Hit by 100 and Double Chance by 0.2%. Deals 71–71 additional damage on landing an attack. Cooldown: 1s. |
Highest |
|
|
Earth's Grace |
Increases the caster's Critical Damage Boost by 10.5% and Accuracy by 100. |
Highest |
|
|
Healing Enhancement |
Increases the caster's Heal Boost by 22.4% of Attack. |
High |
|
|
Immortal Veil |
Increases the caster's Defense by 2% and Critical Hit Resist by 100. |
High |
|
|
Warm Benediction |
Increases the caster's Max HP by 6% and Max MP by 7. |
High |
|
|
Empyrean Lords' Benediction |
Increases the caster's Block by 200 and restores 53–64 HP on Block. Cooldown: 3s. |
Lower |
|
|
Prayer of Concentration |
Forms a Protective Shield that blocks 424 damage and increases Heal Boost by 20% for 30s when HP is 50% or less. Cooldown: 60s. |
Lower |
|
|
Heal Block |
Has a 7% chance to reduce the target's Incoming Heal by 32% for 5s on landing an attack. Cooldown: 5s. |
Lower |
Radiant Benediction is super important as it heals you while you deal damage. During your
Condemnation spamming, you're attacking frequently enough to benefit from this effect without having to interrupt everything for a dedicated healing spell.
Healing Enhancement is another passive I wouldn't ignore. Since its healing bonus scales with your Attack, improving your offensive equipment also contributes to your healing capabilities.
Best Cleric Stigma Skills in AION 2
Stigmas are pretty important too. Make sure to read the descriptions of all of them. But know that you don’t need to unlock all of them. In fact, you’ll need only around 4.
For the main PvE damage build, Earth Punishment is non-negotiable. It's the ability that makes our
Condemnation rotation possible, and it's also the first Stigma I recommend pushing to level 20. The other slots can change depending on your party composition and whether you need resurrection.
| Icon |
Stigma |
Description |
|
Earth Punishment |
Level 1: 1,186 Earth damage at 20m, followed by periodic Earth damage for 10 seconds. Deals 20 Stagger Gauge Damage. |
|
|
Prayer of Amplification |
Increases Attack during its effect. The level 5 Specialty adds 20% PvE Damage Boost and 10% PvP Damage Boost. |
|
|
Noble Aura |
Summons an aura lasting 300 seconds. At level 1, it attacks your target for 472 damage every 2 seconds. |
|
|
Light of Protection |
Provides offensive and defensive bonuses. Overlapping effects with the Chanter's corresponding Mantra do not stack. |
|
|
Summon Resurrection |
Resurrects a fallen party member. |
|
|
Benevolence |
Provides healing support, with a periodic cleansing effect available at level 20. |
|
|
Salvation |
Provides a short period of protection against incoming damage, including temporary immunity. |
|
|
Voice of Doom |
Level 1: 1,100 Earth damage to enemies near the target, periodic damage, and 60% reduction to Incoming Heal and HP Potion Recovery for 20 seconds. |
|
|
Absolution |
Party healing and debuff removal. |
|
|
Yustiel's Power |
Increases party Damage Tolerance. |
My usual recommendation for random dungeon groups is Earth Punishment,
Prayer of Amplification,
Light of Protection, and
Summon Resurrection, provided there's no Chanter supplying the overlapping buff.
When you have a Chanter, swap Light of Protection for
Noble Aura. The relevant effects from
Light of Protection and the Chanter's Unwavering Mantra don't stack, so there's little reason to keep both.
Since most of the time people will be using resurrection stones, you can replace Summon Resurrection with
Noble Aura or
Benevolence, depending on whether your party needs more damage or support.
But with random players, this won’t work; you’re gonna need that Summon Resurrection, especially when you yourself are unfamiliar with the dungeon you’re about to play. After all, Cleric is expected to keep the party alive, and having a way to bring someone back after a mistake is worth considerably more than a small increase in DPS.
Noble Aura Specialties
|
Stigma Level |
Specialty Effect |
|
5 |
+200 Aura Critical Hit |
|
10 |
+20 damage against targets affected by Debilitating Mark |
|
15 |
+30% damage against targets with Incapacitated Immunity |
|
20 |
-1s Aura attack cooldown |
|
25 |
An additional +30% damage against targets with Incapacitated Immunity |
Noble Aura is a particularly comfortable choice because it lasts five minutes and provides additional damage without much attention. I would use it in groups that already have a Chanter providing the relevant party buff.
Voice of Doom Specialties
|
Stigma Level |
Specialty Effect |
|
5 |
Up to +20% damage when more targets are hit |
|
10 |
Removes Protective Shields on hit |
|
15 |
-200 Critical Hit Resist for the duration |
|
20 |
-50% Damage over Time intervals |
Voice of Doom is an optional PvP pick, but it's worth considering against Clerics, Chanters, and defensive opponents. The level 10 shield removal makes it interesting against Templars in particular.
Best AION 2 Cleric PvE Rotation
The macro is pretty simple; you just put most of your damaging skills into one button column and then enable the macro. Don’t forget to set the macro button in the settings menu. Remember, you don’t have to use any of the damage-dealing skills manually, except for your basic attack that restores MP. What you do is hold down both mouse buttons and let the combat play out.
Now, here’s what you put in your macro. Obviously, you can’t stack all of these into the same column, so add several skill columns into the macro so that you’re all used when you hold down the button.
Prayer of Amplification
Debilitating Mark
Earth's Retribution
Bolt
Divine Aura
Noble Aura
Light of Regeneration
You can arrange the skills between the macro and your second button according to what feels comfortable. The important thing is to keep the Condemnation combination working and make sure your macro doesn't repeatedly interrupt it with less valuable attacks.
Here’s how to use the macro to deal more single-target damage:
- Hold both buttons to apply your buffs and debuffs.
- Once
- Keep holding the button responsible for
- Repeatedly cast
- Resume holding both buttons when the burst window finishes.
The reason this works is that Condemnation can continuously reset its cooldown during the burst window. By temporarily stopping your other abilities, you give
Condemnation more opportunities to activate instead of competing with attacks that deal less damage.
Why Use Bolt?
Bolt is pretty useful too, but it has a long cooldown. So, what you do is use
Earth’s Retribution, which has a Discharge attack in its combo. This thing, with the right specialty, reduces
Bolt’s cooldown by 7 seconds every time Discharge is used. And then
Bolt itself gives you Skill Speed from one of its Specialties, so that’s also useful for everything else you use.
One small tip: if you have very little Combat Speed, fully charging Bolt can feel unnecessarily slow. You can release its button earlier to shorten the cast when you need to. Once you've accumulated more Combat Speed, managing
Bolt becomes considerably more comfortable.
Should Cleric use Judgment Thunder for PvE?
If you don’t mind switching up your macro every now and then, for single-target dungeon bosses, I recommend leaving Judgment Thunder out of the main damage macro.
Although the skill deals damage, it will make you spam Condemnation less frequently. That means you’ll be dealing less damage over time.
At the same time, when farming, you should add Judgment Thunder back into the rotation. You’ll want to use more AoE, as oftentimes there are just packs of monsters. You can also swap out
Divine Aura for its AoE Specialties when farming large groups of monsters.
Browse our hottest Aion 2 Boosting services








How to Heal as Cleric in AION 2
Healing is still your primary responsibility when playing Cleric in group content. Fortunately, you don't need to abandon your damage rotation to do it effectively. Several abilities provide passive or ongoing healing, and your direct heals can be activated separately whenever someone takes heavy damage.
When it comes to actually healing, you can use your skills retroactively. Some of them heal targets over time. And for when someone takes big damage and is close to dying, you can use one of your big heals. Just make sure you assign quick slots you can easily reach. If you have a mouse with more buttons on the side, even better.
|
Healing Skill |
Best Use |
Recommended Effects |
|
Healing Light |
Regular direct healing |
Additional consecutive uses; increased healing on low-HP targets |
|
Radiant Recovery |
Larger heals and cleansing |
Reduced cooldown; additional use; removal of harmful effects |
|
Light of Regeneration |
Ongoing healing |
Increased healing on low-HP targets and additional Movement Speed |
|
Summon Resurrection |
Recovering fallen teammates |
Resurrection during group content |
|
Benevolence |
Additional party support |
Cleansing support, particularly at higher levels |
Healing Light is your regular healing tool.
Radiant Recovery removes any negative effects and CC;
Light of Regeneration gives you healing over time and also increases movement speed. It’s nice to use on a cooldown. Everyone will appreciate it. Just don’t use it on tanks; they’re usually moving less, keeping the boss facing them.
Also, don't forget about Radiant Benediction, which is your most useful passive.
Best AION 2 Cleric PvP Build
Let’s get this clear - just like any ranged caster, a Cleric is a tough son of a gun to deal with in PvP. Now, I’m talking about Abyss when thinking about PvP. Arenas and battlegrounds are less chaotic and require more skill and concentration. In any case, with this amount of heals, buffs, and debuffs, you’ll feel like a king in PvP. Unless, of course, you’re ganked by a bunch of Asmodians.
So, what do you need to change for a PvP build? Not a lot, actually. But there are some Stigmas that are better in PvP than in PvE
Best Cleric PvP Stigmas
For solo PvP, I recommend these four Stigmas:
Light of Protection
Salvation
These are going to make a more rounded build for PvP.
Earth Punishment is still useful for dealing damage.
Noble Aura gives you additional consistent damage, while
Light of Protection makes you way harder to kill.
Salvation is the defensive option here. It will allow you to escape dodgy situations in the abyss.
Another option is Voice of Doom, especially against classes that rely on defensive shields. At level 10, it can remove protective shields, making it potentially useful against Templars and other defensive opponents.
Best Cleric Stigmas for group PvP
For larger fights where your team needs a dedicated healer, I would consider switching to a full-support combination.
| Icon |
Stigma |
Purpose |
|
Absolution |
Group support |
|
|
Yustiel's Power |
Defensive support and Damage Tolerance |
|
|
Benevolence |
Healing and cleansing support |
|
|
Salvation |
Protection against incoming burst damage |
This approach gives up some of your personal damage to concentrate on keeping teammates alive.
Benevolence becomes especially interesting at level 20 thanks to its repeated cleansing effect. When several teammates are affected by harmful effects, that can be much more useful than another offensive ability.
Best Cleric PvP Combo
The main difference between PvE and PvP is that enemies can remove Chains of Torment or
Earth Punishment. Without those effects, you lose the ability to repeatedly cast
Condemnation.
That's why I recommend adding Judgment Thunder to your PvP damage rotation.
The basic approach is:
- Apply your offensive buffs and debuffs.
- Activate
- Focus on repeated
- If the enemy cleanses your debuffs, return to your normal damage rotation.
- Use
Judgment Thunder to maintain damage while waiting for another
- Save
You can use the same two-button macro system from PvE and simply include Judgment Thunder as an additional attack.
When both important debuffs are active, I recommend temporarily prioritizing Condemnation just as you would against a dungeon boss.
Best Cleric Stats in AION 2
For PvE, Cleric benefits from many of the same offensive stats as other damage classes. You want reliable attacks, good critical-hit performance, and enough Combat Speed to make your rotation feel comfortable.
However, Cleric also benefits from Attack through Healing Enhancement, which makes offensive improvements valuable for both damage and healing. This is one of the reasons I wouldn't build purely defensive equipment for regular PvE.
|
Stat |
PvE Priority |
Why It Matters |
|
Accuracy |
Very High |
Helps attacks land consistently |
|
Critical Hit |
Very High |
Improves damage outside guaranteed critical-hit windows |
|
Damage Boost |
Very High |
Increases overall damage |
|
Attack |
High |
Improves damage and contributes to healing through Healing Enhancement |
|
Combat Speed |
High |
Makes the damage rotation and Bolt casts more comfortable |
|
Critical Damage Boost |
High |
Benefits your critical-hit-heavy rotation |
|
Double Chance |
High |
Provides additional offensive value |
|
Cooldown Reduction |
High |
Helps cycle important abilities more frequently |
I wouldn't spend a fortune trying to get perfect attributes on early equipment. You'll replace a lot of your items as your Gear Score increases, so save expensive rerolls for pieces you're actually going to keep.
Best Cleric PvP stats
For PvP, I recommend paying more attention to survivability, especially Block and Critical Hit Resist.
|
Stat |
Priority |
Why It Matters |
|
Block |
Very High |
Improves survivability against incoming attacks |
|
Critical Hit Resist |
Very High |
Helps reduce the effectiveness of enemy critical hits |
|
Constitution |
High |
Supports a more defensive PvP build |
|
Dexterity |
High |
A possible defensive Soulbind priority |
|
Accuracy |
High |
Keeps your attacks reliable against defensive opponents |
|
Damage Boost |
High |
Maintains offensive pressure |
Early in progression, Block can be particularly effective because many opponents haven't accumulated enough Accuracy or unlocked the necessary countermeasures.
However, I wouldn't treat Block stacking as a permanent answer to every PvP matchup. Its effectiveness changes as players obtain better gear and improve their stats.


You got -20% OFF 
Best Cleric Gear and Manastones
For regular PvE, I recommend following an offensive gearing approach while maintaining enough survivability to handle dungeon mechanics. Attack, Accuracy, Critical Hit, and damage-related bonuses are all worth looking for, and there's no need to reroll every piece of equipment immediately.
For PvP, the priorities change toward defensive Soulbinds and Manastones. Block and Critical Hit Resist are especially attractive while players are still building their equipment.
|
Content |
Recommended Attributes |
|
PvE dungeons |
Accuracy, Damage Boost, Attack, Critical Hit |
|
PvE damage |
Critical Damage Boost, Double Chance, Combat Speed |
|
PvP |
Block, Critical Hit Resist, Constitution, Dexterity |
|
General progression |
Affordable upgrades that improve Gear Score without excessive rerolling |
For Manastones, use the same basic approach. Offensive stones are preferable for PvE, while Block and Critical Hit Resist are worth considering for a dedicated PvP set.
I would avoid spending large amounts of Kina on temporary equipment, especially before reaching the dungeon and crafted-gear progression stages where you'll start replacing earlier pieces.
Best Cleric Daevanion Board Progression
Daevanion is important because it gives you additional skill levels, passives, and useful attributes. However, I wouldn't spend too much time worrying about the perfect route through every early board. You're going to unlock most of the important nodes eventually, and by the time you're working through roughly 1,200–1,400 GS dungeon progression, your first few boards should already be largely filled out.
During leveling, I would prioritize whichever nodes help you reach useful skill breakpoints. That gives you immediate benefits instead of spending points on attributes that don't noticeably change how your Cleric plays.
My main priorities would be:
Healing Light and
Radiant Recovery: Invest enough points to keep your healing reliable.
- Important passives: Pick up
Radiant Benediction,
Earth's Grace,
Healing Enhancement, and other useful passives along your route.
If you're traveling toward an especially valuable orange attribute node, there's nothing wrong with grabbing it. I just wouldn't sacrifice an important skill breakpoint solely to follow a rigid board order.
You can also redistribute Daevanion Points for a relatively small cost, so this isn't a permanent decision.
As you continue playing, complete regional quests, Sealed Dungeons, and other side activities that provide additional Daevanion Points. You can also obtain points through certain shops, including Nightmare and Shugo progression.
Best Cleric Arcana in AION 2
Arcana is particularly useful for Cleric because it provides additional skill levels, helping you reach the breakpoints that make your damage and healing abilities much better.
For the main two-button PvE build, I recommend using two Magic Arcana pieces and three Primal pieces. The Magic Bell and Mirror are the preferred Magic pieces, providing useful offensive attributes while allowing you to keep the remaining slots for the Primal set.
|
Arcana Slot |
Recommended Skills or Bonuses |
|
Grail / Chalice |
Condemnation |
|
Parchment |
Condemnation, Bolt, Radiant Recovery |
|
Compass |
Judgment Thunder, Light of Regeneration, Divine Aura, Healing Light |
|
Bell |
Warm Benediction, Empyrean Lord's Grace, Immortal Veil, Survival Willpower |
|
Mirror |
Empyrean Lord's Benediction, Healing Enhancement, Radiant Benediction, Earth's Grace |
The first Arcana I would pay particular attention to is the Grail, since it can help you reach Condemnation level 20.
When transmitting an Arcana with a selectable skill, choose Condemnation and hope that the remaining attributes roll well. The other effects are randomized, so you'll probably end up with some less-than-perfect pieces before getting the result you want.
For the early Unique Chalice crafting process, prioritize the variant that supports your Condemnation-focused progression. You don't need to spend additional materials trying to guarantee multiple perfect skills on your first attempt.
Once you've acquired your Arcana, remember that enhancements can also increase random attributes. I would prioritize getting the right skill combinations first rather than immediately chasing expensive enhancement outcomes.
Best Cleric Pantheon and Pets
Pantheon and Pets provide additional attributes that become increasingly useful as your character progresses. These systems aren't as immediately important as getting the main skills and Stigmas working, but they're worth developing alongside your equipment. For Pantheon, I recommend prioritizing Illusion and Wisdom wherever possible. The Tol'Athera Wings are another useful long-term goal through seasonal progression because they provide Accuracy, Attack, and Cooldown Reduction. All three are valuable for the Cleric build we're using.
Best Cleric Pet attributes
For Pets, focus on offensive bonuses that complement your regular PvE gear. If you're specifically building for PvP, you can shift some of those choices toward defensive attributes.
|
Pet Attribute |
Recommended Use |
|
Attack Bonus |
General PvE damage |
|
HP Increase |
Survivability |
|
Accuracy / PvE Accuracy |
Reliable damage |
|
Block |
PvP survivability |
|
Regeneration |
Additional sustain |
When working on Genus Insights, I recommend avoiding expensive rerolls and locked attributes too early. Higher-level Insight boards give you more useful opportunities to build toward the attributes you actually want.
The more attributes you lock, the more expensive subsequent rolls become. Because of that, it's worth waiting until a board reaches approximately level 9–10 before spending heavily on preserving ideal rolls.
AION 2 Cleric Tips and Tricks

There are several small things that make Cleric noticeably easier to play, especially when you're handling damage, healing, and dungeon mechanics at the same time. Most of them don't require expensive gear or additional skill points. They're simply about getting the most out of your existing abilities.
- Keep
- Don't force
- Use
- Use Lightning Scatter Shot after Stagger breaks. It's more situational than the rest of your regular skills, but it has a place when dealing with staggered targets.
- Keep your healing buttons separate. You should always be able to use
- Watch for cleansable debuffs.
- Move your party frames closer to the action. This makes it easier to keep track of teammates without losing sight of the boss.
- Use different Stigma presets. Your dungeon, solo farming, solo PvP, and group PvP builds shouldn't necessarily use the same four abilities.
Cleric healing tips for dungeons
- Keep
- Save
- Use
- Position your party frames close enough to the center of the screen that you can check HP while watching boss attacks.
- Equip
Summon Resurrection when playing with random groups.
- Don't sacrifice a teammate's survival just to finish another
One interface change I'd particularly recommend is moving your party frames closer to your character. You can do this through the HUD editor. Having HP bars within your regular field of view makes it considerably easier to react while dodging attacks and continuing your rotation.
Best Cleric Targeting Settings
I also recommend experimenting with Action Control Mode instead of sticking exclusively with the older AION-style controls. It works particularly well with the two-button rotation and makes moving around during encounters more comfortable.
For targeting, these are useful starting settings:
|
Setting |
Recommendation |
|
Target Scanning |
Front of Camera |
|
Target Priority |
Priority Setting |
|
Priority 1 |
Hostile Players |
|
Priority 2 |
Players Attacking Me |
|
Target Hostile Player |
Tab |
|
Auto Target Upon Skill Use |
Enabled for PvE; optional for PvP |
|
Set Main Target Upon Attack |
Left Click |
For PvP, you might want to disable automatic targeting upon skill use when there are neutral or hostile monsters nearby. Otherwise, you can accidentally switch your target away from the player you're fighting.
Check out more AION 2 Guides:
F.A.Q.
Is Cleric good in AION 2?
Yes, Cleric is one of the most useful classes for group content because it combines healing, cleansing, defensive support, and respectable single-target damage. It's also capable of handling solo content, although AoE farming is not its biggest advantage.
What is the best Cleric build in AION 2?
For PvE, I recommend a Condemnation-focused build using Earth Punishment, Chains of Torment, and a two-button damage rotation. This lets you maintain good DPS while keeping direct heals available for your teammates.
Can Cleric deal good DPS in AION 2?
Absolutely. Condemnation can deal repeated critical hits with almost no cooldown when you apply the right debuffs, allowing Cleric to produce surprisingly good single-target DPS. Its main limitation is fighting large groups of weak enemies.
What is the best Cleric Stigma in AION 2?
Earth Punishment is the most important offensive Stigma because it enables guaranteed Condemnation critical hits against affected targets. I recommend leveling it to 20 before investing heavily in the other offensive Stigmas.
What stats should Cleric prioritize in AION 2?
For PvE, prioritize Accuracy, Critical Hit, Damage Boost, Attack, and useful Combat Speed bonuses. For PvP, Block and Critical Hit Resist become more important, especially against opponents who haven't developed enough Accuracy to counter defensive builds.
Is Cleric good for PvP in AION 2?
Yes, Cleric can be very difficult to kill thanks to its healing, sustain, and defensive Stigmas. It can also deal consistent damage, although enemies that frequently cleanse Earth Punishment or Chains of Torment can interrupt its strongest offensive combo.
What skills should I level first as Cleric?
Condemnation is my first choice for level 20 because it's the main damage skill in the PvE rotation. After that, Bolt and Radiant Recovery are excellent priorities depending on whether you want more damage or better healing and cleansing.
Does Cleric need a complicated rotation?
Not necessarily. A two-button macro can handle most of your regular damage rotation, and you can improve its performance by prioritizing Condemnation during Earth Punishment windows. The main challenge is learning when to interrupt your damage to heal, cleanse, or react to boss mechanics.