 Dallon Avery
AION 2 Templar Guide Quick Overview:
- Templar is a melee tank that can deal damage. So you’re never just tanking with this class.
- Judgment is your most important damage skill that you will try to spam as often as possible.
- Prioritize leveling Judgment, followed by Warding Strike, Vicious Strike, and Annihilate.
- Your main role is to draw aggro from the boss by stacking Enmity, then use blocks to stay alive and deal more damage with your macro.
- The main PvE build uses a simple macro that includes most of your combo skills with the Vicious Strike through animation cancel.
Need help leveling up and gearing your Templar? Buy AION 2 Powerleveling service at Skycoach and get your character to any desired level with optional completion of all horizontals on the map which lets you get that much needed gear score!


Read closely 
Browse our hottest Aion 2 Boosting services








AION 2 Templar Class Overview
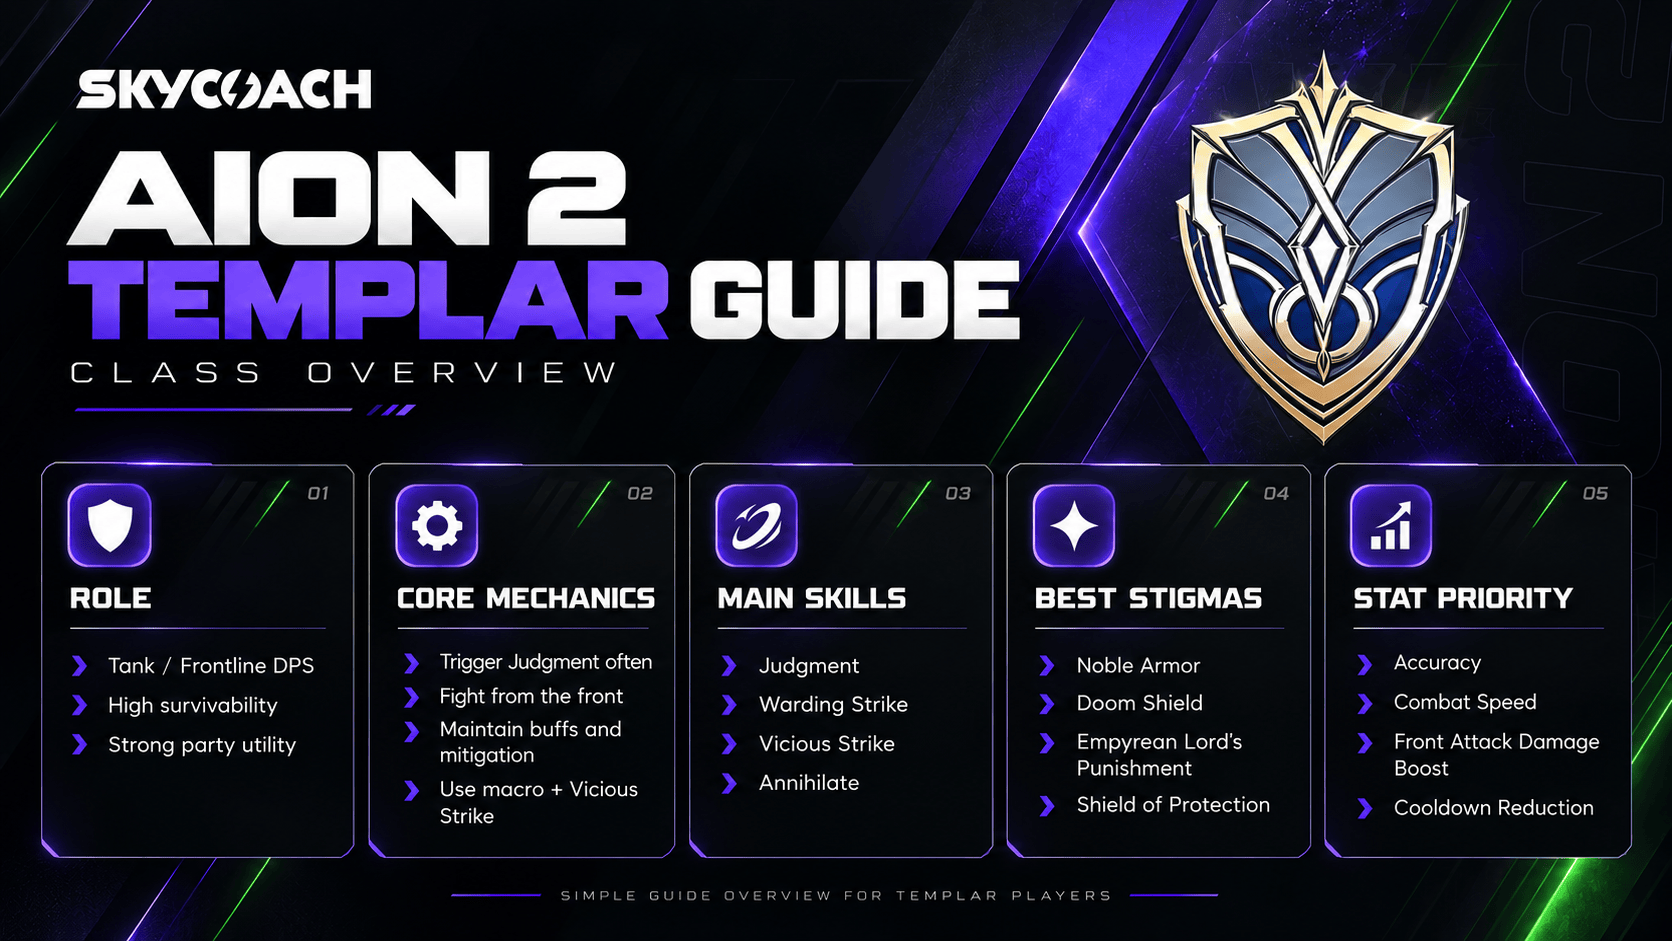
Templar is AION 2’s classic tank, but just like every other class in the game, Templar is capable of dealing tons of damage. Even more so, I’ve seen Templars in the game being in the top-1 position by damage dealt in various instances. So, right away, I want you to throw out of your head the notion that you only need to tank as Templar. Oh hell nah!
If you're still choosing your main, check out my AION 2 Class Tier List to see how Templar compares to the other classes.
What’s cool about Templar is that both offensive and defensive buttons interact with each other. Both types benefit when you use them all. It’s not like you have to press these buttons when you attack and others when you defend. They all come together for one beautiful rotation. But I’m getting ahead of myself.
And while classes like Assassin and other DPS want to stay behind the boss, Templar prefers fighting directly in front of it. You have abilities that generate Enmity (this is what AION 2 calls aggro or threat), skills that help you move toward enemies, and blocks that can save you when dodging isn't possible. You can even keep dealing damage while protecting the rest of your group.
Also, speaking of positioning, I recommend turning on the setting that shows which way the boss is facing. It's particularly useful for Templar because you want to keep the boss looking at you while your teammates attack from behind. Check out my AION 2 Settings Guide for other useful settings that can make combat easier and improve performance.
I would say Templar is one of the easier classes to pick up, especially once you get your macro working. The basic rotation isn't particularly complicated. I’d say it’s brain-dead, since you will end up using two buttons at most and a few more to turn on your buffs.
What takes practice is learning boss mechanics, managing your defensive abilities, and positioning enemies properly so your teammates can attack safely. But if you’re scared to play the tank role in the group as I was, don’t be. Templar is insanely good at dealing damage, so you’ll enjoy farming, increasing GS, and when the time comes to run Expeditions and other group content, you won’t have to do anything special besides perhaps making sure the boss faces you and the rest of the party can hit its back. Plus, you’ll be very hard to kill in the Abyss, unlike all the other classes. Even Gladiator. Trust me, I main Gladiator.
How Judgment Works
Before we get into the actual build, you need to understand Judgment. This is the skill that makes Templar's entire PvE rotation work.
Judgment is a melee attack that increases Enmity and deals Stagger Gauge Damage. Its base cooldown is five seconds, but several other Templar abilities can trigger a short window in which you can activate it. That means you don't have to sit around waiting for
Judgment's regular cooldown every time.
The four main ways to trigger Judgment in our build are:
Warding Strike: The most-used attack that also heals you and reduces damage taken
Shield Smite: A quick AoE stun that leads into
Debilitating Smash.
Doom Shield: A Stigma ranged attack that lets you charge at enemies, gain protection, and trigger
Judgment.
Shield Rush: Another ranged (10m)
So you’re just going to mainly loop through these conditions to trigger Judgment every time, while also using your
Vicious Strike to replenish MP, as everything else spends it. All specialties that you’ll unlock will be useful for this.
Judgment also has several important Specialties. These include HP absorption, extra damage against enemies affected by Impact-type status, guaranteed Critical Hits, and cooldown removal. The last two are super important for the damage-focused build. I’ll explain everything in more detail, but for now, remember that
Judgment is the most important ability for you.
Best Templar Build in AION 2

The build that I’m about to describe is the one that lets you both tank and deal damage, which is exactly how Templar is supposed to be played. It’s built around spamming Judgment along with some buffs that allow you to keep dealing damage without taking much damage yourself. You can also check my AION 2 Best Builds for Each Class guide if you want shorter recommendations for the other classes.
|
Build component |
Recommendation |
|
Main skill |
Judgment |
|
Core attacks |
Warding Strike, Vicious Strike, Shield Smite, Annihilate |
|
Additional attacks |
Debilitating Smash, Punishment, Pummel |
|
Main Stigmas |
Noble Armor, Doom Shield, Empyrean Lord's Punishment, Shield of Protection |
|
Main passives |
Fury, Insulting Roar, Impact Hit, Punishing Benediction |
|
Build priority |
Judgment Lv. 16 first, followed by Warding Strike, Vicious Strike, and Annihilate |
What's nice about this build is that you’re both a tank and a damage dealer, which seems to be the intended playstyle for this class. If you just look at the Warding Strike skill, for example, it both deals AoE damage and heals you over time. So that’s kind of the whole idea of the class.
Fury passive gives you a front attack damage boost, PvE and PvP damage boost on block, while other abilities make you take less damage. For more difficult encounters, you can replace one of your offensive Stigmas with
Shield of Protection. I would recommend doing this when you're learning a new boss, playing without a reliable healer, or struggling with mechanics that require blocking. Yes, you don’t even need a healer yourself; your damage dealers do!
You'll mainly use this build in Expeditions, Transcendence, Nightmare, and other PvE content where bosses can actually put your tanking abilities to the test. If you're not familiar with all the different instance types yet, I recommend checking out my AION 2 Dungeons Guide. It explains their differences, entry requirements, rewards, and which ones you should prioritize.
Templar Leveling Build
Templar’s leveling rotation is pretty simple. You basically just use whatever is available to you at the moment, and as you level up, you unlock more systems and more skills, gaining access to Stigmas, more skill points, etc.
You'll start with Vicious Strike and
Pummel, gradually unlocking more skills. Luckily, you’ll get
Judgment and
Warding Strike even before you finish the tutorial island.
Don't worry too much about farming additional levels early on. Just keep following the main story, complete the necessary quests, and you'll reach level 45 before long. If you're unsure what to prioritize along the way, check out my AION 2 Leveling Guide, where I cover the entire leveling process and explain which activities are actually worth your time.
Once you unlock the main Judgment rotation, I recommend focusing on getting your key skills to level 12. That’ll be at around level 45. This is an important milestone because you unlock a second Specialty slot, which allows you to combine more useful effects. So, just start leveling your skills in the same priority as I show in this guide.
Here’s what you need to do while leveling:
- During the main story: Use
Vicious Strike and
Pummel alongside your unlocked attacks. Don't spend too much time trying to perfect the rotation.
- Once
- At level 8: Unlock the first useful Specialties on your main skills.
- At level 12: Focus on your core damage skills and equip their second Specialties.
- After reaching level 45: Start working toward
One thing I wouldn't recommend is spending all your early resources getting every active skill to the same level. Some skills only need a particular Specialty to be useful, while others are worth taking much higher. But even if you do that, you can just reset them if you made a mistake. I’ve done it a couple of times myself. As far as I remember, it’s free, no Kina required.
You can change your skill priorities as more Daevanion points, gear bonuses, and Arcana cards become available. Your first job is getting the build to function properly, not making every number on your skill screen look the same.
Best Templar Skills and Specialties
As I keep saying, most of your PvE damage comes from making Judgment available as often as possible, so skills that trigger it or reduce the cooldowns of those triggers are particularly important. You'll also need
Punishment for its Executor buff and several secondary attacks to fill the gaps in your rotation.
I recommend getting your main skills to level 12 first, then working toward Judgment level 16. Remember that skill levels 8 and 12 unlock your first two Specialty slots, while level 16 unlocks another Specialty option. You won't get a third equipped Specialty slot until level 20.
Templar Skill Leveling Priority
| Icon |
Skill |
Target Level |
Key Specialty Effects |
|---|---|---|---|
|
Judgment |
16 first, 20 later |
Critical Hit on hit; Remove cooldown |
|
|
Warding Strike |
12–16 |
Cooldown reduction, healing and defensive effects |
|
|
Vicious Strike |
12, then 16 |
+50% Multi-Hit on hit; -2s [Warding Strike] cooldown on hit; Adds [Threatening Blow] Chain Skill |
|
|
Annihilate |
12–16 |
+100% damage to targets with Incapacitated Immunity; -10s cooldown; Changes to AoE Skill |
|
|
Shield Smite |
8–12 |
50% chance to trigger [Debilitating Smash] on hit; -2s cooldown |
|
|
Pummel |
12 |
-20% MP consumed; -1s [Punishment] cooldown on hit |
|
|
Punishment |
8–12 |
+30% Skill Speed; Changes to mobile skill |
|
|
Shield Rush |
12 |
+10m range; -10s cooldown |
Specialty descriptions are taken from the Global game-client databases. The Warding Strike row is still a summary rather than an exact transcription of its Specialty tooltips.
Judgment
Judgment is your main damage skill and the first ability I would prioritize when spending resources. At level 1, its in-game description identifies it as an attack against an enemy within four meters that increases Enmity and deals five Stagger Gauge Damage. It normally has a five-second cooldown, but the idea is to trigger it repeatedly through your other shield attacks.
Here are its available Specialties:
|
Level |
In-game Specialty Description |
|
8 |
Absorbs 1% HP |
|
8 |
Deals extra damage on attacking a target afflicted with Impact-type status |
|
8 |
Extra damage on hit |
|
12 |
Critical Hit on hit |
|
16 |
Remove cooldown |
The important ones for our build are Critical Hit on hit and Remove cooldown. The first helps Judgment deal more consistent damage, while the second removes the skill's normal cooldown. Together, they're a big part of why this attack is worth investing in before everything else.
I can tell you right now that every class seems to have that one skill that they need to get the “remove cooldown” specialty on.
At level 16, you'll still have only two Specialty slots. I would prioritize those two offensive effects rather than HP absorption for PvE damage. I mean, 1% HP doesn’t mean shit when you have the largest HP pool among all classes. When you eventually reach level 20, you'll have another slot available. Don't confuse removing Judgment's cooldown with making it available whenever you feel like it, though. You still need to trigger its activation condition through your other abilities. That's what we're building the rest of the rotation around.
Warding Strike
Warding Strike is arguably your second most important active skill. It deals damage, contributes to your defenses, and can trigger
Judgment. Unlike a regular defensive cooldown that you save for emergencies, this is an ability you'll want to use constantly. It both deals AoE damage and heals you over time. On top of that, it triggers
Judgment for 2 seconds and gives you damage resist in PvE and PvP.
Vicious Strike's level 12 Specialty is what makes this interaction particularly good. Each successful hit reduces
Warding Strike's cooldown by two seconds. That means the more you attack, the sooner
Warding Strike becomes available again. And every additional
Warding Strike gives you another opportunity to use
Judgment. You see where this is going. I would work on
Warding Strike after getting
Judgment to its highest available level for you. It's a particularly useful investment because it improves your offensive rotation and survivability at the same time. Once you can no longer level your skill anymore, then invest your points into other skills. Later on, you’ll increase your highest skill level through other means.
Vicious Strike
Vicious Strike is your simple left-click attack or fast attack. The game describes it as an attack that damages up to four enemies within four meters, increases Enmity, and restores 100 MP. Its follow-up attacks make it useful for recovering MP while keeping pressure on your target.
So, basically, it’s your main or light attack that has a 3-hit combo, each of which deals progressively more damage. All hits are also AoE, which is nice, provided you use a shield and sword combo.
Here are its Specialties:
|
Level |
In-game Specialty Description |
|
8 |
+20% MP restored |
|
8 |
Absorbs 1% HP |
|
8 |
+50% Multi-Hit on hit |
|
12 |
-2s [Warding Strike] cooldown on hit |
|
16 |
Adds [Threatening Blow] Chain Skill |
For PvE, I would prioritize the Multi-Hit bonus alongside the Warding Strike cooldown reduction. The latter is especially important because it indirectly helps you trigger
Judgment much more frequently. You can take the HP absorption Specialty while leveling if you need additional healing, but I wouldn't give up the cooldown reduction once it becomes available.
And yes, you'll use Vicious Strike all the way into endgame. Keep it on your left mouse button and use it alongside your main macro.
Annihilate
Annihilate is another useful damage skill, especially against bosses that cannot be controlled by ordinary crowd-control effects. It normally activates against targets affected by Stun or Knockdown, and the base skill also has a chance to trigger against enemies with Incapacitated Immunity. So, one more time,
Annihilate is a conditional skill, which you can only use if one of three conditions is met:
- Stun target
- Knockdown target
- On attacking Incapacitated Immunity target
Its available Specialties are:
|
Level |
In-game Specialty Description |
|
8 |
+50% Multi-Hit on hit |
|
8 |
+20% Knockdown Chance |
|
8 |
+100% damage to targets with Incapacitated Immunity |
|
12 |
-10s cooldown |
|
16 |
Changes to AoE Skill |
For boss fights, the bonus damage against targets with Incapacitated Immunity is particularly valuable. Most bosses aren't going to let you knock them down whenever you want, so I prefer focusing on effects that work against these targets.
The cooldown reduction for Annihilate is massive, because it has a 20-second cooldown by default and it’s a big damage button.
Doom Shield's level 5 Stigma upgrade also resets
Annihilate's cooldown on hit, giving you another way to bring the skill back. That's why I'd prioritize
Annihilate after
Judgment,
Warding Strike, and
Vicious Strike rather than neglecting it completely.
Shield Smite
Shield Smite is one of your
Judgment triggers, but that's not the only reason it's useful. It also combos with
Debilitating Smash, which provides additional damage and a defensive debuff. So, it’s like the two-hit combo:
Shield Smite →
Debilitating Smash.
The skill's Specialties are:
|
Level |
In-game Specialty Description |
|
8 |
+1s Stun duration |
|
8 |
Removes MP Cost and restores 200 MP on hit |
|
8 |
50% chance to trigger [Debilitating Smash] on hit |
|
12 |
-2s cooldown |
|
16 |
AoE Stun |
The two important specialties here are reduced MP cost with 200 MP on hit and the 50% chance to trigger Debilitating Smash. Seeing how relatively easy it is to level up a skill to level 12, these two should be easy to get. They’re definitely better than increased stun duration. At the same time, though, I wouldn't level
Shield Smite ahead of
Judgment, though. It's an important part of the rotation, but primarily because of the other abilities it makes available.
Pummel
Pummel is your heavy attack by default. So if on PC,
Vicious Strike is your left-click;
Pummel is your right-click. So, it’s the attack that spends your MP. It's a repeatable attack that increases Enmity and combos into Punishing Strike. More importantly, it helps reduce
Punishment's cooldown, making it easier to maintain the Executor buff that gives you additional PvE damage.
Its available Specialties are:
|
Level |
In-game Specialty Description |
|
8 |
-20% MP consumed |
|
8 |
[Punishing Strike] absorbs 3% HP |
|
8 |
Deals up to 12% more damage when fewer targets are hit |
|
12 |
-1s [Punishment] cooldown on hit |
|
16 |
[Punishing Strike] grants extra damage on hit |
The level 12 cooldown reduction is the important one for this build. Each reduction helps bring Punishment back sooner, which means you can maintain its 20% PvE Damage Boost more consistently. The downside is MP consumption. So, what you do is make a macro that includes
Pummel, and then you hold both the left mouse button and the right mouse button, so that you both spend and restore MP at the same time. It works through so-called animation cancel. You can learn more about how macros work in my AION 2 Macros guide. Check it out; it’s pretty important to use macros in this game.
The source creator reported gaining roughly 4,000–5,000 additional DPS after changing his rotation, although that's based on his own character and training dummy tests. I wouldn't expect exactly the same increase on every character.
Punishment
Punishment is another important part of Templar's damage rotation, mostly because of its Executor buff. It's a charged attack that can hit 4 enemies around a target within 4 meters, and the buff lasts for 20 seconds.
Executor provides the following bonuses:
- +200 Accuracy
- +20% PvE Damage Boost
- +10% PvP Damage Boost
That's a pretty impressive set of bonuses from a single skill, if I do say so myself. I recommend opening boss encounters with Punishment when you have enough time to charge it properly, then using it again to refresh Executor as needed.
The available Specialties are:
|
Level |
In-game Specialty Description |
|
8 |
Absorbs 10% HP |
|
8 |
Inflicts Damage over Time to target on hit |
|
8 |
+30% Skill Speed |
|
12 |
Changes to mobile skill |
|
16 |
Ignores Block and Evasion and lands as a Critical Hit |
I particularly like the Skill Speed and mobile-skill options. Punishment is a charged ability, and being able to move while using it makes boss encounters more comfortable. Although it might be a bit difficult to do, you have to hold down the button and also press directional buttons to move around. The goal here is to keep Executor active. Executor: increases Accuracy by 200, PvE damage boost by 20%, and PvP Damage Boost by 10%. So you see why it's important. That's also why the cooldown reduction from
Pummel matters so much.
Templar Mobility Skills
Templar isn't as mobile as Assassin, but it still has several useful abilities for getting back into melee range. That's important because bosses move, mechanics force you to dodge, and sometimes the enemy simply refuses to stand where you want it.
| Icon |
Skill |
What it does |
Why I recommend it |
|---|---|---|---|
|
Shield Rush |
Rushes toward an enemy within 10m after Dodge or while flying, with a chance to inflict Stun. Triggers Judgment for 2s. |
Great for returning to melee range after dodging |
|
|
Poach |
Pulls eligible enemies toward you or closes the distance when the target cannot be pulled. |
Useful for controlling positioning and chasing bosses |
|
|
Shield Smite |
Attacks and controls enemies while triggering Judgment. |
Helps maintain your rotation once you're in melee range |
Shield Rush is a great gap closer, especially at level 8 when its Specialty increases the range by 10 meters, while its level 12 Specialty reduces the cooldown by 10 seconds. That gives you a 20-meter engagement tool with much better availability.
I wouldn't use Shield Rush just to squeeze another
Judgment activation into the rotation if you need to Dodge first. It can feel clunky, and you'll potentially lose more damage than you gain. Personally, I would save it for repositioning, which is something you'll be doing quite a lot as a tank.
Poach is the GOAT skill in PvP. If you play Templar to its strengths, what you want to do is target a healer or another weak DD and “hook” them to you. If you’re surrounded by teammates, that’s an easy kill. More on PvP build later.
Other Useful Templar Skills
There are a few secondary abilities worth mentioning even though I wouldn't prioritize them over Judgment and the main rotation.
Flash Rampage is your one “hold button down” skill for when a boss is staggered. Just like with all the other classes, it’ll be replaced with your regular macro in the endgame, because it will deal more damage.
Defiance is worth keeping available for defensive situations and dealing with crowd control.
So, don’t level up Flash Rampage too much, unless there’s a specific Specialty you want to unlock on it. But chances are you’re going to want to reset your skill points later and put them into other skills at later stages, when you have high GS. Also, I wouldn’t activate its nodes on Daevanion Boards.
Browse our hottest Aion 2 Boosting services








Best Templar Stigmas
Stigmas give Templar some of its most valuable offensive and defensive abilities. For the Global version, you can equip four at a time, and I recommend choosing them around the content you're going for rather than trying to use every Stigma you unlock. The most important ones for our PvE build are Noble Armor and
Doom Shield, followed by
Empyrean Lord's Punishment and
Shield of Protection as a defensive alternative.
One thing to remember is that Stigmas work differently from regular active skills. Their Specialty effects become active automatically as you reach the required levels, so you don't need to choose between two unlocked effects. The problem is that upgrading Stigmas becomes increasingly expensive, meaning you should prioritize the breakpoints that actually improve your build. Wasting resources can be difficult to recover from, seeing how all of the game’s content is time-gated in one way or another. Specialties for each Stigma unlock at levels 5, 10, 15, and 20. Stigmas themselves unlock at character levels 22, 27, 32, and 37.
| Icon |
Stigma |
Investment Priority |
In-game Description |
Important Specialties |
|
Noble Armor |
Lv. 15 main goal |
Increases Max HP by 5.4% for 120s and immediately restores HP by 5.4% of Max HP. Not affected by buff dispel effects. |
Lv. 5: +5% Defense for the duration. Lv. 10: x1.5 [Insulting Roar] effect for the duration. Lv. 15: x1.5 [Fury] effect for the duration. |
|
|
Doom Shield |
Lv. 5 early |
Rushes to a target within 20m and deals 1254 damage. Has a 75% chance to inflict Knockdown for 3s. Grants a Protective Shield that blocks damage equaling 5% Max HP for 5s on hit. Triggers [Judgment] for 3s. 100% Knockdown chance on NPCs. 20 Stagger Gauge Damage. |
Lv. 5: Resets [Annihilate] cooldown on hit. Lv. 10: +200 Block for 5s on hit. |
|
|
Empyrean Lord's Punishment |
Lv. 10 early, then reallocate |
Selects a target within 20m and deals damage to up to 4 enemies within 4m of the target, with a 50% chance to inflict Stun for 3s. 100% Stun chance on NPCs. 50 Stagger Gauge Damage. |
Lv. 5: Up to +20% damage when less targets hit. Lv. 10: +50 Stagger Gauge Damage. Lv. 15: +10% PvE Damage Boost and +5% PvP Damage Boost for 10s on hit. |
|
|
Shield of Protection |
Lv. 10 defensive option |
Temporarily increases Block Damage Reduction by 100% and guarantees Block. Restores 110 MP and Stamina once on Block. |
Lv. 5: +1 consecutive use. Lv. 10: Changes to mobile skill. Lv. 15: +20% Move Speed for 3s on Block. |
The offensive setup should prioritize damaging the boss and maintaining your party buffs. For encounters where you need additional survivability, I would replace Empyrean Lord's Punishment with
Shield of Protection.
Best Templar Passive Skills
Templar's passives are another reason the class works so well as a tank that can deal damage. You have bonuses to Front Attack, Attack, Double Chance, Critical Hit, HP, Defense, and Damage Tolerance. Tolerance might be an unfamiliar word to you if you come from other MMORPG games. Basically, that’s damage reduction.
These passive effects trigger as you do your macro rotation, so you don't need to do anything particularly complicated to benefit from them. That’s why they’re called passives.
For the PvE build, I would prioritize Fury and
Insulting Roar first, then level up
Impact Hit and
Punishing Benediction. After those, you can invest more into
Enhance Health,
Ironclad Defense, and
Block Pain for survivability.
| Icon |
Passive |
Priority |
In-game Description |
|
Fury |
Highest |
Increases the caster's Front Attack Damage Boost by 0.3%. Grants 5.5% PvE Damage Boost and 2.75% PvP Damage Boost to the caster and party members for 20s on Block. Cooldown: 1s. |
|
|
Insulting Roar |
Highest |
Increases Enmity Boost by 100% and grants 5.5% Attack for 5s on landing a Front Attack. Cooldown: 5s. |
|
|
Impact Hit |
High |
Increases the caster's Impact-type Chance by 11.2% and Double Chance by 0.3%. |
|
|
Punishing Benediction |
High |
Increases Critical Hit by 100 and has a 50% chance to deal additional damage when attacking. Cooldown: 1s. |
|
|
Enhance Health |
Medium |
Increases HP by 250, Max HP by 7.5%, and Incoming Heal by 6%. |
|
|
Ironclad Defense |
Medium |
Increases Defense by 7% and Endurance by 1%. |
|
|
Block Pain |
Medium |
Grants Block Pain for 10s when attacked, providing 11% PvE Damage Tolerance and 5.5% PvP Damage Tolerance. Cooldown: 20s. |
|
|
Warding Shield |
Medium–Low |
Increases the caster's Block by 200 and restores 53–64 HP on Block. Cooldown: 3s. |
|
|
Guarding Seal |
Medium–Low |
Grants a Guarding Seal that blocks damage equaling 21% of Max HP for 30s when HP is 50% or less. Cooldown: 60s. |
|
|
Survival Willpower |
Medium–Low |
Increases Status Effect Resist by 17%. Grants 12% PvE Damage Tolerance and 6% PvP Damage Tolerance for 5s when afflicted with Stun, Knockdown, Airborne, Frost, or Fear. Also increases Status Effect Resist by 10% for 5s when hit while afflicted with these effects (up to 10 stacks). Damage Tolerance cooldown: 60s. Status Effect Resist cooldown: 1s. |
Values are base-level tooltip values, not the values these passives reach after upgrading.
AION 2 Templar PvE Rotation
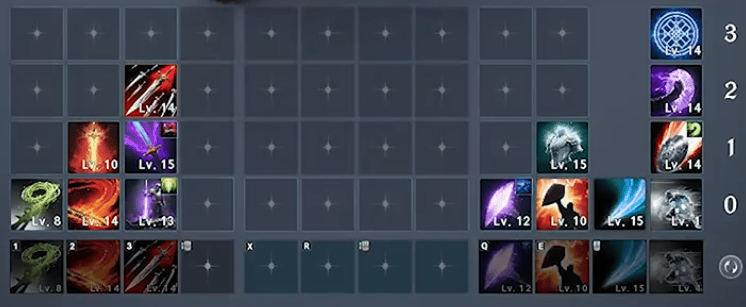
Templar's PvE rotation is much easier than it looks once you understand how Judgment works. The goals for your rotation are:
- Spamming Judgement
- Keeping Executor buff for as long as possible
- Loop through other skills/attacks
The build also has a nice advantage over more complicated melee classes: several of your defensive bonuses activate while you're doing your normal rotation. Warding Strike helps with healing and damage reduction, while blocking triggers
Fury. So, you can focus on dealing damage without completely neglecting your role as a tank.
Templar Opening Rotation
For boss encounters, I recommend using the following opening sequence:
Noble Armor: Activate your HP and passive-enhancing buff before engaging.
Punishment: Charge your attack to activate Executor, gaining Accuracy and PvE Damage Boost.
Empyrean Lord's Punishment: Deal additional damage and significantly reduce the boss's Stagger Gauge.
Annihilate: Activate whenever available through its trigger conditions.
After your opener, keep using Vicious Strike alongside your macro. The goal is to repeatedly activate
Warding Strike,
Shield Smite, and
Judgment while refreshing your buffs.
One thing I'd pay attention to is boss positioning. If you're tanking, you should generally keep the boss facing away from your teammates. Don't turn it around just to land another attack. Your party's damage and survivability matter more than a small improvement to your personal DPS.
Templar Sustained DPS Rotation
Once your opening buffs are active, the rotation becomes a priority system rather than a fixed sequence.
I would focus on:
- Activating
- Using
- Keeping
- Using
- Refreshing Executor through
- Activating
The most important part is maintaining the relationship between Vicious Strike,
Warding Strike, and
Judgment. If you neglect
Vicious Strike's cooldown-reduction interaction, you'll spend more time waiting for
Warding Strike, which means fewer
Judgment activations.
Pummel adds another interaction by reducing
Punishment's cooldown. Ideally, you want Executor active as consistently as possible because its PvE Damage Boost contributes to everything else you're doing.
Best Templar Macros
Templar has a fairly simple macro-based PvE playstyle. The main idea is to use Vicious Strike on your left mouse button while activating a priority-based macro with your right mouse button. If you haven't used the game's macro system before, check out my AION 2 Macros Guide. It explains how quickslot chains, skill priority, and animation canceling work.
| Icon |
Skill |
Purpose in the Rotation |
|
Doom Shield |
Triggers Judgment and provides protection |
|
|
Shield Smite |
Triggers Judgment and enables Debilitating Smash |
|
|
Warding Strike |
Triggers Judgment, restores HP, and maintains protection |
|
|
Debilitating Smash |
Adds damage and applies its debuff |
|
|
Annihilate |
Provides additional damage when activated |
|
|
Pummel |
Fills downtime and reduces Punishment's cooldown |
Keep Vicious Strike assigned separately, preferably to the left mouse button. Normally, you want to set your Macro button to the right mouse button, so that you can hold down both at the same time.
The exact priority order matters, especially with Pummel. Placing
Pummel incorrectly can make it be spammed instead of allowing the other abilities to activate. So make sure to place your skills as shown in the screenshot I'd also keep defensive abilities and important movement skills available for manual activation. You don't want an automatic rotation spending
Shield of Protection right before a boss mechanic that actually requires it.
Templar PvP Build and Combos
Templar is naturally good at fighting on the frontline in PvP, although you need to approach these encounters differently from ordinary dungeon bosses. You still have great defensive abilities and crowd control, but other players aren't going to stand in front of you while you repeat Judgment forever.
Your PvE build can serve as a starting point, but I'd put more emphasis on mobility, control, and staying alive when fighting other players. This is especially important in the Abyss, where encounters can quickly turn into fights against several opponents. You can read more about that in my AION 2 Abyss PvP Guide.
Templar PvP Skill Priorities
| Icon |
Skill |
PvP Use |
|
Shield Rush |
Rush and Stun the enemy |
|
|
Poach |
Yoink your target; best used on squishy classes |
|
|
Shield Smite |
Apply CC and trigger Judgment |
|
|
Judgment |
Main melee damage |
|
|
Doom Shield |
Engage, deal damage, and gain protection |
|
|
Shield of Protection |
Survive dangerous attacks and trigger Block effects |
|
|
Noble Armor |
Improve survivability and passive bonuses |
|
|
Defiance |
Defensive utility against crowd control |
Your main job as a Tank in PvP, especially Mass PvP, is not to kill but to create opportunities. Since you’re pretty chonky, you’re expected to dive headfirst into an enemy pile and make them attack you while damage dealers pick their targets. You will probably die, but you won’t go down easy; that’s your job. You should change some skill Specialties and maybe even stigmas for PvP. Look for more stuns and other crowd-control effects.
Best Templar Stats
For Templar, you gotta focus on damage just as much as survivability. Combat Speed is particularly valuable because you're constantly attacking and triggering other abilities. Front Attack Damage Boost also makes sense because you'll spend most boss encounters fighting directly in front of your target.
Accuracy is another important stat, especially once you start fighting harder dungeon bosses. There's little point in investing everything into offensive bonuses if your attacks aren't even landing.
|
Stat |
Priority |
What It Does |
|
Accuracy |
Essential |
Helps attacks connect against enemy defensive stats |
|
Combat Speed |
Very High |
Increases attack and skill action speed |
|
Front Attack Damage Boost |
Very High |
Increases damage when attacking from the front |
|
Cooldown Reduction |
Very High |
Reduces skill cooldowns, helping maintain important effects |
|
Double Chance |
High |
Provides a chance to deal increased damage |
|
Weapon Damage Boost |
High |
Increases weapon-related damage |
|
Critical Hit |
High |
Improves the chance of landing Critical Hits |
|
Attack |
High |
Increases damage dealt |
|
Damage Tolerance |
Situational |
Reduces incoming damage |
|
HP / Defense |
Situational |
Improves survivability while tanking |
I wouldn't recommend stacking only defensive stats just because you're playing a tank. Templar already has several excellent defensive abilities, so increasing your damage can make encounters much faster. However, the balance changes when you're progressing through difficult content. If you're constantly dying or your healer can't keep up, additional Damage Tolerance and HP become more useful.
I haven’t had many problems as a tank in the first real dungeons (2-star Vakron), and if I died, I died because of not knowing the boss mechanics. Still, you have a block that absorbs almost all incoming damage, so don’t forget to block and you’ll be golden.


You got -20% OFF 
Best Templar Gear and Manastones
Templar benefits from equipment that provides useful offensive bonuses and additional levels for its important skills. Judgment is the main priority here, because reaching its higher-level Specialties makes such a difference to your rotation.
While leveling, I wouldn't spend too much Kina trying to obtain perfect stat combinations. You'll replace plenty of equipment as you progress, and getting enough Gear Score to enter better dungeons is way more important than perfecting every individual stat. I recommend checking my AION 2 Gear Score Farming Guide for the main progression milestones. That’s where I explain specific GS numbers that you should go for and why they’re important.
Templar Gear Progression
My general priorities would be:
- Upgrade your Longsword and Guard to improve your main offensive stats.
- Look for Combat Speed and useful offensive bonuses on gear you plan to keep.
- Prioritize
- Use movement-related bonuses on Boots and Earrings when appropriate.
- Invest more heavily in Soul Binding once you're working with longer-term equipment.
- Use Arcana and Daevanion progression to reach important skill level breakpoints.
I would also pay attention to the difference between an item that gives you more Gear Score and one that improves your actual rotation. Reaching the next dungeon requirement is important, but once you're comfortably farming that content, better skill bonuses can sometimes matter more than a small numerical Gear Score increase.
Now, getting a good Longsword and Guard is only half the job. You'll eventually need to work on Enhancement, Soul Binding, Manastones, and transferring upgrades between gear pieces. I've covered all these systems in my AION 2 Gearing Guide, so I recommend reading that before spending tons of Kina and materials on your equipment.
Best Templar Manastones
For Manastones, I would focus on offensive bonuses that improve your damage rather than trying to stack only HP or Defense. The main build relies on frequent attacks and several damage multipliers, so offensive rolls become particularly valuable. I'd prioritize useful damage bonuses, then adjust your choices depending on which stats your current equipment is missing. Don't spend all your expensive Manastones on equipment you're about to replace. I prefer using more affordable rolls while progressing, then investing in better combinations when I have gear worth keeping.
Best Templar Daevanion Boards
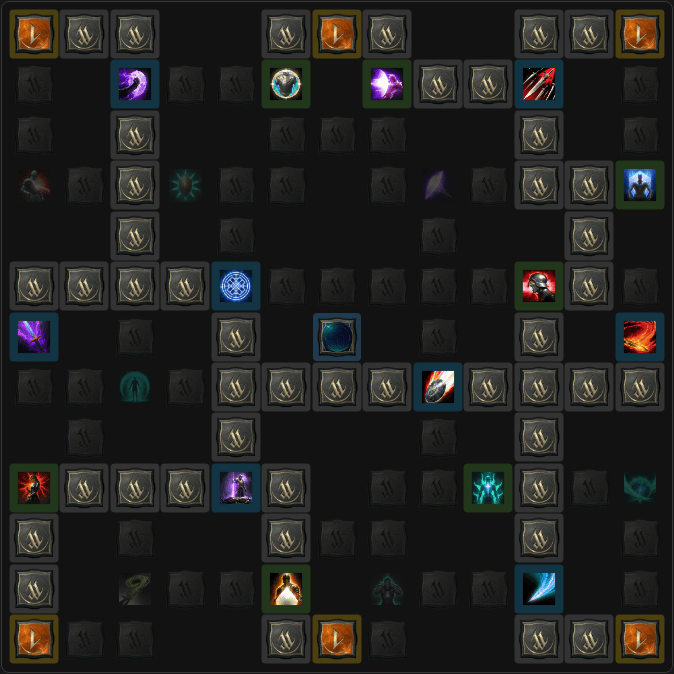
Daevanion is particularly important for Templar because your build depends on reaching specific skill levels. You won't get Judgment, and every other important ability, to level 16 or 20 through normal skill points alone, so Daevanion nodes provide some of the extra levels you need.
I recommend prioritizing useful skill nodes before trying to complete every board or immediately reach all the corner bonuses.
The problem is that you can't just pick any node you want. You need to unlock paths through the boards, and you'll also need to collect enough Daevanion Points to reach those important skill upgrades. If you're still figuring out how the system works, check out my AION 2 Daevanion Board Guide. Here, I'll focus specifically on which upgrades matter most for Templar.
Templar Daevanion Progression Priority
|
Order |
Goal |
Reason |
|
1 |
Judgment Lv. 12 |
Unlock guaranteed Critical Hit Specialty |
|
2 |
Vicious Strike Lv. 12 |
Unlock Warding Strike cooldown reduction |
|
3 |
Important supporting skills Lv. 12 |
Establish core Specialty combinations |
|
4 |
Judgment Lv. 16 |
Unlock cooldown removal Specialty |
|
5 |
Warding Strike upgrades |
Improve Judgment triggers and survivability |
|
6 |
Annihilate upgrades |
Improve secondary damage and cooldown interactions |
|
7 |
Important offensive passives |
Increase overall damage and party buffs |
|
8 |
Valuable board nodes |
Obtain additional offensive and defensive stats |
The exact path depends on the available nodes and how many Daevanion Points you've collected. Don't automatically rush toward a corner if taking a nearby skill node gets Judgment or
Vicious Strike to a valuable breakpoint. I would prioritize unlocking the abilities that make the rotation work, then return for the larger stat bonuses as more points become available.
Best Templar Arcana
Arcana cards provide additional stats and skill levels, making them another important part of Templar's progression. They become available through Transcendence content, which you can start farming at 1,600 Gear Score. The most important thing is getting useful skill bonuses, particularly Judgment. Additional
Judgment levels help you reach the breakpoints required for its most important Specialties.
|
Priority |
Bonuses to Look For |
|
Highest |
Judgment |
|
Very High |
Fury |
|
High |
Warding Strike |
|
High |
Vicious Strike |
|
High |
Annihilate |
|
High |
Insulting Roar |
|
High |
Impact Hit |
|
Secondary |
Punishing Benediction and other useful skills |
For early Arcana, I recommend focusing on obtaining cards with the skill bonuses you actually need rather than immediately chasing perfect four-line rolls. Once you have enough Arcana resources, you can start working toward better combinations. The important thing is reaching Judgment level 16, then eventually 20, without sacrificing too many useful stats elsewhere.
Best Templar Pantheon and Pets
Pantheon and Pets provide additional stats that contribute to Templar's damage and survivability. They're useful progression systems, but I wouldn't prioritize minor stat improvements here over important skill upgrades.
For Pantheon, I would look at the following bonuses:
|
Pantheon Stat |
Main Benefits |
|
Destruction |
Attack Increase and Perfect Resist |
|
Time |
Combat Speed and Double Chance Resist |
|
Space |
Movement Speed and Block Chance |
|
Wisdom |
Reduced MP Consumption and Double Chance |
|
Illusion |
Cooldown Reduction and Endurance Penetration |
I particularly like Time and Illusion for this build because Combat Speed and Cooldown Reduction interact nicely with the frequent attacks required to trigger Judgment. Wisdom is also useful because
Pummel can consume quite a lot of MP during longer fights. For Pets and Genus Insight, I would follow the usual offensive progression. Focus on developing the boards and obtaining useful stats as you collect more Pets, but don't spend excessive resources trying to perfect every bonus early on.
AION 2 Templar Tips and Tricks
Templar becomes much easier once you stop treating every skill as an independent button and start understanding how the different abilities work together. Most of your damage comes from maintaining a few interactions consistently, while your survivability depends on using the right defensive abilities when they're needed.
Here are the things I'd pay the most attention to:
- Prioritize
- Don't ignore
- Maintain Executor.
- Use
- Keep the boss facing away from your team. Your positioning matters because teammates may rely on Back Attacks, and you don't want to expose them to frontal boss mechanics.
- Save
- Use
Shield of Protection when necessary. A slightly lower DPS build is better than repeatedly dying while learning an encounter.
- Don't waste Stigma Shards. Prioritize the upgrades that provide valuable effects rather than spreading resources across everything.
- Practice your macro. The
One final tip: don't judge your Templar's performance by the DPS meter alone. You're still supposed to tank, position enemies, and deal with mechanics. A good Templar maintains damage while doing all of those things rather than ignoring their responsibilities to chase a higher DPS number.
F.A.Q.
Is Templar good in AION 2?
Yes, Templar is an excellent choice if you enjoy melee combat and want a character that can take considerable damage while still contributing offensively. It's particularly useful for group PvE because it combines tanking, party protection, and respectable sustained damage.
Can Templar deal high DPS in AION 2?
Yes, especially when using a damage-focused build centered around Judgment and its cooldown interactions. Templar can deal surprisingly high sustained damage, although your actual performance depends on skill levels, gear, positioning, and maintaining the correct buffs.
What are the best Templar skills in AION 2?
Judgment is the main priority, followed by Warding Strike, Vicious Strike, and Annihilate. You should also invest in Punishment and the abilities that trigger Judgment because they contribute to your sustained damage rotation.
What are the best Templar Stigmas in AION 2?
Noble Armor and Doom Shield are two of the most important choices for the damage-focused PvE build. Empyrean Lord's Punishment contributes Stagger damage, while Shield of Protection is particularly useful when you need additional survivability.
What stats should Templar prioritize?
Accuracy, Combat Speed, Front Attack Damage Boost, Cooldown Reduction, and other offensive stats are all useful for Templar. For difficult tanking encounters, you should also consider Damage Tolerance, HP, and defensive bonuses rather than building exclusively for damage.
Is Templar easy to play in AION 2?
I'd say Templar is fairly easy to learn, especially once you understand the Judgment rotation and configure your macro. The harder part is learning to position bosses, handle mechanics, and use defensive abilities at the right moments.
Is Templar better for PvE or PvP?
Templar can contribute in both, but its strengths are particularly straightforward in group PvE, where its defensive abilities and party buffs are useful. In PvP, you'll need to pay more attention to mobility, crowd control, and surviving enemy burst damage rather than simply repeating your dungeon rotation.