 Dallon Avery
AION 2 Macro Guide Quick Overview:
- Macros let you bind several skills to a single custom button, and they will all execute as long as you hold it down.
- The game’s skill priority system is not the same as macros, but you can bind up to 4 skills to the same hotbar slot.
- Basic attacks can be woven between skills to animation cancel.
- A macro should usually contain repeatable core attacks, not an entire rotation.
- Mobility, defensives, and important burst skills are generally better kept manual.
Do you want to deal even more damage on your class to beat Conquest dungeons? Buy AION 2 Powerleveling and increase your gear score with the help from professional veteran MMO players at Skycoach.


Read closely 
Browse our hottest Aion 2 Boosting services








How AION 2 Macros Work
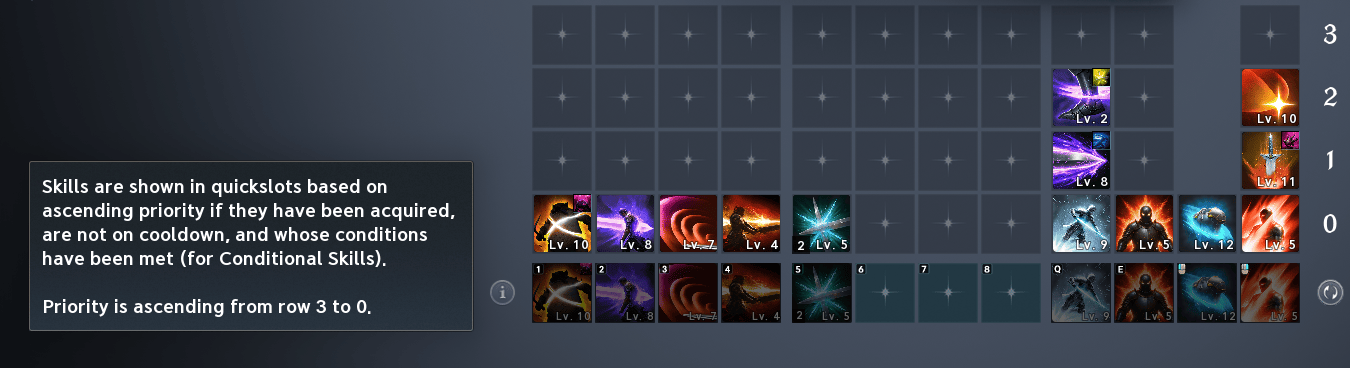
Each slot on the hotbar in this game is more like a combo, which can host not one but several skills. Usually, we think that the bottom hotbar is the first one; then you have your second one above it when you don’t have any more free slots but have too many new skills. The count goes up to 3 or more in most MMORPGs. When you open the Skills menu in AION 2 (K by default) and look at 5 rows of quickbacks, you immediately think of 5 quickslot bars. But they’re not what you think they are.
Instead, you only get one row of quick slots, but each slot can take more than one skill, which it would then activate when you press the button tied to that slot, in order of priority. It’s not a macro, although it works similarly. It’s more of a combo panel where multiple skills are executed while the same quickslot button is pressed down, assuming those skills are available. You can also think of this as skill chaining.
Now, what macros let you do is combine those skill chains. Because, let’s say you have 3 skills on your “1” quick slot and 3 skills on your “2” quick slot, when you press down “2” after holding down “1”, the skills from the first quick slot stop executing, so you’re just switching between. But if you put both quick slots “1” and “2” in this example into a macro, they will merge into one skill chain, and as long as you hold down that custom button for macro (which you must set in the options), both skill chains will execute as one.
How to Create a Macro in AION 2
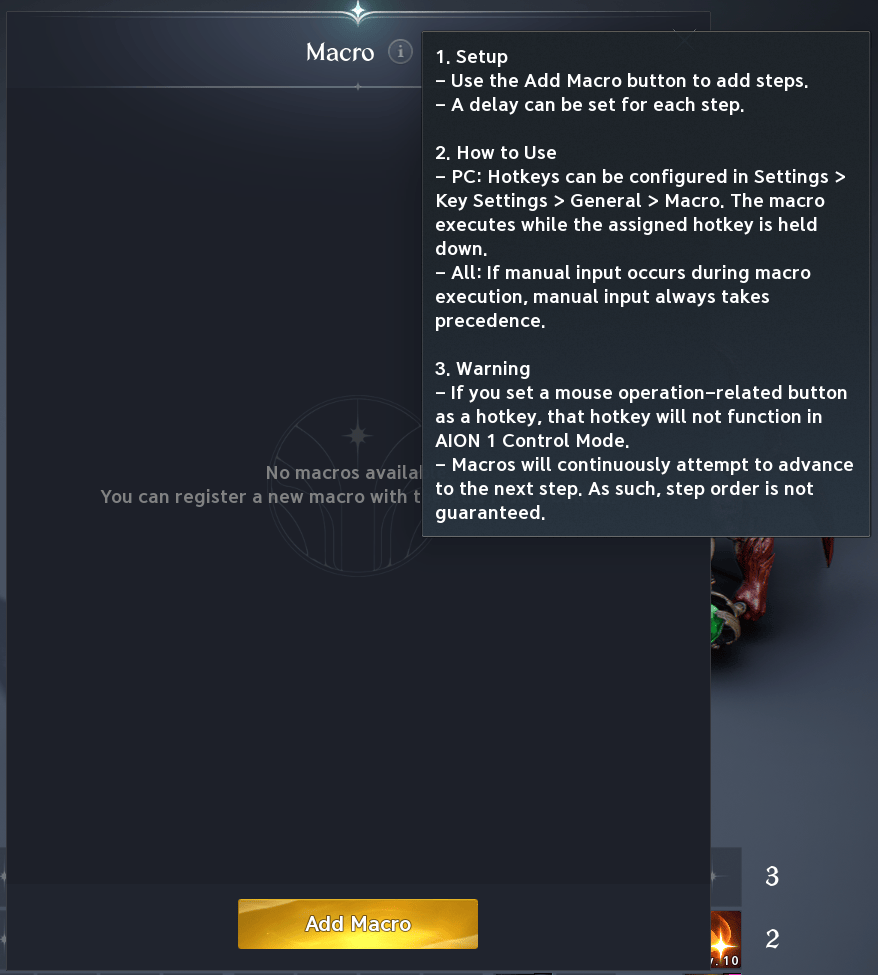
Creating a macro is pretty simple once your hotbar is already organized. The important part is that you are adding hotkey lines to the macro, not individual skills. That means the skills you want to automate should first be arranged under the same hotkey in the correct priority order.
To create one:
- Open the Skills menu.
- Click Macro in the top-right corner.
- Select Add Macro.
- Add the hotkey line or lines you want the macro to use.
- Set a delay for each step if needed.
- Save the macro.
- Go to Settings > Key Settings > General > Macro and assign a Macro key.
- Hold that key in combat to use the macro.
If a hotkey line already contains several skills, the macro will work through that line using the same priority and availability rules as normal. This is why most setups start by arranging a clean core skill chain on one button first, then adding that button to the macro. Вставленный текст
You can also add several different hotkeys to one macro, but more is not always better. Since macros keep trying to advance through their steps and the execution order is not perfectly rigid, overly complicated setups can become less predictable than a simple core combat macro.
AION 2 Skill Weaving and Animation Cancelling
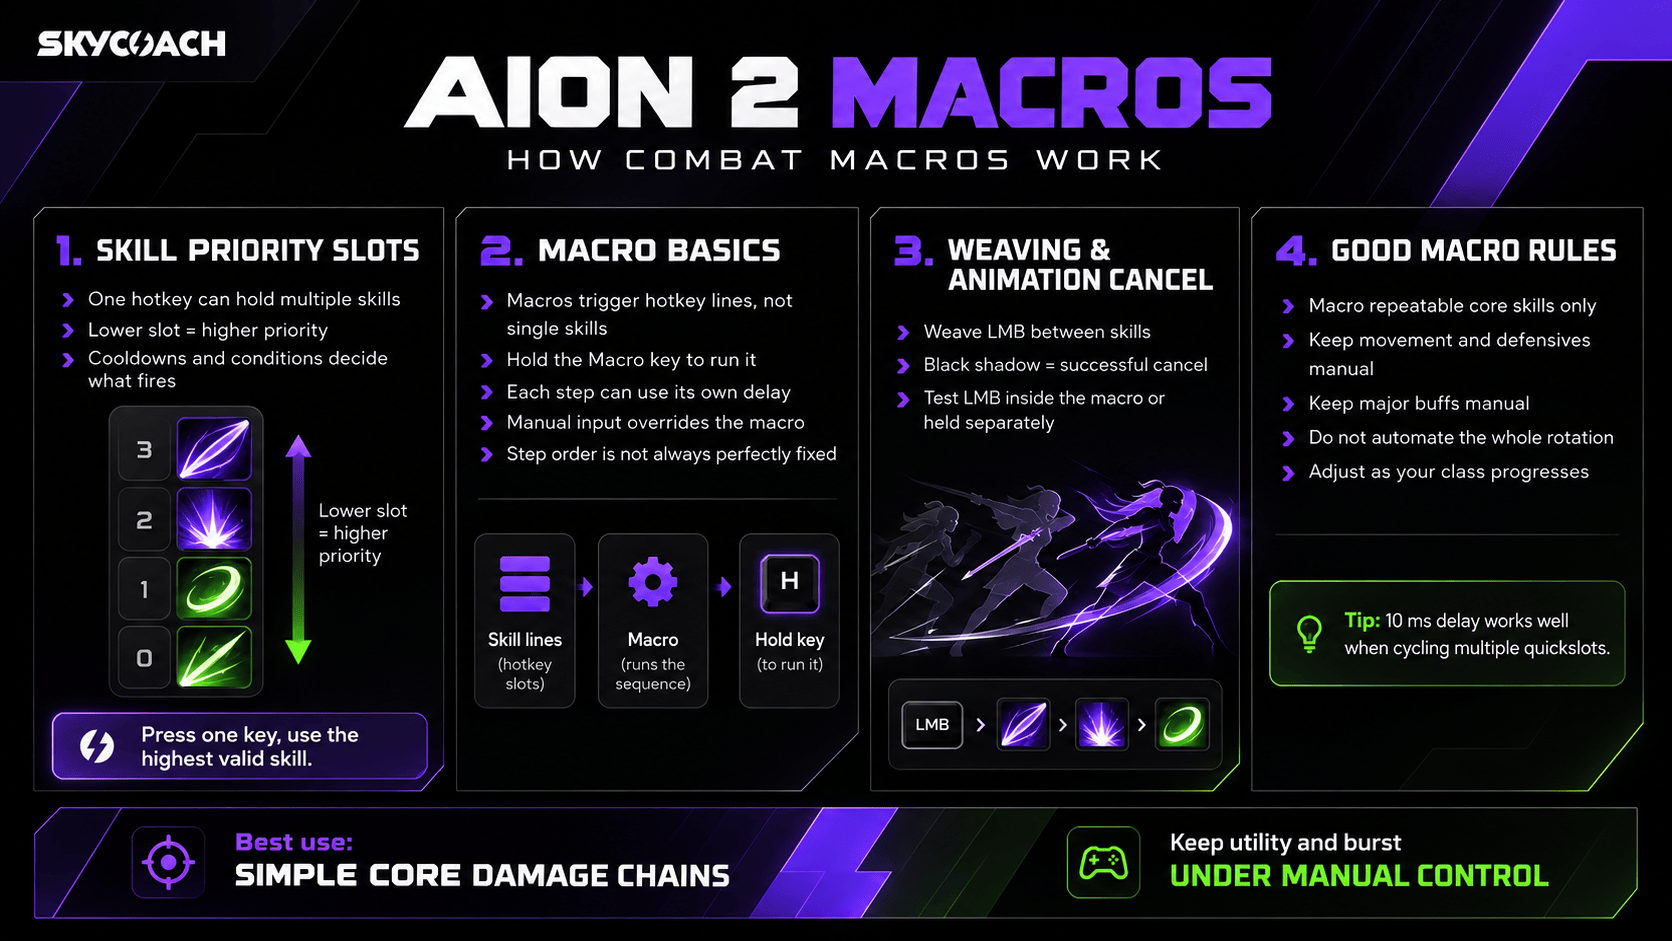
Macros become much more useful once you combine them with basic attack weaving. In AION 2, many skill animations can be canceled by weaving your LMB attack between abilities. When an animation cancel works, the game shows a black shadow or silhouette behind your character, which is the easiest visual cue that the cancel happened correctly.
And you wanna weave in your light attacks because they’re the ones that restore mana that other skills consume.
There are two main ways to handle this. You can place your basic attack inside the macro so one held button handles both the core skill chain and LMB weaving. Alternatively, you can keep LMB separate and hold it together with the Macro key.
Keeping LMB separate is usually the better starting point because it can result in more consistent animation cancels. The exact result can still vary depending on your class, skill combos, cooldown speed, and combat speed, so it is worth testing both approaches on your own character.
How to Build a Good Combat Macro
The best AION 2 macros are usually simple. Instead of trying to automate an entire rotation, use the macro for the skills you want to press constantly during normal combat. This usually means your main filler attacks, frequently available damage skills, and conditional abilities that naturally fit into the same priority line.
Keep utility or situational skills outside the macro. Mobility skills, defensives, healing tools, and major damage buffs are usually better controlled manually so they are available when you actually need them. A long-cooldown burst skill can easily be wasted on a weak enemy or right before a boss mechanic if it is buried inside an automatic sequence.
It is also worth keeping early macros minimal while you learn the class. As skill levels, specialties, cooldown speed, and combat speed improve, the same Macro may start behaving differently or even stop working at all. Once you understand which abilities you genuinely want to use on cooldown, you can gradually add them to the macro instead of rebuilding the entire rotation around automation.
Browse our hottest Aion 2 Boosting services








AION 2 Best Macros for Every Class
Now, I know leveling in this game is kind of fast, but you also want to make sure that your damage output is up there when it comes time to run dungeons. You can get away with dancing on the keyboard while killing mobs in the open field, but sooner or later you’re going to have to give it your best, and that’s when you’ll need your macros. I’ll give you a macro template to start with for each class. It’s going to be a very simple one, but it’ll already be way better to use alongside your light attack. You can look up all skills and what they do at AION 2 Database.
Assassin Macro
- Macro skill chain:
 Insignia Explosion,
  Heart Gore,
  Savage Roar
 - Basic attack:
 Quick Slice
Assassin benefits from keeping the macro focused on repeatable damage skills. Insignia Explosion, Heart Gore, and Savage Roar form the main skill line, while Quick Slice stays separate as the basic attack used for weaving.
The idea is to keep those three skills in one priority column, with Insignia Explosion at the highest priority, then hold Quick Slice separately for weaving and animation cancels. This keeps the macro simple while still covering the abilities you want to use frequently during normal combat.
Cleric Macro
- Basic attack:
 Earth's Retribution
 - Macro skill chain:
 Chain of Torment →
  Debilitating Mark →
  Condemnation →
  Judgment Thunder
Cleric uses Earth's Retribution separately as the basic attack because it restores 110 MP every time it lands. That matters for a class whose main damage skills consume MP, especially when Chain of Torment costs 150 MP, Debilitating Mark costs 100 MP, and Judgment Thunder costs 120 MP.
The macro itself makes sense because the skills complement each other rather than just filling space. Chain of Torment applies a 10-second DoT and reduces the target's PvE Damage Tolerance by 5%, which effectively makes the following attacks more valuable. Debilitating Mark adds another 10-second DoT while also reducing the enemy's PvE Damage Boost by 5%.
Condemnation belongs after Chain of Torment because it can only be used on a target already affected by Chain of Torment. It also has a short 3-second cooldown, and one of its later specializations can restore 100 MP or reset its cooldown on a critical hit. Judgment Thunder then gives the line another repeatable AoE hit and can later chain into Divine Punishment.
So the Cleric macro is basically built around keeping its two debuffs active, triggering Condemnation whenever its requirement is met, and filling the remaining gaps with Judgment Thunder while Earth's Retribution keeps feeding MP back into the rotation.
Sorcerer Macro
- Basic attack: 2-Hit Chain
- Additional quickslot:
 Flame Arrow
 - Macro skill chain:
 Winter’s Shackles →
  Bittercold Wind →
  Blaze →
  Firestorm
 - Macro priority: Winter’s Shackles skill line first, 2-Hit Chain second
Sorcerer includes the basic attack line directly in the macro. The first macro input is the skill line with Winter’s Shackles, Bittercold Wind, Blaze, and Firestorm, while the 2-Hit Chain is placed second as the fallback input.
The main skill line handles the repeatable damage abilities, while the 2-Hit Chain fills the gaps when those skills are unavailable. Flame Arrow stays on a separate quickslot and is used manually rather than being added to the macro.
That makes Sorcerer one of the cleaner examples of combining a normal skill chain and the basic attack inside the same macro instead of holding LMB separately.
Templar Macro
- Basic attack:
 Vicious Strike
 - Second skill line:
 Warding Strike →
  Pummel
 - Third skill line:
 Doom Shield →
  Debilitating Smash →
  Judgment →
  Shield Smite
 - Macro priority: third skill line first, second skill line second
- Delay: 10 ms after each macro input
Templar uses Vicious Strike separately as the basic attack, while the macro combines the other two skill lines. The first macro input contains Doom Shield, Debilitating Smash, Judgment, and Shield Smite, and the second contains Warding Strike and Pummel. Each macro step uses a 10 ms delay before moving on to the next input.
The first line is useful because several of its skills interact with one another. Shield Smite can trigger Judgment for 2 seconds, and one of its later specializations can also trigger Debilitating Smash, so grouping those abilities under the same priority line lets the macro take advantage of those conditions whenever they become available. Aion 2 Doom Shield is also a Stigma skill, which is worth calling out because it makes this macro dependent on having that Stigma equipped.
Warding Strike and Pummel then act as the second macro input, giving Templar another repeatable line to fall back on while the first one is unavailable. The 10 ms delays are significant here because this macro is intentionally cycling between two separate quickslots rather than relying on a single stacked skill line.
Chanter Macro
- Basic attack:
 Onslaught
 - Second skill line:
 Spinning Strike
 - Third skill line:
 Dark Crush →
  Marchutan’s Wrath →
  Impactful Crush →
  Incandescent Blow
 - Macro priority: second skill line first, third skill line second
- Delay: 10 ms after each macro input
Chanter keeps Onslaught separate as the basic attack and combines its two main damage quickslots in the macro. Spinning Strike gets the first macro position, while Dark Crush, Marchutan’s Wrath, Impactful Crush, and Incandescent Blow are grouped together in the second skill line.
This keeps the macro centered on repeatable offensive skills without pulling utility or support abilities into it. Spinning Strike gets checked first, then the macro moves to the larger damage chain whenever those skills are available. Onslaught remains outside the macro so it can still be used separately for weaving between those attacks.
Gladiator Macro
- Basic attack:
 Keen Strike
 - Second skill line:
 Rage Burst →
  Overhead Slam →
  Rending Blow
 - Macro priority: second skill line only
- Delay: 10 ms after the macro input
Gladiator is one of the simplest classes here because the macro only needs a single skill line. Keen Strike stays separate as the basic attack, while Rage Burst, Overhead Slam, and Rending Blow share the second quickslot and handle the repeatable damage chain. Since there is only one quickslot inside the macro, there is no need to cycle between multiple skill lines like Templar or Chanter. The macro simply keeps attempting that second line while Keen Strike remains available separately for weaving between skills. Checkout more builds at questlog.gg


You got -20% OFF 
Spiritmaster Macro
- Basic attack:
 Cold Shock
 - Second skill line:
 Summon: Water Spirit →
  Jointstrike: Corrode →
  Summon: Earth Spirit →
  Summon: Fire Spirit
 - Third skill line:
 Jointstrike: Curse →
  Elemental Fusion →
  Dimensional Control →
  Combustion
 - Macro priority: second skill line first, third skill line second
- Delay: 10 ms after each macro input
Spiritmaster’s macro is built around keeping a Spirit active and automatically using the skills that become available from Spirit attacks. Summon: Water Spirit gets the highest priority in the second line because it deals ranged Water damage and restores 20 MP whenever its attacks land. The same line also contains Jointstrike: Corrode, which applies a 20-second DoT and makes the target take 10% more damage from the Spirit, followed by Earth and Fire Spirit as alternative summons.
The third line is where the class’s conditional skills fit together. Dimensional Control becomes available whenever a Spirit uses its skill and restores 100 MP on hit, while Elemental Fusion only activates after reaching four elemental stacks from Spirit skill usage. Putting them into the macro means those short activation windows are used automatically instead of requiring constant monitoring.
Ranger Macro
- Basic attack:
 Snipe
Snipe - Second skill line:
 Vaizel's Authority →
  Explosive Arrow
 - Third skill line:
 Gale Arrow →
  Drill Dart →
  Tempest Shot
 - Macro priority: second skill line first, third skill line second
- Delay: 10 ms after each macro input
Ranger’s macro combines a burst-oriented line with a more repeatable damage line. Vaizel’s Authority sits in the first macroed slot because it increases Attack for 30 seconds, while Explosive Arrow follows as a heavier hit that gains extra damage against targets affected by Slow or Root.
The third line handles the skills Ranger can cycle through more regularly. Gale Arrow grants a 10-second buff that increases Combat Speed and PvE Damage Boost, so it makes sense to give it priority in that chain. Drill Dart follows with a 5-second cooldown, restores 100 MP on a Critical Hit, and applies Bleed, while Tempest Shot has no cooldown and works as the filler whenever the higher-priority skills are unavailable.
Snipe stays separate as the basic attack line, so the macro focuses on maintaining Ranger’s buffs and cycling its repeatable attacks without folding every input into one button.
Read our other AION 2 guides:
F.A.Q.
What are Macros in AION 2?
Macros are an in-game feature that allow you to use abilities from several quick slots with a single press of a button.
How to use a Macro in AION 2?
To use a macro, go to the Skills menu and click on the macro icon in the top-right corner. Add one or more quick slots with skills inside them, and make sure to assign a dedicated key to the macro to use it.
Should I use Macros in AION 2?
This is an official feature of AION 2’s combat system; not using it usually means that your character isn’t dealing as much damage as they could.
What are skill chains in AION 2?
In AION 2, one quick slot on your hotbar can include more than one active skill. When you assign several skills to one quick slot, they will be executed in order of their priority.
Can I make a Macro for the entire rotation in AION 2?
While it’s technically possible to add multiple quick slots into the same macro, the more abilities you include, the less likely they will all work, because most skills in the game can be activated only if specific combat conditions are met. It’s best to keep macros shorter, so you can use them on a loop.