 Dallon Avery
Division 2 Escalation Guide Quick Overview:
- Escalation is very similar to WoW’s Mythic+ system
- Escalation is one of the few sources of prototype gear
- There are 10 tiers of scalable difficulty
- Higher tiers mean increased loot and chances of getting Prototype gear
- The list of missions available in Escalation rotates every Tuesday
- Escalation has targeted loot which changes every day
Trying to farm Escalation but been down on luck? Buy Division 2 Escalation service at Skycoach and get as many runs on any tier you want! You can also get tokens and other Escalation-related rewards from our veteran Division 2 players.


Read closely 
Browse our hottest Division 2 Boosting services





What is Escalation in Division 2?
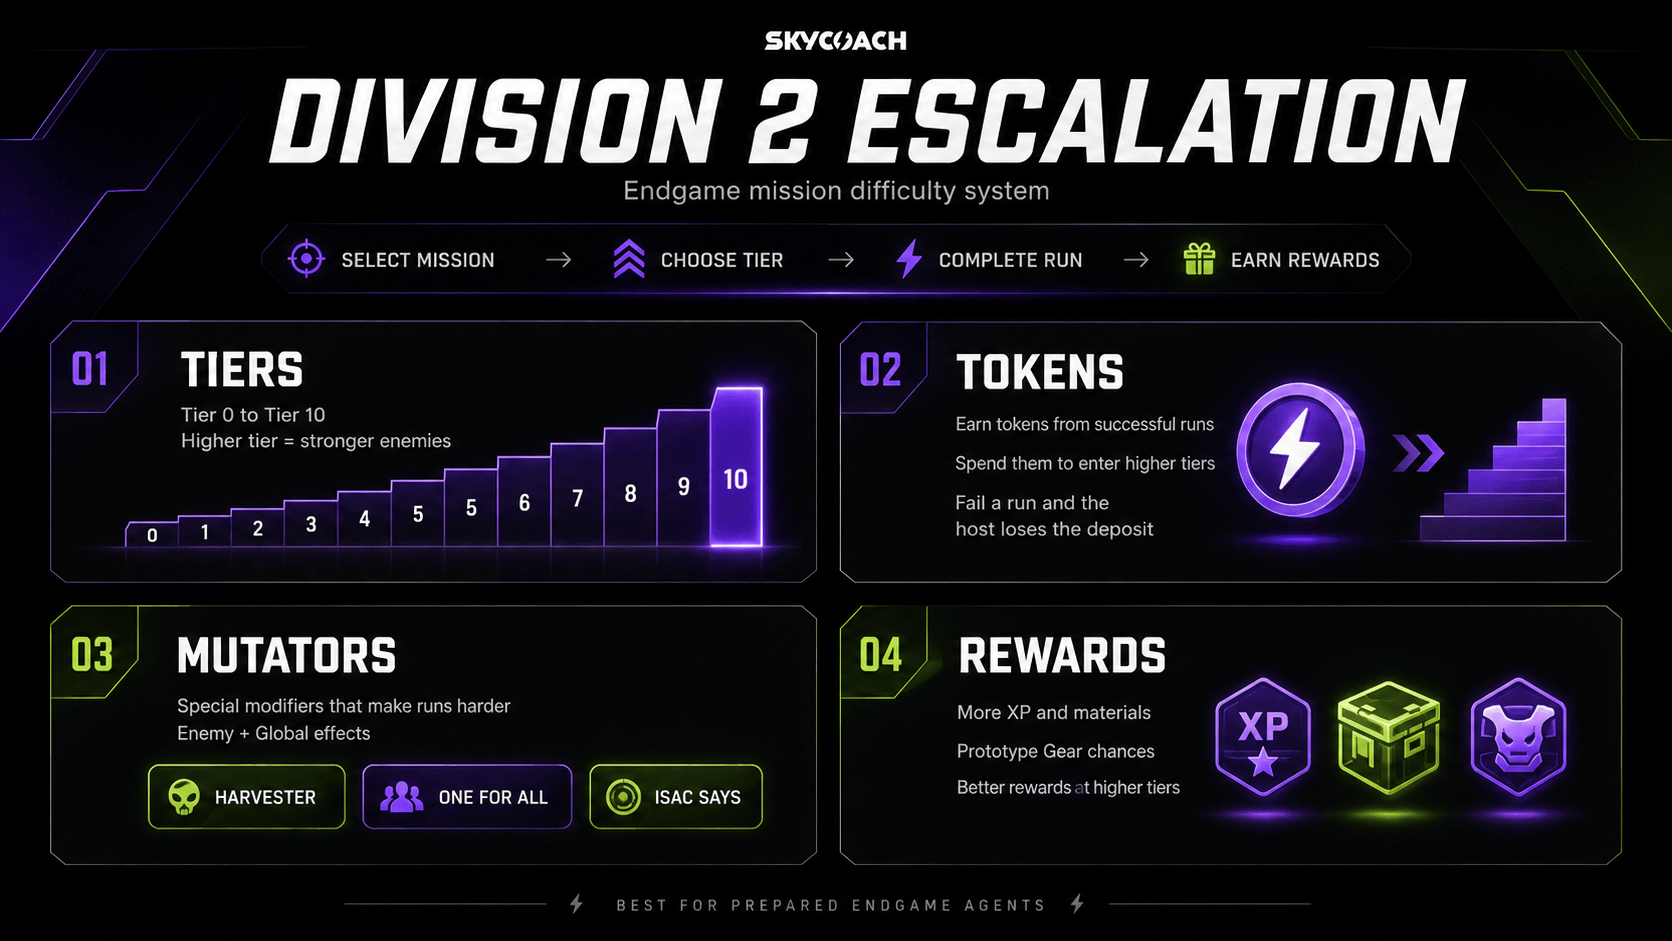
Escalation is perhaps one of the most endgame activities you can do in the game besides raids. Unlike raids, this activity is far more accessible to those who have just reached endgame, and it can be used to farm SHD levels and, more importantly, Prototype gear.
In short, Escalation allows you to play specific missions from a rotating pool at a significantly greater difficulty in exchange for special rewards. Every Escalation mission has a 60-minute time limit, regardless of the selected Tier. If the timer reaches zero before you complete the mission, the run fails. I explain more about what it means in a separate section.
Completing Escalation always earns you Escalation Tokens, which you can use to unlock higher Tiers of Escalation. Tiers make enemies stronger; the higher the tier you select. Tiers, except Tier 0, feature Mutators: unique and dangerous modifiers applied to enemies. Next, I will explain each of these things separately in this guide, so you know what you’re dealing with.
Escalation Requirements
Escalation becomes available once you complete the main campaign and reach Level 40. At that point, you can access the mode and start playing at its lowest difficulty, which is Tier 0.
But I wouldn’t try Escalation at all at that point, because I’m pretty sure you’re not ready for it at all. This endgame scaling difficulty system is designed for those players who are tired of playing the Heroic difficulty missions with all global modifiers turned on. I’m sure that a lot of Division 2 players with an SHD level over 2000 have been dreaming of a chance to put their builds to the real test, and Escalation is exactly that.
You should ideally have a proper endgame build and a good understanding of basic combat mechanics before you begin climbing Escalation Tiers. In particular, higher Tiers require you to understand:
- How your build and its talents work;
- Enemy archetypes, weakpoints, and AI behavior;
- Positioning and corner peeking;
- Enemy and reinforcement spawn points on each mission (yep!);
- The layouts and objectives of the missions you are playing.
Knowing the missions becomes especially important at higher Tiers. Escalation uses the same missions and enemy AI you encounter in standard story missions, and those are designed to impress you by putting you in impressive set pieces and situations. While that works well for immersion when you’re playing through them for the first time for the story, when you’re in Escalation, that can mess you up!
You do not need Prototype gear to start playing Escalation. A good conventional build is much more important, especially while learning the mode. Prototype gear becomes useful for pushing your performance further, but it cannot compensate for a poorly assembled build or a lack of knowledge about the game's combat mechanics.
So, don't be afraid to try Escalation once you unlock it, but treat its first few Tiers as an introduction. As you climb higher, your build, positioning, and knowledge of each mission will become increasingly important.
Division 2 Escalation Mission Rotation
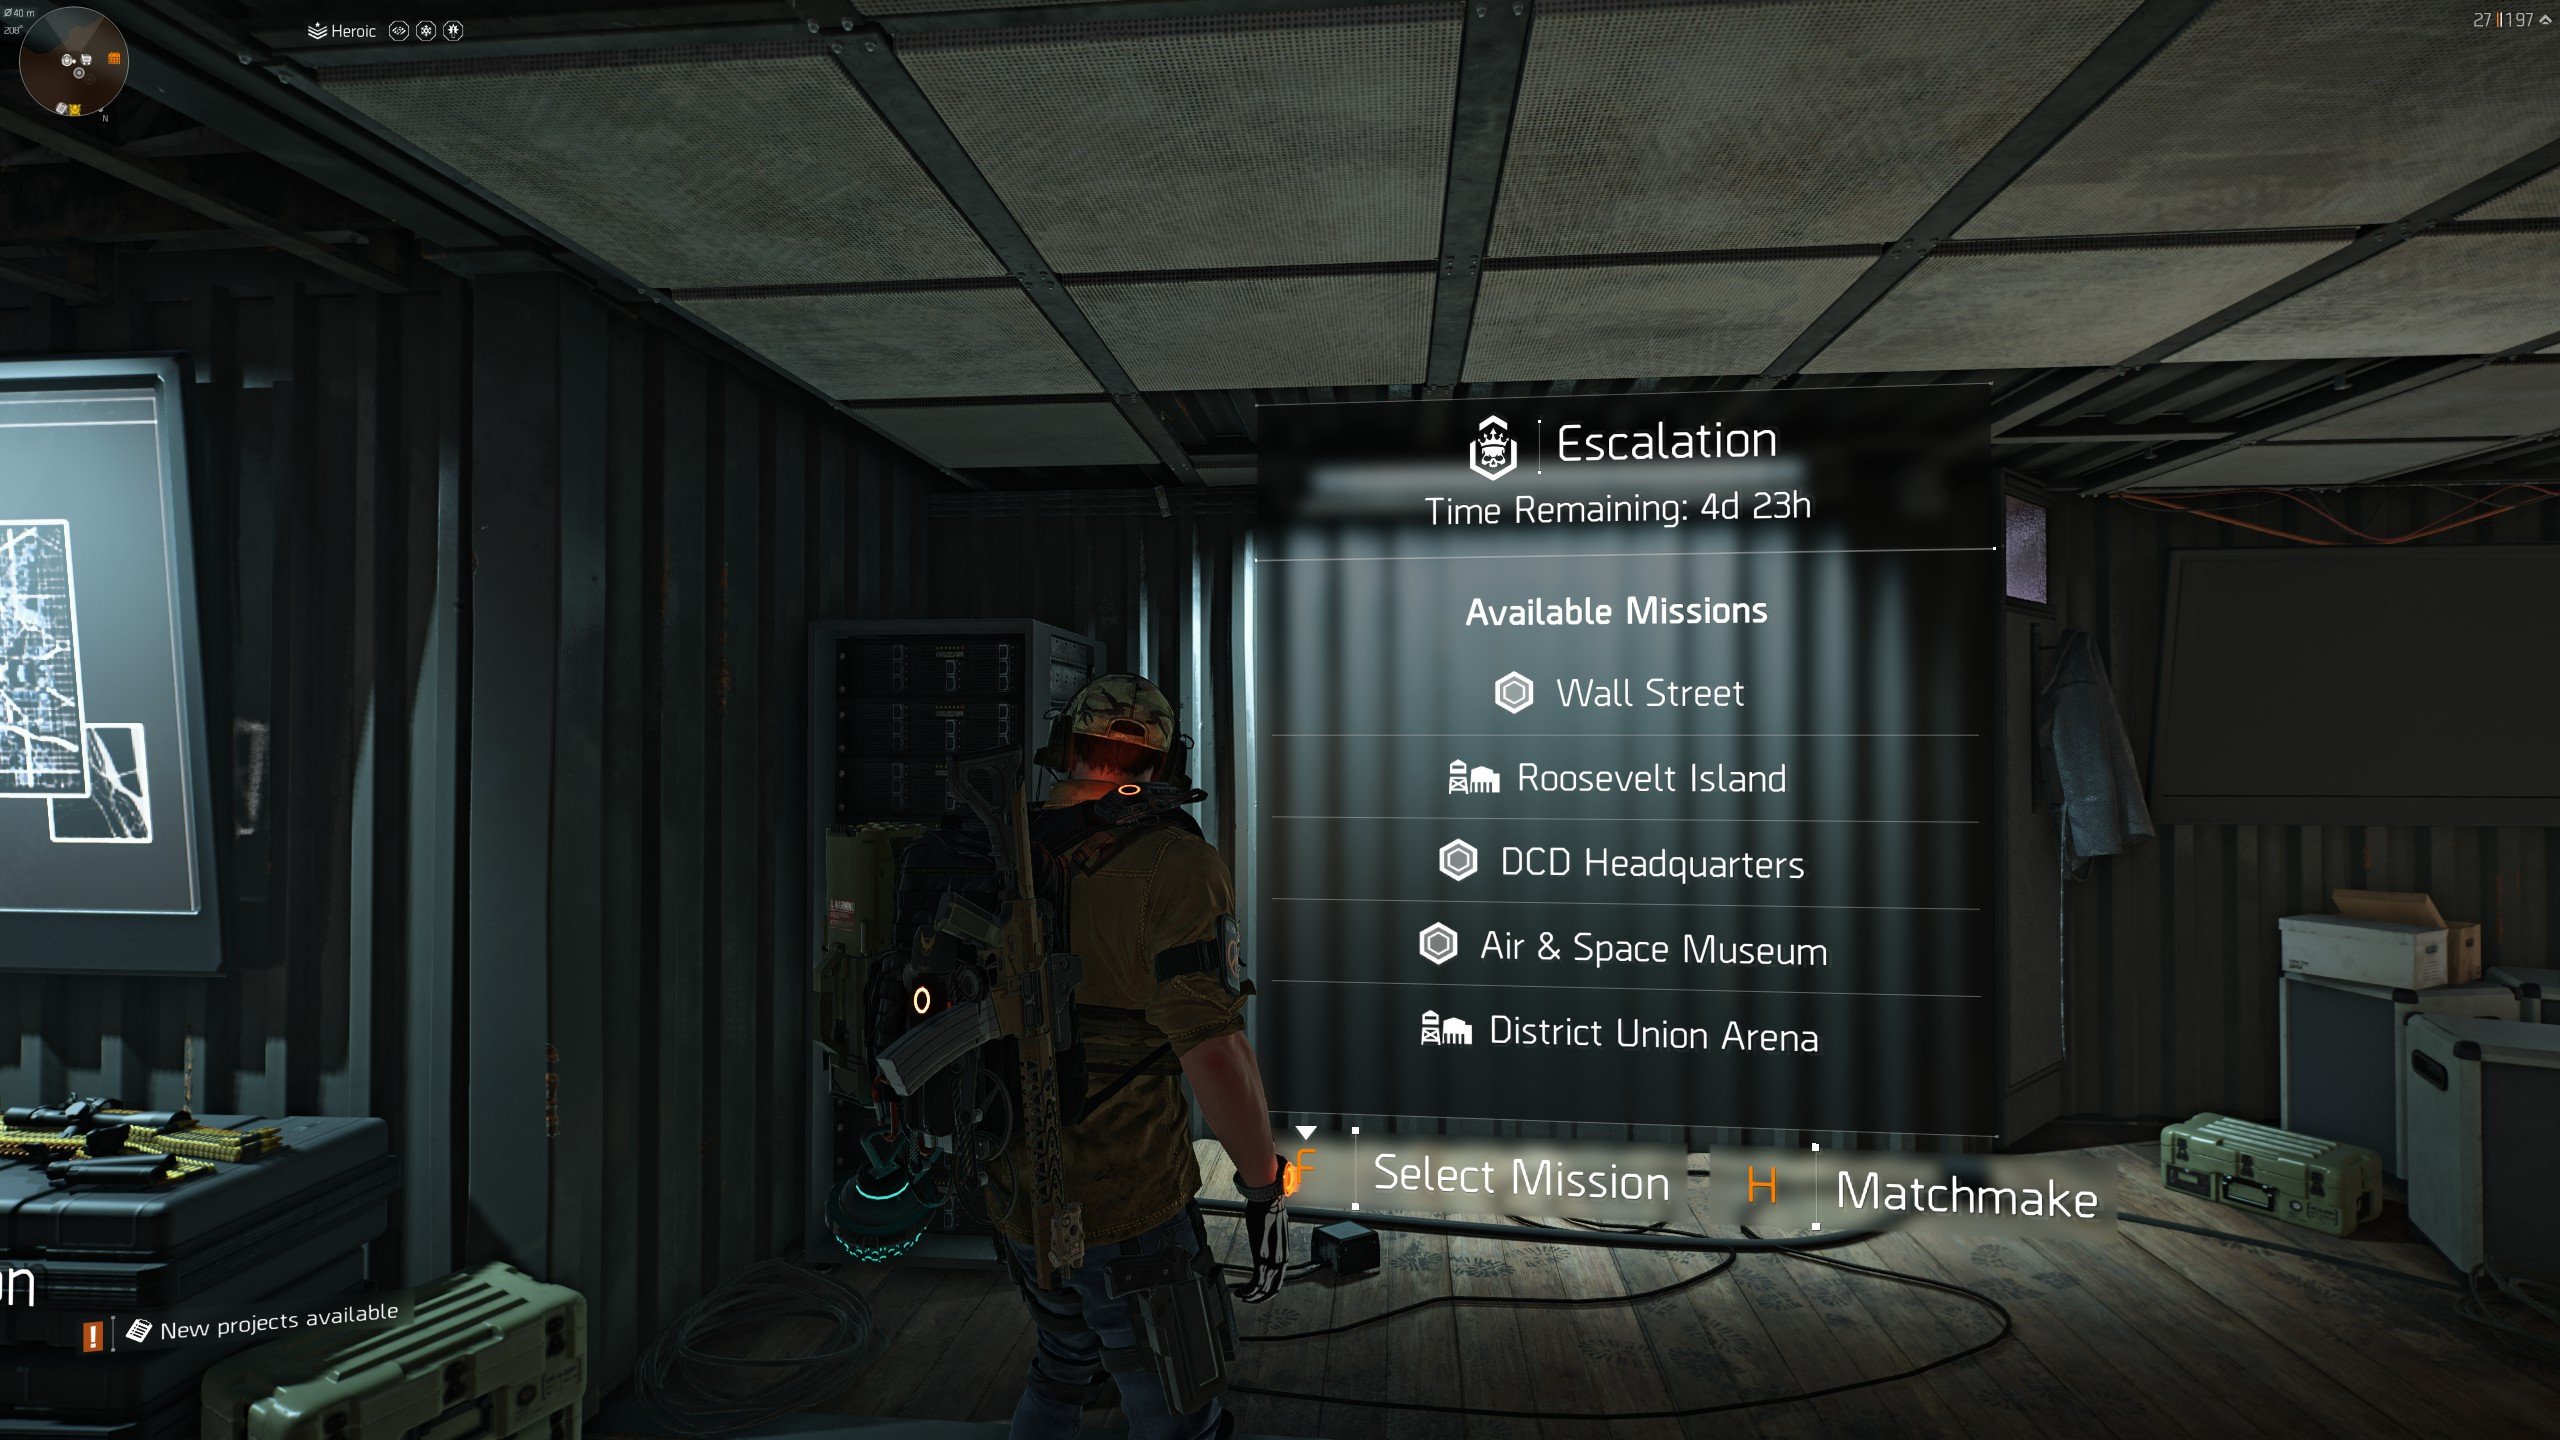
You can’t just activate Escalation on any mission whenever you want. This mode runs on a rotation that resets every Tuesday. There are five Main Missions or Strongholds available for Escalation each week.
The rotation is also not completely random. Escalation uses pre-made mission playlists, with each playlist containing five missions. As of Y8S2, there are nine known playlists in the rotation.
|
Playlist |
Escalation Missions |
|
1 |
The Tombs, Manning National Zoo, Bank Headquarters, American History Museum, Space Administration HQ |
|
2 |
Pathway Park, Camp White Oak, Grand Washington Hotel, Jefferson Trade Center, Federal Emergency Bunker |
|
3 |
Wall Street, Roosevelt Island, DCD Headquarters, Air & Space Museum, District Union Arena |
|
4 |
Stranded Tanker, ViewPoint Museum, Jefferson Trade Center, Bank Headquarters, DCD Headquarters |
|
5 |
Liberty Island, Potomac Event Center, American History Museum, Jefferson Plaza, Air & Space Museum |
|
6 |
The Art Museum, Capitol Building, Jefferson Plaza, Lincoln Memorial, Federal Emergency Bunker |
|
7 |
The Art Museum, Manning National Zoo, Camp White Oak, The Pentagon, DARPA Research Labs |
|
8 |
Coney Island Ballpark, Coney Island Amusement Park, ViewPoint Museum, Capitol Building, Potomac Event Center |
|
9 |
The Pentagon, DARPA Research Labs, District Union Arena, Roosevelt Island, Space Administration HQ |
These playlists mean that some missions appear in several different rotations, while others may disappear for several weeks. The currently active five missions can always be checked through the Escalation menu at the Base of Operations in Washington, D.C., and you can fast travel directly to any available mission from there.
Your mission choice becomes increasingly important once you start pushing higher Tiers. Escalation does not change the basic layouts, objectives, enemy AI, or spawn structure of these missions, so a mission you already know well is usually much easier to approach than one whose encounters and reinforcement spawns you barely remember.
For that reason, you do not necessarily have to play every Escalation mission available in a given week. If your main goal is climbing Tiers or farming Escalation efficiently, choosing a mission you know well can make a major difference, especially once enemy scaling and Mutators become much more punishing.
Division 2 Escalation Tokens Explained
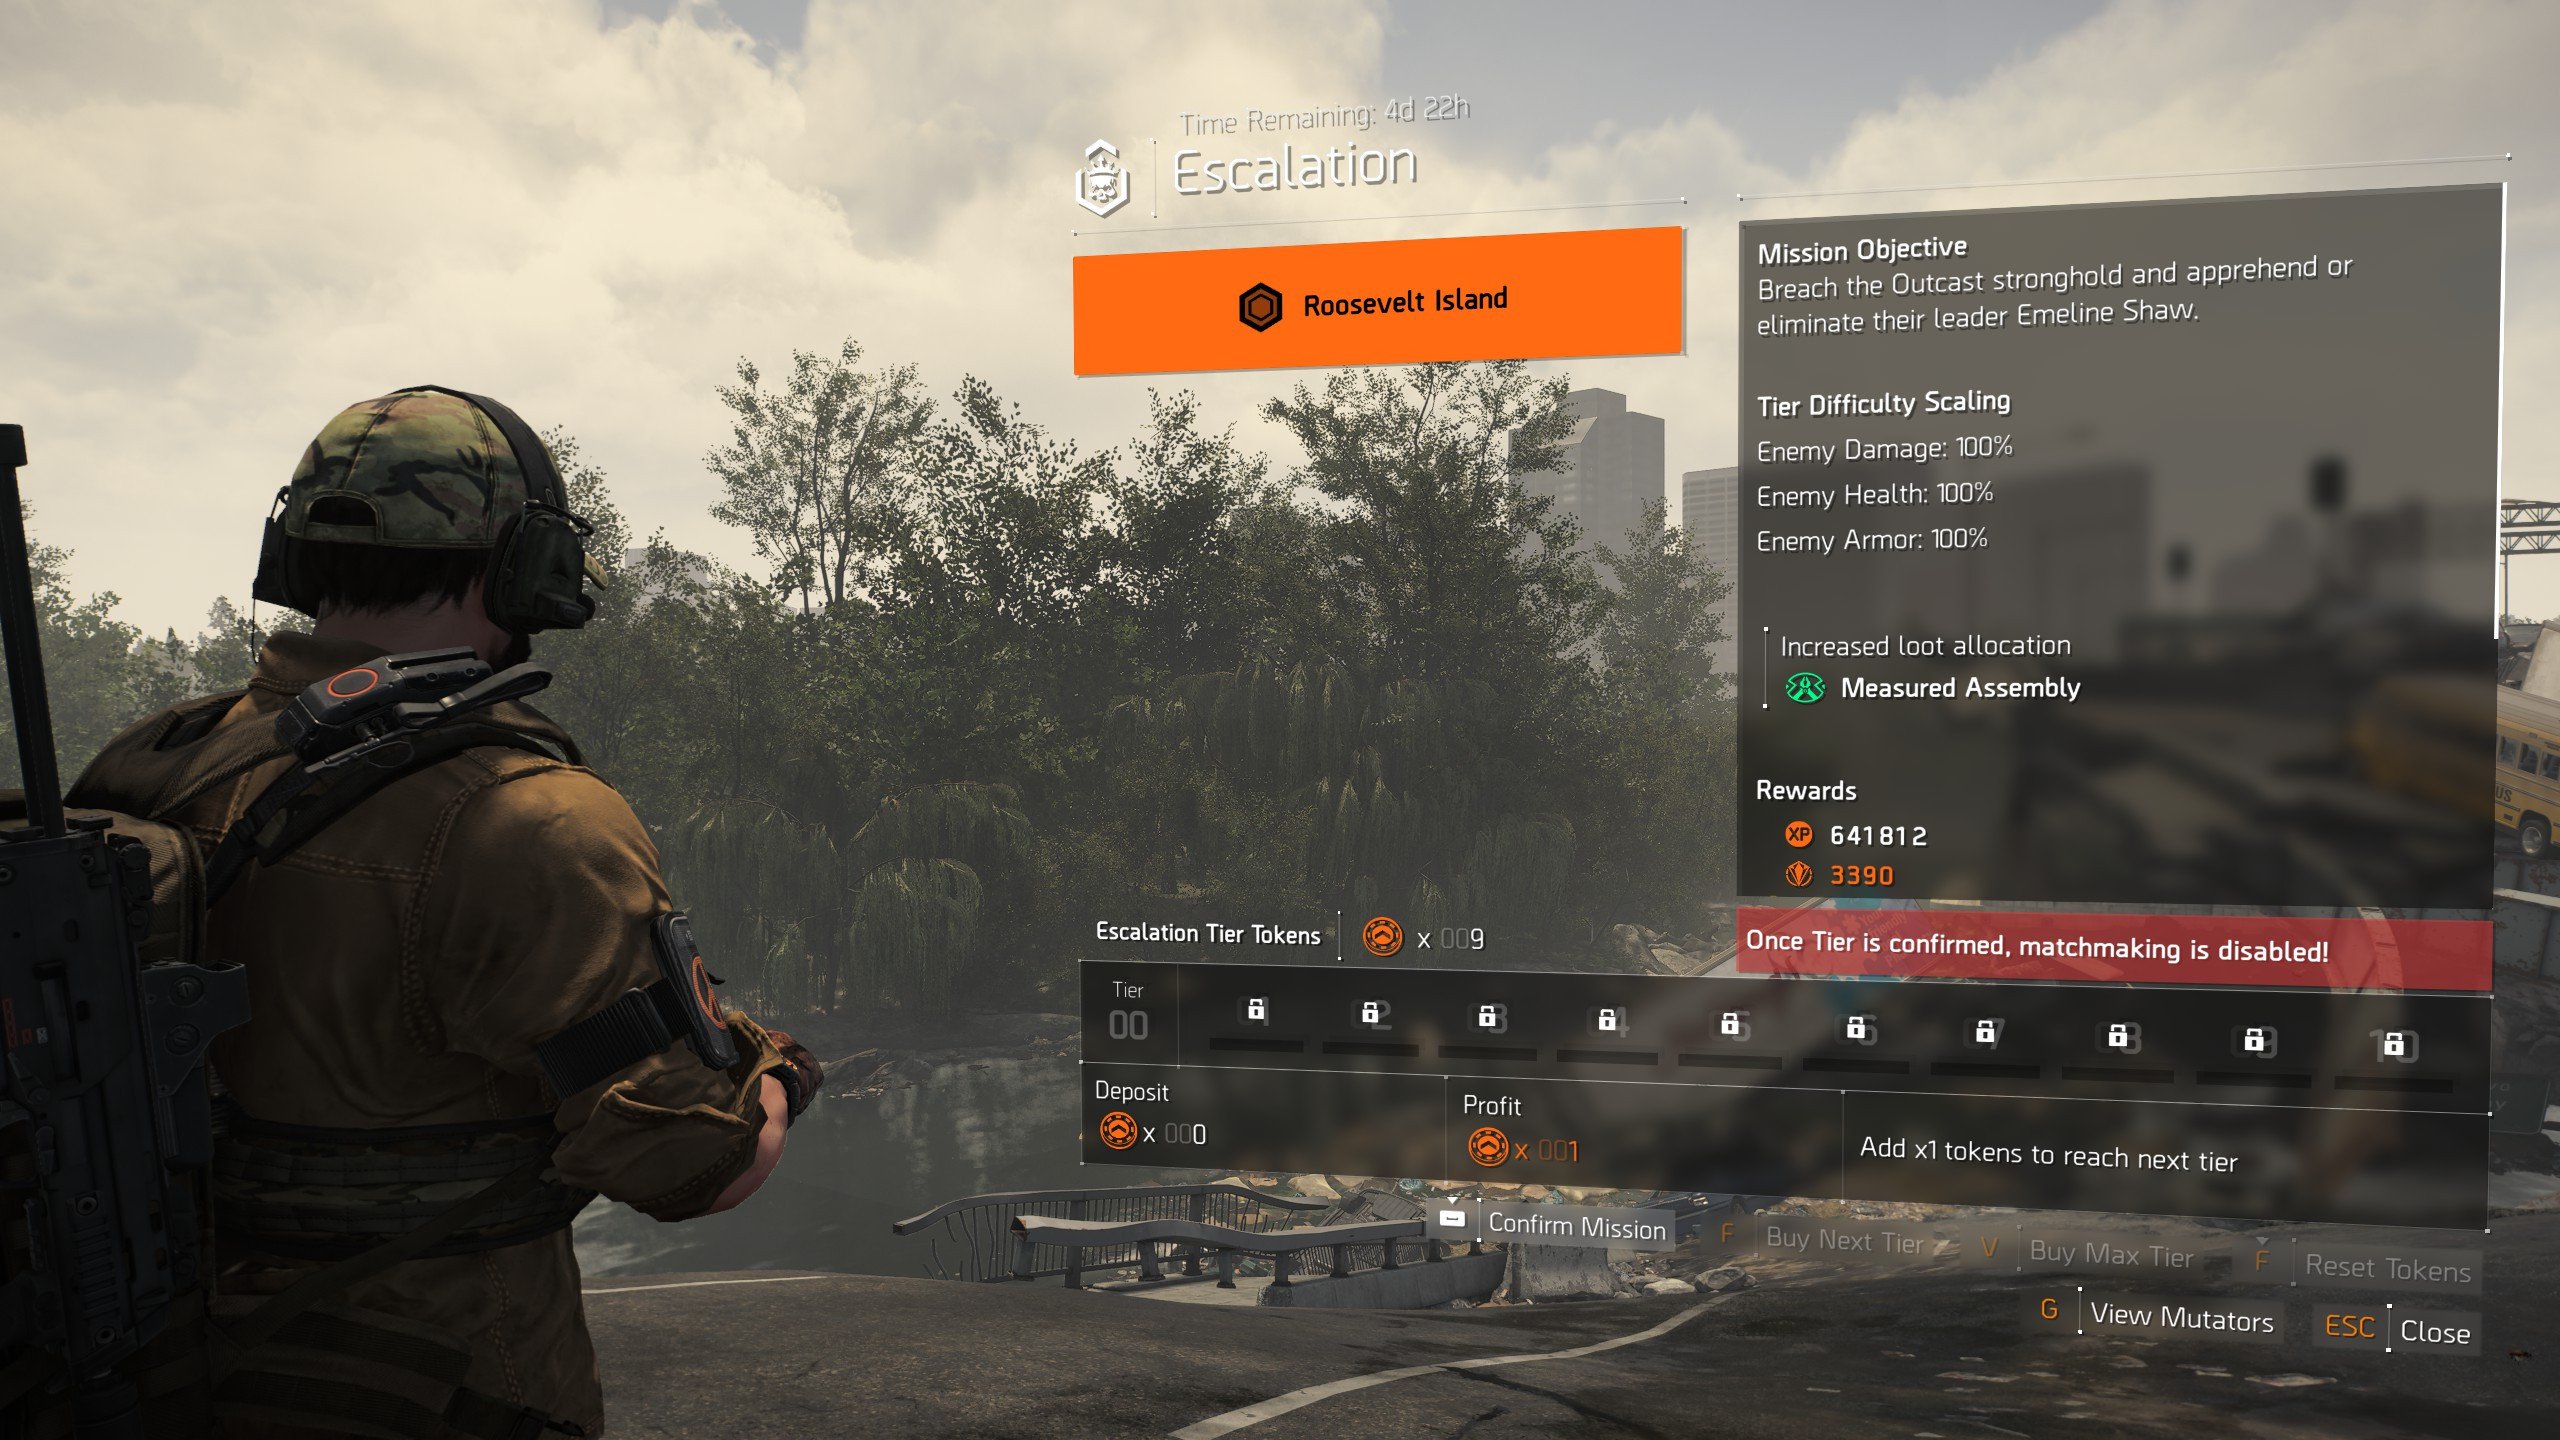
Escalation Tokens are a special currency used to start Escalation missions above Tier 0. Think of them as a wager: the higher the Tier you choose, the more Tokens you have to put at risk before starting the mission.
Tier 0 is completely free and rewards 1 Escalation Token upon completion, making it the starting point for players who do not have any Tokens yet. Once you have enough, you can spend those Tokens to attempt higher Tiers.
Importantly, Tokens do not permanently unlock a Tier. They are simply the entry cost for each attempt. If you want to run Tier 5, for example, you need to pay its 19-Token deposit every time you host a new Tier 5 run.
The current Token costs and rewards are:
|
Tier |
Token Cost |
Host Reward |
Host Profit |
Group Member Reward |
|
Tier 0 |
0 |
1 |
+1 |
1 |
|
Tier 1 |
1 |
5 |
+4 |
2 |
|
Tier 2 |
4 |
10 |
+6 |
3 |
|
Tier 3 |
8 |
16 |
+8 |
4 |
|
Tier 4 |
13 |
23 |
+10 |
5 |
|
Tier 5 |
19 |
31 |
+12 |
6 |
|
Tier 6 |
27 |
41 |
+14 |
7 |
|
Tier 7 |
37 |
53 |
+16 |
8 |
|
Tier 8 |
49 |
67 |
+18 |
9 |
|
Tier 9 |
63 |
83 |
+20 |
10 |
|
Tier 10 |
80 |
102 |
+22 |
11 |
The Host Profit column is the amount you actually gain after subtracting the initial deposit. For example, hosting Tier 10 costs 80 Tokens. Completing it rewards the host with 102 Tokens, leaving them with 22 more Tokens than they had before starting the run.
How Escalation Tokens Work in a Group
Escalation handles Tokens differently for the group leader and other group members. Only the leader selects the Tier and pays the Token deposit required to launch the mission. Other players do not have to match that deposit.
If the mission is completed, the leader receives the Host Reward shown above, while every other player receives the smaller Group Member Reward. This means joining someone else's Escalation is a risk-free way to build up your own Token supply, while hosting provides substantially more Tokens for a successful clear.
However, the host also takes all of the risk of losing tokens.
What Happens if You Fail an Escalation?
Escalation missions have no checkpoints. If your group wipes or the mission timer expires, the run fails and the Tokens deposited by the host are lost.
This becomes increasingly punishing at higher Tiers. Losing a Tier 2 attempt costs only 4 Tokens, while failing Tier 10 immediately removes 80 Tokens from the host's balance.
If you no longer have enough Tokens to attempt the Tier you want, you will need to drop to a cheaper Tier and complete runs to build your Token supply back up. Tier 0 can always be played for free, so it is impossible to become completely locked out of Escalation.
This risk/reward system is also why you should not automatically select the highest Tier you can afford. A Tier that you can clear consistently is much better for building Tokens than repeatedly wagering them on a difficulty your build or group cannot reliably complete.
Escalation Tokens also have another use: they can be spent at the Escalation Requisition Vendor on Prototype caches, as explained in the rewards section below.
Finally, Escalation Tokens do not reset between seasons. Any Tokens you save will remain available when the next season begins.
Division 2 Escalation Tiers Explained
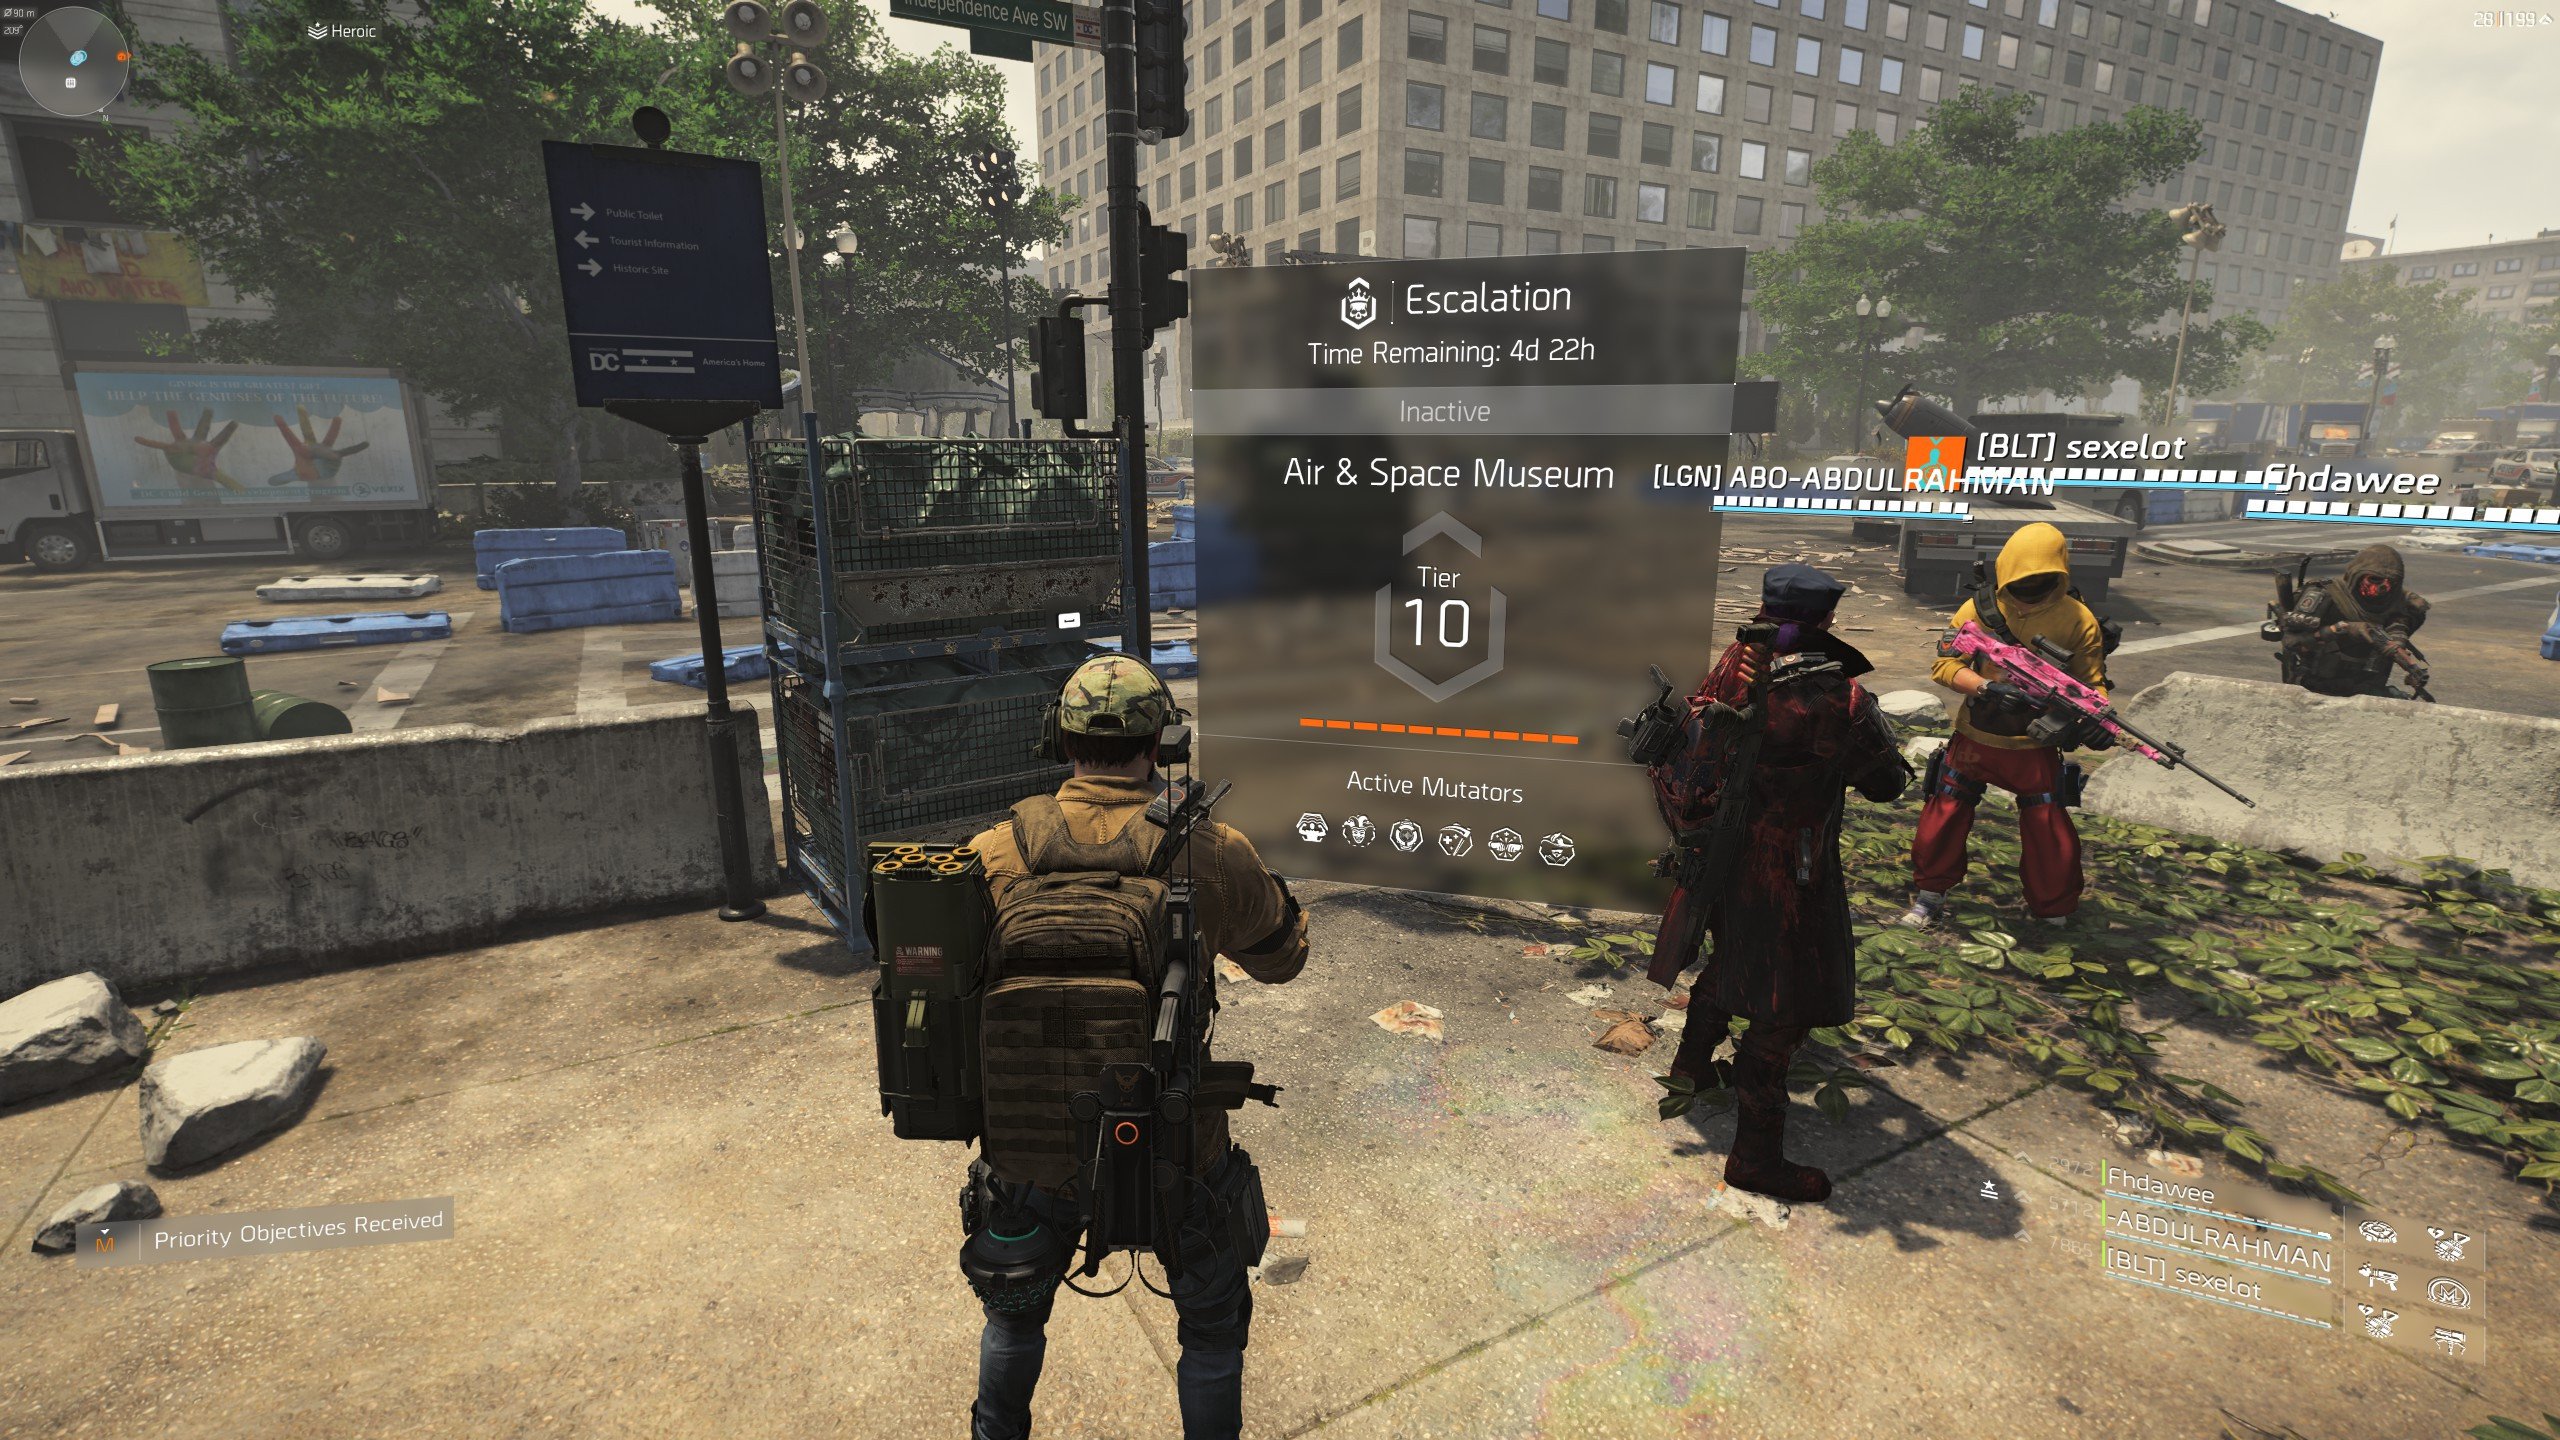
Escalation has Tier 0 followed by 10 increasingly difficult Tiers. Tier 0 serves as the baseline and can always be attempted for free, while Tier 1–10 require Escalation Tokens to start. The Tier you choose applies to the entire mission and determines how powerful enemies are, which Mutators can appear, and how valuable your potential rewards become. You can learn more in this Reddit post.
The most obvious difference you’ll see is the enemy damage, health, armor, and enemy types present in the missions.
|
Escalation Tier |
Enemy Damage |
Enemy Health |
Enemy Armor |
|
Tier 0 |
100% |
100% |
100% |
|
Tier 1 |
150% |
160% |
160% |
|
Tier 2 |
200% |
200% |
200% |
|
Tier 3 |
250% |
250% |
250% |
|
Tier 4 |
300% |
300% |
300% |
|
Tier 5 |
350% |
350% |
350% |
|
Tier 6 |
400% |
450% |
450% |
|
Tier 7 |
450% |
530% |
530% |
|
Tier 8 |
500% |
650% |
650% |
|
Tier 9 |
550% |
700% |
700% |
|
Tier 10 |
550% |
800% |
800% |
The first five Tiers scale relatively predictably. By Tier 5, enemies deal 3.5 times the damage and have 3.5 times the Health and Armor of Tier 0. Starting with Tier 6, however, enemy survivability begins scaling faster than their damage. Tier 8 enemies already have 650% Health and Armor, while Tier 10 reaches 800%. Enemy damage eventually caps at 550% on Tiers 9 and 10, but the final Tier still adds another substantial increase to Health and Armor.
This is why the difference between lower and higher Escalation Tiers is not simply that fights take a little longer. At higher Tiers, enemies become more than just bullet sponges. You will never beat higher tiers without a build that actually works. Now, it’s time to cover every Escalation Mutator and how to deal with it in the next section.
Browse our hottest Division 2 Boosting services






Division 2 Escalation Mutators Explained
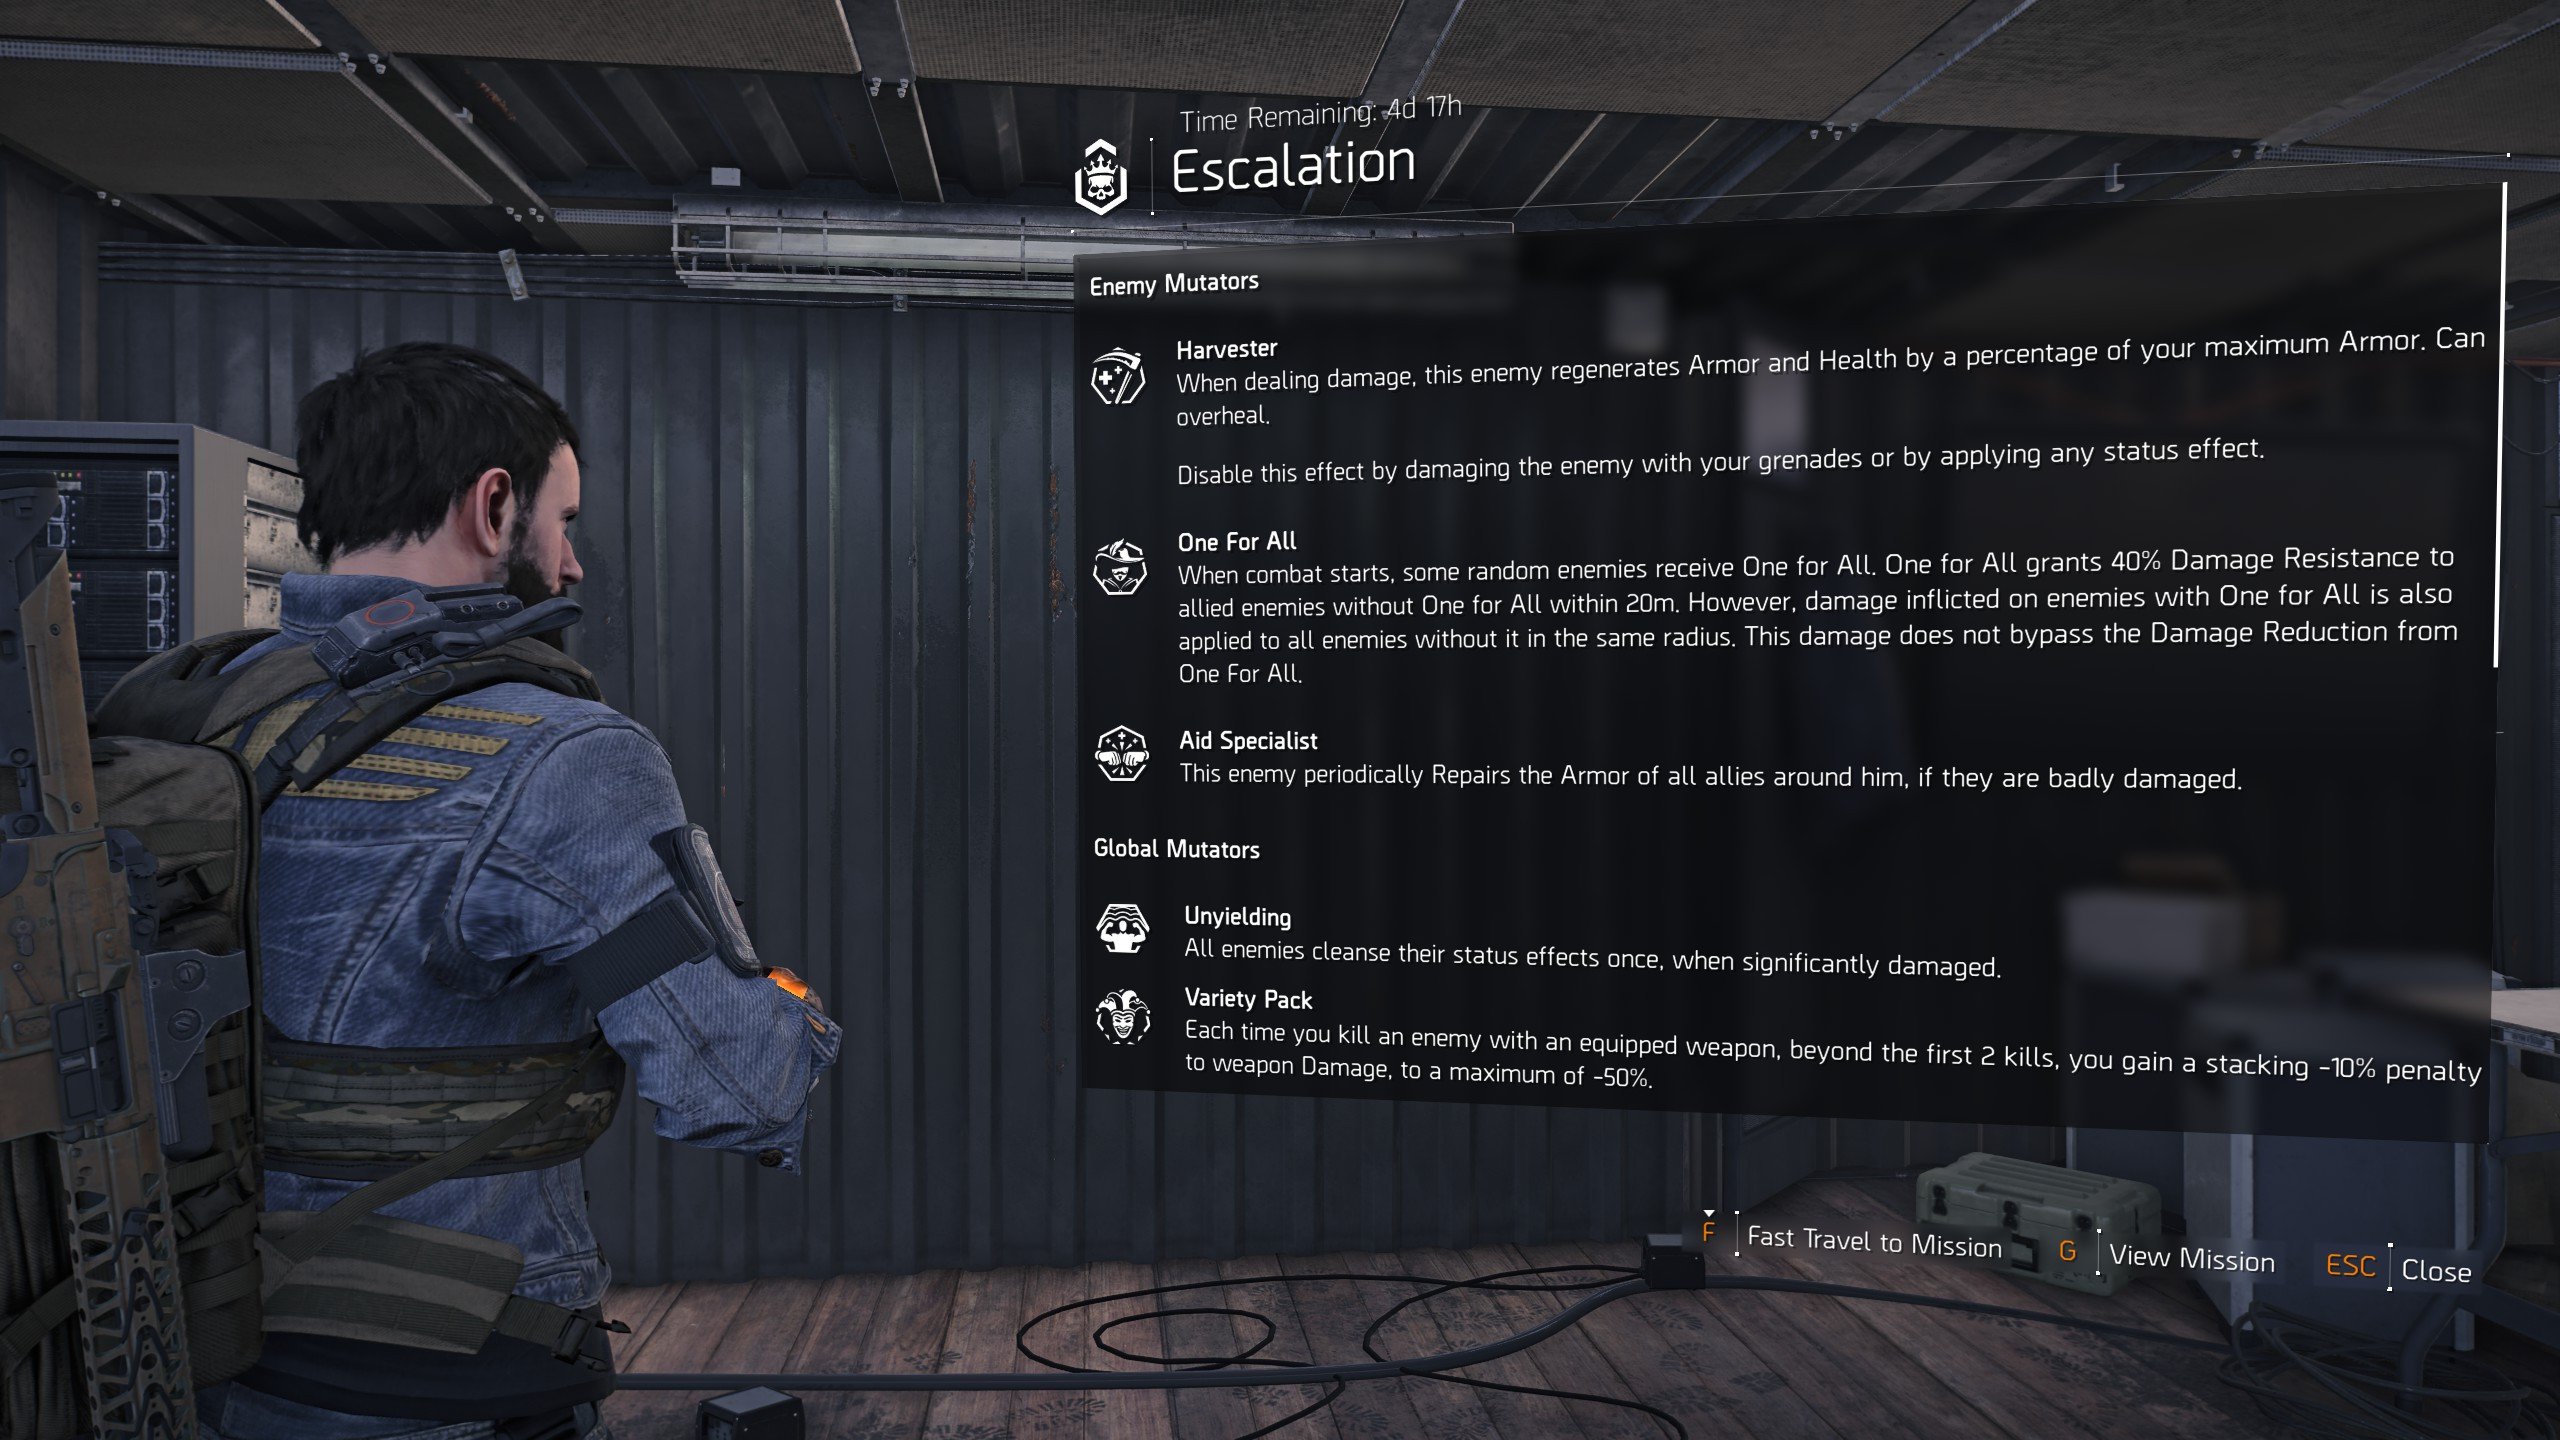
Mutators are special modifiers introduced as you progress through Escalation Tiers. Unlike the Health, Armor, and Damage bump covered above, Mutators add new mechanics that can change which enemies you should prioritize and how you play your build.
There are two types of Mutators:
- Enemy Mutators are randomly assigned to individual enemies when they spawn.
- Global Mutators affect the entire mission and are always active once you reach the required Tier.
As of TUY8S2.3, the Mutators are introduced at the following Tiers:
|
Mutator |
Type |
Appears From |
|
Harvester |
Enemy |
Tier 1 |
|
Unyielding |
Global |
Tier 2 |
|
One For All |
Enemy |
Tier 3 |
|
Variety Pack |
Global |
Tier 5 |
|
Aid Specialist |
Enemy |
Tier 7 |
|
ISAC Says |
Global |
Tier 7 |
Mutators are cumulative. For example, reaching Tier 7 does not replace the Mutators from previous Tiers; you now have to deal with all six.
Enemy Mutators
An enemy can randomly receive one Enemy Mutator when it spawns. The Mutator icon takes around three seconds to become visible, so pay attention to newly spawned enemies before deciding which target to focus.
The chance of each Enemy Mutator appearing also increases at higher Tiers:
|
Tier |
Harvester |
One For All |
Aid Specialist |
|
Tier 1 |
60% |
– |
– |
|
Tier 2 |
60% |
– |
– |
|
Tier 3 |
75% |
35% |
– |
|
Tier 4 |
75% |
35% |
– |
|
Tier 5 |
75% |
35% |
– |
|
Tier 6 |
75% |
35% |
– |
|
Tier 7 |
75% |
35% |
35% |
|
Tier 8 |
75% |
35% |
60% |
|
Tier 9 |
75% |
60% |
60% |
|
Tier 10 |
75% |
60% |
75% |
Harvester
Harvester appears from Tier 1. Whenever an enemy with Harvester damages you, it regenerates its own Armor and Health based on a percentage of your maximum Armor. Harvester can also overheal the enemy beyond its normal Health.
Harvester is generally the least troublesome Enemy Mutator. Avoid trading shots with these enemies unnecessarily and focus them down normally.
One For All
One For All appears from Tier 3 and is one of the most important Mutators to recognize.
An enemy with One For All grants 40% Damage Resistance to nearby enemies within 20 meters. However, there is a major advantage: damage dealt to the One For All enemy is also applied to nearby enemies affected by it, and this transferred damage bypasses the Damage Resistance.
This makes One For All enemies your highest-priority targets in most encounters. Instead of wasting ammunition against enemies receiving the Damage Resistance, shoot the One For All target. You will damage it while simultaneously dealing the same damage to other enemies around it.
This can actually turn One For All into an advantage. If a heavily armored or particularly tanky enemy receives the Mutator, sustained damage against it can heavily damage or even kill an entire group of enemies around it.
Be aware that multiple One For All enemies can also provide Damage Resistance to each other, so identify and focus these targets as quickly as possible.
Aid Specialist
Aid Specialist appears from Tier 7. These enemies periodically repair the Armor of badly damaged allies around them.
That makes them dangerous in higher Tiers, where enemies already have enormous Health and Armor pools. Leaving an Aid Specialist alive can undo a significant amount of your team's damage.
As a general rule, prioritize Aid Specialists as soon as you identify them. The main exception is when a One For All target gives you a more efficient way to damage the entire group at once.
Global Mutators
Global Mutators work differently. They are always active throughout the mission once you reach the Tier at which they are introduced, and their effects apply regardless of which enemies spawn.
Unyielding
Unyielding becomes active from Tier 2.
Enemies affected by a Status Effect will cleanse that effect once after taking significant damage.
This is particularly important when using Riot Foam or another Crowd Control setup. An enemy you have immobilized can cleanse the effect after taking enough damage, meaning you may have to apply your Crowd Control again instead of assuming that enemy will remain disabled for the full duration.
Variety Pack
Variety Pack becomes active from Tier 5 and discourages you from relying exclusively on one weapon.
After your first two kills with an equipped weapon, subsequent kills begin applying a stacking -10% Weapon Damage penalty, up to a maximum penalty of -50%. Getting a kill with a different weapon resets the stacks.
Variety Pack effectively has seven stages:
- Kills 1–2: no Weapon Damage penalty;
- Kill 3: -10%;
- Kill 4: -20%;
- Kill 5: -30%;
- Kill 6: -40%;
- Kill 7+: -50%.
The easiest way to deal with it is simply to alternate weapons periodically. You do not need to switch after every kill; just avoid allowing the penalty to remain at its maximum when you need your full damage output.
There are also some unusual ways to clear Variety Pack. Destroying one of your own deployable Skills can reset it, as can the explosion after destroying certain Black Tusk Warhounds and Mini-Tanks. These are useful quirks to know, but switching weapons and getting a kill is the normal and most reliable method.
ISAC Says
ISAC Says becomes active from Tier 7. At random points, ISAC assigns you one of three colored debuffs: Red, Blue, or Yellow. Each color has a different penalty and requires a specific action to remove it.
Successfully clearing the debuff also rewards you with +30% Rate of Fire for 10 seconds.
|
Color |
Debuff |
How to Clear |
|
Red |
-25% Weapon Damage |
Destroy a weakpoint or armor plate |
|
Blue |
-30% Weapon Handling |
Get 3 kills or assist kills |
|
Yellow |
1.3× Skill Cooldowns |
Get a kill or assist kill while holding your sidearm |
The Red debuff is particularly noticeable on DPS builds because it directly reduces your Weapon Damage. Breaking either an enemy weakpoint or an armor plate clears it.
Blue reduces Weapon Handling and clears after three kills or assists, so it will often disappear naturally during combat.
Yellow increases Skill cooldowns and can therefore be more disruptive for Skill and Support builds. You do not necessarily have to score the final kill with your sidearm: an assist can clear the debuff as long as you are holding your sidearm when the enemy dies.
An ISAC Says debuff does not disappear or change on its own. If you ignore it, that same debuff can remain active for the rest of the run, so it is generally worth completing the required action whenever you get an opportunity.
Mutators may change between seasons, so the exact set and their effects are worth checking whenever a new season or major Title Update changes Escalation.


You got -20% OFF 
Division 2 Escalation Rewards
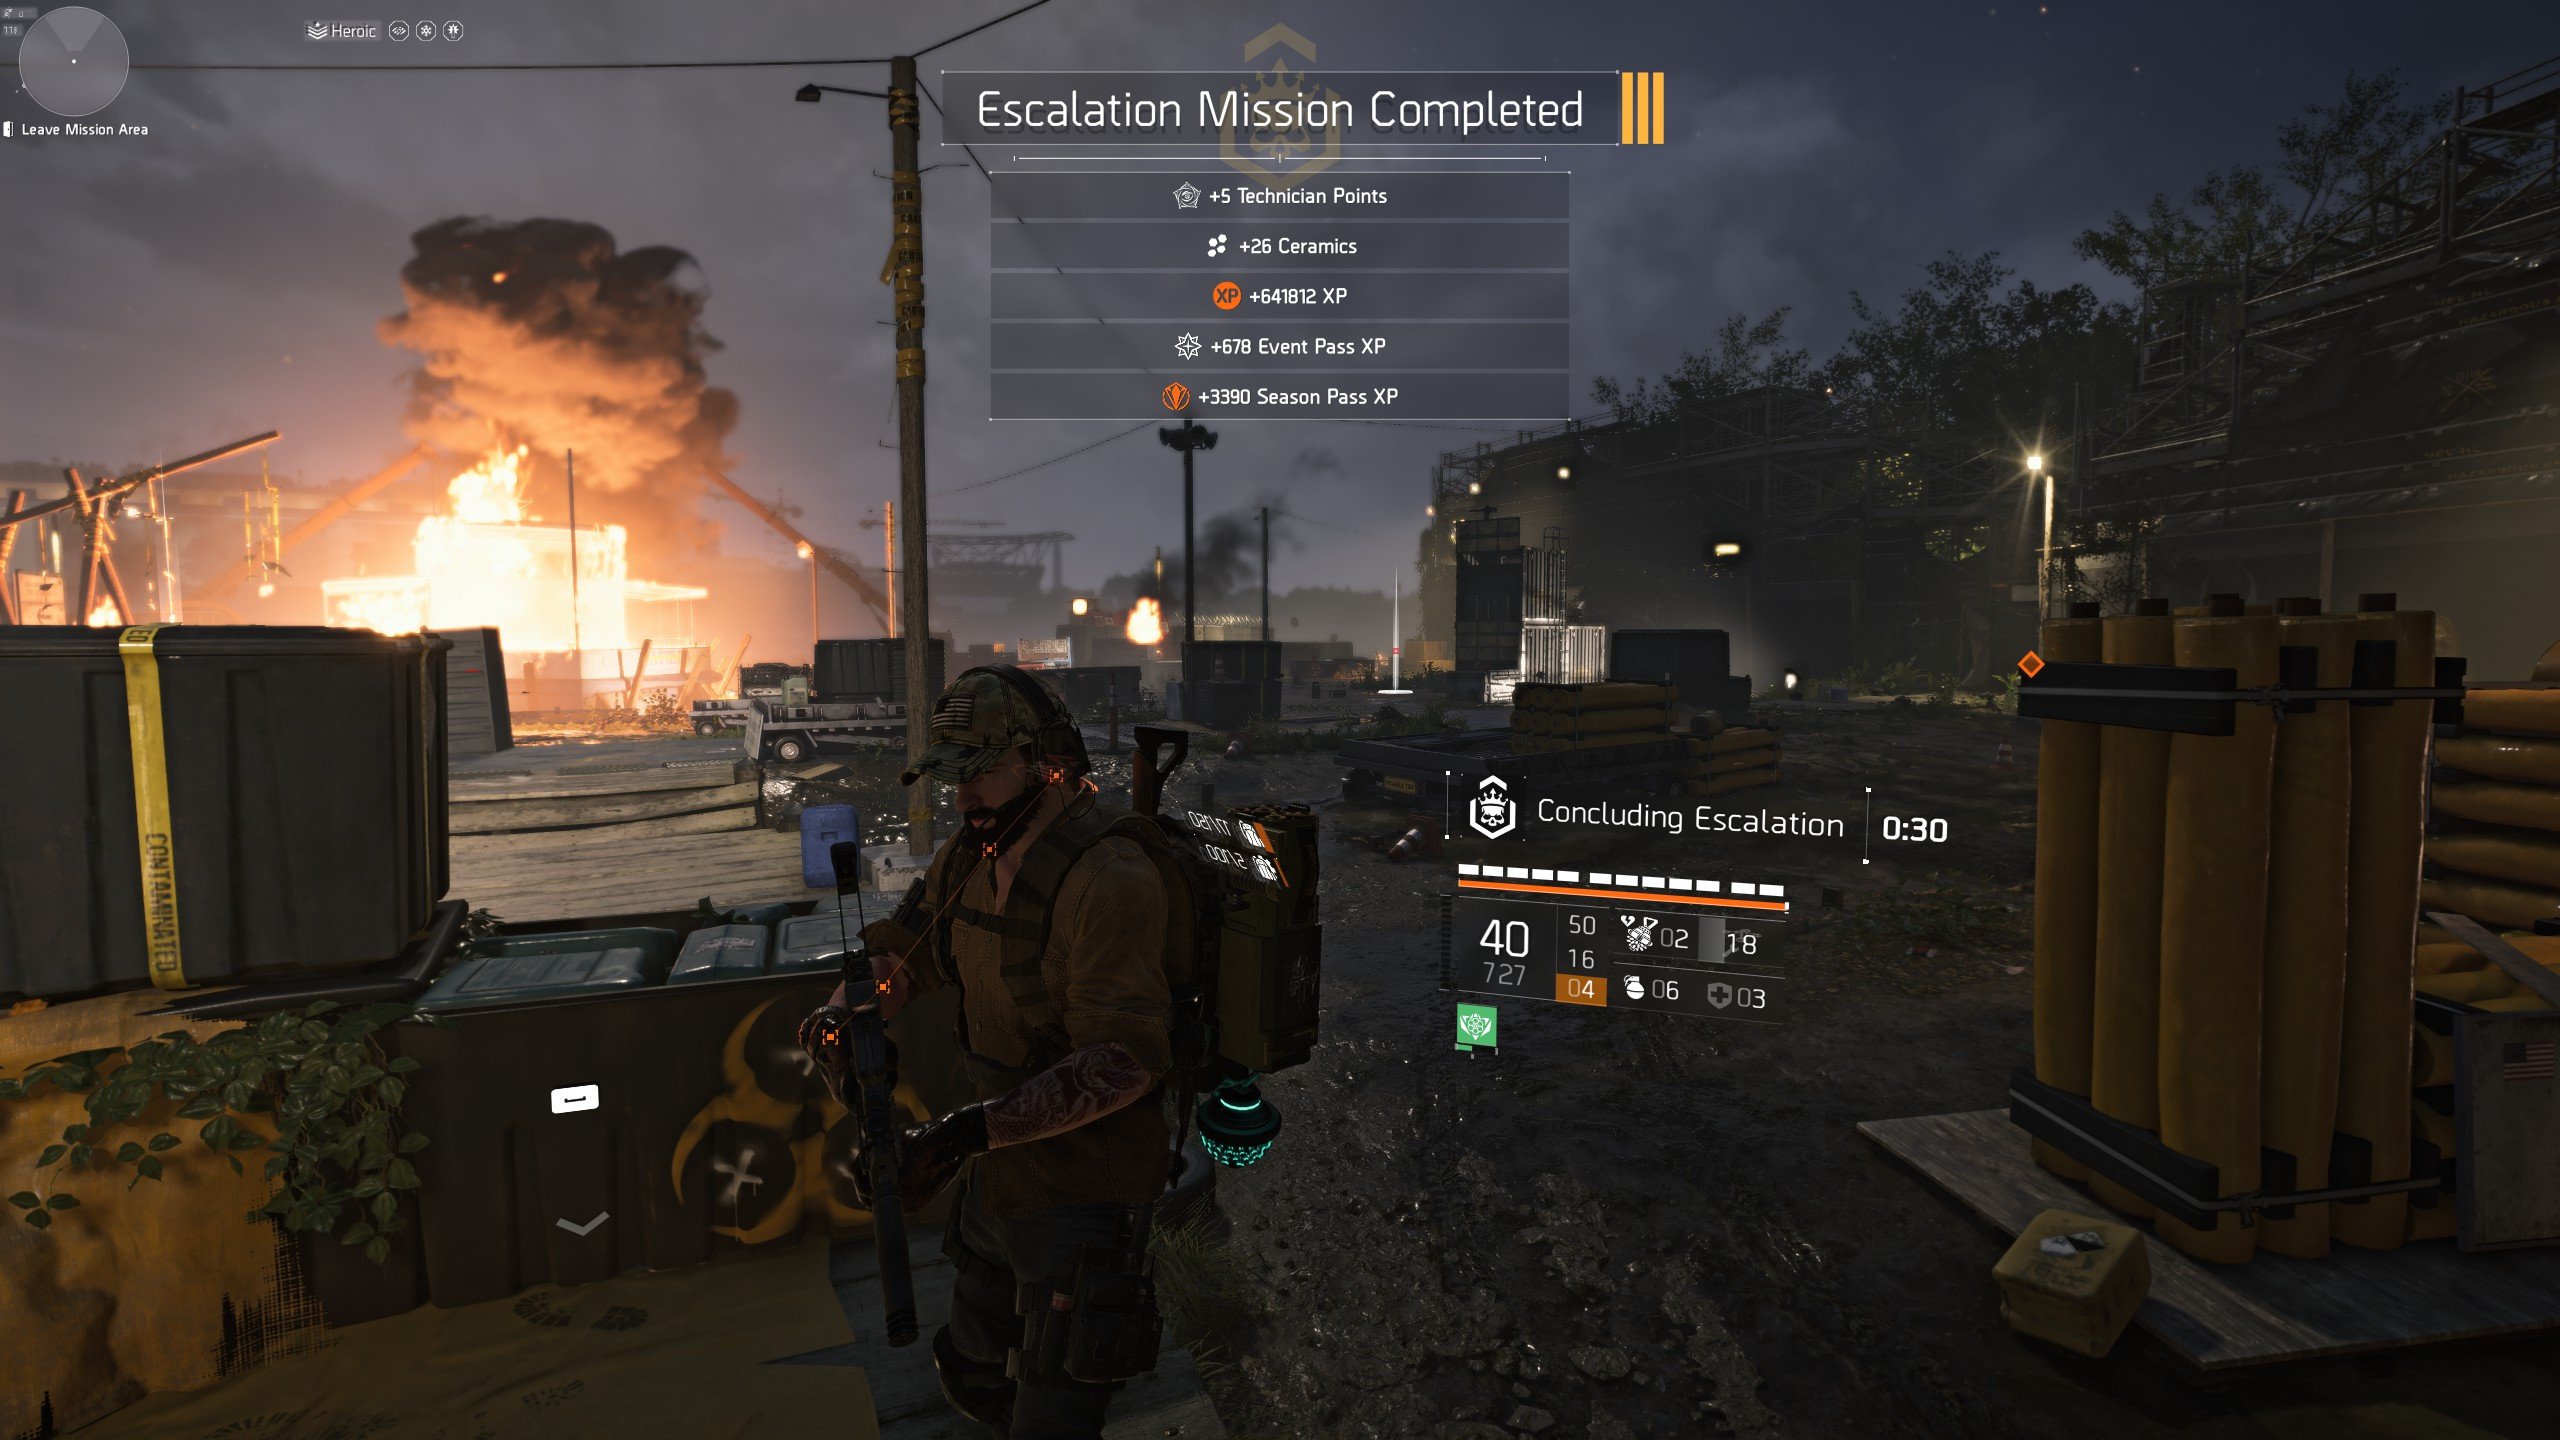
The main reason to push higher Escalation Tiers is that the rewards improve alongside the difficulty. In addition to the normal loot dropped throughout a mission, completing an Escalation can reward Escalation Tokens, large amounts of XP, Field Recon Data, SHD Calibration, Exotic Components, and even Prototype Gear pieces.
When I ran the new Incursion with my friends the other day, I kept dying because my SHD level was not as high as my friend’s; one of them said, “We gotta run some Escalation together, bring you up a bit”. So, if nothing else, Escalation is pretty good for leveling up.
Your guaranteed completion rewards depend on the Tier:
|
Escalation Tier |
Base XP |
Field Recon Data |
SHD Calibration |
Exotic Components |
|
Tier 1 |
441,750 |
– |
– |
– |
|
Tier 2 |
526,750 |
5 |
– |
– |
|
Tier 3 |
626,750 |
5 |
2 |
– |
|
Tier 4 |
766,750 |
7 |
2 |
– |
|
Tier 5 |
916,750 |
7 |
3 |
1 |
|
Tier 6 |
1,016,750 |
10 |
3 |
2 |
|
Tier 7 |
1,106,750 |
10 |
4 |
2 |
|
Tier 8 |
1,216,750 |
10 |
4 |
3 |
|
Tier 9 |
1,306,750 |
10 |
5 |
3 |
|
Tier 10 |
1,536,750 |
10 |
5 |
4 |
As you can see, the reward increases are gradual rather than all-or-nothing. Exotic Components begin appearing as completion rewards at Tier 5, while higher Tiers also provide more Expertise-related materials and substantially more XP.
Prototype Gear Drops
Escalation is the primary permanent activity for directly farming Prototype Gear. Starting from Tier 1, every enemy you kill has a small chance to drop a Prototype weapon or gear piece, and this chance increases as you climb through the Tiers.
|
Escalation Tier |
Prototype Drop Chance per Enemy |
|
Tier 1 |
0.20% |
|
Tier 2 |
0.40% |
|
Tier 3 |
0.60% |
|
Tier 4 |
0.60% |
|
Tier 5 |
0.80% |
|
Tier 6 |
1.25% |
|
Tier 7 |
1.50% |
|
Tier 8 |
2.00% |
|
Tier 9 |
2.50% |
|
Tier 10 |
3.00% |
I was pretty lucky to get a prototype piece drop on Tier 2 today! These percentages are per enemy, not per mission, which means a long Escalation with many enemies gives you numerous individual chances at a Prototype drop. Tier 10 currently reaches a 3% chance per NPC.
I won't go too deeply into Prototype Gear itself here, since it is a separate endgame system with its own upgrading, Augments, and optimization mechanics.
Escalation Targeted Loot
Escalation also has its own Targeted Loot, which changes with the daily reset. Unlike Countdown or The Summit, you cannot manually select what you want to target; you have to work with whichever Targeted Loot is currently assigned to the available Escalation missions.
Higher Tiers also increase the chance for enemies to drop an item from the current Targeted Loot pool:
|
Escalation Tier |
Targeted Loot Chance |
|
Tier 1 |
5% |
|
Tier 2 |
11% |
|
Tier 3 |
16% |
|
Tier 4 |
22% |
|
Tier 5 |
28% |
|
Tier 6 |
39% |
|
Tier 7 |
45% |
|
Tier 8 |
50% |
|
Tier 9 |
56% |
|
Tier 10 |
62% |
Because the mission playlist rotates weekly while Targeted Loot rotates daily, it is worth checking the Escalation menu each day. A mission that is not particularly attractive to farm one day may become much more valuable when it receives Targeted Loot you actually need.
Escalation Requisition Vendor
Finally, the Escalation Tokens you earn are not only used to enter higher-Tier runs. You can also spend excess Tokens at the Escalation Requisition Vendor in the Base of Operations to obtain Prototype Gear directly.
The vendor offers three types of Prototype caches:
- Prototype Random Cache – 5 Tokens: always available and contains one random Prototype item.
- Prototype Gear Cache – 10 Tokens: rotates daily between different equipment types and has a higher chance of better rolls.
- Prototype Weapon Cache – 10 Tokens: rotates daily between weapon types and also has a higher chance of better rolls.
There is no purchase limit, so Tokens you do not need for progression can eventually be converted into additional chances at useful Prototype items.
Check out more Division 2 guides:
- How to Get Lexington
- Battle for Brooklyn Secret Hunter Masks Guide
- How to Get Provocator Armor
- Leveling Guide
F.A.Q.
Can Rogue Agents Spawn in Escalation?
Yes. Rogue Agents can randomly appear during Escalation, scale to your current Tier, and can receive Mutators. Their number is also one greater than your group size, meaning a four-player group can encounter five Rogues.
How Do You Unlock Escalation in The Division 2?
Escalation becomes available after you complete the main campaign and reach Level 40. Once unlocked, you can start with Tier 0 without needing any Escalation Tokens.
Where Do You Start Escalation in The Division 2?
Go to the Escalation menu in the Base of Operations, located near the Countdown Vendor, and choose one of the currently available missions. You can fast travel to the mission and select your Escalation Tier at the panel outside its entrance.
Can You Play Escalation Solo?
Yes. Every Escalation Tier can be attempted solo or in a group, although the highest Tiers become considerably more demanding when played alone.
Does Escalation Have Matchmaking?
Yes. Escalation supports public matchmaking, which searches for players based on your selected Tier rather than a specific mission.
How Do You Get Escalation Tokens in Division 2?
Complete Escalation missions to earn Tokens, starting with Tier 0, which costs nothing to enter and awards 1 Token. Higher Tiers award progressively more Tokens when successfully completed.
Do Group Members Need Escalation Tokens?
No. Only the group leader pays the Token cost required to start the selected Tier, while the other players can join without paying a deposit. Group members still receive a smaller number of Tokens when the mission is completed.
What Happens If You Fail an Escalation Mission?
Escalation has no checkpoints, so a full group wipe or running out of time immediately fails the attempt. The Tokens deposited by the group leader to start that run are lost.
Do Escalation Tokens Reset Between Seasons?
No. Escalation Tokens no longer reset between seasons, so any Tokens left in your inventory carry over into future seasons and updates.
How Many Escalation Tiers Are There?
Escalation runs from Tier 0 to Tier 10, giving you 11 selectable difficulty levels in total. Tier 0 is the free baseline, while Tiers 1–10 progressively increase enemy strength, Token costs, Mutators, and potential rewards.
When Does the Escalation Mission Rotation Reset?
The Escalation mission playlist changes during the weekly Tuesday reset. Five missions from one of the predefined playlists become available for the following week.
What Is the Easiest Escalation Mission?
There is no official difficulty ranking, but Lincoln Memorial, DCD Headquarters, and American History Museum are generally among the easiest Escalation missions to learn and complete. Familiarity with enemy spawns and good fighting positions can matter just as much as the mission itself.
Can You Get Prototype Gear From Escalation?
Yes. Enemies in Escalation can drop Prototype weapons and gear, with the drop chance increasing at higher Tiers. Prototype drops begin at Tier 1 and reach a 3% chance per NPC at Tier 10.
Which Escalation Tier Is Best for Farming Prototype Gear?
Tier 10 has the highest Prototype drop chance at 3% per enemy, followed by Tier 9 at 2.5% and Tier 8 at 2%. In practice, the best farming Tier is the highest one you can complete consistently without regularly losing runs and Tokens.