 Dallon Avery
World of Warcraft’s Patch 11.1.7 introduces something that quietly reshapes how many players approach combat: the Single-Button Assistant. Tucked inside the game’s UI, this new feature promises to simplify DPS rotations without dumbing them down—offering a smarter, smoother way to play for anyone who’s ever felt overwhelmed by action bars, cooldowns, or the pressure to “play perfectly.”
Welcome to your WoW single-button rotation guide to mastering this new system. In the following sections, we’ll break down how the Single-Button Assistant works, how to activate it, and which class specs perform best with it. You’ll also get a class-by-class breakdown with recommended builds and practical tips. Whether you’re returning to WoW after a break, experimenting with a new alt, or just want a more relaxed way to enjoy combat, this guide is designed to get you up to speed quickly—and make the most of the button.
Read our other The War Within guides:
- D.I.S.C. Belt Guide
- Mythic+ Dungeon Guide
- Gearing Guide
- Best Classes Guide
- Best Addons
- Leveling Guide
Note: At Skycoach, you can Buy WoW Boost at the best prices with fast delivery. Use our special PROMO CODE (in green) hidden in this article for a 20% DISCOUNT.
Browse our hottest WoW Boosting services


What Is the Single-Button Assistant?
The Single-Button Assistant is a new combat feature added in Patch 11.1.7 that allows players to execute a simplified damage rotation by repeatedly pressing one ability. Rather than choosing the right spell each time and playing a piano on your keyboard, the game uses internal logic to automatically decide which offensive ability should be cast next, based on your current specialization, talents, resources, and combat situation. This feature lowers the barrier to entry for DPS gameplay, especially for players who are learning a new class, using a controller, or need a more accessible way to interact with fast-paced combat. And while fast-paced is not the perfect or most accurate description of WoW’s combat, at endgame, the sheer amount of buttons that you need to press makes every moment count.
While this WoW one-button rotation tool resembles rotation add-ons like Hekili or HeroRotation, it goes a step further by taking direct action. You don’t just see the suggestion—you press a single ability on your bar, and the assistant casts what the system deems optimal at that moment. Despite this convenience, Blizzard designed it with clear limitations to preserve balance and player control.
Here’s what the Single-Button Assistant can and can’t do:
| What it does | What it doesn’t do |
| Executes damaging abilities in a logical priority sequence | Activate cooldowns like Avenging Wrath or Bestial Wrath |
| Adapts to your current talents and nearby enemies (e.g., uses AoE abilities when enemies are grouped) | Use movement abilities, interrupts, defensives, or crowd control |
| Reacts to spell availability, resources, and procs | Handle target swapping or healing spells |
| Account for encounter mechanics or strategic timing |
This makes it important to understand the feature as a helper, not a full automation tool. In fact, to avoid it becoming a performance crutch, Blizzard applied a built-in penalty: each press of the button incurs a slight delay—approximately 25% of a global cooldown. This delay prevents it from being more efficient than manual execution, even in perfect conditions.
In terms of performance, simulations and developer notes suggest a 15–20% DPS loss compared to an optimized, manual rotation. So, when you WoW simplify DPS rotation it produces numbers that are worse. However, for players who struggle with consistency or forget key abilities in the heat of combat, this tool can actually result in higher real-world DPS by maintaining a steady, uninterrupted flow of damage.
Because it offers a simplified, stable way to engage with your rotation, the Single-Button Assistant is especially useful in content like world quests, open-world events, campaign play, and low- to mid-tier group content. It’s also helpful in Delves, scenarios, and solo challenges where survivability is manageable and maximizing burst isn’t critical.
How to Use the Single-Button Assistant
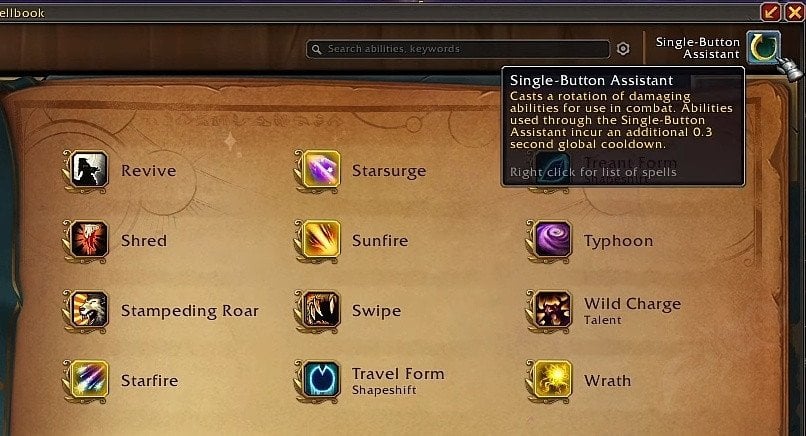
Here’s how to use one button rotation WoW. It’s really simple, but knowing how to configure and use it effectively ensures you get the most out of the system. Unlike traditional abilities, this tool doesn’t require enabling from a settings menu—it exists as a unique spell within your character’s spellbook and must be placed manually onto your action bar. Once it’s there, you can use it like any other ability by pressing the assigned key repeatedly.
To set it up, follow these basic steps:
- Open your Spellbook (P by default).
- Look for the Single-Button Assistant spell in the General tab.
- Drag it onto your action bar.
- Press it to begin cycling through your recommended offensive abilities.
This feature functions separately from Assisted Highlight, the companion mode that visually outlines which spell you should cast next without executing it for you. While Assisted Highlight is useful for learning rotations manually, the Single-Button Assistant is intended for players who want to focus less on decision-making and more on staying engaged in combat.
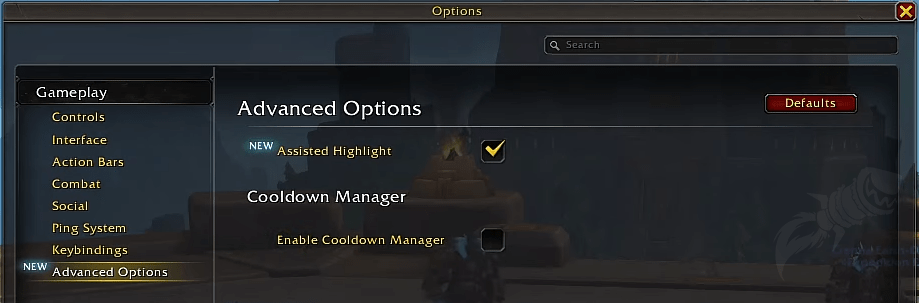
If you prefer to also see what the system is doing while using the button, you can activate Assisted Highlight for extra clarity. This option can be enabled from the game settings:
- Go to Options → Gameplay → Advanced Options.
- Check the box labeled Assisted Highlight to enable visual cues on your action bar.
Once activated, the system will highlight the next spell it intends to use, giving you insight into its internal decision-making process. This is helpful for understanding your rotation passively or preparing to take over with manual play later.
It’s important to note that you should avoid rapidly spamming the button, especially for classes with channeled spells like Eye Beam or Convoke the Spirits. Pressing too quickly can interrupt these spells before they complete, resulting in a loss of damage. Instead, develop a steady rhythm that respects your global cooldown timing.
The Single-Button Assistant works best in consistent damage situations, such as solo questing or fighting bosses with minimal mechanics. In high-intensity encounters like Mythic+ or endgame raids, you’ll still need to manually handle cooldowns, target swaps, interrupts, and mechanics—none of which the assistant can perform. However, even in those scenarios, the assistant remains a viable learning tool, especially when paired with Assisted Highlight to guide decision-making visually.
Top Specs for the Single-Button Assistant
Not all class specs are created equal when it comes to performance under the Single-Button Assistant. The system favors straightforward, builder-spender rotations and specs that rely less on nuanced ability timing or conditional procs. Based on current PTR testing and community feedback, specs can be grouped into tiers depending on how well they perform under the assistant's automation.
This tier list doesn’t reflect overall class strength or PvE viability. Instead, it shows how efficiently the assistant mimics an optimal rotation without player intervention. Specs with linear priorities and fewer reactive elements tend to perform best, while those with complex procs or situational decisions struggle more under this system. So here are the best classes for one button rotation WoW:
| Tier | Specs |
| S Tier | Beast Mastery Hunter, Havoc Demon Hunter, Frost Death Knight, Arms Warrior, Devastation Evoker |
| A Tier | Marksmanship Hunter, Retribution Paladin, Enhancement Shaman, Fire Mage, Outlaw Rogue, Shadow Priest |
| B Tier | Feral Druid, Affliction Warlock, Windwalker Monk |
| C Tier | Subtlety Rogue, Balance Druid, Destruction Warlock |
While this WoW single-button assistant spec tier list is pretty valid, it's worth emphasizing that the assistant's performance is tied to your talent choices as well. Some talents may enhance compatibility, while others introduce complexity the assistant isn't designed to handle. Wherever possible, each spec's recommended build will be tailored to make the assistant as effective as it can be within its limitations. Let's now break down what each tier represents, starting with the strongest performers.
Close to Perfect – S Tier
These specs operate with almost no drop in output when played through the Single-Button Assistant. Their simplicity, lack of positional requirements, and steady pacing make them ideal.
- Beast Mastery Hunter – Maintains full damage while mobile, benefits from clean builder-spender design.
- Havoc Demon Hunter – Few abilities, straightforward rotation, very assistant-friendly.
- Frost Death Knight – Especially in 2H builds; easy rune and RP generation makes for consistent performance.
Other notable mentions:
- Arms Warrior – Works surprisingly well with the assistant, especially in AoE scenarios.
- Devastation Evoker – High uptime and fluidity in rotation lends itself well to automation.
S-tier specs generally have these traits:
- Consistent ability priority
- Minimal reliance on cooldown micro-management
- Little to no decision-making branching paths
Pretty Good – A Tier
These specs do well with the assistant but have some damage falloff or situational quirks that keep them just shy of optimal.
- Marksmanship Hunter – Solid overall, though movement penalties and cooldown usage aren't perfectly handled.
- Retribution Paladin – Assistant mostly keeps up but stumbles slightly around Holy Power overcapping.
- Enhancement Shaman – Performs well with proper talents, though it loses value without managing cooldowns manually.
List of other A-tier specs:
- Fire Mage
- Outlaw Rogue
- Shadow Priest
In this tier, specs may suffer slightly from missed opportunities like poor cooldown syncing, wasted resources, or clunky AoE priority.
Passable – B Tier
These specs are usable, especially for casual or open-world content, but fall behind significantly in performance compared to manual play.
- Feral Druid – Snapshotting and bleed upkeep often break down without player intervention.
- Affliction Warlock – Rotational flow is inconsistent; DoTs may not be refreshed efficiently.
- Windwalker Monk – The assistant struggles with chi management and maintaining mastery uptime.
Expect:
- Misused cooldowns
- Inefficient resource dumping
- Unreliable AoE prioritization
These specs are fine for world quests or low-end content, but not recommended for Mythic+ or competitive group play using the assistant alone.
Poor Fit – C Tier
Specs in this category rely too heavily on precise timing, proc reactions, or burst windows to be reliably handled by the Single-Button Assistant.
- Subtlety Rogue – High burst complexity and positional abilities aren't handled well.
- Balance Druid – Eclipse management and Astral Power generation are often misaligned.
- Destruction Warlock – Poor shard management and inefficient use of Chaos Bolt or Rain of Fire.
C-tier specs tend to be:
- Overloaded with procs or reactive gameplay
- Inflexible without manual adaptation
- Prone to massive DPS loss under automation
While these specs are playable with the assistant, they're far from optimal and should only be used this way for learning or leveling purposes.
This section offers targeted guidance for each class that benefits from the Single-Button Assistant. For every class listed, you'll find a spec recommendation, a sample build optimized for assistant compatibility, and a brief explanation of why it performs well. The goal is not to maximize DPS potential but to streamline performance so the assistant can deliver reliable, consistent results.
You won’t see every specialization here—only those that fall into the S, A, and select B tiers from earlier. Specs in the C Tier are intentionally left out due to their poor compatibility with the system, and would likely cause more frustration than benefit.
Class-by-Class Breakdown
The Single-Button WoW TWW Rotation Assistant brings different results across the many classes and specializations in World of Warcraft. Some specs can function relatively well with the tool, especially in single-target or open-world scenarios, while others suffer from severe performance drops, flawed logic, or complete inability to perform their core roles. In this section, we’ll go class-by-class and examine how each spec performs under the Assistant — with clear notes on what to expect and what needs to be done manually.
Death Knight
The Single-Button Rotation Assistant offers varied results across Death Knight specs. While Unholy sees modest performance losses and can function adequately with some manual input, Blood and Frost suffer from more serious limitations. Defensive and situational awareness is generally lacking across the board, especially for tanks.
Blood Death Knight
The Assistant is a poor match for Blood. Its logic prioritizes Runic Power generation over spending, often casting Dancing Rune Weapon and then burning all runes on Heart Strike without regard for diseases or defensive timing. Crucially, it fails to cast any meaningful defensive abilities manually, which can make it dangerous to rely on in group content.
Rotation Assist Losses:
- Assisted Highlight: ~10% DPS loss (if manually adjusted), ~35% without.
- Single-Button Assistant: ~40% DPS loss (~50% RP mismanagement)
Manual Cooldowns:
- Icebound Fortitude
- Vampiric Blood
- Tombstone
- Anti-Magic Shell
- Bonestorm (misused by Assistant)
- Dancing Rune Weapon (cast on cooldown regardless of encounter)
The Assistant may function as a practice tool in trivial content but is not suitable for serious tanking.
Frost Death Knight
Frost sees somewhat better results, especially in Single Target. The Assistant does decently with Obliteration-based builds, but fails to make the most of burst windows, and like other specs, it doesn’t handle cooldown syncing well.
Rotation Assist Losses:
- Assisted Highlight: ~6–9% DPS loss
- Single-Button Assistant: ~18% DPS loss
Manual Cooldowns:
- Pillar of Frost
- Empower Rune Weapon
- Frostwyrm's Fury
- Anti-Magic Shell
- Icebound Fortitude
Empower Rune Weapon is never used, and Pillar of Frost often goes unsynced with cooldown windows.
Unholy Death Knight
Unholy is surprisingly functional under the Assistant with some user oversight. While major cooldowns like Summon Gargoyle and Army of the Dead must be manually managed, the rotation logic covers much of the basic core and performs reasonably well.
Rotation Assist Losses:
- Assisted Highlight: ~5–6% DPS loss
- Single-Button Assistant: ~12–15% DPS loss
Manual Cooldowns:
- Summon Gargoyle
- Army of the Dead
- Dark Transformation
- Unholy Blight
- Death and Decay (AoE handling inconsistent)
When manually supporting it with cooldowns, Unholy can become one of the better fits for the tool, particularly in simple solo or leveling content using the easy DPS rotation WoW.
Druid
The Single-Button Rotation Assistant delivers mixed results across Druid specs. While Balance and Feral show moderate promise, Guardian and Restoration expose the tool’s limitations in handling defensive roles and healing functionality. Manual control of key cooldowns remains essential regardless of spec.
Balance Druid
Balance is one of the better fits for the Assistant thanks to its steady builder-spender rotation and relatively slow pace. The tool struggles with precise cooldown alignment and DoT refresh logic but remains functional with some user input.
Rotation Assist Losses:
- Assisted Highlight: ~8% DPS loss
- Single-Button Assistant: ~15% DPS loss
Manual Cooldowns:
- Celestial Alignment
- Incarnation: Chosen of Elune
- Starfall (cast frequency and timing can be inconsistent)
- Fury of Elune
- Defensive utilities like Barkskin or Renewal
While not perfect, Balance is viable for casual or open-world content when supported with proper cooldown usage.
Feral Druid
Feral’s intricate combo point and bleed management make it a challenging fit for the Assistant. It frequently wastes energy and mismanages bleeds, especially without talents like Bloodtalons. Still, in its most basic form, it’s serviceable for easy content.
Rotation Assist Losses:
- Assisted Highlight: ~12% DPS loss
- Single-Button Assistant: ~20% DPS loss
Manual Cooldowns:
- Tiger’s Fury
- Berserk
- Adaptive Swarm (when talented)
- Feral Frenzy
Improper bleed refresh timing and a general lack of cooldown synchronization reduce the spec’s overall viability in any challenging scenario.
Guardian Druid
Guardian suffers heavily from the Assistant’s lack of awareness around defensive usage and resource management. It tends to overuse Mangle and underprioritize Ironfur or Frenzied Regeneration, compromising survivability.
Rotation Assist Losses:
- Assisted Highlight: ~18% DPS loss
- Single-Button Assistant: ~30% DPS loss
Manual Cooldowns:
- Barkskin
- Survival Instincts
- Ironfur / Frenzied Regeneration
- Rage of the Sleeper
- Incarnation: Guardian of Ursoc
Due to its critical gaps in tanking logic, Guardian is not recommended for the Assistant beyond solo or trivial content.
Restoration Druid
As with all healers, Restoration sees minimal utility from the Assistant, which only performs offensive actions. It does not track healing throughput or prioritize ally health in any way, making it unfit for actual healing content.
Rotation Assist Losses:
- Assisted Highlight: ~25% DPS loss
- Single-Button Assistant: ~35% DPS loss
Manual Cooldowns:
- All healing spells, including:
- Swiftmend
- Tranquility
- Nature’s Swiftness
- Flourish
- Defensive tools like Barkskin and Ironbark
Restoration Druids looking to optimize DPS between heals should rely on simple macros or highlight guidance, not the one-button assistant.
Evoker
Evoker’s unique mechanics — especially Empowered spells — make it a mixed experience for the Single-Button Rotation Assistant. While Augmentation can function well with some manual input, Devastation and Preservation face more technical challenges that reduce reliability. Empower handling remains the tool’s biggest limitation for all three specs.
Augmentation Evoker
Augmentation has one of the most straightforward rotational designs in the game, and much of its output is based on empowering allies. This makes it one of the best-suited specs for the Assistant tool. However, Empower spells remain problematic, and cooldowns must be handled manually.
Rotation Assist Losses:
- Assisted Highlight: ~5% DPS loss
- Single-Button Assistant: ~8% DPS loss
Manual Cooldowns & Adjustments:
- Breath of Eons
- Tip the Scales
- Prescience (targeting not automated)
- Fire Breath and Upheaval should be manually cast to avoid Empower issues
- Use a build with Interwoven Threads instead of Time Skip for simplicity
Despite the flaws, Augmentation is one of the top specs for the Assistant, especially in content where mechanical precision isn’t critical.
Devastation Evoker
Devastation’s reliance on both Empower and Channel spells creates substantial friction with the Assistant. The default behavior causes frequent Empower interruptions and inefficient GCD usage, making macros or manual intervention almost mandatory.
Rotation Assist Losses:
- Assisted Highlight: ~9% DPS loss
- Single-Button Assistant (with Empower workaround): ~17% DPS loss
- Full Single-Button Assistant: ≥25% DPS loss
Manual Cooldowns & Suggestions:
- Dragonrage, Deep Breath, and Tip the Scales should be used manually
- Empower spells (Fire Breath & Eternity Surge) must be bound separately
- Macros with [nochanneling] are essential to prevent breaking Disintegrate
Devastation can perform decently with setup, but out-of-the-box usage will lead to large performance drops.
Preservation Evoker
Preservation, like other healers, gains little from the Assistant as it only performs offensive abilities. It will never heal and simply casts Fire Breath and Living Flame, ignoring the rest of your healing toolkit. It is not suitable for any healing scenario.
Rotation Assist Losses:
- Assisted Highlight: ~20–25% DPS loss (no healing support)
- Single-Button Assistant: ~30–35% DPS loss
Manual Requirements:
- All healing spells, including Echo, Reversion, Spiritbloom, Dream Breath
- Disintegrate is ignored entirely
- Verdant Embrace and other mobility/healing utilities
Preservation should not rely on the Assistant for group content. If a simple offensive rotation is needed, manually binding 1–2 offensive spells offers better results without the GCD penalty.
Hunter
Hunters benefit from their ranged, GCD-efficient style and pet automation, but results vary by specialization. Beast Mastery aligns well with the tool's logic, while Marksmanship and Survival suffer more from oversimplification and resource mismanagement.
Beast Mastery Hunter
Beast Mastery is a top-tier spec for the Assistant due to its simplicity and passive pet damage. The Assisted Highlight performs near-optimally. The Single-Button version introduces minor losses from the additional GCD penalty.
Rotation Assist Losses:
- Assisted Highlight: ~2% DPS loss
- Single-Button Assistant: ~14% DPS loss
Manual Cooldowns:
- Call of the Wild
- Potions, trinkets, and racials
For casual content and accessibility, Beast Mastery is an ideal match for the Assistant tool.
Marksmanship Hunter
Marksmanship suffers from rotation oversimplification. The Assistant performs decently in AoE situations but falls short in single-target due to poor cooldown alignment and burst sequencing.
Rotation Assist Losses:
- Single-Target Assisted Highlight: ~7% DPS loss
- AoE Assisted Highlight: ~2.5% DPS loss
- Single-Target, Single-Button Assistant: ~15% DPS loss
- AoE, Single-Button Assistant: ~12% DPS loss
Manual Cooldowns:
- Trueshot
- Trinkets, potions, and racials
Manual cooldown usage is vital. Without it, Marksmanship's performance drops considerably with the Assistant.
Survival Hunter
Survival is a poor fit for the tool. The Assistant frequently overcaps Focus and alternates inefficiently between Wildfire Bomb and Kill Command, often ignoring Focus thresholds. This results in substantial DPS loss.
Rotation Assist Losses:
- Assisted Highlight: ~11% DPS loss
- Single-Button Assistant: ~26% DPS loss
Manual Cooldowns:
- Coordinated Assault
The Assistant struggles with Survival's nuanced Focus management and cleave mechanics. Manual play is highly recommended for any meaningful content.
Browse our hottest WoW Boosting services


Mage
While all three Mage specs suffer notable performance losses with the Assistant, Arcane is hit the hardest due to its complexity. Fire also underperforms due to its reliance on high-tempo play, while Frost lands somewhere in the middle depending on talent choice.
Arcane Mage
Arcane is not a good candidate for the Assistant tool. The rotation is intricate, requiring perfect execution of cooldown stacks and procs. The Assistant clips channels, misuses cooldowns, and struggles with movement, leading to major losses.
Rotation Assist Losses:
- Assisted Highlight: ~15–25% DPS loss
- Single-Button Assistant: ~25–30% DPS loss
- Single-Button Assistant without manual cooldowns: ~30–50% DPS loss
Manual Cooldowns:
- Touch of the Magi
- Arcane Surge
- Evocation
- Shifting Power
- Arcane Orb
Due to poor cooldown timing and GCD clipping, Arcane suffers steeply with the tool. Even casual players are better off using an “easy mode” rotation instead.
Fire Mage
Fire Mage’s fast-paced gameplay, frequent instant casts, and double-combustion openers are poorly handled by the Assistant. The tool fails to queue Fire Blast during casts and often interrupts Shifting Power with untimely GCDs.
Rotation Assist Losses:
- Assisted Highlight: ~10% DPS loss
- Full Single-Button Assistant: ≥30% DPS loss
Manual Cooldowns:
- Combustion
- Shifting Power
- Trinkets, potions, and any off-GCD utility
To somewhat mitigate losses, a macro like /cast [nochanneling] One-Button Assistant can prevent interruptions to channels, but this also limits spell queuing.
Frost Mage
Frost Mage's losses vary by talent build. Frostfire builds fare better with the tool, while Spellslinger sees higher drops, especially in AoE. Frost’s reliance on instants makes it sensitive to the Assistant’s slower GCD pacing.
Rotation Assist Losses:
- Frostfire Build:
- Assisted Highlight: ~8% (ST), ~15% (AoE)
- Single-Button Assistant: ~19% (ST), ~25% (AoE)
- Spellslinger Build:
- Assisted Highlight: ~13% (ST), ~17% (AoE)
- Single-Button Assistant: ~25% (ST), ~29% (AoE)
Manual Cooldowns:
- Icy Veins
- Frozen Orb
- Cold Snap (if talented)
- Any defensive/utility spells
Frost can still be serviceable with the Assistant in casual settings. AoE content suffers more due to improper cooldown use and spell priority issues.
Monk
The Assistant tool is useful for very casual or low-pressure content, but each spec comes with its own limitations, particularly around cooldowns, channeling, and healing.
Brewmaster Monk
Brewmaster’s damage rotation works fairly well with Assisted Highlight, but Single-Button Assistant has a glaring issue—it won't cast Blackout Kick at all unless you're using Blackout Combo. Without that talent, the Assistant simply fails to function properly.
Rotation Assist Losses:
- Assisted Highlight: ~2% DPS loss
- Single-Button Assistant (fixed): ~21% DPS loss
Manual Cooldowns:
- Weapons of Order
- Invoke Niuzao, the Black Ox
- Purifying Brew, Celestial Brew
- Fortifying Brew, Dampen Harm, Diffuse Magic, Zen Meditation
If you’re using this tool as a learning aid, it can help develop good habits. But it’s no substitute for proper tanking awareness and cooldown usage.
Mistweaver Monk
The Rotation Assist only performs a DPS rotation—it does not use any healing spells. For Mistweaver, that means it just spams Living Flame and Fire Breath, ignoring healing entirely. Even its DPS logic doesn’t account for common healing conversions like Jadefire Teachings.
Rotation Assist Losses:
- Assisted Highlight: Moderate DPS loss
- Single-Button Assistant: High DPS loss due to GCD tax and missed priorities
Manual Cooldowns & Healing:
- Thunder Focus Tea
- Invoke Chi-Ji, the Red Crane
- Jadefire Stomp, Renewing Mist
- All actual healing spells
Mistweaver players are better off not using this feature at all unless playing trivial content with damage-focused builds.
Windwalker Monk
Windwalker is one of the specs least compatible with the Assistant. Its complex rotation, frequent cooldown windows, and channeling behavior (like Fists of Fury) are mishandled or outright broken. The Assistant fails to manage buffs, channels, and AoE properly.
Rotation Assist Losses:
- Single Target:
- Assisted Highlight: ~15% (with cooldowns), ~30% (without cooldowns)
- Single-Button Assistant: ~26% (with cooldowns), ~38% (without cooldowns)
- Multi-Target:
- Assisted Highlight: ~16% (with cooldowns), ~32% (without)
- Single-Button Assistant: ~27% (with cooldowns), ~40% (without)
Manual Cooldowns:
- Storm, Earth, and Fire
- Invoke Xuen, the White Tiger
- Fists of Fury (should be channeled manually)
- Defensives, trinkets, racials
You can improve things slightly with a macro to prevent interrupting channels:
#showtooltip
/stopmacro [channeling]
/cast Single-Button Assistant
Even with macros, Windwalker’s performance using the Assistant tool remains far below potential.
Paladin
The Single-Button Assistant has varying usefulness across the Paladin specializations. For Holy and Protection, its limitations are too severe to recommend outside of open-world content. Retribution can make use of the Assistant to some extent, especially with cooldowns managed manually.
Holy Paladin
For Holy Paladin, the tool is essentially not functional in group content. It does not use any healing abilities and performs a very basic DPS rotation that fails to spend Holy Power, omits Holy Shock, and frequently results in idle time.
Rotation Assist Losses:
- Assisted Highlight: Extremely high DPS loss (~60% or higher)
- Single-Button Assistant: Also extremely high (~65% or more)
Manual Cooldowns & Spells:
- Avenging Wrath, Divine Toll, Holy Prism
- Holy Shock (not used at all)
- Shield of the Righteous (Holy Power spender)
- All healing and support spells
This tool does not support the actual role of a Holy Paladin and is best avoided in dungeons or raids.
Protection Paladin
Like Holy, Protection Paladin suffers due to the Assistant not spending Holy Power. It builds resources but does not use them, resulting in low damage output and poor survivability. Even minimal tanking mechanics like using Shield of the Righteous are left out.
Rotation Assist Losses:
- Assisted Highlight: ~60% DPS loss
- Single-Button Assistant: ~65% DPS loss
Manual Cooldowns:
- Shield of the Righteous, Word of Glory
- Avenging Wrath, Ardent Defender, Guardian of Ancient Kings
- Holy Bulwark, Sacred Weapon
The tool is ineffective in real combat and should be avoided in group tanking content.
Retribution Paladin
Retribution is the one Paladin spec that can reasonably use the Assistant. The highlight mode can be helpful for players learning the priority, though the Single-Button Assistant does lose a significant amount of output due to slower GCDs and inflexibility.
Rotation Assist Losses:
- Assisted Highlight: ~5% DPS loss
- Single-Button Assistant: ~25% DPS loss
Manual Cooldowns:
- Avenging Wrath or Crusade (manual unless you talent into Radiant Glory)
- Divine Toll, Final Reckoning, Execution Sentence, Wake of Ashes
With most major cooldowns included when talented correctly, Retribution has one of the better integrations with the Assistant—though still not ideal for higher-end content.
Priest
The effectiveness of the Single-Button Assistant varies greatly across Priest specializations. Healing specs get very limited utility, while Shadow benefits from a surprisingly solid core rotation with some important manual additions.
Discipline Priest
The Rotation Assistant is not designed for healing and performs only a basic DPS rotation. This means no Atonement management, no Penance, and no proactive or reactive healing during group content.
Rotation Assist Losses:
- Assisted Highlight: Significant DPS loss (est. ~25%+ depending on activity)
- Single-Button Assistant: Higher DPS loss, plus no healing functionality
Manual Abilities Needed:
- All healing and support spells
- Penance, Power Word: Barrier, Pain Suppression, Evangelism
Discipline Priests should avoid using the Assistant in dungeons or raids. It may be tolerable in solo open-world content with self-healing spells used manually.
Holy Priest
Holy Priest faces the same limitations: the tool does not heal or target allies. As such, its utility is extremely restricted to dealing minimal DPS via Holy Fire and Smite.
Rotation Assist Losses:
- Assisted Highlight: Estimated ~20–30% DPS loss
- Single-Button Assistant: Estimated ~30–40% DPS loss
Manual Abilities Needed:
- All healing and support spells
- Holy Word: Serenity, Divine Hymn, Guardian Spirit, etc.
Like other healer specs, Holy Priest gets no benefit from this tool in group settings. It is usable only for solo content where healing is minimal.
Shadow Priest
Shadow is one of the better specs for the Rotation Assistant, particularly on single-target fights. Both Voidweaver and Archon hero talents are supported, and with cooldowns manually managed, the performance is acceptable for casual content.
Rotation Assist Losses (Single Target):
| Mode | Voidweaver | Archon |
| Assisted Highlight – With CDs | ~4% loss | ~4% loss |
| Assisted Highlight – No CDs | ~23% loss | ~45% loss |
| One-Button Assistant – With CDs | ~18% loss | ~18% loss |
| One-Button Assistant – No CDs | ~35% loss | ~49% loss |
Rotation Assist Losses (AoE):
| Mode | Voidweaver | Archon |
| Assisted Highlight – With CDs | ~3% loss | ~3% loss |
| Assisted Highlight – No CDs | ~42% loss | ~48% loss |
| One-Button Assistant – With CDs | ~16% loss | ~16% loss |
| One-Button Assistant – No CDs | ~43% loss | ~55% loss |
Manual Cooldowns Needed:
- Void Eruption, Dark Ascension, Power Infusion
- Shadowfiend, Shadow Crash
- Unfurling Darkness should be untalented for compatibility
Movement management is not handled by the Assistant. You'll need to cover movement phases with Power Word: Shield and instant casts. Besides, Opener sequences are not automated. A pre-made macro for opening can improve early burst.
Shadow Priest is viable with the Assistant if you manage cooldowns and movement carefully. It's not ideal for high-end content but usable for most casual activities.
Rogue
Rogues are naturally resource-driven and highly rotationally nuanced. While the Assistant handles the basics, many key damage sources, cooldowns, and interactions are not used or are mismanaged, leading to considerable performance drops—especially in multitarget situations.
Assassination Rogue
Assassination's linear DoT-based rotation aligns reasonably well with the Assistant. It performs decently in single-target, but drops off in multitarget due to the Assistant's lack of bleed management and positional targeting logic.
Rotation Assist Losses:
- Single Target – Assisted Highlight: ~7% DPS Loss
- Single Target – One Button: ~15% DPS Loss
- Dungeons – Assisted Highlight: ~15% DPS Loss
- Dungeons – One Button: ~25% DPS Loss
Manual Cooldowns Needed:
- Deathmark
- Thistle Tea
- Vanish
Assassination is one of the better-performing Rogue specs for the Assistant. However, you must still manually manage burst windows and cooldowns for strong results.
Outlaw Rogue
The Assistant provides a stripped-down version of Outlaw's rotation. Its simplistic behavior leads to significant DPS losses, particularly because it doesn’t adapt to Roll the Bones buffs or handle combo point overflow intelligently.
Rotation Assist Losses:
- Assisted Highlight: ~20% DPS Loss
- One Button: ~35% DPS Loss
Manual Cooldowns Needed:
- Adrenaline Rush
- Vanish
The Assistant for Outlaw is best reserved for players focused purely on accessibility. The performance cost is high, and core mechanics like cooldown timing, movement tools, and Between the Eyes windows are mishandled or ignored.
Subtlety Rogue
Subtlety is one of the most complex specs in the game. The Assistant performs poorly, lacking logic for managing debuffs like Fazed or coordinating cooldowns like Shadow Blades and Secret Technique. Even with manual input, it falls short for real content.
Rotation Assist Losses:
- Assisted Highlight: ~17% DPS Loss
- One Button: ~26% DPS Loss (up to 40% if no cooldowns are used manually)
Manual Cooldowns Needed:
- Shadow Blades
- Flagellation
- Secret Technique
- Racial abilities, trinkets, and potions
Shadow Dance is used on cooldown regardless of contextю Movement, burst windows, and opener sequences must be handled manually and do not expect the Assistant to execute any advanced priority logic.
Subtlety is fundamentally unsuited to the current Assistant's limitations. Only consider it for trivial solo content where optimization doesn’t matter.
Shaman
Shamans are flexible, with each spec offering different levels of compatibility with the Assistant. While DPS specs can function moderately well with careful cooldown usage, the Assistant is not viable for healing gameplay.
Elemental Shaman
Elemental’s rotation is mostly straightforward in single-target, making it a good fit on paper. However, several bugs and poor support for talents like Echoes of Great Sundering result in a steep performance loss in AoE. Cooldown alignment issues with Ancestral Swiftness are also impactful.
Rotation Assist Losses:
- Single Target – Assisted Highlight: ~8–16% DPS Loss
- Single Target – One Button: ~20–25% DPS Loss
- AoE – Assisted Highlight: ~30% DPS Loss
- AoE – One Button: ~50% DPS Loss
Manual Cooldowns Needed:
- Ascendance
- Ancestral Swiftness (technically used, but extremely inefficient)
Elemental can be viable with the Assistant for basic raid encounters, but AoE performance suffers greatly. Manually tracking and using Ancestral Swiftness is critical.
Enhancement Shaman
The Assistant’s performance varies significantly based on hero talent choice. Totemic works surprisingly well, while Stormbringer fails to manage Maelstrom Weapon effectively. AoE support is also much stronger with Totemic.
Rotation Assist Losses:
| Talent | Context | With CDs | One Button |
| Totemic | Single Target | ~6% | ~10% |
| AoE | ~8% | ~12% | |
| Stormbringer | Single Target | ~16% | ~32% |
| AoE | ~34% | ~34% |
Manual Cooldowns Needed:
- Ascendance (especially if using Stormbringer)
- On-use trinkets and racials
If you're running Totemic, Enhancement is one of the best Assistant-compatible specs in the game. Just stay away from Stormbringer if you want a smooth experience.
Restoration Shaman
Like all healers, the Assistant only performs a basic DPS rotation and doesn't cast healing abilities. It will spam Lightning Bolt and skip key DPS talents like Acid Rain. The result is substantial losses in damage and total utility.
Rotation Assist Losses:
- Single Target – Assisted Highlight: ~20% DPS Loss
- AoE – Assisted Highlight: ~40% DPS Loss
- Single Target – One Button: ~30% DPS Loss
- AoE – One Button: ~60% DPS Loss
Manual Cooldowns Needed:
- All healing spells
- Healing Rain, Surging Totem, etc.
Restoration Shaman gains little from this tool and is best played manually if healing or if trying to contribute meaningful DPS.
Warlock
The Assistant offers decent single-target support for Affliction and Destruction, but AoE, cooldown management, and resource timing issues hold them back. Demonology requires such careful planning that the Assistant becomes a liability in most situations.
Affliction Warlock
Affliction can work moderately well with the Assistant in single-target, assuming the player manually handles Summon Darkglare and cooldown coordination. However, it fails to refresh DoTs consistently and doesn't align major cooldowns, leading to steady DPS leaks.
Rotation Assist Losses:
- Single Target – Assisted Highlight: ~11.5% DPS Loss
- Single Target – One Button: ~11.5% DPS Loss
- AoE – Assisted Highlight: ~15.5% DPS Loss
- AoE – One Button: ~16% DPS Loss
Manual Cooldowns Needed:
- Summon Darkglare
- Phantom Singularity
- Soul Rot
If you’re vigilant with cooldowns and DoT maintenance, Affliction can perform reasonably well under Assistant guidance. Just don’t expect proper Shard pooling or ideal DoT uptime.
Demonology Warlock
Demonology is one of the worst fits for the Assistant. The system ignores Summon Demonic Tyrant and makes no effort to align pets or resource usage. AoE is especially bad due to the complete omission of Implosion, which is a key part of your burst window.
Rotation Assist Losses:
| Content | Assisted Highlight | One Button |
| Single Target | ~7%+ | ~17%+ |
| AoE | ~10%+ | ~20%+ |
Losses can be even higher if cooldowns are not manually used.
Manual Cooldowns Needed:
- Summon Demonic Tyrant
- Felstorm
- Implosion
- On-use trinkets and racials
Demonology gains next to nothing from the Assistant and is not recommended outside of trivial content. You’ll have to pilot your pets and cooldowns entirely manually to make it viable.
Destruction Warlock
Destruction is one of the few specs that performs fairly well with the Assistant. Its rotation is simpler, with fewer cooldown dependencies. Most of the damage comes from building and spending Soul Shards, which the Assistant handles decently. However, it ignores Summon Infernal and Havoc, which are major contributors to DPS.
Rotation Assist Losses:
| Content | Assisted Highlight | One Button |
| Single Target | ~3.8% | ~10.4% |
| AoE | ~11% | ~14% |
Manual Cooldowns Needed:
- Summon Infernal
- Havoc (or use Mayhem as a more passive alternative)
Destruction is one of the better fits for casual Assistant use. Just keep an eye on your cooldowns and consider talenting passively when possible to reduce the burden of manual inputs.
Conclusion
Single-Button Rotation Assistant is a welcome accessibility feature and a useful tool for players looking to simplify their gameplay, whether due to physical limitations, learning preferences, or just a more relaxed approach to content. While it won’t compete with a skilled player executing a full manual rotation, it allows many specs to remain surprisingly functional in casual PvE, questing, and even low to mid-level group content.
That said, success with the Assistant depends on choosing the right spec, the right talents, and knowing which parts of your rotation need manual support. Some specs (like Beast Mastery or Devastation) run well almost out of the box. Others (like Subtlety or Balance) lose too much to be viable without careful intervention.
F.A.Q.
How do I enable the one-button rotation in WoW Retail?
The Single-Button Assistant can be enabled in the in-game settings under the Combat or Accessibility tab. Look for the “Single-Button Rotation” option and assign a keybind.
Is one-button rotation better than manual rotation in WoW: The War Within?
Not usually. Manual rotation will always outperform the Assistant when played correctly, especially for specs with complex mechanics.
What are the best specs to use one-button rotation with in WoW?
Specs with simple builder-spender rotations perform best. Top examples include:
- Beast Mastery Hunter
- Havoc Demon Hunter
- Arms Warrior
- Devastation Evoker
Is the one-button rotation good in WoW: The War Within?
It depends on the class and spec. Some specs lose minimal DPS, while others drop performance by over 30%. It's best used for casual content or accessibility.
What’s the difference between Assisted Highlight and the One-Button Assistant?
Assisted Highlight shows the next recommended ability but lets you press it manually. Single-Button Assistant automates the rotation when you press a single key repeatedly.


