 Dallon Avery
Delta Force Operators Tier List Quick Overview:
- There are 16 Operators in Season 10 across 4 classes: 4 Assault, 3 Support, 5 Engineer, 4 Recon
- Only default operators are available to new players
- You can either buy or unlock new operators by completing Recruitment tasks
- Operator skills work differently in Operations compared to Warfare mode
- The meta is different for both modes, but there are some clear overlaps
Trying to get the best loot from the Space City? Buy Space City Raid service for Delta Force and get high-value gear and currency for your stash!


Read closely 
Browse our hottest Delta Force Boosting services

Best Delta Force Operators for Warfare
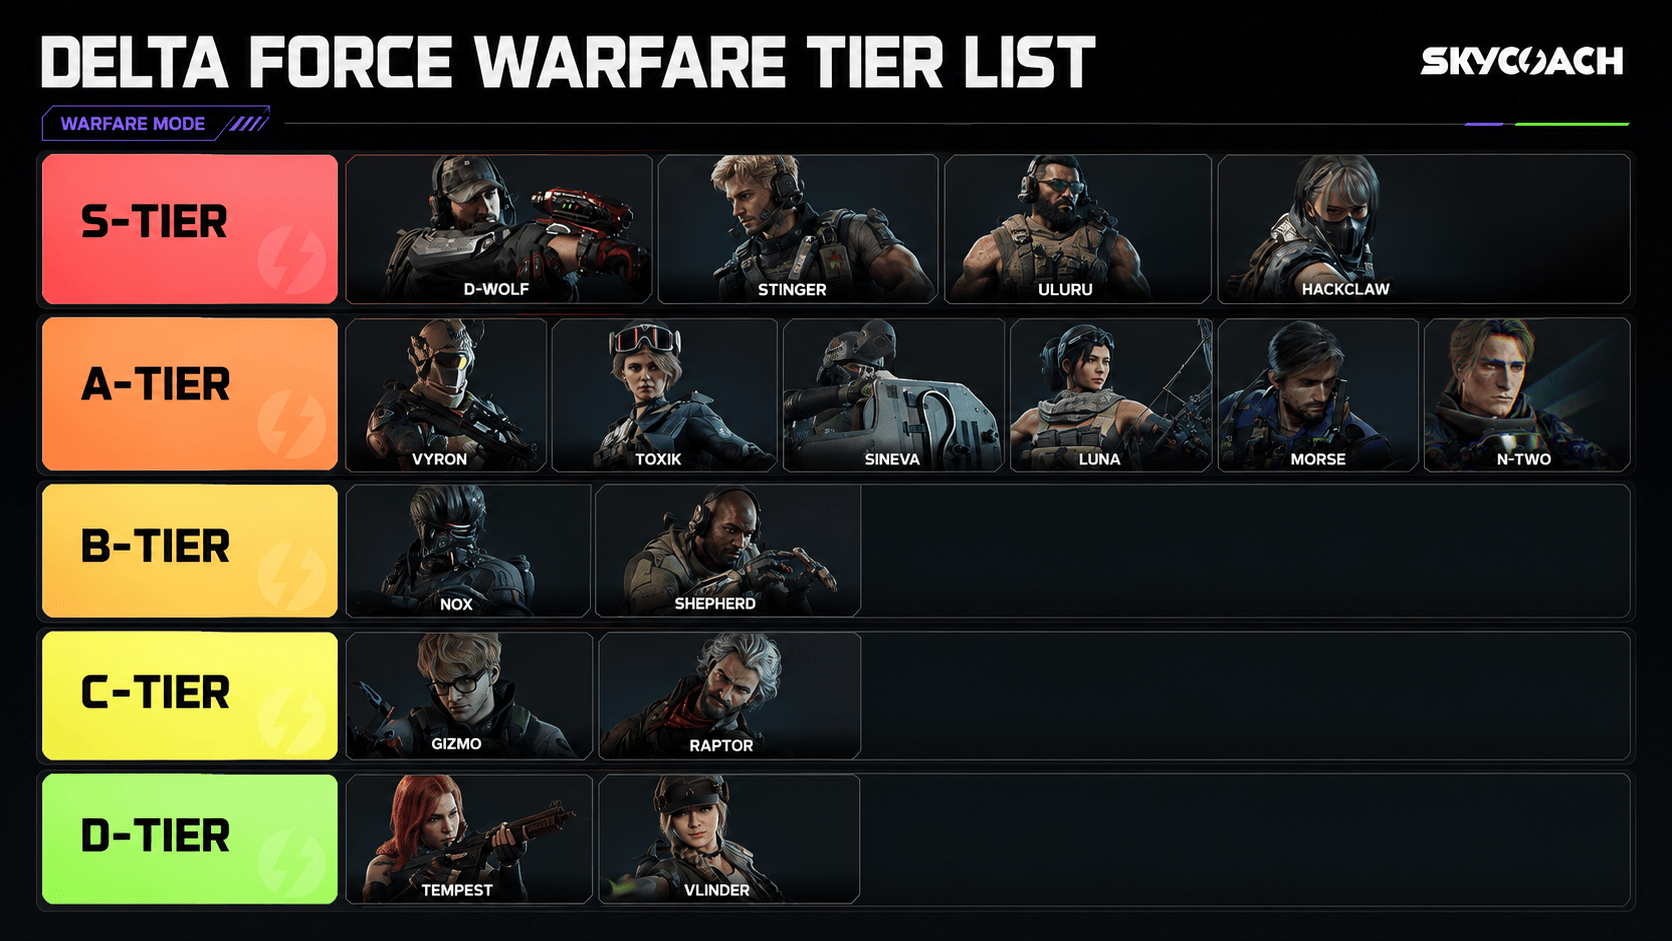
It absolutely baffles me to know that as of writing this, Season 10 has been going for like a solid week and I’ve not seen a single reliable Operators tier list for the current season. So, I decided to take matters into my own hands and rank all Delta Force operators in both game modes. This tier list ranks operators for Warfare mode, which, as you know, is your Battlefield-like 32v32, capture-the-point style game mode. Here’s my ranking:
|
Tier |
Operators |
|
S-Tier |
D-Wolf, Stinger, Uluru, Hackclaw |
|
A-Tier |
Vyron, Toxik, Sineva, Luna, Morse, N-Two, |
|
B-Tier |
Nox, Shepherd |
|
C-Tier |
Gizmo, Raptor |
|
D-Tier |
Tempest, Vlinder |
Some of the placements may shock you, and that’s fine - this is my tier list, which I wrote based on my personal experience with the game. But, generally speaking, it mostly follows the same meta that you can see in other sources, although I found all of those less trustworthy.
Delta Force Warfare S-Tier Operators
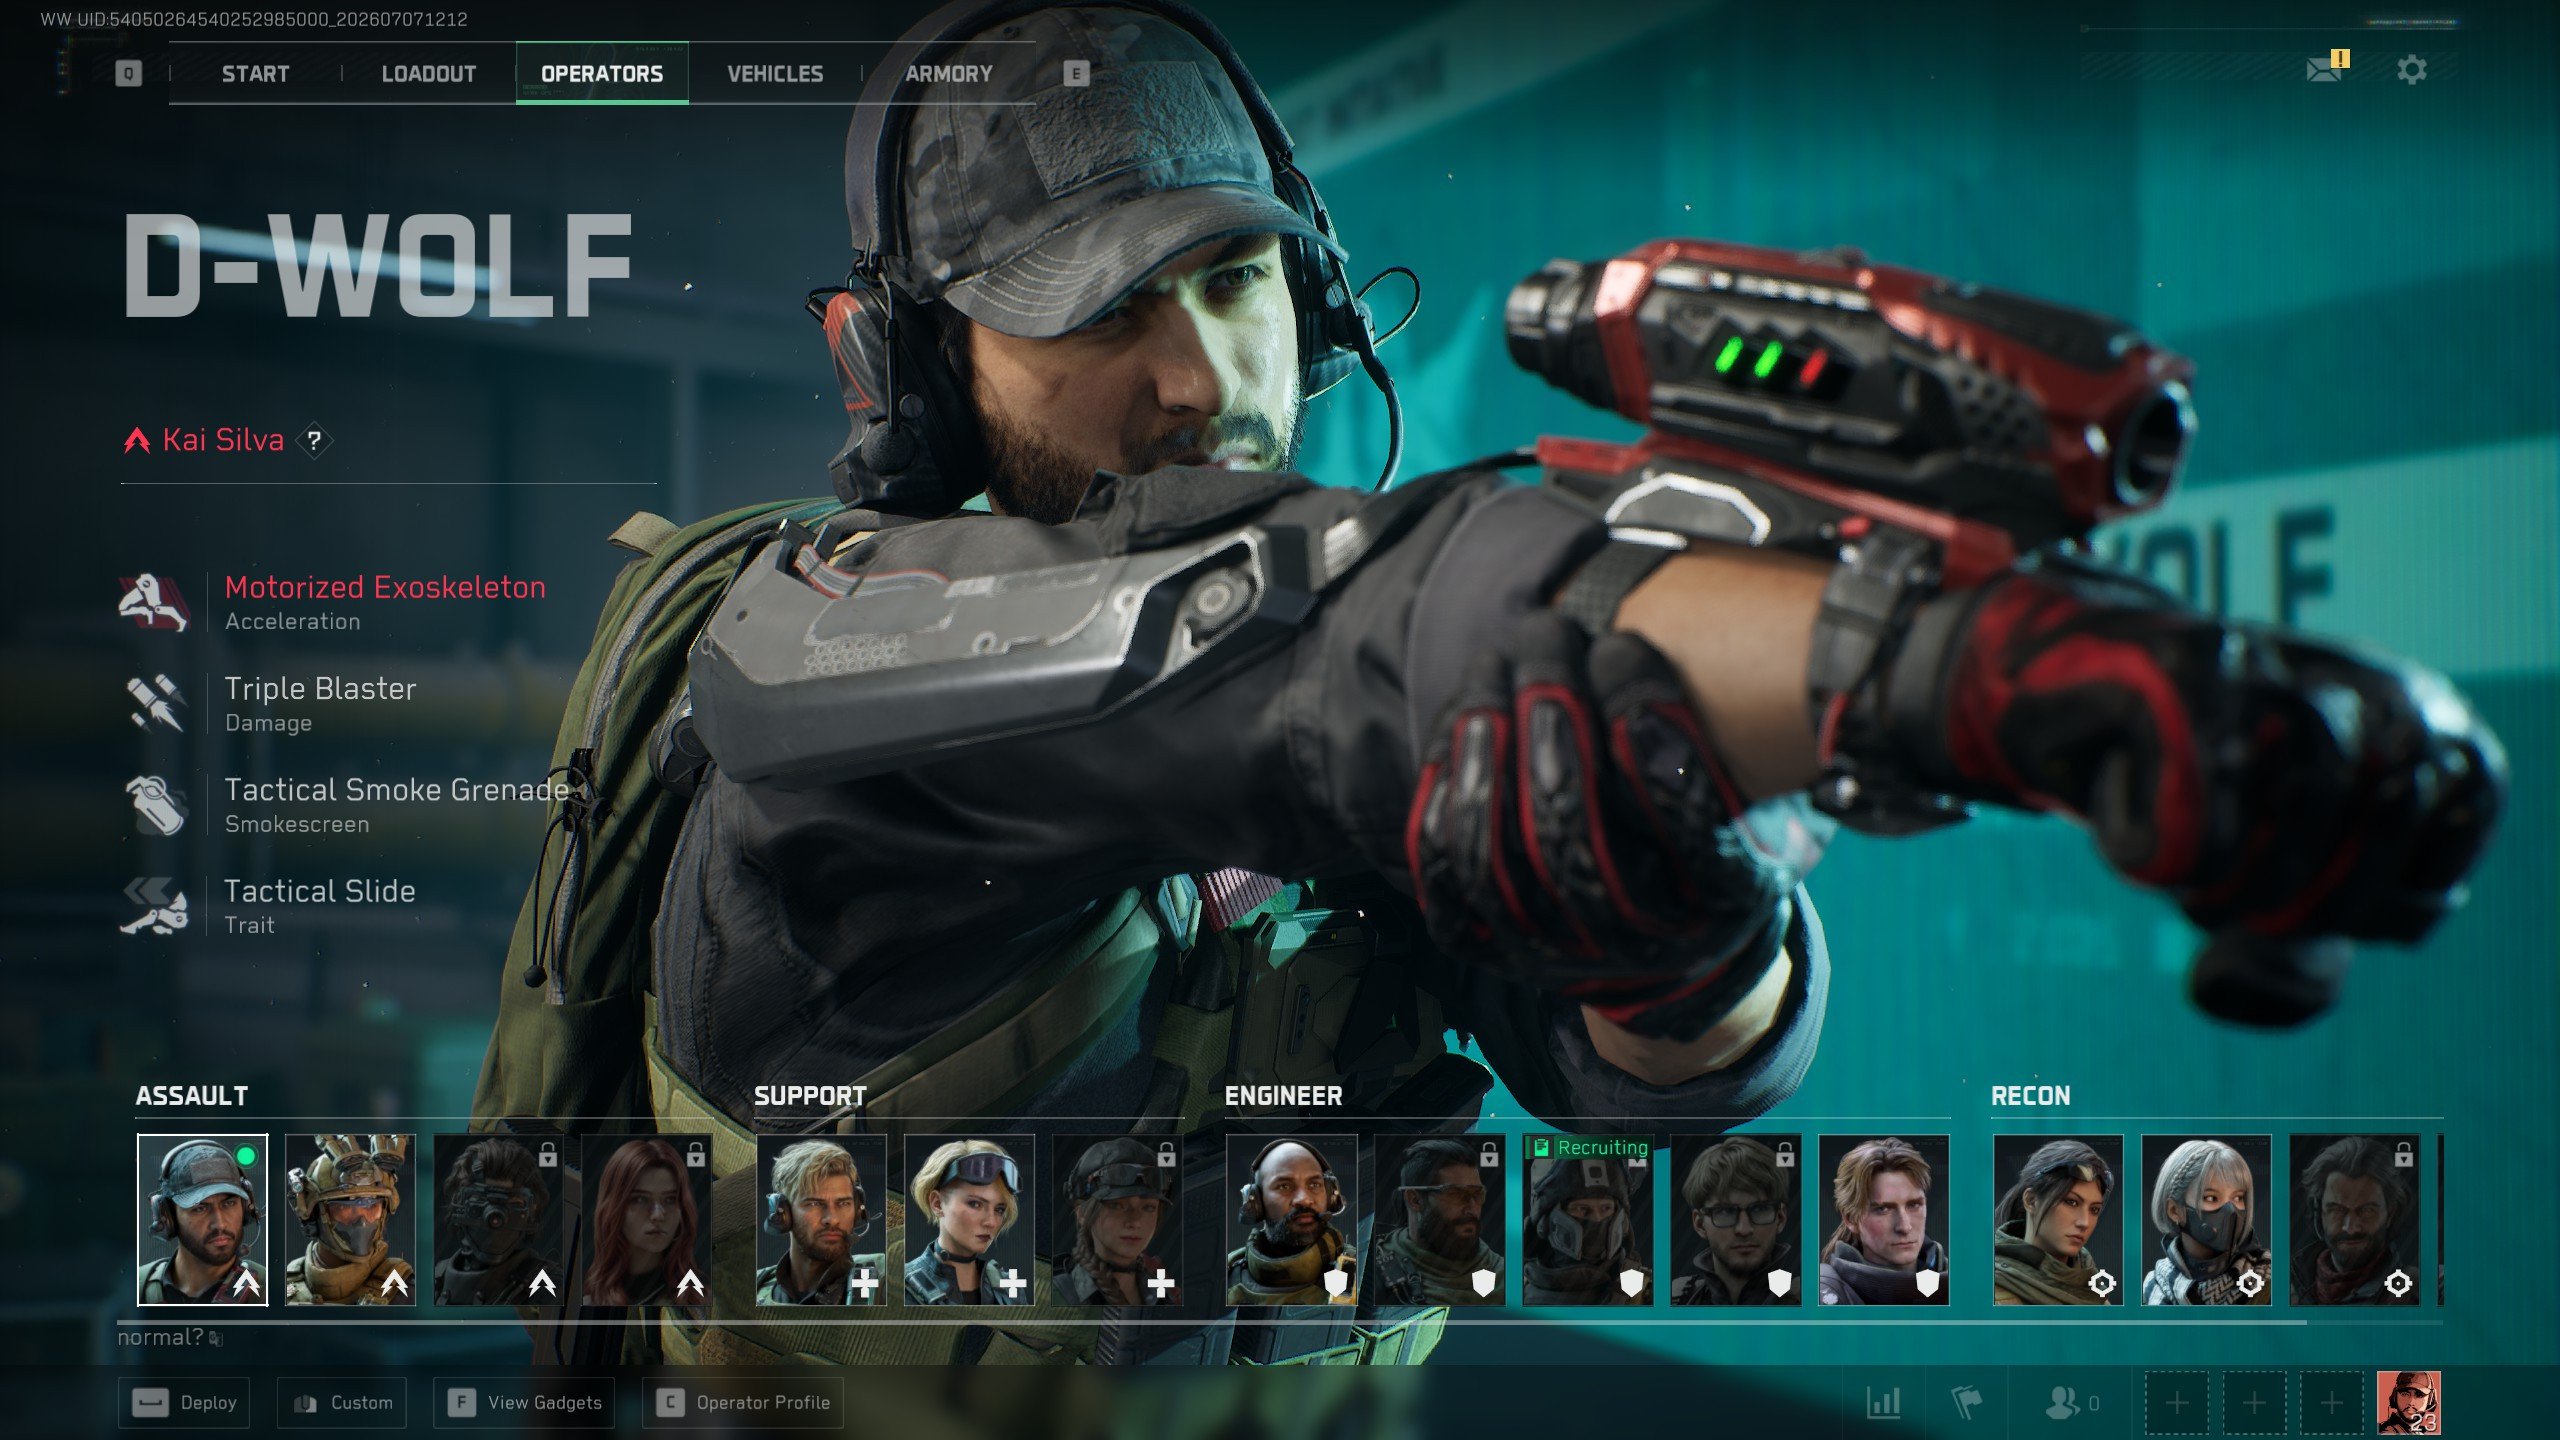
D-Wolf
- Motorized Exoskeleton: Increases sprint speed. Downing enemies while the ability is active restores HP and extends its duration.
- Triple Blaster: Fires a high-explosive grenade that sticks to vehicles on impact. In Warfare, D-Wolf gets one shot before the ability goes on cooldown.
- Tactical Smoke Grenade: Releases fast-dissipating smoke immediately on impact.
- Tactical Slide: Allows D-Wolf to perform a fast slide with his exoskeleton.
I’d like to start with my favorite operator so far, D-Wolf. I’ve seen him in D-tier in other tier lists, but I strongly disagree with that placement. He usually ends up in D-tier because the authors “find him boring”. Really?
First of all, he’s the perfect operator for new players. He has a very simple toolkit of abilities. The movement boost is absolutely huge in this game. I can’t tell you how many times I’ve managed to get behind the enemy lines and clear out chokepoints, giving my team the chance to retake a point or capture it. And you also get the 3 frag-like projectiles with the Triple Blaster, which is just amazing. Now, I use D-Wolf to complete Recruitment tasks to unlock other operators. So, all in all, he deserves S-tier.
Stinger
- Hive-Tech Pistol: Fires homing shots that heal allies and suppress pain. Aiming down sights focuses healing on one target, while holding the ability lets Stinger heal himself.
- Smokescreen: Sends a controllable UAV forward while it creates a long line of smoke.
- Hive-Tech Smoke Grenade: Creates smoke that can be turned into a healing area when shot with the Hive-Tech Pistol.
- Expertly Rescue: Lets Stinger revive squadmates more effectively and bring them back with more HP.
Stinger is another S-tier because he is just the best and simplest support/healer in the game. All thanks to his easy-to-use Hive-Tech Pistol, which doesn’t even require you to aim. Everybody knows that you only win games (especially if you’re on the attacking side with tickets counting down on each player's death), and when you have such a simple and effective operator who can put down heals on the ground, then also heal different players individually with his pistol and revive fast?! Come on, what more do you need? Stinger can also revive you with full health, which is incredibly important and is a huge advantage for your team in Warfare.
Uluru
- Loitering Munition: Fires a camera-guided missile that splits into four additional bombs when it explodes. Hip-fire launches it along a preset trajectory.
- Quickset Cover: Creates an instant piece of concrete cover.
- Composite Incendiary: Throws an incendiary grenade that creates an area of fire and quickly destroys Quickset Covers.
- Battle Hardened: Gives Uluru stronger resistance to slowing effects caused by fractures and class gear.
I’d say Uluru is the best operator to deal with enemy vehicles, on the ground or in the air. Seriously, Uluru should be the first operator to unlock if you’re new to the game; he’s like the main, real engineer in the whole game. Instead, you’re given Shepherd by default, which is not a bad operator, but he isn’t really qualified to deal with the enemy vehicles, which, in my opinion, is an engineer’s first responsibility. And besides, Uluru has a deployable cover, incendiary for area denial, and anti-camping utility. What more could you want?
Hackclaw
- Signal Decoder: Scans for up to six enemy signals within 60 meters ahead and displays their movement trails. The closest enemy is highlighted in red.
- Flash Drone: Sends a drone forward that flashes enemies within range. It can also follow a custom trajectory created with the Signal Decoder.
- Data Knife: Hacks and temporarily disables electronic devices within 10 meters. Hitting an enemy marks them for nearby squadmates, while downing an enemy reduces the cooldown.
- Silent Step: Increases movement speed while crouching or moving silently and reduces movement noise.
So, I would say that Hacklawthe is the best Recon operator, simply because she gives you the temporary vision that allows you to spot enemies behind hard cover. Do you know where chokepoints come from? They’re not appearing from both teams constantly killing each other in the same place. Sooner or later, that’s going to end. No, Chokepoints are created by those who know where to hide in the capture point and get an angle that will allow them to kill any enemy approaching. Do you know how many times I’ve tried to clear out a point just to get killed by some dude who has some crazy angle on it? Well, Hacklaw’s Signal Decoder will help you retake or defend control points, which directly contributes to the match’s win condition.
But that’s not the only thing that she’s got going on. Her Data Knife can disable vehicle defenses such as smokes on tanks or other electronic gadgets. Flanking is also much easier with her Silent Step.
Delta Force Warfare A-Tier Operators
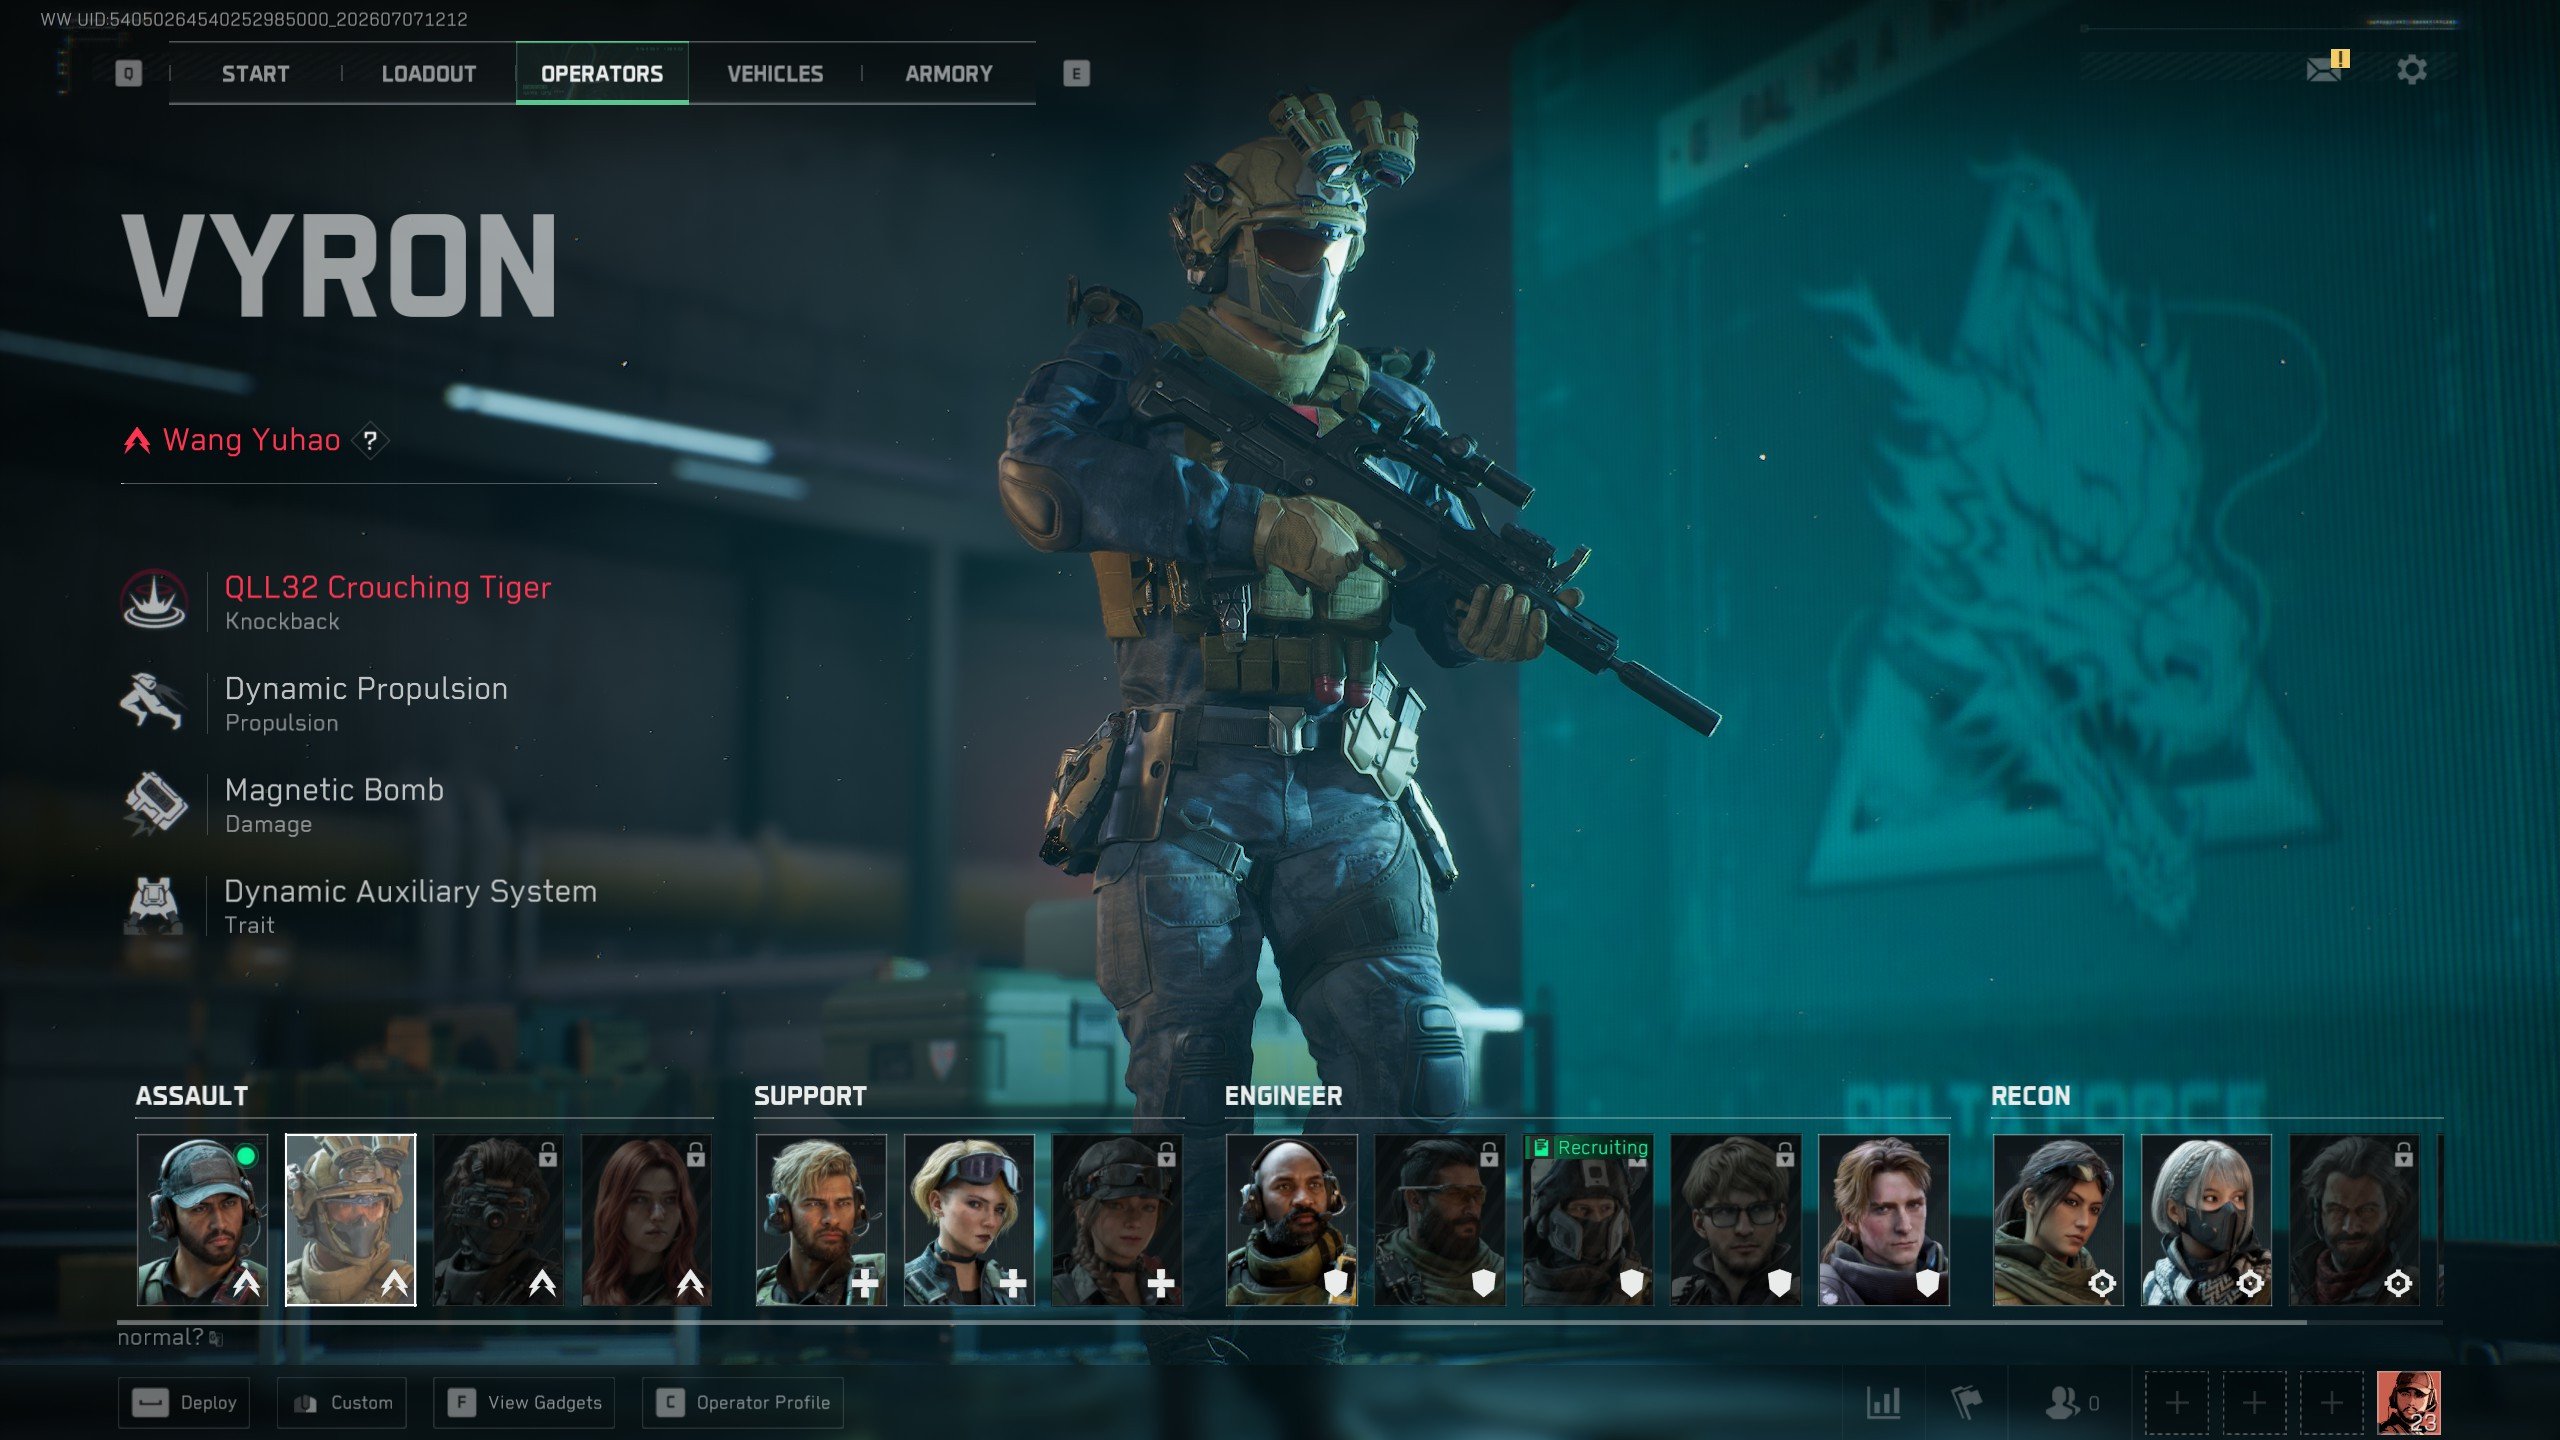
Vyron
- QLL32 Crouching Tiger: Fires a compressed-air shell that explodes and knocks nearby enemies back.
- Dynamic Propulsion: Dashes Vyron forward. Downing enemies reduces the cooldown.
- Magnetic Bomb: Throws a high-explosive charge that sticks to hard surfaces and detonates after a delay.
- Dynamic Auxiliary System: Reduces fall damage and temporarily increases movement speed after using gadgets or falling.
I’ve seen Vyron in S-tier, but I’ve put him in A just because his mobility skill is less predictable and less controllable than the D-Wolf’s faster sprint. I swear, I picked Vyron because he looked cooler the first time I started playing, but then I quickly switched to D-Wolf because I just couldn’t get the hang of his movement tech. The Magnetic Bomb is also weird to me because it has a trajectory like a C4, which means you can’t throw it very far. Still, Vyron deals equally effectively with infantry and vehicles.
Toxik
- "Dragonfly" Swarm System: Sends a UAV swarm forward. Allies gain an adrenaline boost, while enemies suffer impaired hearing and vision and reduced Max HP.
- Adreno-Boost: Buffs nearby allies by increasing Handling, reducing Hit Flinch, and temporarily increasing movement speed. Kills and assists can strengthen the next buff.
- Blinding Gas: Creates gas that blinds enemies after enough exposure.
- Swift Healing: In Warfare, reduces nearby squadmates' HP recovery delay after taking damage.
Toxik is more of a buffer for the team and debuffer for the enemies rather than a direct healer like Stinger. Still, she’s super useful in Warfare in chokepoints. Her Adreno-Boost is much like D-Wolf’s ultimate, but shorter, so it’s really good too. If you’re playing with a squad of friends, I think she’ll be even more effective when you can coordinate actions with your friends.
Sineva
- EOD Set: Reduces explosive and burn damage while increasing protection. Sineva can switch between the Blast Shield and his weapons, although Handling and Accuracy are reduced.
- Grapple Gun: Pulls enemies, downed teammates, or gear crates toward Sineva. The rope can be damaged.
- Razor Wire Grenade: Deploys wire that damages, slows, and applies bleeding to enemies moving through it.
- Rear Guard: Keeps the Blast Shield on Sineva's back when not in use, blocking bullets from behind. During rescues, the shield protects him from the front.
This is the operator I decided to unlock first, and I didn’t regret it. He has a shield! Come on! Not only that, but you also get a grapple gun? Have you seen a better combination in any other character-focused shooters? I sure haven’t. He had a rework in Season 8, which made him more versatile and less restrictive, allowing Sineva to use weapons while the EOD set is equipped.
Luna
- Detection Arrow: Reveals enemies below its flight path and leaves micro-sensors that detect moving targets. Its detection radius increases with height.
- Volt Arrow: Creates an electrical field that deals damage over time.
- GE2 Frag Grenade: Deals strong damage to armor and exposed limbs and can be primed before throwing.
- Enemy Analysis: Briefly marks enemies damaged by Luna.
Another Recon who can spot enemies, although unlike Hacklaw, Luna does this differently. If you manage to pull up the bow and fire your arrow, which in the hectic environment of 32v32 battles. The Volt Arrow is also nice for area denial.
There’s even been some discussions on Steam forums where players were arguing who's better - Luna or Hacklaw
Morse
- Advanced Sonar Device: Periodically scans a designated area, reveals how many enemies are inside, and precisely marks enemies that make sound.
- Throwable Jammer: Slows enemies, blurs their vision, reduces turning speed and hearing, and forces them to continuously emit sound.
- Delayed Flashbang: Explodes after a delay and blinds enemies facing it.
- Sonic Sitrep: Detects nearby enemy devices and creates markers visible only to Morse.
Another information-providing operator that you should definitely look into. His toolkit reminds me of one of Luna’s, but it works differently. Personally, I prefer playing as male characters, so Morse is definitely on my unlock list. He is still relatively new, so there’s that. Enemy detection is always great, no matter which operator you choose. What I’m trying to say is that this type of ability gets you into A-Tier on my list.
Worth noting: the Season 10 patch gave the Throwable Jammer a longer cooldown and more warning time for enemies before it triggers — which tones him down from where he was in S9.
N-Two
- Frost Launcher: Fires up to six freezing grenades. Continuous firing increases the firing speed.
- Cryo-Flask: Creates a persistent area of cold gas that builds cold effects on enemies and can freeze doors shut.
- Homing Stun Grenade: Automatically flies toward nearby enemy operators, marking them and disrupting their vision.
- Permafrost: Gradually slows enemies exposed to low temperatures until they become frozen. N-Two can see their hypothermia level, and frozen enemies are pinged. In Warfare, low temperatures also reduce vehicle handling.
I think the new operator added in Season 10, N-Two, is quite alright in Warfare. You know, I put D-Wolf in S-tier because movement in this game mode is the strongest gadget. Everyone is running around like crazy, and being able to take that speed away does wonders. That’s why N-Two is an A-tier operator on my list. Homing Stun Grenades are just as great as anything with “homing” in the name. Usually, you have to rely on your own skill to land shots and get the nades to land where you want. With these stun grenades being homing, it’s just one less thing to worry about.
Delta Force Warfare B-Tier Operators
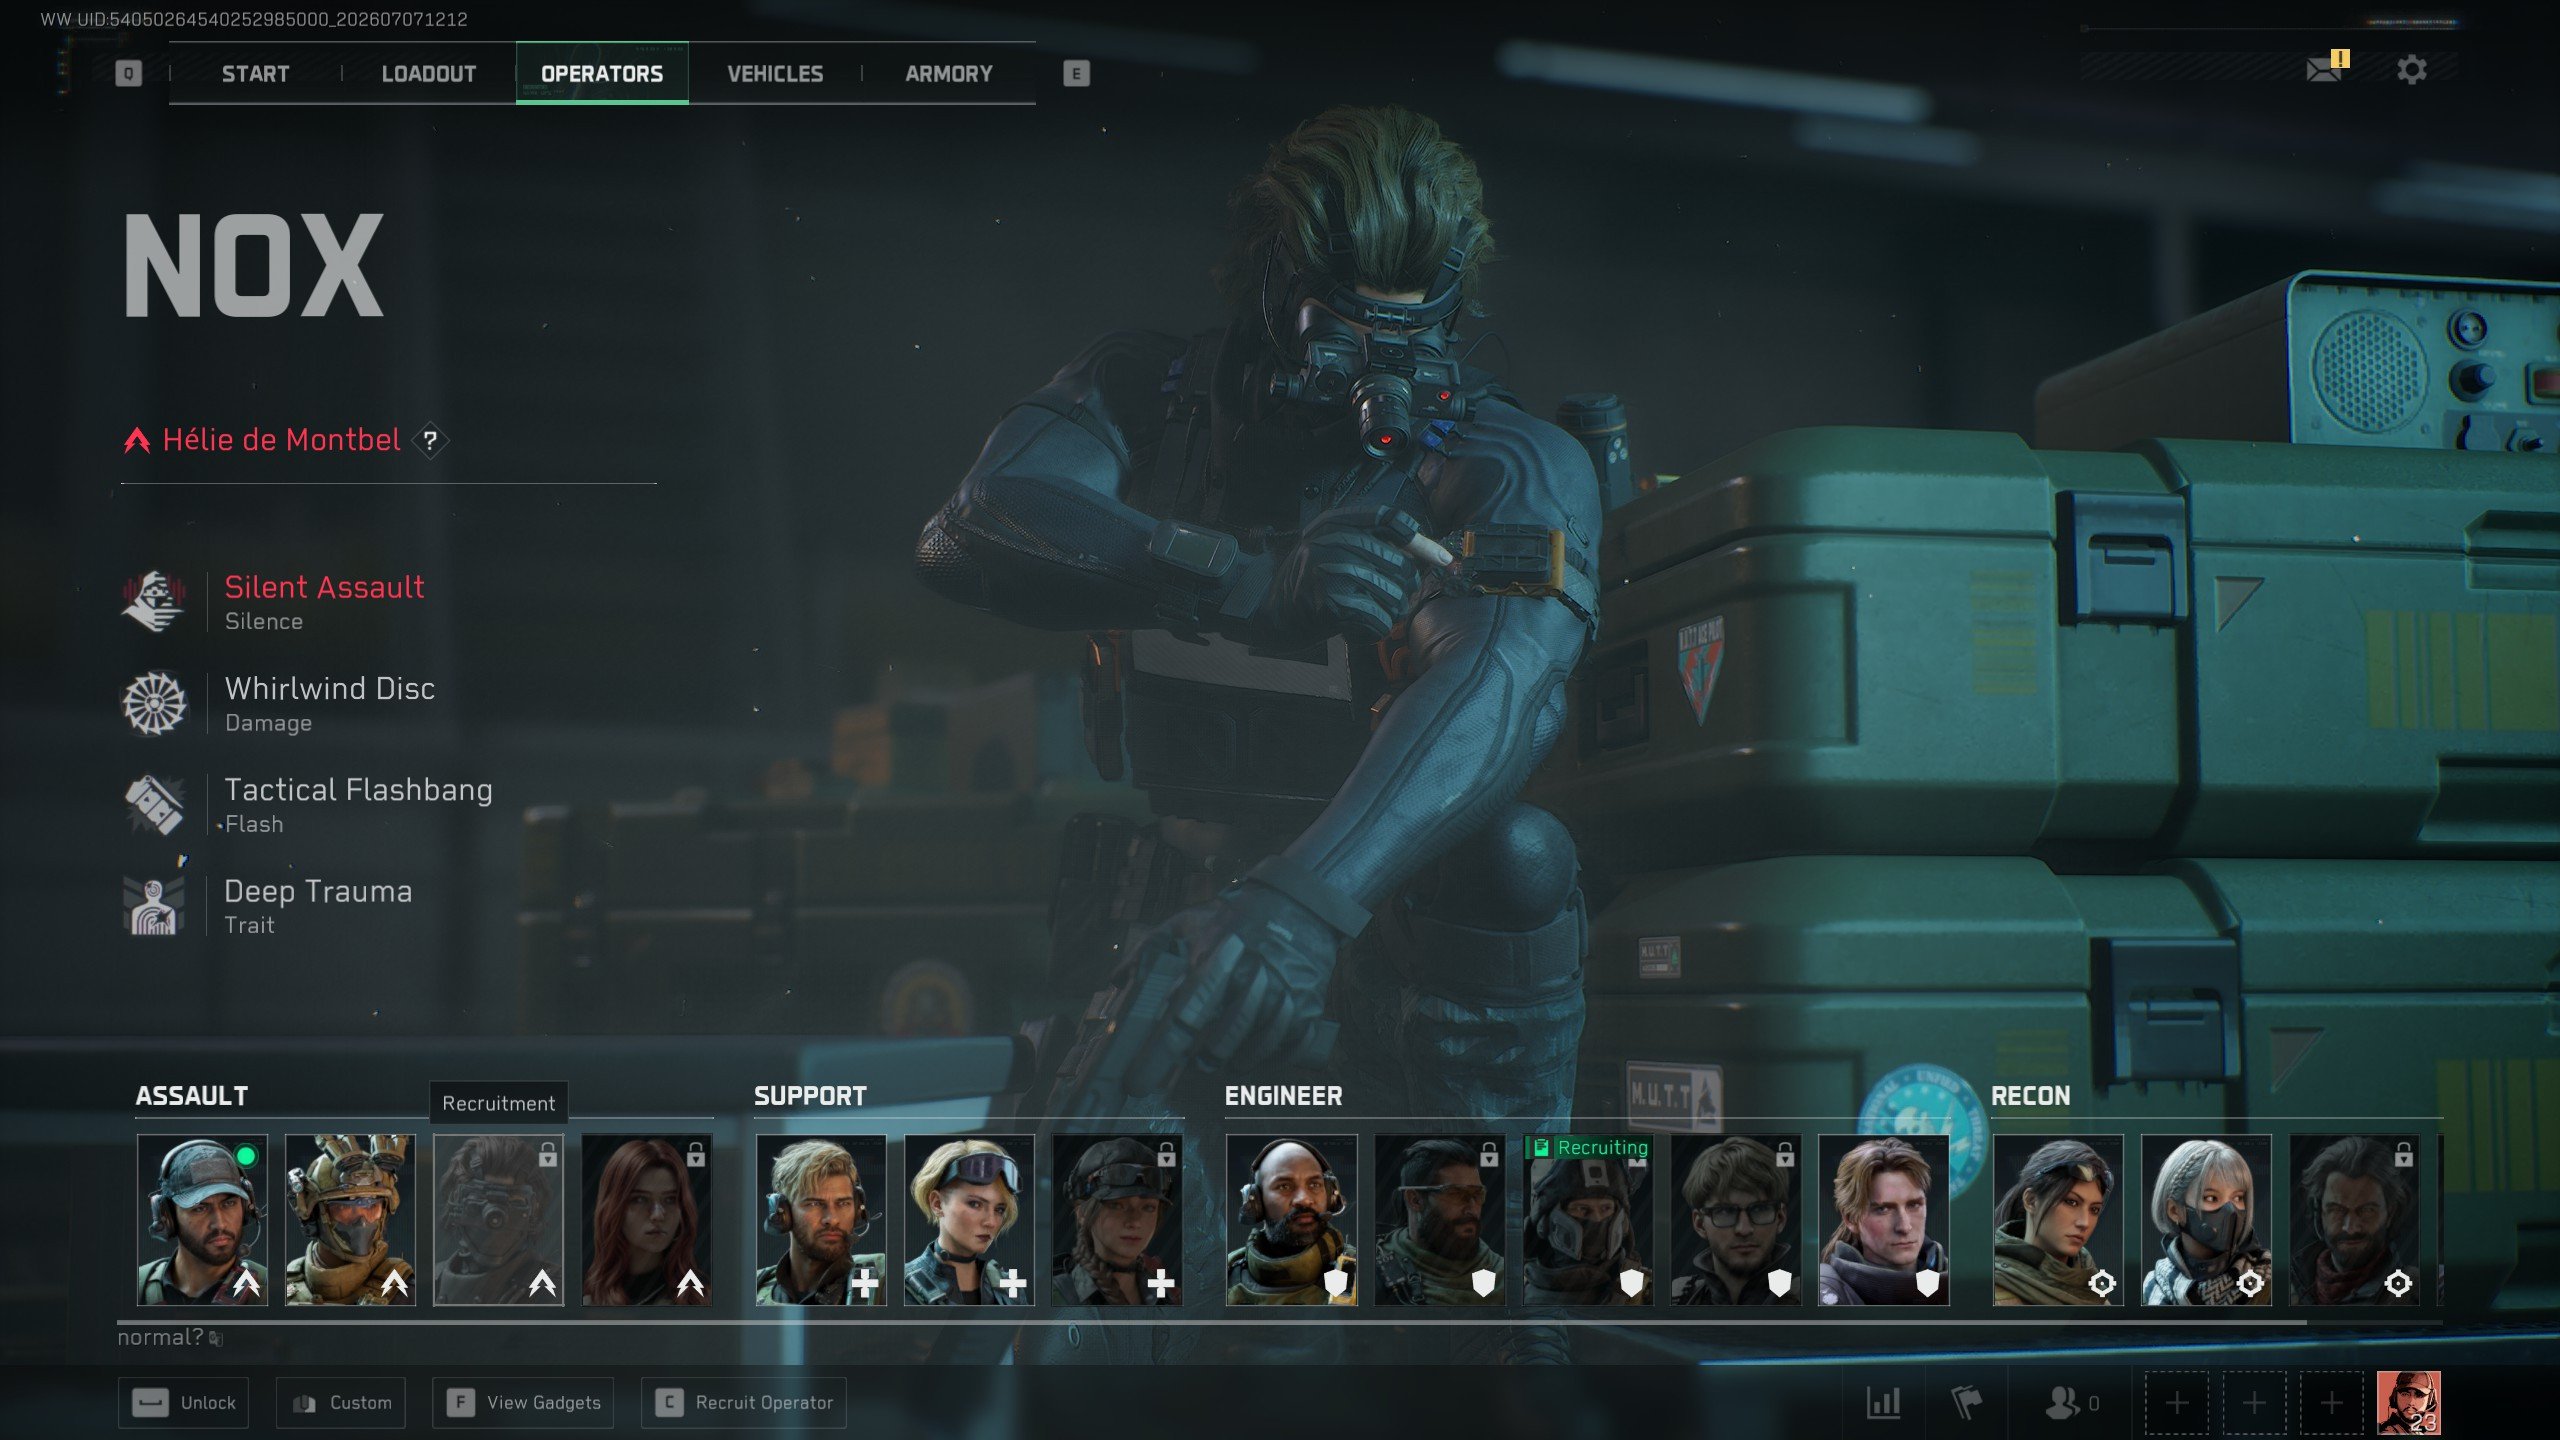
Nox
- Silent Assault: Reduces Nox's sound range, improves mobility, and interferes with enemy Recon gadgets. The duration increases when Nox is alone or has a downed squadmate.
- Whirlwind Disc: Can lock onto enemies and track them before exploding, dealing damage, slowing movement, and applying bleed. It can also be thrown without locking on.
- Tactical Flashbang: Blinds and stuns nearby enemies.
- Deep Trauma: Reduces the health regeneration of enemies damaged by Nox. He can also use Respawn Beacons belonging to other squads in the same faction without consuming their uses.
Nox is one of the coolest-looking operators in the roster, in my opinion. He is this game’s version of Solid Snake. Even his looks give you a hint that he might not be that great in open-style combat of the Warfare game mode. His Whirlwind Disc is also a homing gadget, but you have to wait until it locks onto an enemy just like when you’re using a Javelin missile. I don’t have to explain that the moment you see an enemy, there’s no time to waste locking on them. At least tanks are slower, so this gadget is super situational. Silent Assault, the ultimate, also seems to be designed for the extraction-type game mode rather than 32v32 battles. You can still use it for safely fanking enemies, but that’s just about the only use case I can think of. The flashbangs are always nice, though.
Shepherd
- Sonic Paralysis: Sends out a drone that suppresses enemies and reduces their fire rate. A quick deployment creates one suppression pulse, while holding the ability creates four.
- Sonic Trap: Sticks to surfaces and triggers when enemies approach, damaging and slowing them.
- GE2 Frag Grenade: Deals strong damage to armor and exposed limbs and can be primed.
- Sonic Defense: Reduces damage taken from explosions.
I found Shepherd pretty useful, but as far as engineers go, he just ain’t the best. His Drone is definitely nice to use when pushing chokepoints, and the 2 Sonic Traps that you get are amazing for defending those points. I even got a couple of kills with them! Overall, Shepherd is a pretty good standard operator once you spend a little time getting used to his abilities and learning when to use them.
Delta Force Warfare C-Tier Operators
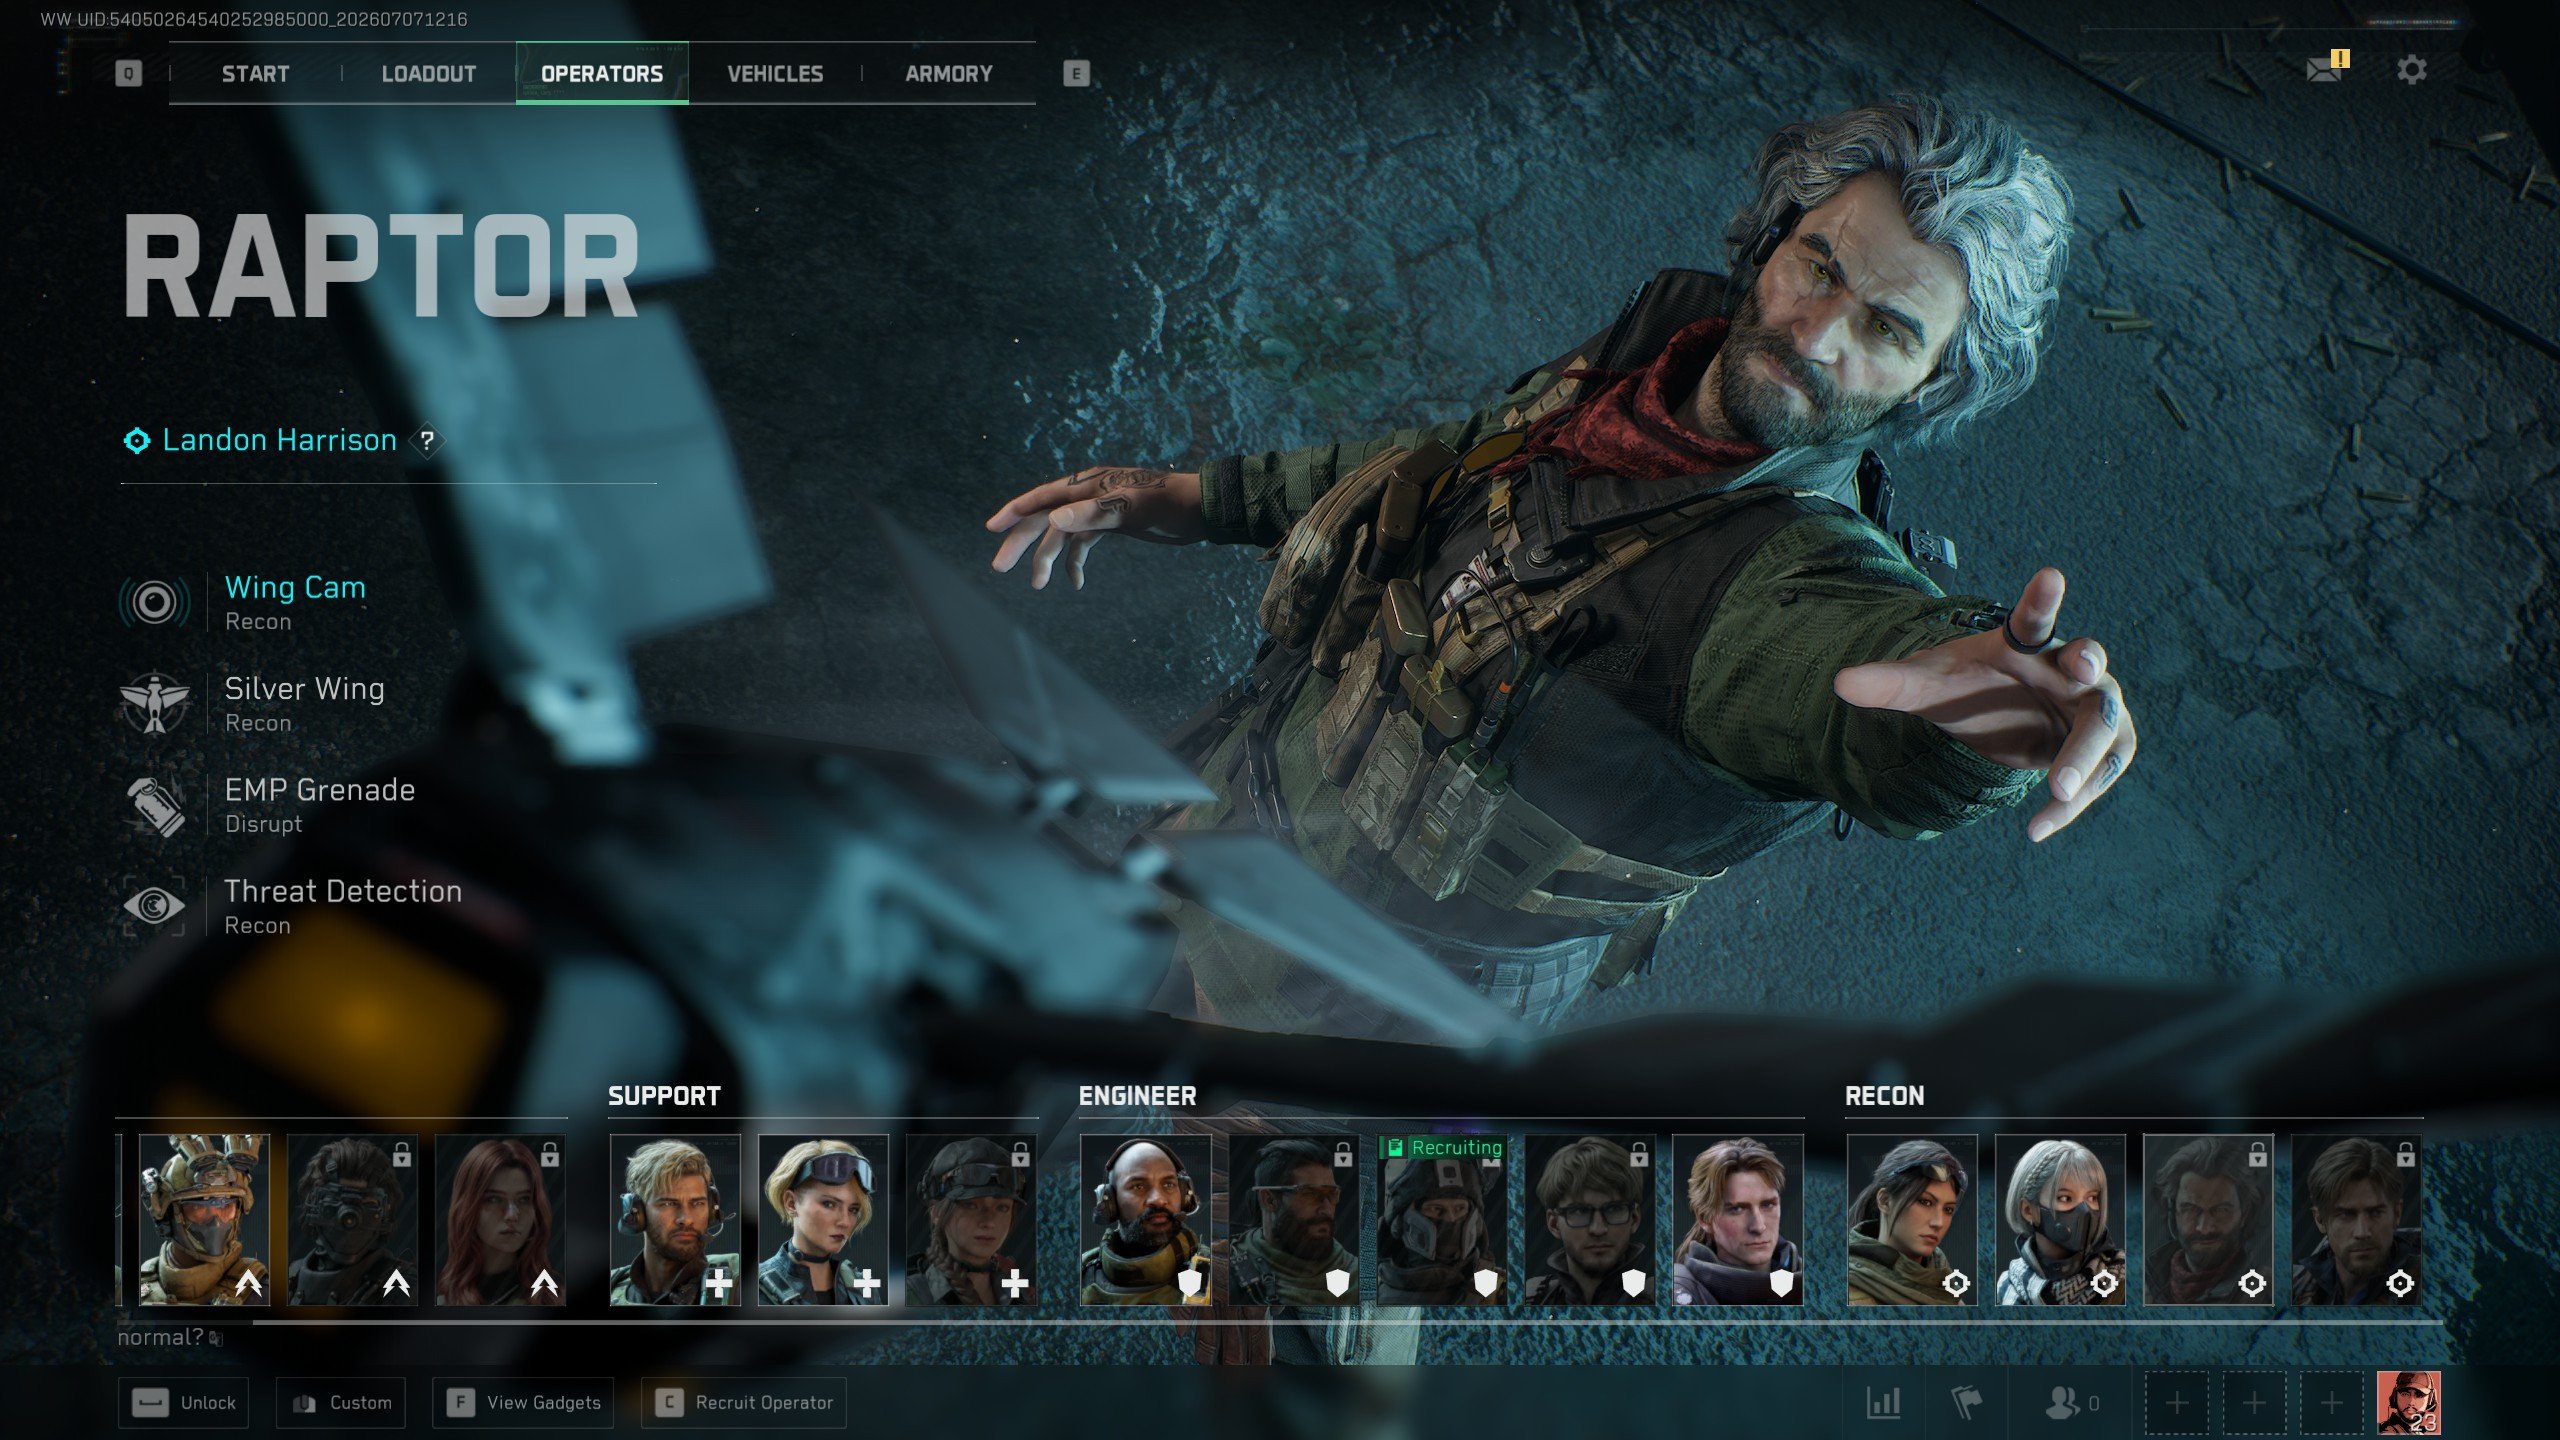
Gizmo
- T.I.M: Sends out a mobile unit that pursues enemies and fires a restraining net, limiting movement and preventing aiming down sights or using operator gadgets.
- Crawler Nest: Releases three tracking crawlers that explode on enemies and apply corrosion. Corrosion increases the bullet damage taken.
- Smoke Mine: Creates smoke that slows enemies. Corroded enemies are marked while inside the smoke.
- Firewall: Improves firearm handling while Gizmo is close to his own deployables.
I gotta admit - Gizmo is a cool operator conceptually, but he just doesn’t work as well as you’d think in those big battles. His drones are easy to kill, and without him, what does he have? Smokes? D-Wolf got them too. The only time when I see myself using those drones is during those final minutes of the match when everyone is trying their hardest to control or retake the point. In the midst of chaos, those sneaky little buggers can actually reach enemies and be useful.
Raptor
- Wing Cam: Attaches a camera to an enemy and periodically marks their position. If the target dies, the camera remains and keeps marking the area.
- Silver Wing: Deploys a manually controlled drone that marks enemies up to 90 meters away. It can carry EMP grenades, deploy Wing Cams, and self-destruct.
- EMP Grenade: Disables electronic equipment, weapon attachments, sights, and nearby electronic gadgets.
- Threat Detection: Shows a directional indicator when an enemy aims at Raptor and allows him to deploy a Wing Cam on that threat.
Raptor is a cool operator with a drone that can do a lot of different things. Sadly, the number of things you can do with it amounts to nothing when you’re being shot. His bird-like drone can do a lot of things, kind of like Recon’s drone from Battlefield 6. But ask yourself this - do you really have the time to use it when all you have to do is aim your weapon and shoot? Even if you need to destroy enemy equipment on the ground, it's still faster to do so using your main weapon rather than pulling out your drone, flying it to the thing, and pressing the button. Raptor, like some other lower-ranked operators, definitely does shine in Operations game mode, though.
Delta Force Warfare D-Tier Operators
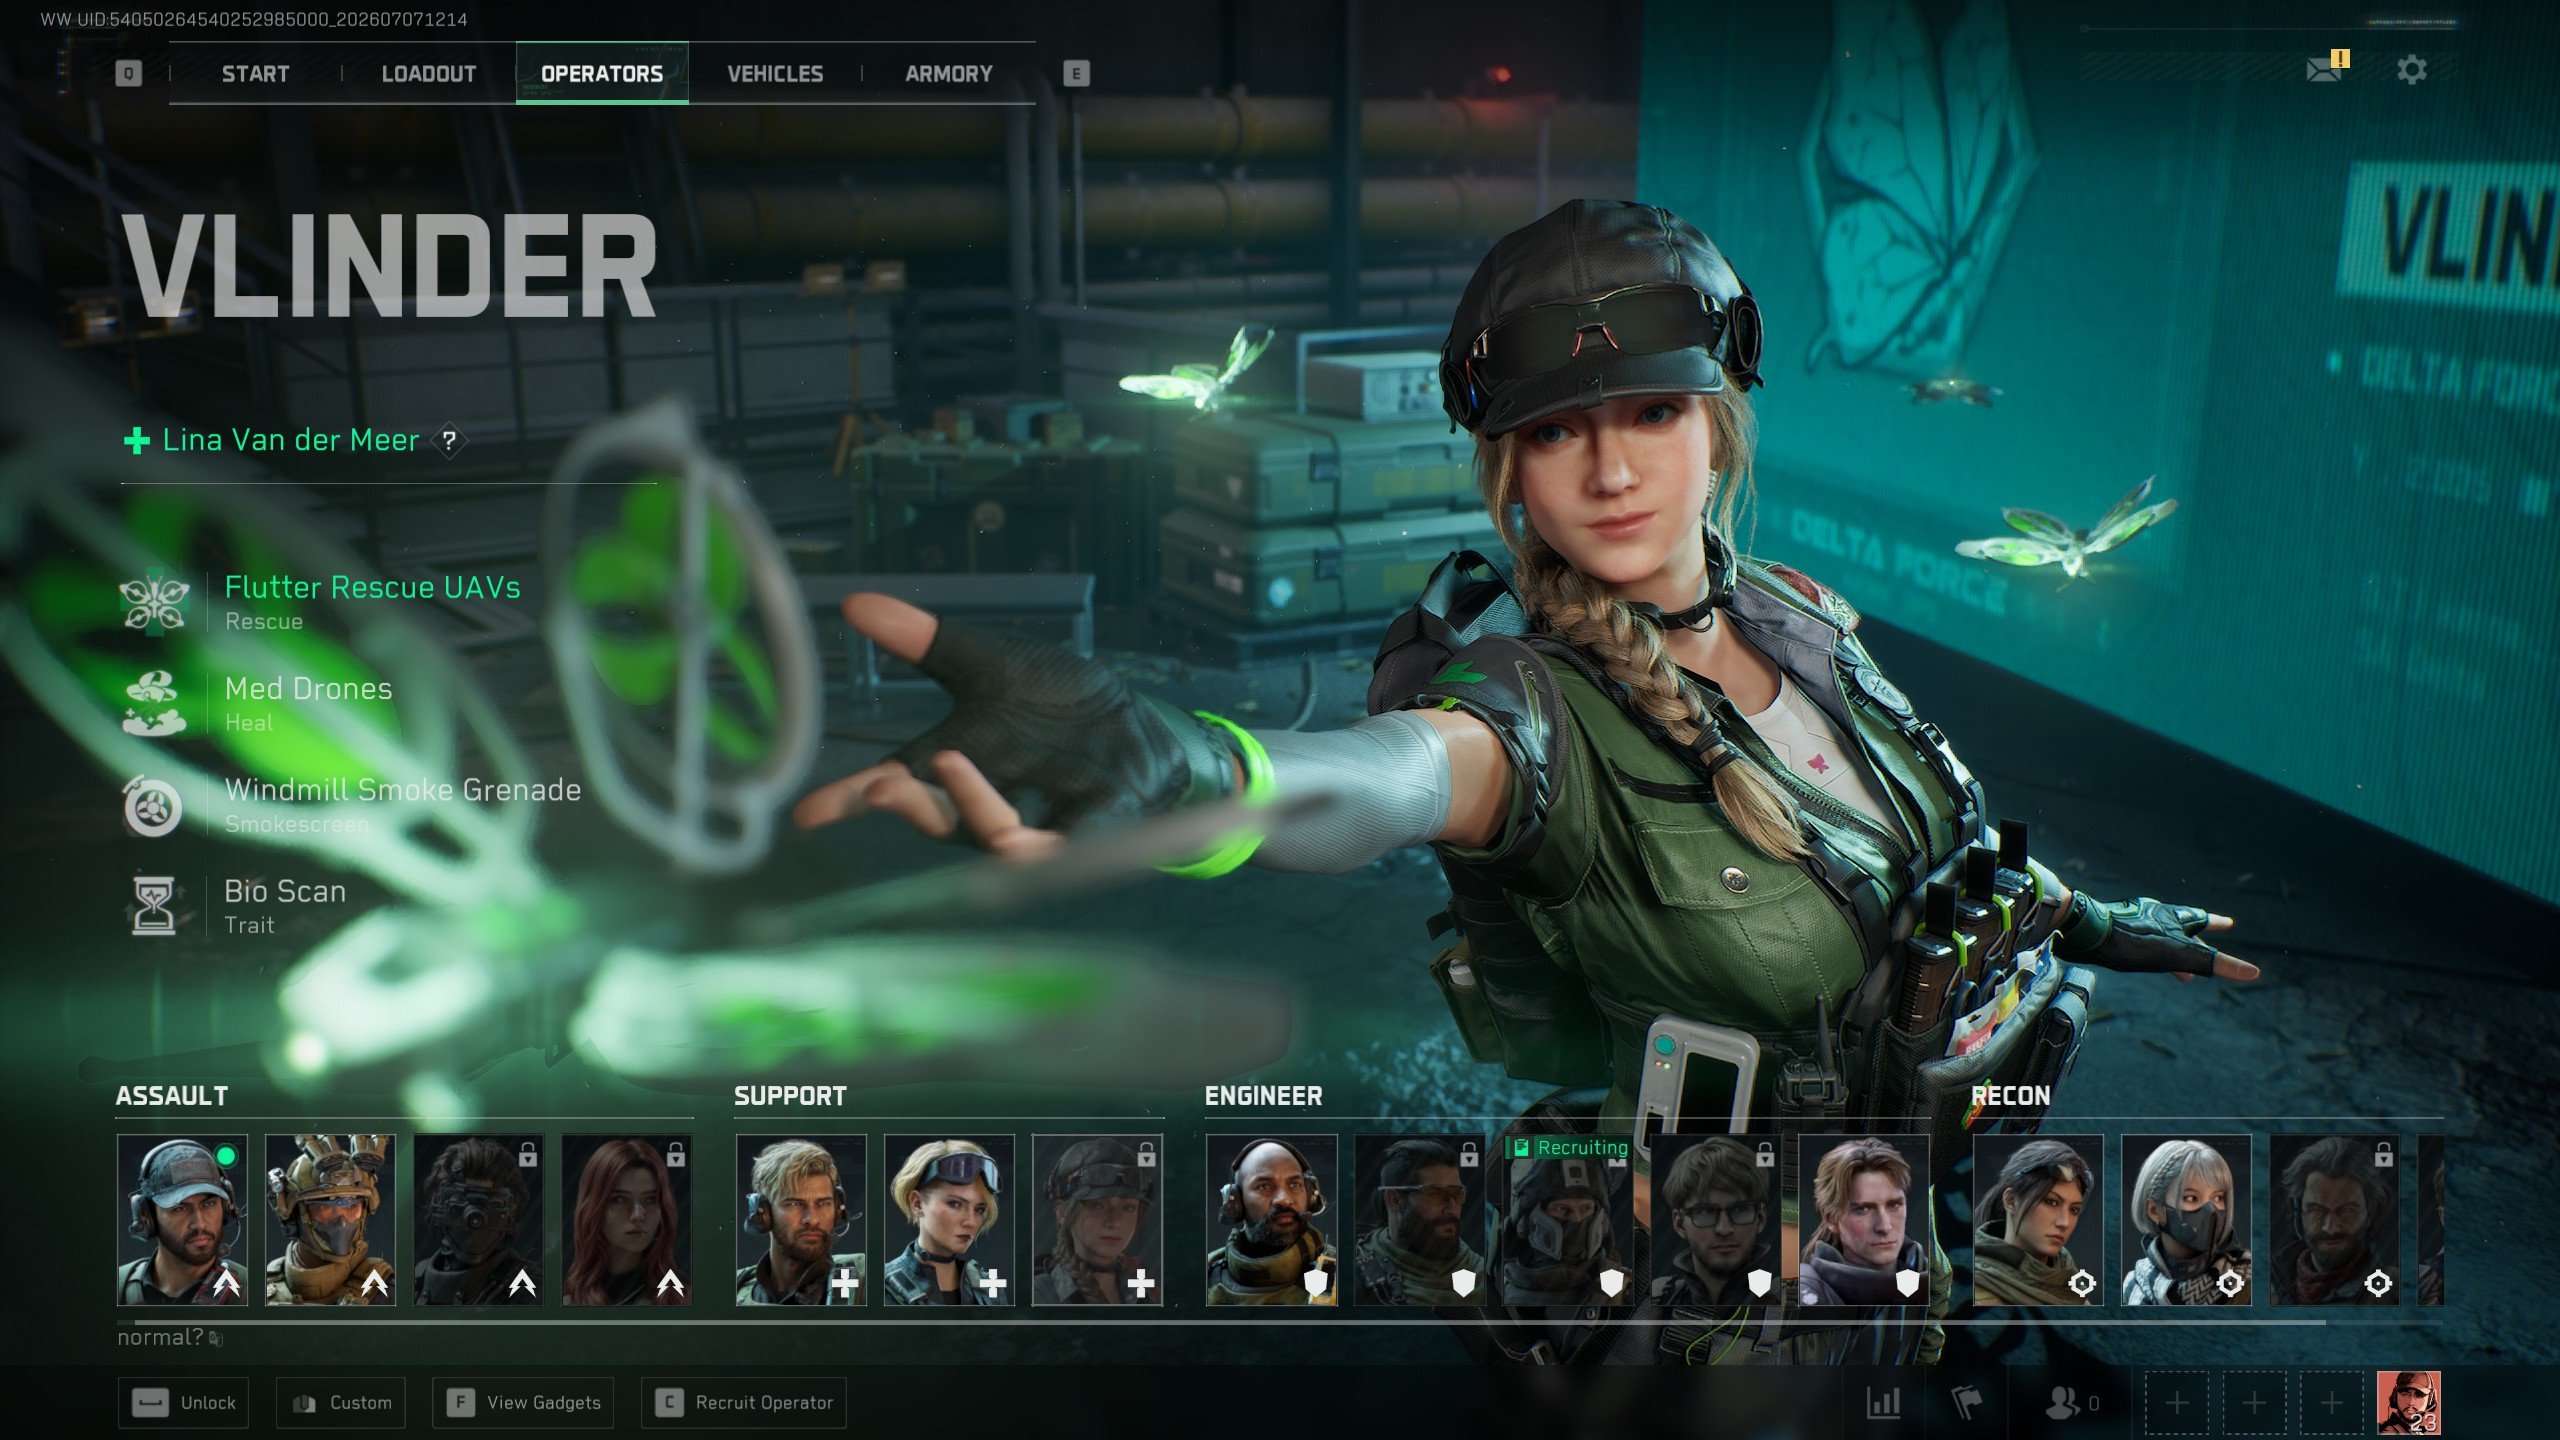
Tempest
- Emergency Evasion Device: Creates an anchor point that pulls Tempest back when reactivated or when she takes fatal damage. During the pull, she can briefly survive damage beyond her normal maximum HP.
- Combat Roll: Performs a fast roll in different directions. Downing enemies reduces the cooldown.
- Drill Charge: Penetrates hard surfaces and releases electricity that disarms and temporarily paralyzes enemies behind cover.
- Auxiliary Surge Spine: Increases sprint speed when bullets or explosive threats are nearby and also improves swimming speed.
Tempest has one of the worst and most useless ultimate abilities in the game. Who would want to be this predictable and pull themselves back to where you were? It’s not the same as Ash’s teleport in Apex Legends. It’s useless in Warfare and Operations alike. The combat roll and the drill charge are both pretty good, but one of the most important abilities for an operator has been wasted on something completely useless.
Vlinder
- Flutter Rescue UAVs: Sends a drone to inject a downed ally with plasma. Approaching that ally then activates defibrillation and revives them. An active defense drone can also block one instance of damage for Vlinder.
- Med Drones: Track a squadmate and heal them and nearby allies. Holding the ability lets Vlinder heal herself.
- Windmill Smoke Grenade: Throws a steerable smoke grenade.
- Bio Scan: In Warfare, reviving a squadmate reduces the cooldown of Flutter Rescue UAVs.
Vlinder has cool abilities on paper, but in reality, her kit is too cumbersome to use. Don’t get me wrong - it’s good that we have Stinger alternatives, but her animation speed at which she uses her gadgets is too slow for the fast-paced Warfare.
Browse our hottest Delta Force Boosting services

Best Delta Force Operators for Operations
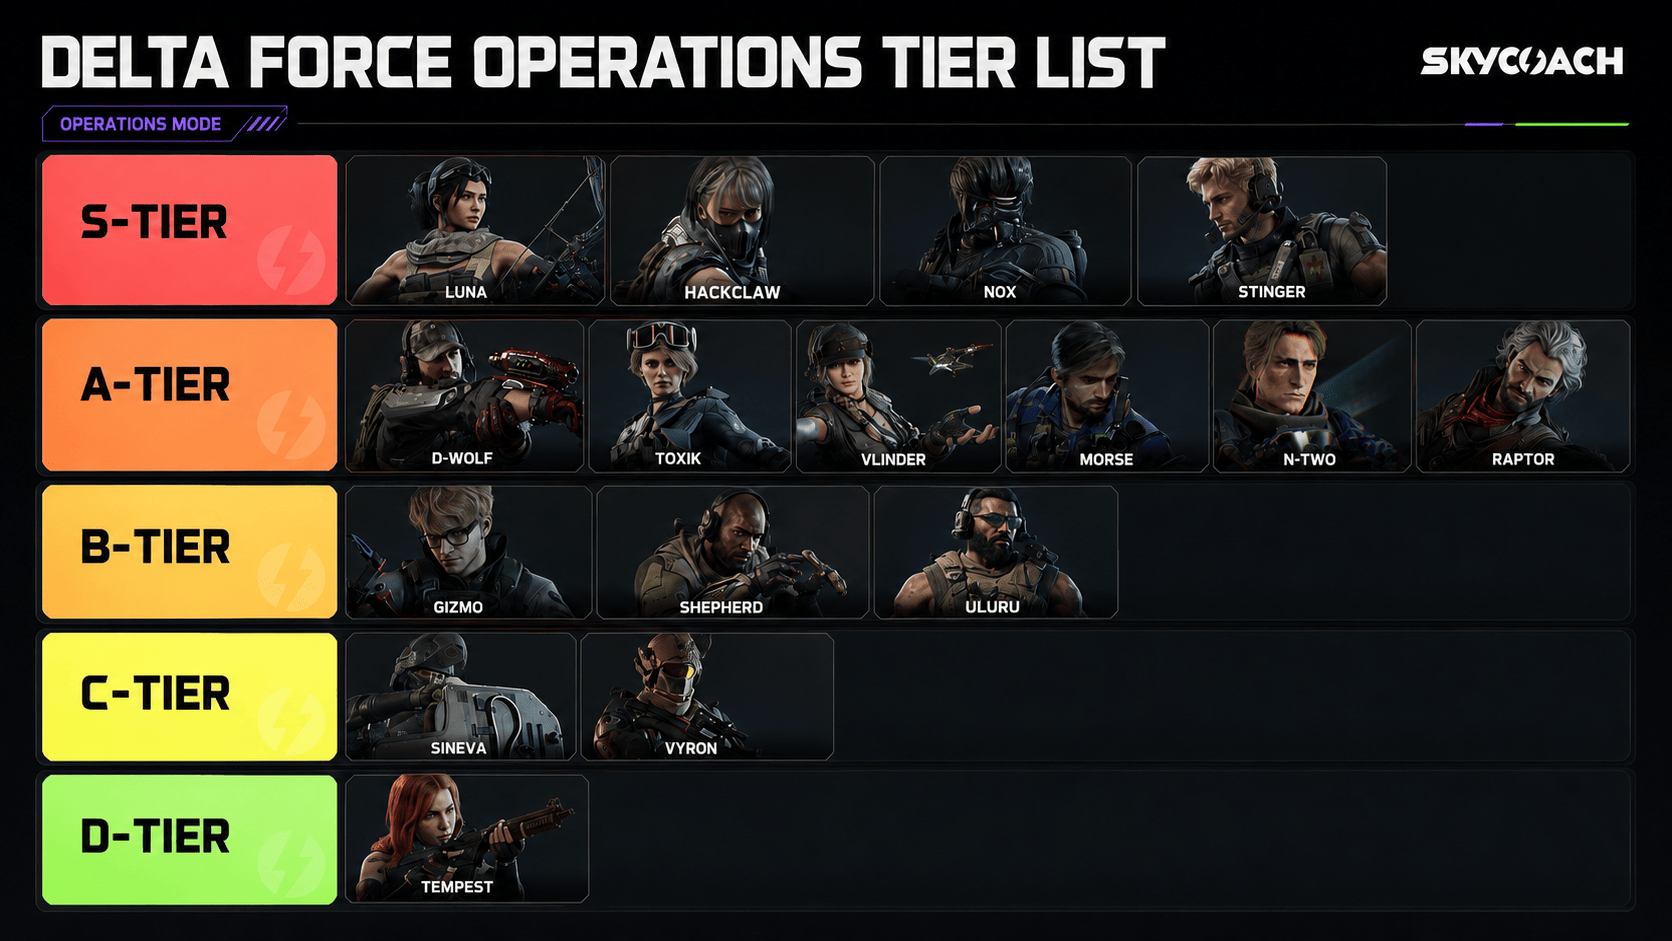
Operations is the extraction mode in Delta Force, and while you do get to use the same operators as in Warfare, literally everything else is different. You no longer have access to the same guns, the ammo is limited, and you have to worry about meds, armor, etc. The main thing that’s different is the pace. It’s much slower, and you really have to listen because the one who sees the enemy first usually wins. That’s why you’ll see different Operators at the top of the Delta Force Operations tier list.
|
Tier |
Operators |
|
S-Tier |
Luna, Hackclaw, Nox, Stinger |
|
A-Tier |
D-Wolf, Toxik, Vlinder, Morse, N-Two, Raptor |
|
B-Tier |
Gizmo, Shepherd, Uluru |
|
C-Tier |
Sineva, Vyron |
|
D-Tier |
Tempest |
Once again, I’m going to explain each placement. Note that the cooldowns for abilities are slightly different in this mode, but unfortunately, I haven’t found any specific data to list here.
Delta Force Operations S-Tier Operators
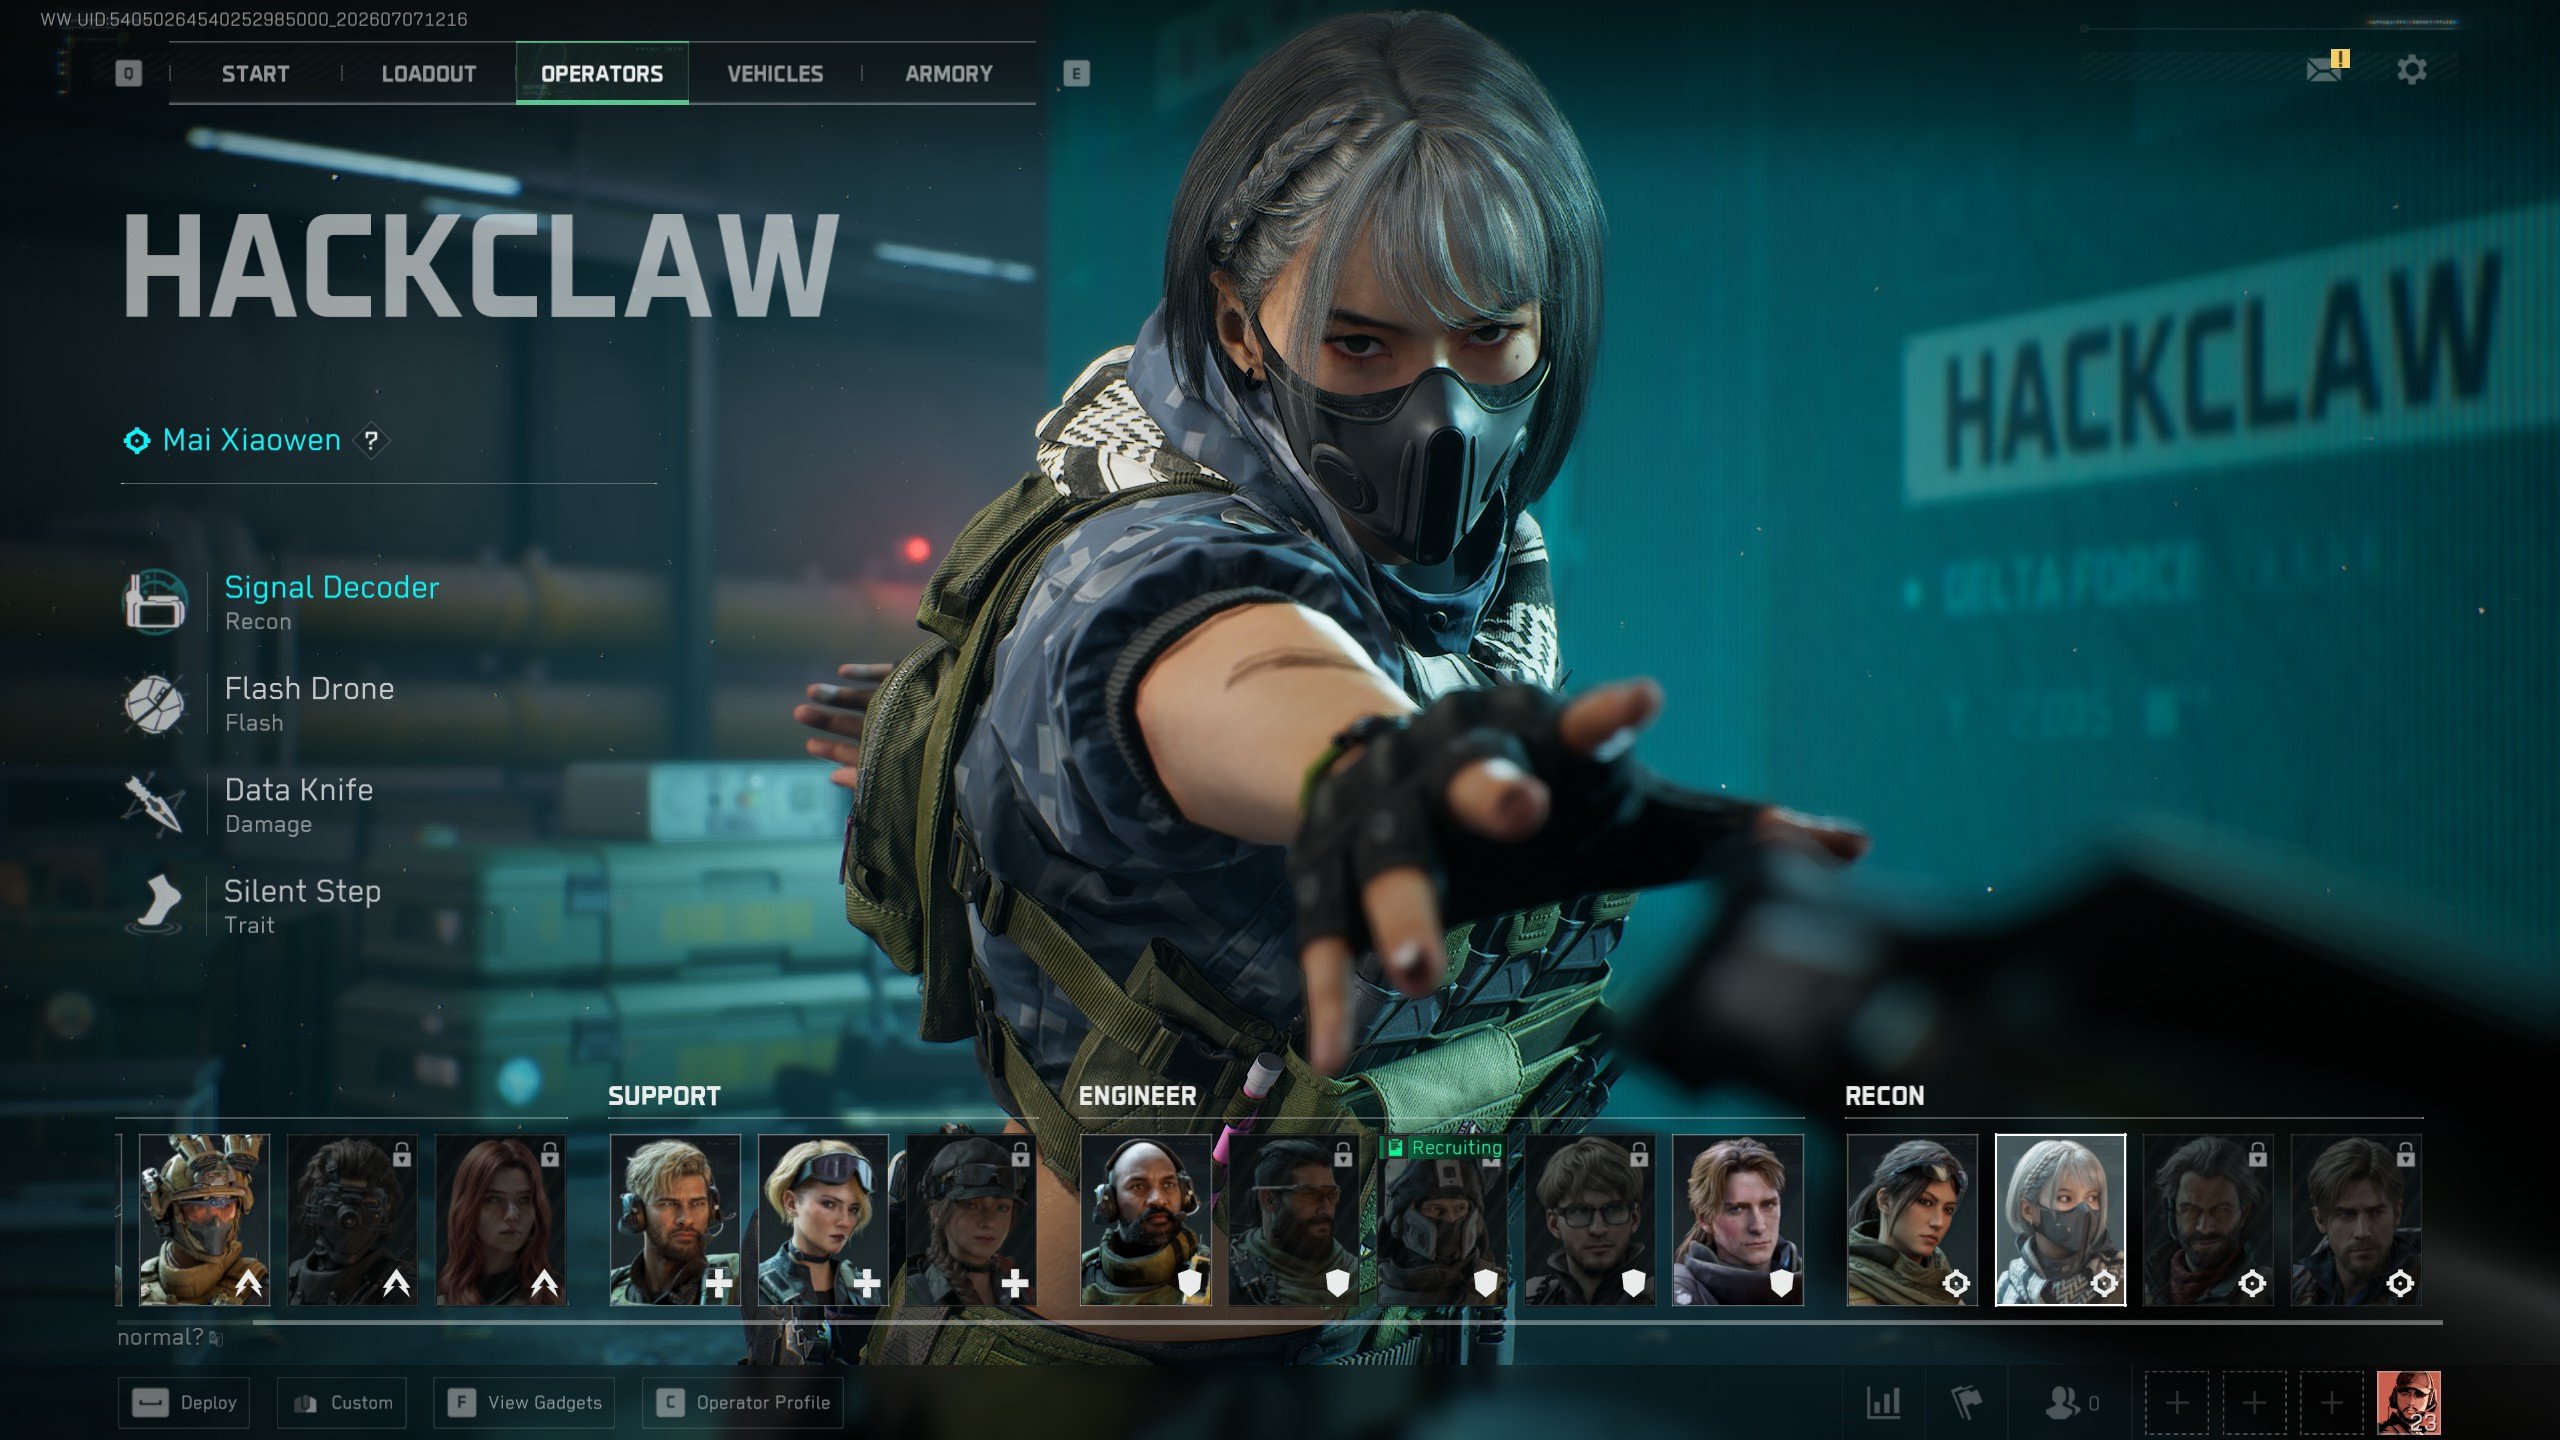
Luna
- Detection Arrow: Reveals enemies below its flight path and leaves micro-sensors that detect moving targets. Its detection radius increases with height.
- Volt Arrow: Creates an electrical field that deals damage over time.
- GE2 Frag Grenade: Deals strong damage to armor and exposed limbs and can be primed before throwing.
- Enemy Analysis: Briefly marks enemies damaged by Luna.
There’s no way around it - information is insanely valuable in Operations, and Luna gives you more of it than almost anyone else. In Warfare, knowing that there’s another enemy behind the wall is nice. In Operations, that same information can literally save your entire loadout. Detection Arrow can tell you whether a building is safe to push, and Enemy Analysis means that simply landing a shot gives your whole squad information. Oh, and she also gets a damaging Volt Arrow and frag grenades because apparently wall hacks weren’t enough.
Hackclaw
- Signal Decoder: Scans for up to six enemy signals within 60 meters ahead and displays their movement trails. The closest enemy is highlighted in red.
- Flash Drone: Sends a drone forward that flashes enemies within range. It can also follow a custom trajectory created with the Signal Decoder.
- Data Knife: Hacks and temporarily disables electronic devices within 10 meters. Hitting an enemy marks them for nearby squadmates, while downing an enemy reduces the cooldown.
- Silent Step: Increases movement speed while crouching or moving silently and reduces movement noise.
Hackclaw was already S-tier on my Warfare list, and I’d say she’s even more naturally suited to Operations. Signal Decoder lets you check whether enemies are nearby without running straight into them, which is obviously a little more important when dying means losing your gear. Silent Step also matters much more here because players actually listen for footsteps. You can use Hackclaw aggressively, defensively, or just to make sure that the supposedly empty building you’re about to loot isn’t occupied by three dudes waiting behind a door.
Nox
- Silent Assault: Reduces Nox's sound range, improves mobility, and interferes with enemy Recon gadgets. The duration increases when Nox is alone or has a downed squadmate.
- Whirlwind Disc: Can lock onto enemies and track them before exploding, dealing damage, slowing movement, and applying bleed. It can also be thrown without locking on.
- Tactical Flashbang: Blinds and stuns nearby enemies.
- Deep Trauma: Reduces the health regeneration of enemies damaged by Nox.
Nox is basically built for Operations. Remember how I said that his Solid Snake toolkit doesn’t make as much sense in a 32v32 battle? Well, now it does. Silent Assault lets you reposition or flank without broadcasting your footsteps to the entire enemy squad, and it even lasts longer when you’re solo or have a downed teammate. Deep Trauma is also nasty here because every bit of healing matters. He takes more skill than Luna or Stinger, but a good Nox player can be an absolute pain to deal with.
Stinger
- Hive-Tech Pistol: Fires homing shots that heal allies and suppress pain. Aiming down sights focuses healing on one target, while holding the ability lets Stinger heal himself.
- Smokescreen: Sends a controllable UAV forward while it creates a long line of smoke.
- Hive-Tech Smoke Grenade: Creates smoke that can be turned into a healing area when shot with the Hive-Tech Pistol.
- Expertly Rescue: Lets Stinger revive squadmates more effectively and bring them back with more HP. In Operations, it also removes debuffs that reduce Max HP.
You know what’s even more useful than a good healer in Warfare? A good healer when everyone is carrying gear they really don’t want to lose. Stinger is still the simplest and most reliable support operator. You get direct healing, self-healing, two different sources of smoke, and better revives. In Operations, Expertly Rescue also removes Max HP reduction debuffs. That’s just ridiculous value from one operator. You don’t have to understand some complicated combo either. See injured teammate, shoot healing pistol. Simple.
Delta Force Operations A-Tier Operators
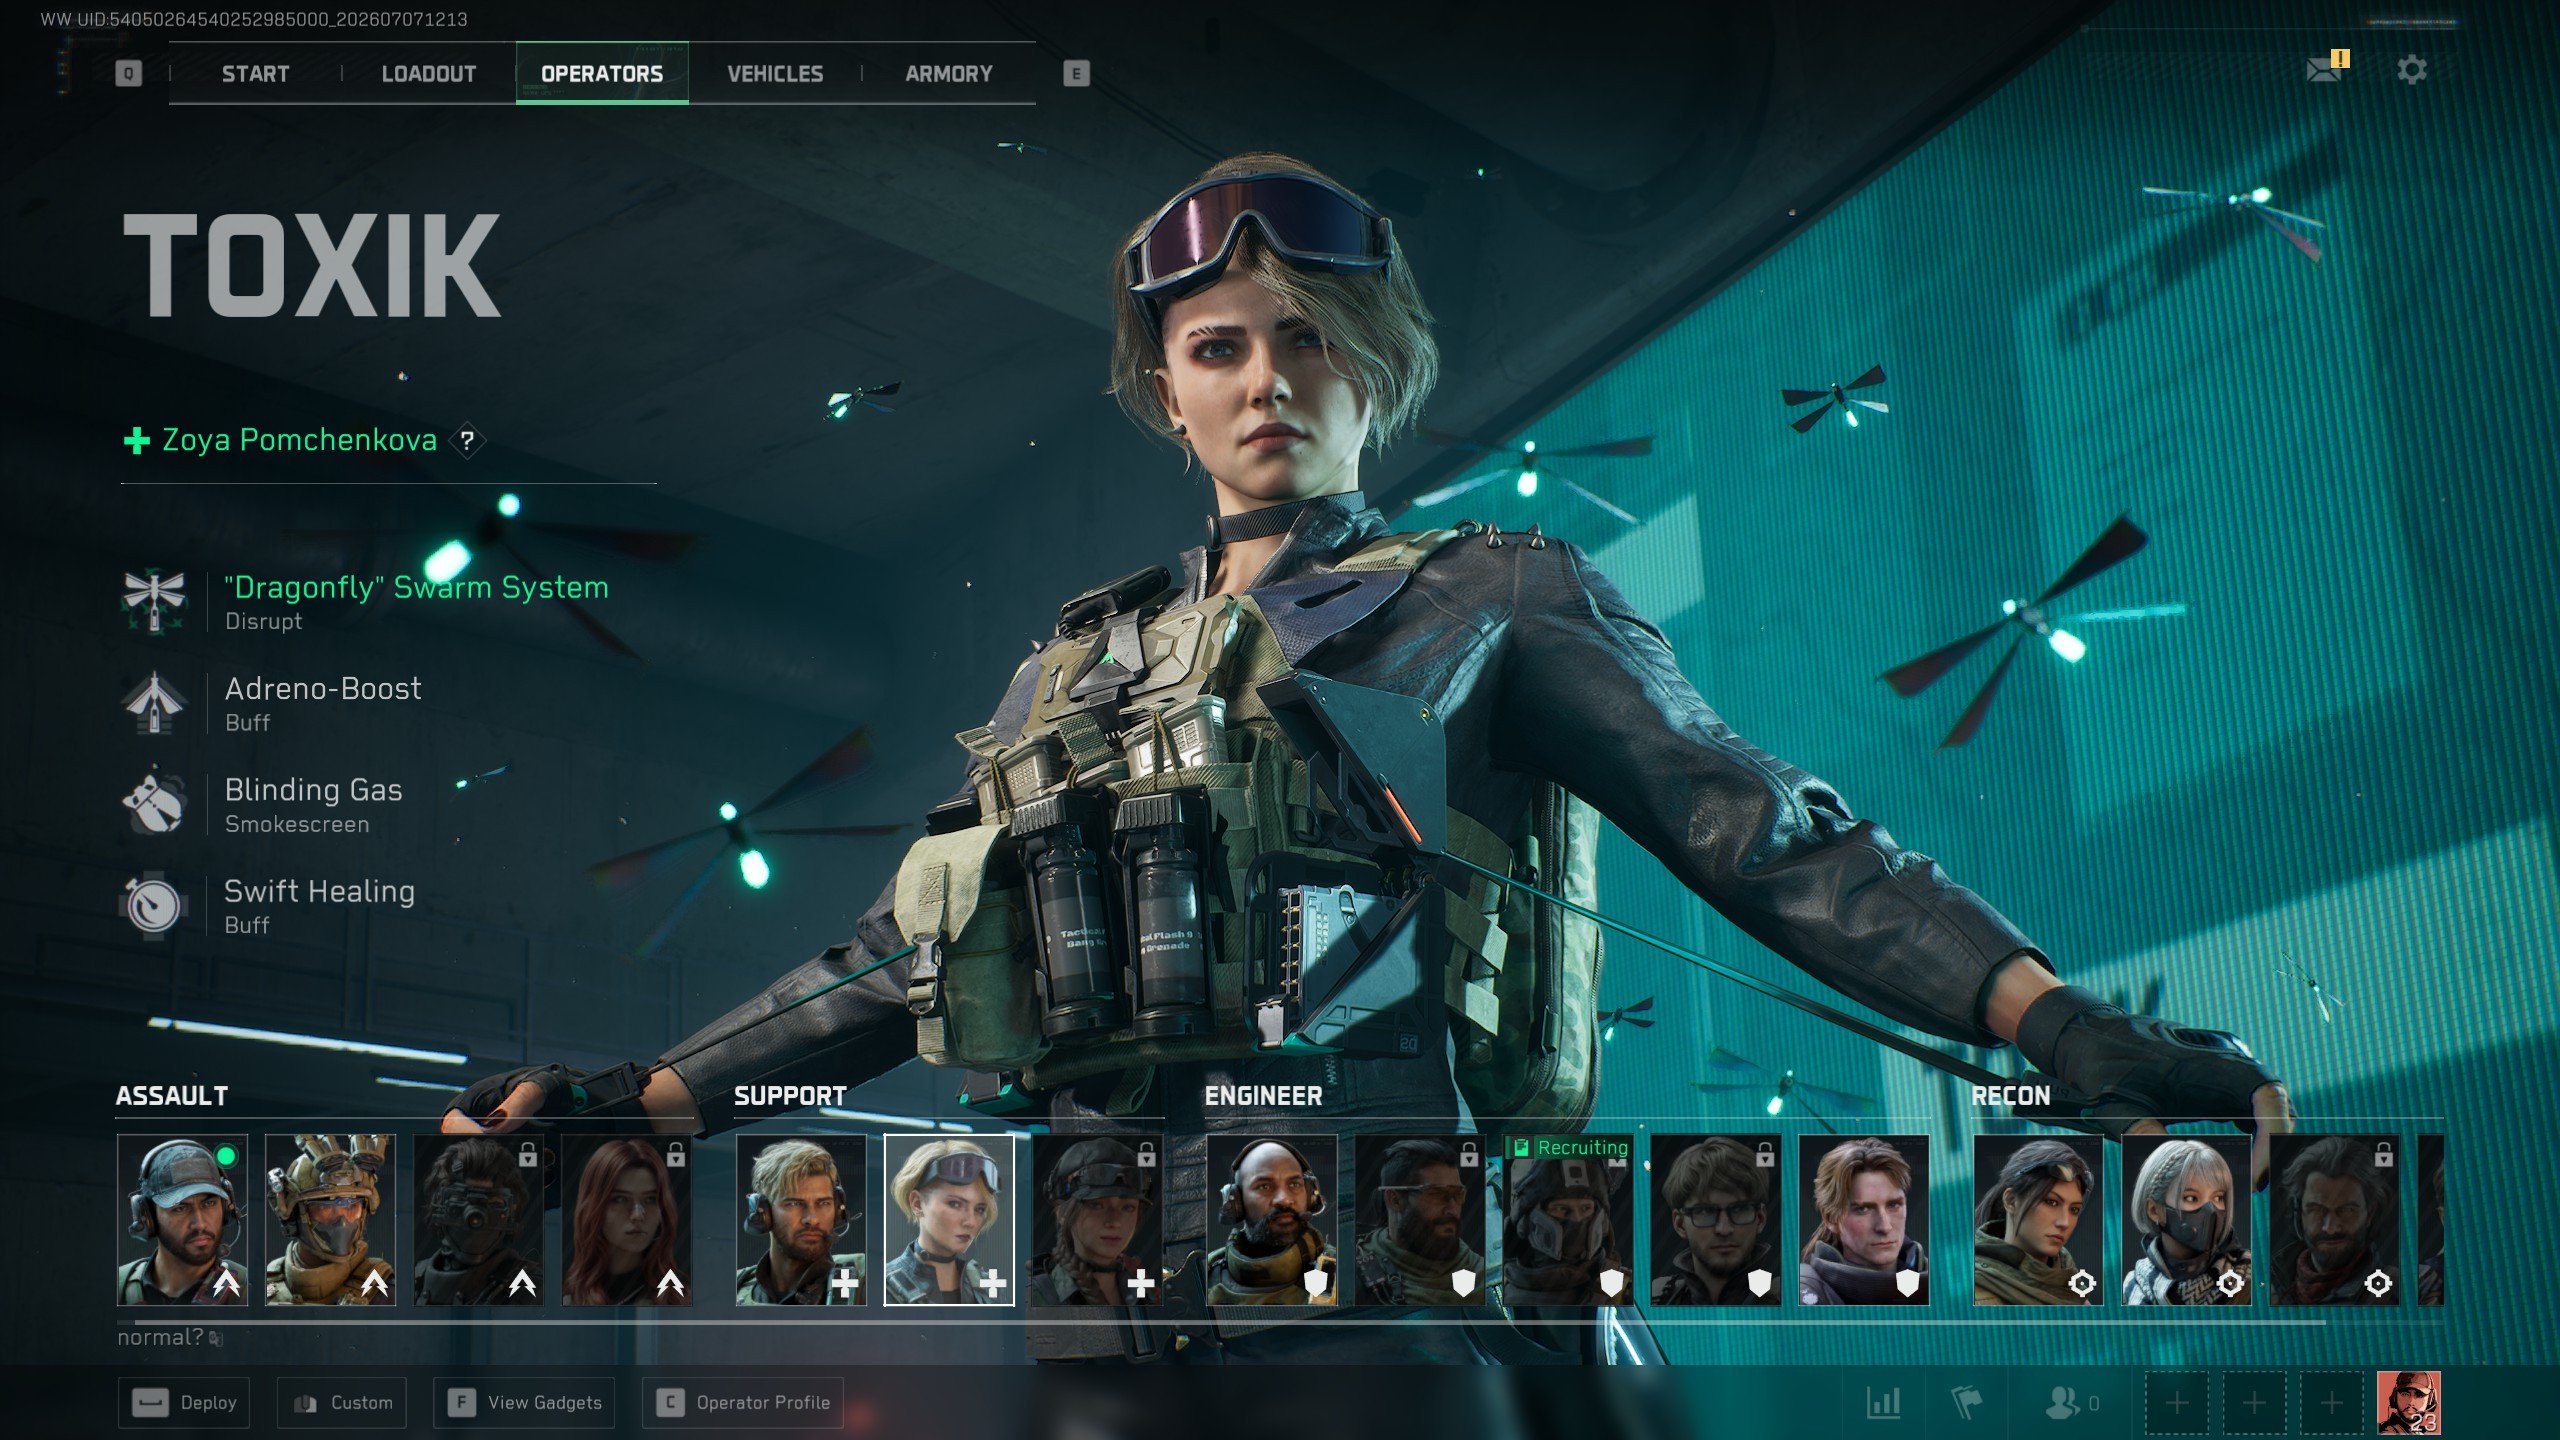
D-Wolf
- Motorized Exoskeleton: Increases sprint speed. Downing enemies while the ability is active restores HP and extends its duration.
- Triple Blaster: Fires high-explosive grenades that stick to vehicles on impact. In Operations, D-Wolf gets two charges before the ability goes on cooldown.
- Tactical Smoke Grenade: Releases fast-dissipating smoke immediately on impact.
- Tactical Slide: Allows D-Wolf to perform a fast slide with his exoskeleton.
D-Wolf is still amazing, but I wouldn’t put him quite as high as in Warfare. You don’t spend the entire Operations match sprinting toward capture points, so his movement is naturally less important. Still, when you actually get into a fight, that movement suddenly becomes incredibly useful. You can reposition, escape, chase injured enemies, or turn a bad fight into a 1v3 win. And unlike in Warfare, you get two Triple Blaster charges before the cooldown. That’s a pretty nice upgrade.
Toxik
- "Dragonfly" Swarm System: Sends a UAV swarm forward. Allies gain an adrenaline boost, while enemies suffer impaired hearing and vision and reduced Max HP.
- Adreno-Boost: Buffs nearby allies by increasing Handling, reducing Hit Flinch, and temporarily increasing movement speed. Kills and assists can strengthen the next buff.
- Blinding Gas: Creates gas that blinds enemies after enough exposure.
- Swift Healing: In Operations, nearby squadmates use consumables faster.
Toxik gets much better when you’re playing with a coordinated squad. The Dragonfly Swarm can basically give your team permission to push while simultaneously making the enemy team worse at fighting back. Reducing Max HP is also much more meaningful in Operations, where players care about injuries and consumables. Speaking of consumables, Swift Healing makes nearby squadmates use them faster. I still prefer Stinger because healing people directly is simpler, but Toxik can completely change a well-coordinated fight.
Vlinder
- Flutter Rescue UAVs: Sends a drone to inject a downed ally with plasma. Approaching that ally then activates defibrillation and revives them. An active defense drone can also block one instance of damage for Vlinder.
- Med Drones: Track a squadmate and heal them and nearby allies. Holding the ability lets Vlinder heal herself.
- Windmill Smoke Grenade: Throws a steerable smoke grenade.
- Bio Scan: Extends squadmates' downed and dying timers. While using Med Drones, Vlinder can see squadmates' outlines and HP status.
This is exactly the game mode Vlinder was made for. Most of my problems with her in Warfare come from the fact that everything she does feels too slow. Operations is slower. You actually have time to use the drones properly instead of watching three more teammates die while an animation plays. Extending downed timers is also genuinely useful when every squad member matters. I still think Stinger is simpler and more reliable, but this is a huge improvement over her Warfare performance.
Morse
- Advanced Sonar Device: Periodically scans a designated area, reveals how many enemies are inside, and precisely marks enemies that make sound.
- Throwable Jammer: Slows enemies, blurs their vision, reduces turning speed and hearing, and forces them to continuously emit sound.
- Delayed Flashbang: Explodes after a delay and blinds enemies facing it.
- Sonic Sitrep: Detects nearby enemy devices and creates markers visible only to Morse.
I already put Morse in A-tier for Warfare just because enemy detection is always useful. Obviously, it’s even better in Operations. Advanced Sonar Device doesn’t just tell you that somebody is nearby - it tells you how many enemies are in the area and can precisely mark the noisy ones. That can be the difference between pushing one guy and accidentally walking into a full squad. The Throwable Jammer is also much nastier here because slowing someone down and ruining their senses can easily decide a close fight.
N-Two
- Frost Launcher: Fires up to six freezing grenades. Continuous firing increases the firing speed.
- Cryo-Flask: Creates a persistent area of cold gas that builds cold effects on enemies and can freeze doors shut.
- Homing Stun Grenade: Automatically flies toward nearby enemy operators, marking them and disrupting their vision.
- Permafrost: Gradually slows enemies exposed to low temperatures until they become frozen. N-Two can see their hypothermia level, and frozen enemies are pinged.
I’d keep N-Two in A-tier here too. Slowing enemies is good in Warfare, but controlling where people can and can’t move is arguably even better in Operations. Cryo-Flask can cover entrances and even freeze doors shut, which is exactly the kind of annoying little thing that becomes useful when fighting inside buildings. Homing Stun Grenades also remain great because, once again, the game does some of the aiming for you. He’s still new, so I’m not ready to throw him into S-tier just yet.
Raptor
- Wing Cam: Attaches a camera to an enemy and periodically marks their position. If the target dies, the camera remains and keeps marking the area.
- Silver Wing: Deploys a manually controlled drone that marks enemies up to 90 meters away. It can carry EMP grenades, deploy Wing Cams, and self-destruct.
- EMP Grenade: Disables electronic equipment, weapon attachments, sights, and nearby electronic gadgets.
- Threat Detection: Shows a directional indicator when an enemy aims at Raptor and allows him to deploy a Wing Cam on that threat.
I had Raptor all the way down in C-tier for Warfare because, seriously, who has time to fly a bird around in the middle of a 32v32 battle? Operations is completely different. Here, finding another squad before they find you is a massive advantage. You can use Silver Wing to scout ahead, decide whether you even want to take a fight, and track enemies who try to escape. Threat Detection is also one of the best passive abilities for surviving. The only reason he isn’t S-tier is that once the actual gunfight starts, most of his toolkit stops helping.
Delta Force Operations B-Tier Operators
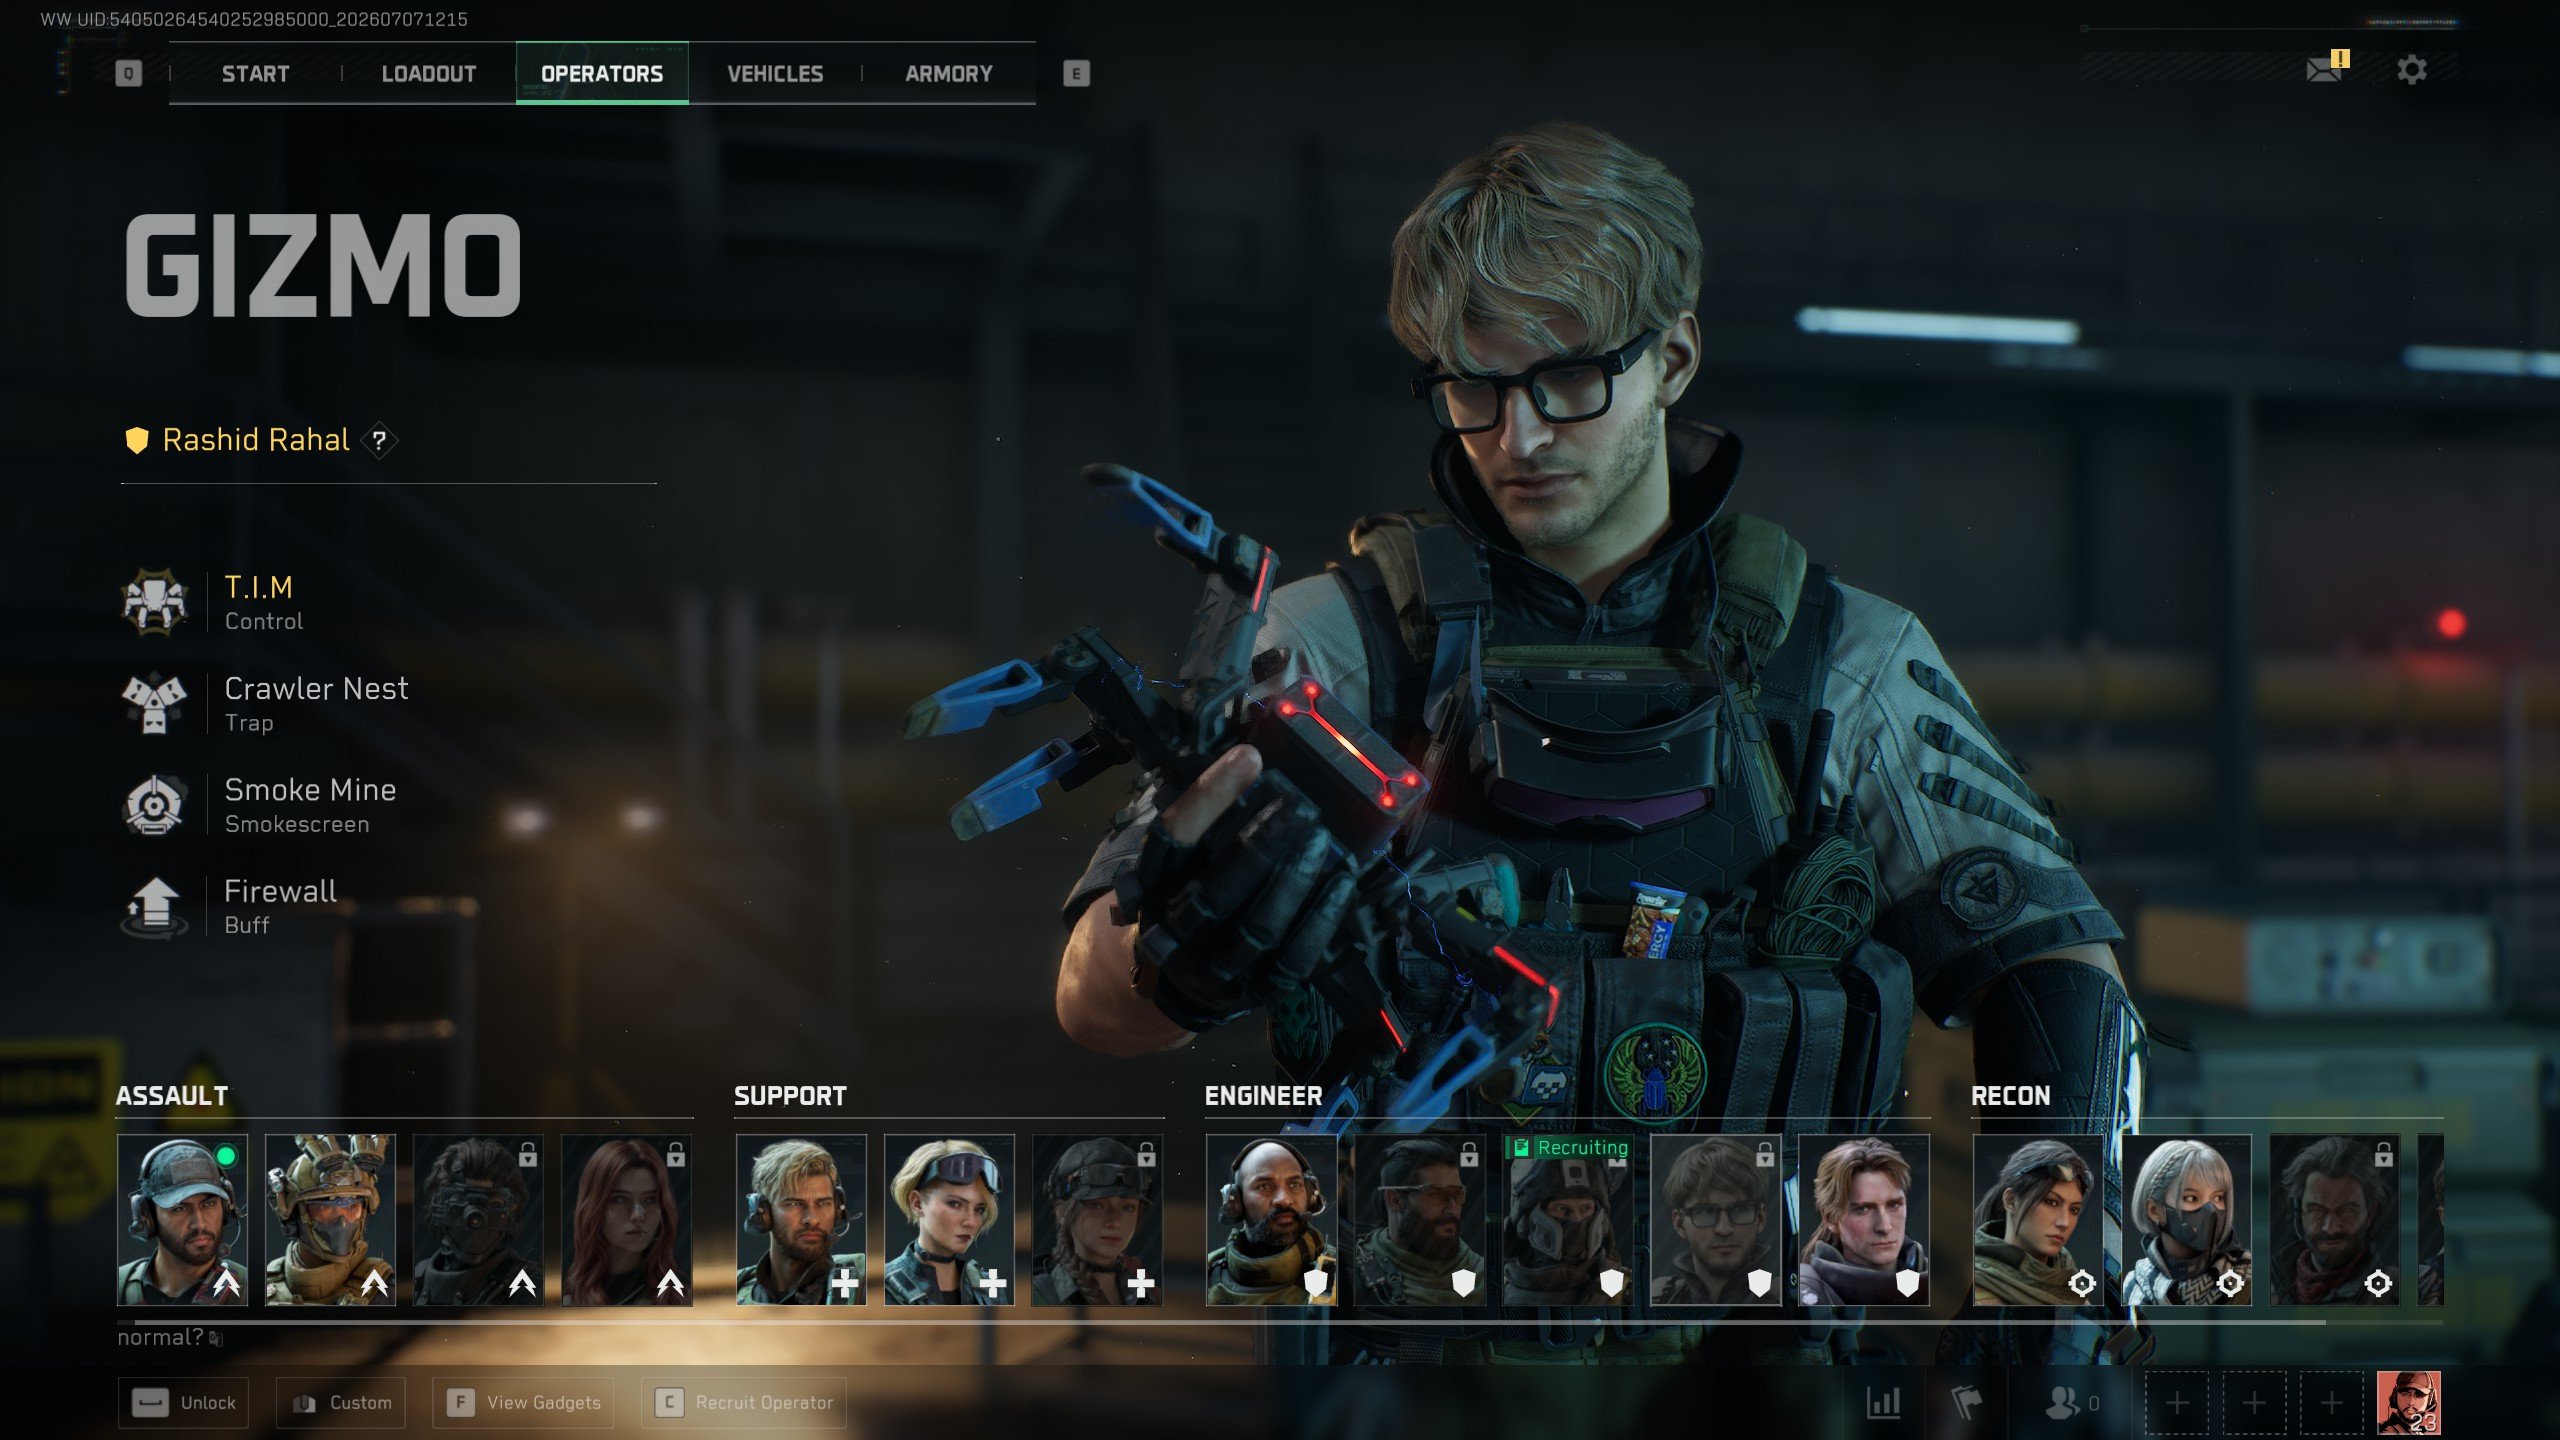
Gizmo
- T.I.M: Sends out a mobile unit that pursues enemies and fires a restraining net, limiting movement and preventing aiming down sights or using operator gadgets.
- Crawler Nest: Releases three tracking crawlers that explode on enemies and apply corrosion. Corrosion increases the bullet damage taken.
- Smoke Mine: Creates smoke that slows enemies. Corroded enemies are marked while inside the smoke.
- Firewall: Improves firearm handling while Gizmo is close to his own deployables.
Gizmo definitely works better here than in Warfare. There are fewer people randomly shooting everything that moves, so his drones have a better chance of actually reaching someone. Crawler Nest is particularly nasty inside buildings, and corrosion makes enemies take more bullet damage. Still, his biggest problem remains the same: you can shoot his stuff. A good Gizmo player can create a lot of pressure, but a bad one just throws expensive-looking robots into somebody’s bullets.
Shepherd
- Sonic Paralysis: Sends out a drone that suppresses enemies and reduces their fire rate. A quick deployment creates one suppression pulse, while holding the ability creates four.
- Sonic Trap: Sticks to surfaces and triggers when enemies approach, damaging and slowing them.
- GE2 Frag Grenade: Deals strong damage to armor and exposed limbs and can be primed.
- Sonic Defense: Reduces damage taken from explosions.
Shepherd remains a pretty good, standard operator. In Operations, his traps become more useful because you can actually defend a building or watch your back while looting. Sonic Paralysis can also make it much harder for an enemy squad to push you. The problem is that Shepherd mostly reacts to what other people are doing. He’s good at saying no, but he doesn’t have the same ability to find enemies, chase them, or completely turn a fight around.
Uluru
- Loitering Munition: Fires a camera-guided missile that splits into four additional bombs when it explodes. Hip-fire launches it along a preset trajectory.
- Quickset Cover: Creates an instant piece of concrete cover.
- Composite Incendiary: Throws an incendiary grenade that creates an area of fire and quickly destroys Quickset Covers.
- Battle Hardened: Gives Uluru stronger resistance to slowing effects caused by fractures and class gear.
This one hurts because Uluru is S-tier in Warfare, but Operations takes away one of the biggest reasons to pick him: constantly dealing with vehicles. He’s still good. Quickset Cover can save you in an open area, and Composite Incendiary is great for blocking doors or forcing enemies out of cover. The Loitering Munition can also punish campers. He just doesn’t have the same clear purpose here that he has in Warfare.

You got -20% OFF 
Delta Force Operations C-Tier Operators
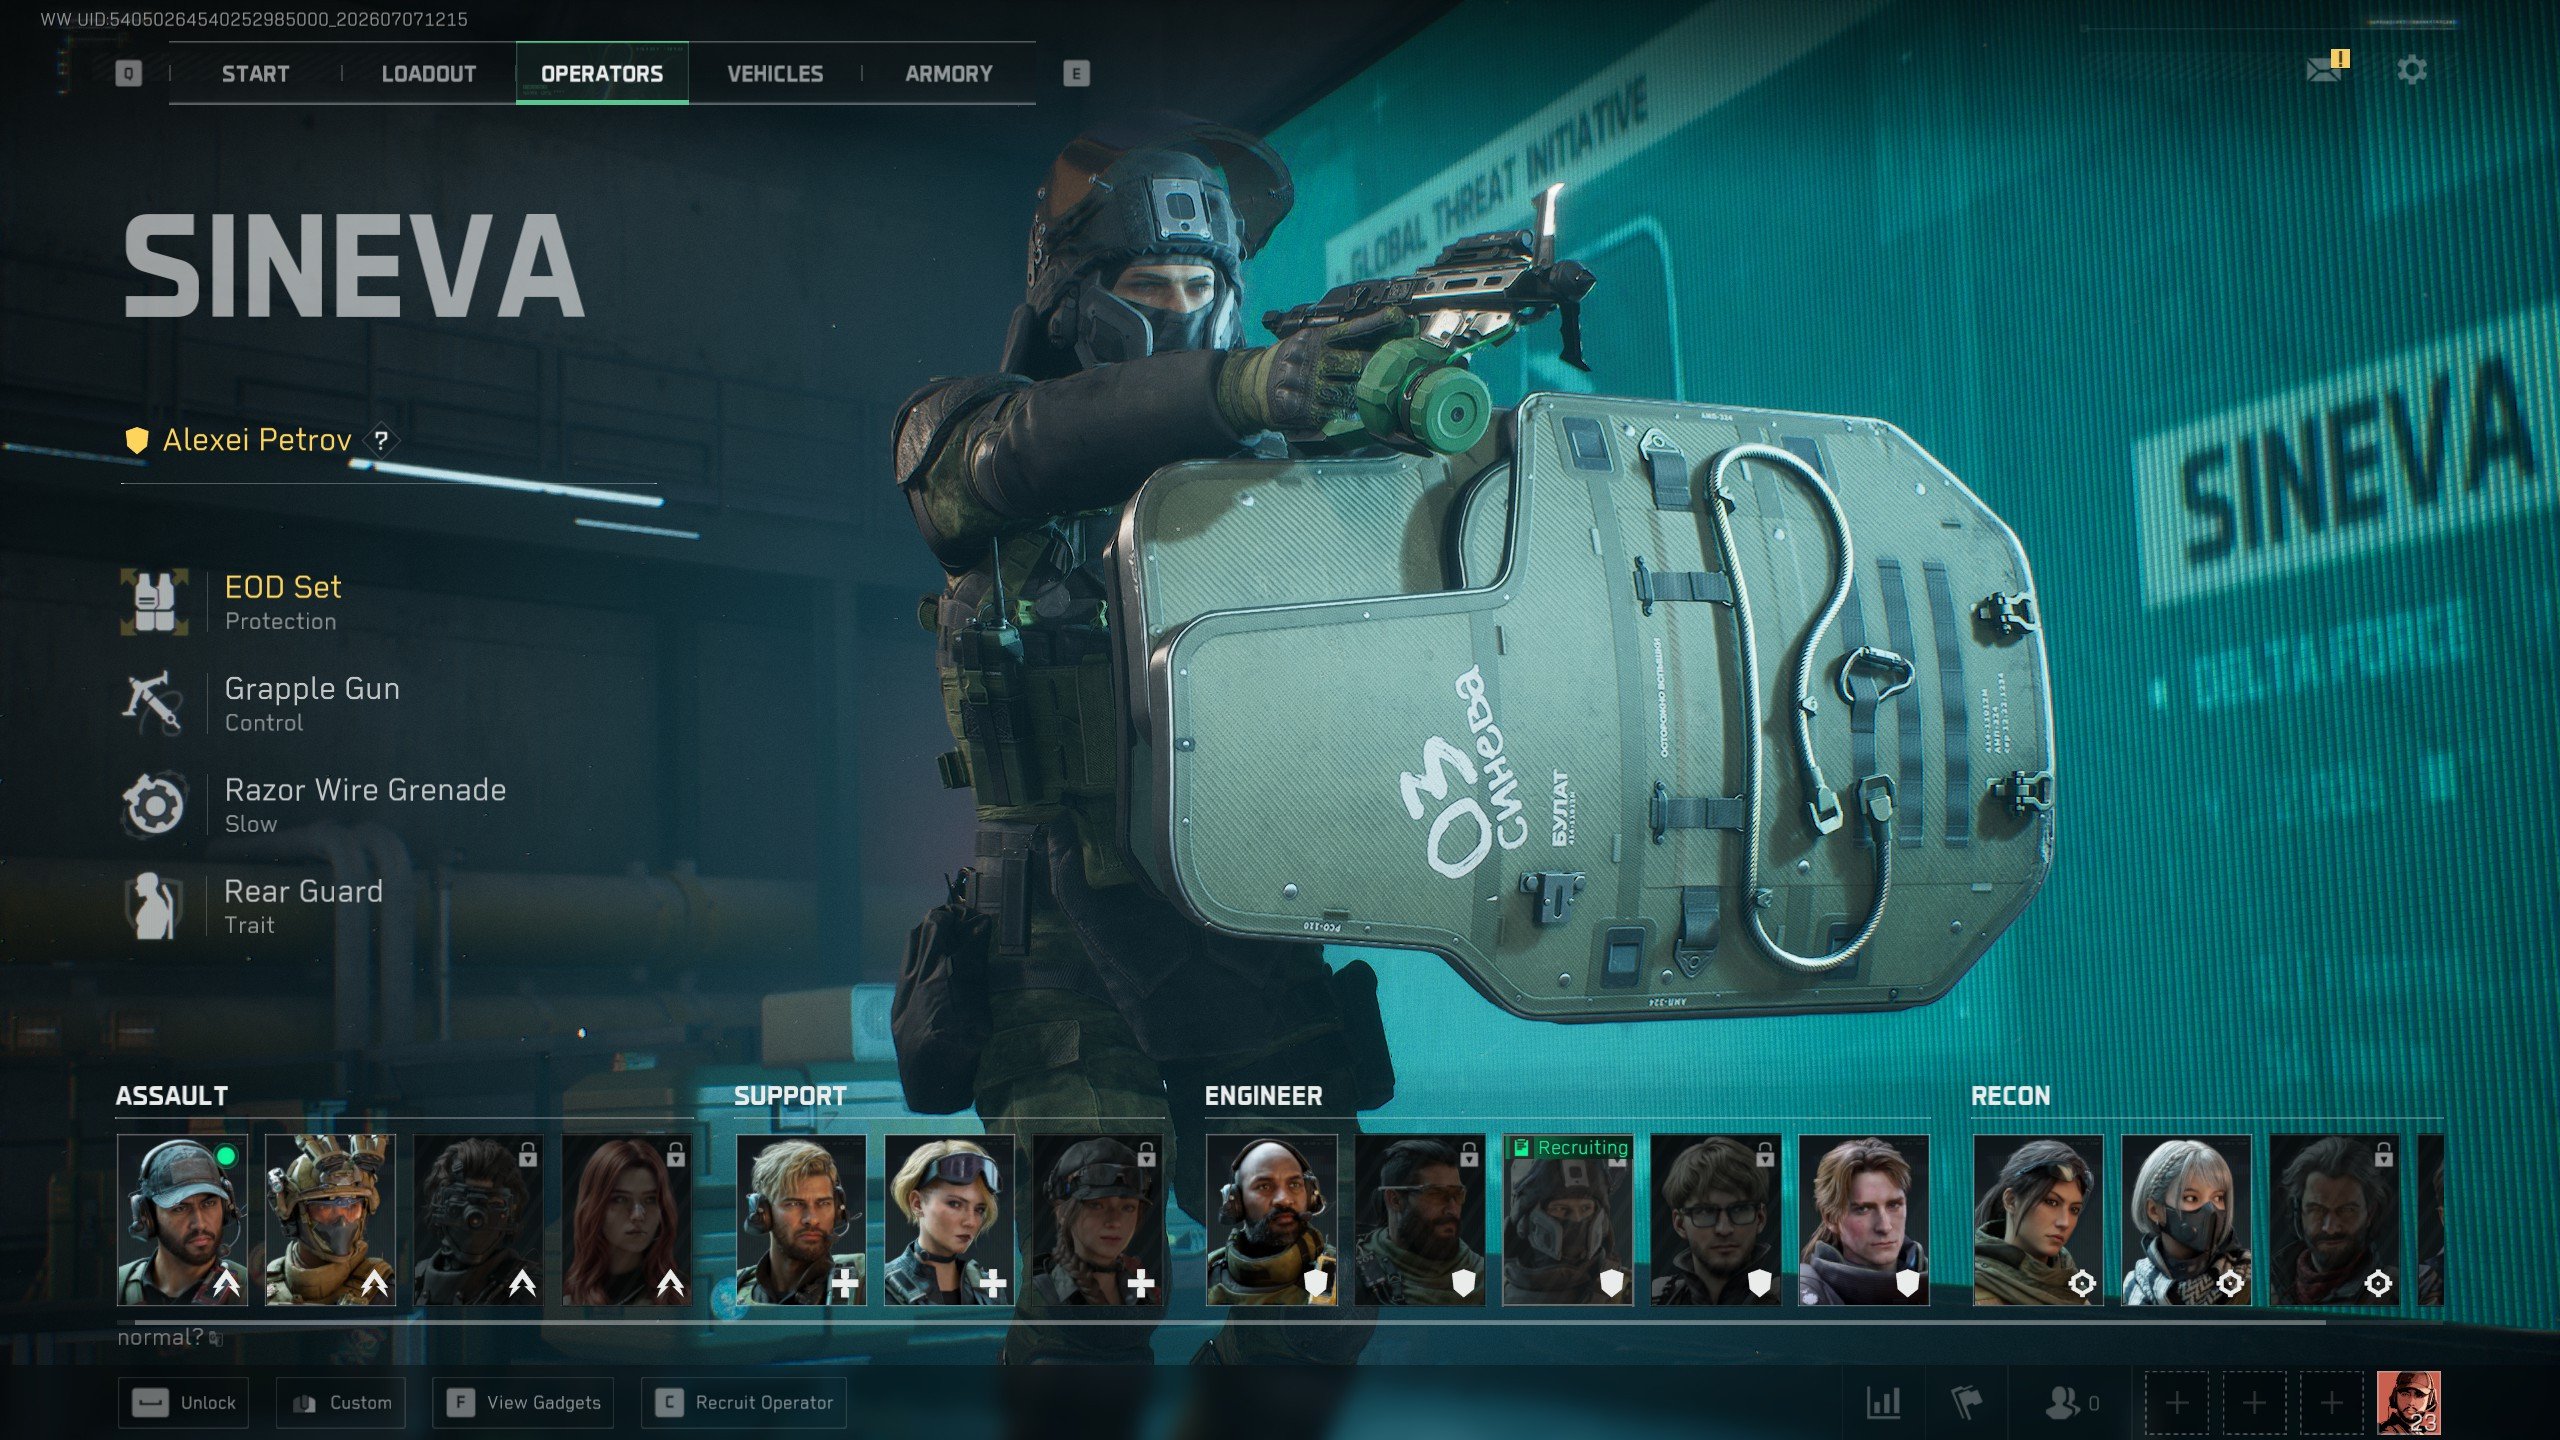
Sineva
- EOD Set: Reduces explosive and burn damage while increasing protection. Sineva can switch between the Blast Shield and his weapons, although Handling and Accuracy are reduced.
- Grapple Gun: Pulls enemies, downed teammates, or gear crates toward Sineva. The rope can be damaged.
- Razor Wire Grenade: Deploys wire that damages, slows, and applies bleeding to enemies moving through it.
- Rear Guard: Keeps the Blast Shield on Sineva's back when not in use, blocking bullets from behind. During rescues, the shield protects him from the front.
I love Sineva's kit conceptually. Shield, grapple gun, razor wire - come on, that sounds amazing. But Operations is not the place where I want to make myself the loudest and most obvious person in the area. His protection can be useful, and pulling a downed teammate into cover is a genuinely cool use of the Grapple Gun. Still, compared to operators who can tell me exactly where an enemy squad is, Sineva just doesn’t bring enough.
Vyron
- QLL32 Crouching Tiger: Fires a compressed-air shell that explodes and knocks nearby enemies back.
- Dynamic Propulsion: Dashes Vyron forward. Downing enemies reduces the cooldown.
- Magnetic Bomb: Throws a high-explosive charge that sticks to hard surfaces and detonates after a delay.
- Dynamic Auxiliary System: Reduces fall damage and temporarily increases movement speed after using gadgets or falling.
Vyron is still fun if you’re one of those cracked movement players who somehow know exactly where every dash is going to send them. I’m not. In Operations, one bad movement ability can put you in the middle of three enemies and cost you an entire loadout. Magnetic Bomb is also awkward to use because you can’t throw it very far. A really good Vyron player can probably make him work, but I’d rather take an operator whose abilities don’t require a training course.
Delta Force Operations D-Tier Operators
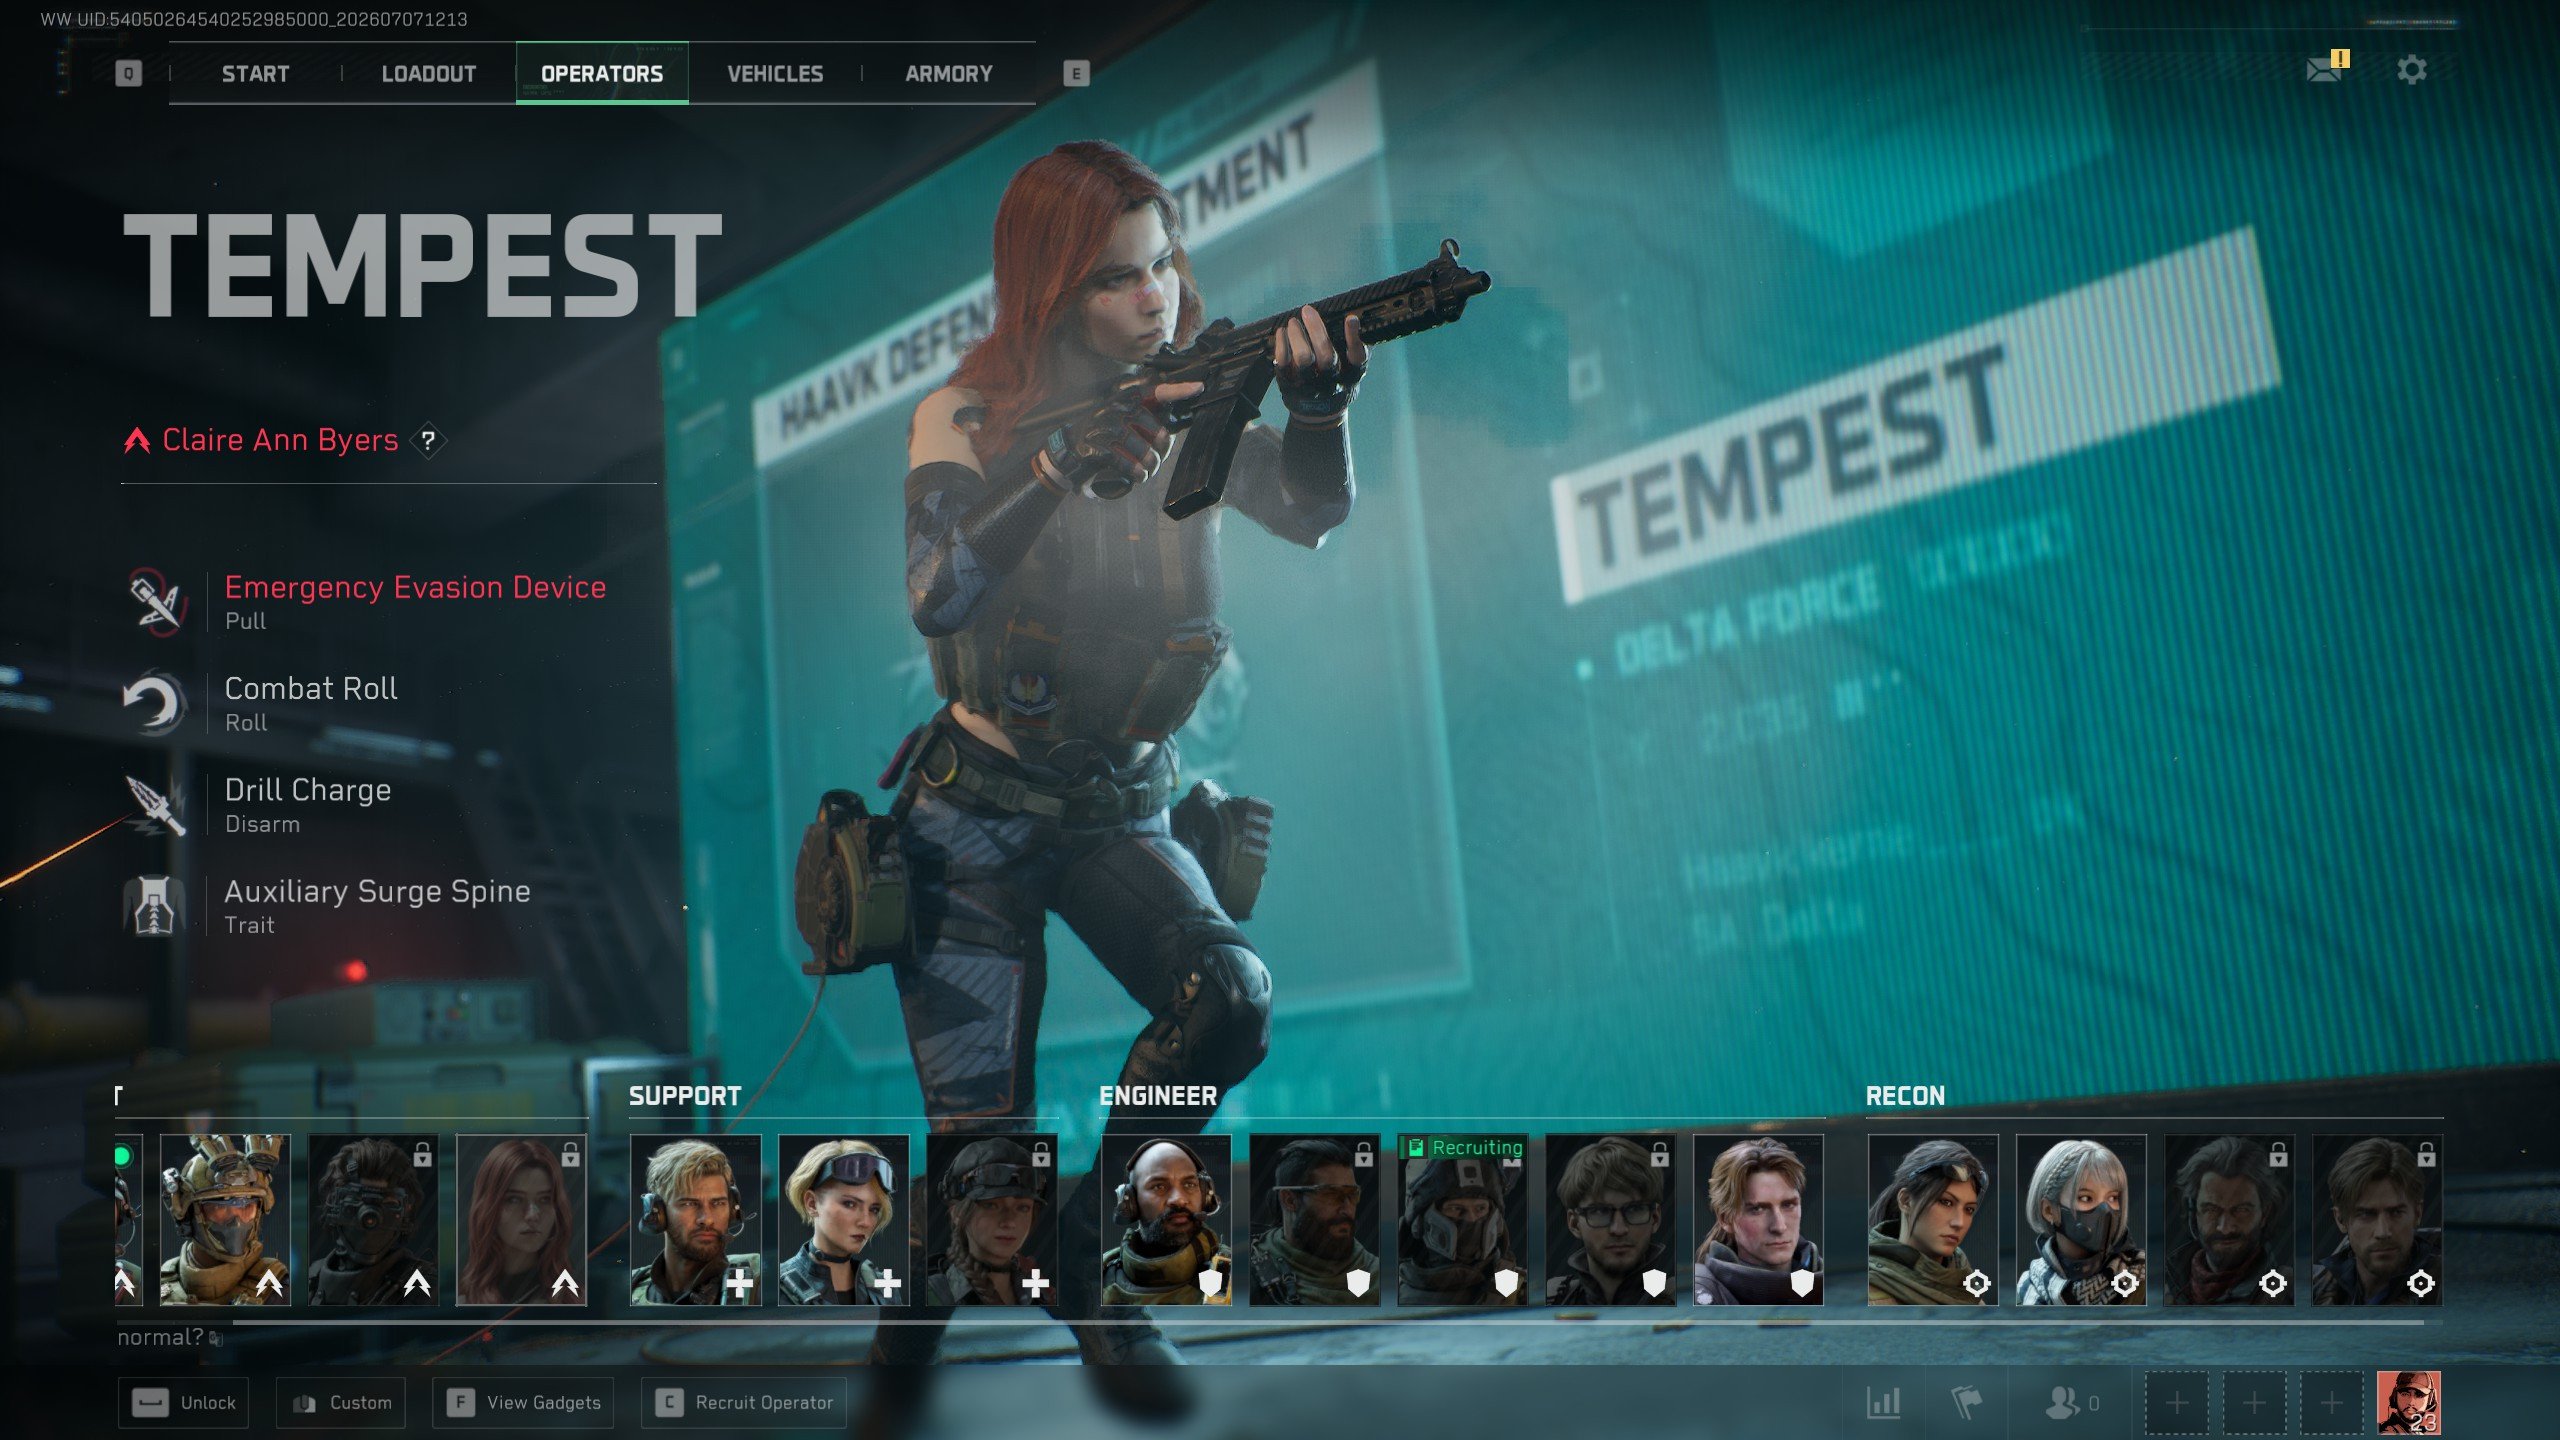
Tempest
- Emergency Evasion Device: Creates an anchor point that pulls Tempest back when reactivated or when she takes fatal damage. During the pull, she can briefly survive damage beyond her normal maximum HP.
- Combat Roll: Performs a fast roll in different directions. Downing enemies reduces the cooldown.
- Drill Charge: Penetrates hard surfaces and releases electricity that disarms and temporarily paralyzes enemies behind cover.
- Auxiliary Surge Spine: Increases sprint speed when bullets or explosive threats are nearby and also improves swimming speed.
Nope. I didn’t like the Emergency Evasion Device in Warfare, and I don’t suddenly like it because my gear is now on the line. The whole ability depends on you setting an anchor and then pulling yourself back to a completely predictable position. If the enemy knows where you came from, congratulations, you’ve just delivered yourself back to them. Combat Roll and Drill Charge are both good abilities, but I’m not putting an operator higher when the most important ability in the entire kit is the one I least want to use. To be fair, the EED does work if you pre-plant the anchor before pushing — it's essentially a 100m tether safety net. I still think it's too predictable for high-level play, but it's not zero value."
Check out other Delta Force Guides:
F.A.Q.
How many Operators are in Delta Force?
As of Season 10, Delta Force has 16 operators. New players only get access to 7 of them across all 4 operator classes: Assault, Engineer, Support, and Recon.
What are the 4 Operator classes in Delta Force?
The four Delta Force operator classes are Assault, Support, Engineer, and Recon. Each class has its own role and access to different class-specific equipment.
Who is the best Operator in Delta Force?
There is no single best operator because Warfare and Operations play completely differently. In my tier list, D-Wolf, Stinger, Uluru, and Hackclaw are S-tier for Warfare, while Luna, Hackclaw, Nox, and Stinger are my top Operations picks.
What is the best Delta Force Operator for beginners?
I recommend D-Wolf for Warfare and Stinger for Operations. Both have simple abilities that are useful without requiring complicated setups or perfect team coordination.
What is the best Operator for Warfare in Delta Force?
My S-tier Warfare operators are D-Wolf, Stinger, Uluru, and Hackclaw. D-Wolf is my personal favorite because his speed, healing, smoke, and Triple Blaster make him useful in almost any match.
What is the best Operator for Operations in Delta Force?
Luna is arguably the safest overall pick for Operations because information about enemy positions is incredibly valuable in an extraction mode. Hackclaw and Nox are also excellent for finding, avoiding, and flanking enemy squads.
How do you unlock new Operators in Delta Force?
Operators are usually unlocked through seasonal passes, events, login rewards, and operator challenges. The exact method depends on the operator and can change between seasons; for example, Season 10 introduced N-Two through the Meltdown season content.
Are Operator abilities different in Warfare and Operations?
Yes, some abilities and traits work differently depending on the mode. For example, D-Wolf gets two Triple Blaster charges in Operations but only one in Warfare, while several passive abilities also have mode-specific effects.