 Rick Flair
All Valo Maps in 2026 Quick Summary:
- Valo has 12 maps in 2026, split between competitive and casual pools.
- Competitive maps are Ascent, Breeze, Fracture, Haven, Lotus, Pearl, and Split.
- Casual maps are Abyss, Bind, Corrode, Icebox, and Sunset.
- Mid control is a major theme across maps like Ascent, Pearl, Split, Corrode, and Sunset.
- Breeze rewards long-range play, Operator control, and strong info agents.
- Haven and Lotus stand out because they have three spike sites.
- Bind relies on teleporter mind games instead of a normal Mid section.
- Icebox and Abyss focus heavily on verticality, ropes, and risky angles.
Valo is a game that rewards tactical thinking and mastery. You won't see this in lower ranks, though. If you want to skip them and go straight to the best players, check out our Valo Rank Boost.


Read closely 
Browse our hottest Valo Boosting services


List of All Valo Maps
Valo’s maps are each unique in their own way. Some of these peculiarities are loved by the community, others are not (looking at you, Fracture.) Currently, there are 12 maps, with 7 of them being fit for competitive games. The other 5 maps are out of the competitive pool, but may return later on:
- Competitive Pool: Ascent, Breeze, Fracture, Haven, Lotus, Pearl, Split
- Casual Pool: Abyss, Bind, Corrode, Icebox, Sunset
In this guide, I attempt to show some strategies, give a list of the best agents for each map in Valo, explain key points, and give you some tips. This article is not an extensive guide to each map. Instead, it serves as a crash course to them. Valo maps, for the most part, are quite deep and require full, lengthy guides to explain them, and in any case, the amount of information you get from them is hard to remember all at once. The short explanations of each map with tips that will instantly help you get better are a different thing.
Ascent
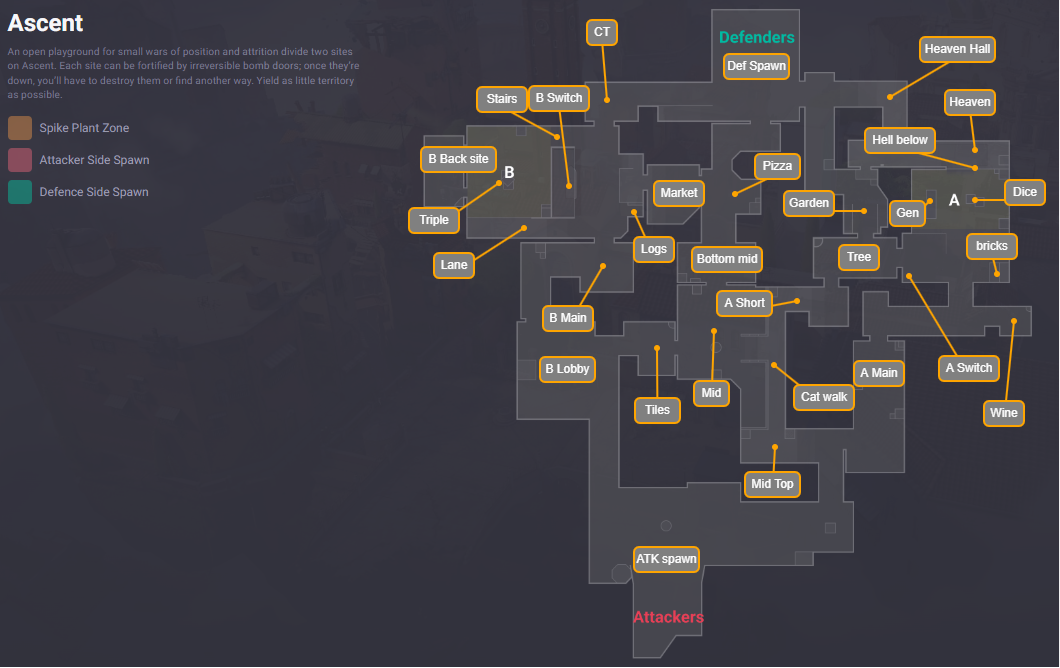
One of the first and most popular Valo maps. Ascent has mechanical doors at both spike sites. A Site has its door at A Link, while B Site has one at Market. Both start open and can be closed or reopened with switches from the site side. Closed doors block bullets, but they have 500 HP and can be destroyed, leaving the doorway open for the rest of the round.
Ascent’s key points are:
- Mid
- Catwalk
- A Tree
- B Main
- Market
Courtyard also has two destructible wall panels leading toward Link. Each has 400 HP and changes color as it takes damage. Once broken, players can wallbang through the wall. A Window also has breakable glass facing A Garden, which shatters from bullets and many ability projectiles. A few tips to play Ascent better:
- Control Mid: One of the strongest mid zones on any map. Losing it means losing a lot of valuable information, plus making enemy rotations easier.
- Split Between the Sites: Ascent is not a very big map, and you can fake an entrance on the site to make the defenders think that you have the plant.
- As Attackers Grab Orbs: Ultimate orbs heavily favor the attackers. Use them. Ascent is not the easiest map for attackers to dominate on, so this can win you a round or two early on.
The best agents to play on Ascent are:
- Sova or Fade: Lots of unsafe angles make them irreplaceable as info gatherers.
- Killjoy or Cypher: Great for B Site lockdown.
- Omen: One of the strongest agents on Ascent. Can smoke Tree or Market on his own.
Ascent is one of the most balanced maps in that it doesn’t favor one specific agent setup, and you can juggle any strategies to fit the situation.
Breeze
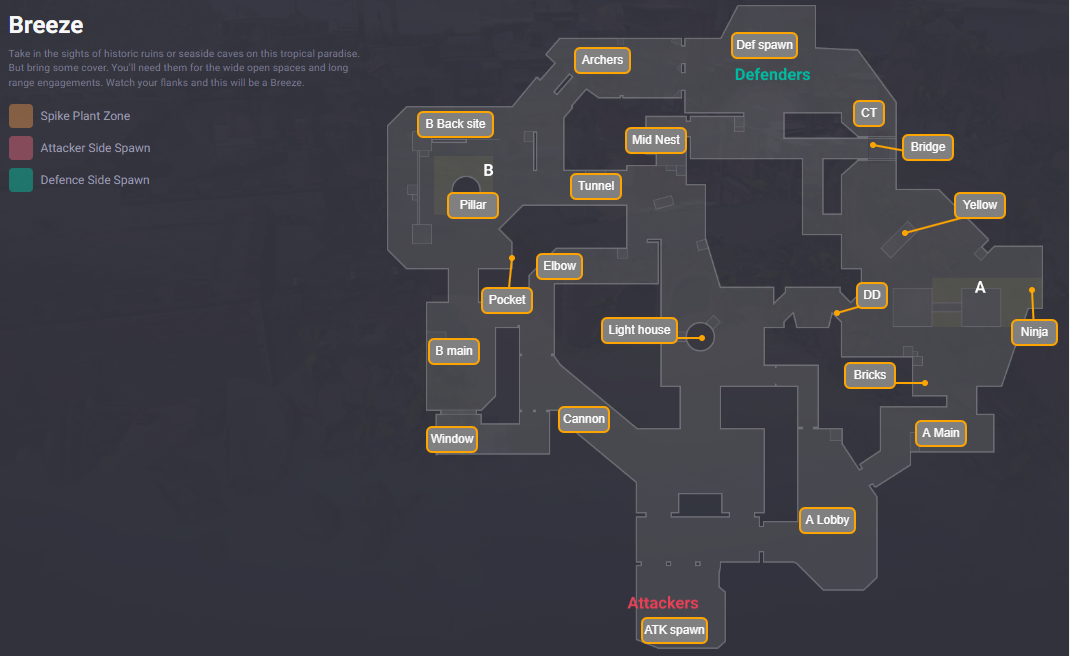
Breeze is one of the most open maps in Valo. Don’t peek with no info. Breeze has a few important map features around the A side. Defenders can use a rope at the back of A Site to reach the Bridge and move into the Hall, giving them another way to reposition or support the site.
Breeze’s key points are:
- A Main
- Mid
- Halls
- B Main
- Elbow
Mid Hall also has an automatic door. It opens as soon as a player gets close enough and makes a clear audio cue, so it can reveal movement. The door opens from both sides and can also be triggered by thrown objects or abilities. This makes Hall control unsafe, since even small actions can give away position or timing. A few tips for Breeze to be a breeze:
- Have an Op Player: Operator is extremely strong on this map due to how many long sightlines the map has.
- Hold Mid Nest as a Defender: The strongest point on the map to control rotations.
- Don’t be Afraid to Retreat as Defenders: The map allows you to protect the site even if it was taken, again, because of the long range.
- Site Taking Tactics: Taking A-site is effective through A Cave, A Hall, or by splitting DD. B-site is easier to take with utility. Cut off Elbow and B Main, and put someone to control this area before planting the Spike.
The best agents to play Breeze:
- Viper: The strongest agent on Breeze, can win rounds solo if you play her well.
- Sova or Skye: Since the map is big, the ability to quickly check further areas of the map is invaluable.
- Jett: Allows you to quickly take mid nest with Op.
Breeze is hard for attackers to take if they don’t realize quick and sudden entrances on sites. Once the defenders take the chokepoints, attackers are basically helpless.
Fracture
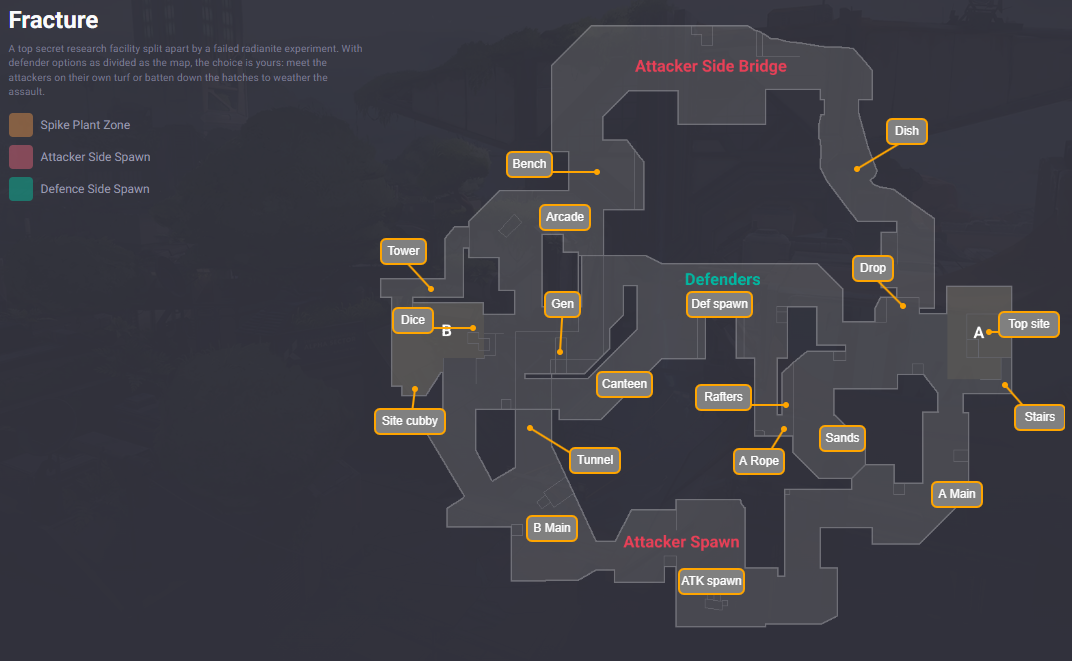
Fracture has a unique split layout with two sites on opposite sides and attacker access from both ends of the map. Attackers spawn together, but can use two one-way cross-map ziplines to reach the opposite side before the round starts. Defenders cannot hear these ziplines during the Buy Phase.
Fracture’s key points:
- A Main
- Dish
- Drop
- B Main
- Arcade
The map also has four ultimate orbs instead of the usual two, with one in each quadrant. A Hall contains an automatic door that opens from either side when players or objects get close, creating a loud audio cue. While riding Fracture’s ziplines, players move automatically and cannot use abilities, detach, or change direction. Here’s how to make Fracture less annoying:
- Be Active on Defense: Sitting on site won’t be useful on this map. You have to hold the key points where attackers will go and don’t let them take ground.
- Use Ziplines: Pretty obvious, but many people ignore them altogether.
- Fake as Attackers: The map is very wide, so feeding enemies disinformation is the best way to take sites.
The best agents for Fracture:
- Breach: Despite Fracture being wide, there are lots of narrow spaces where Breach can stun enemies easily.
- Brimstone: Lots of control. Smoking the chokepoints and denying plants with ultimate is really strong on this map.
- Sova, Cypher, or Skye: Information agents are irreplaceable here on both sides. There’s nothing worse than falling for a fake-out and hearing that the Spike was installed on another site.
Fracture’s layout is the reason why players really dislike it. It plays like a slog and is quite boring as you have to play time almost every round. Unfortunately, that’s how the map was designed to be played, so you can only adapt to it.
Haven
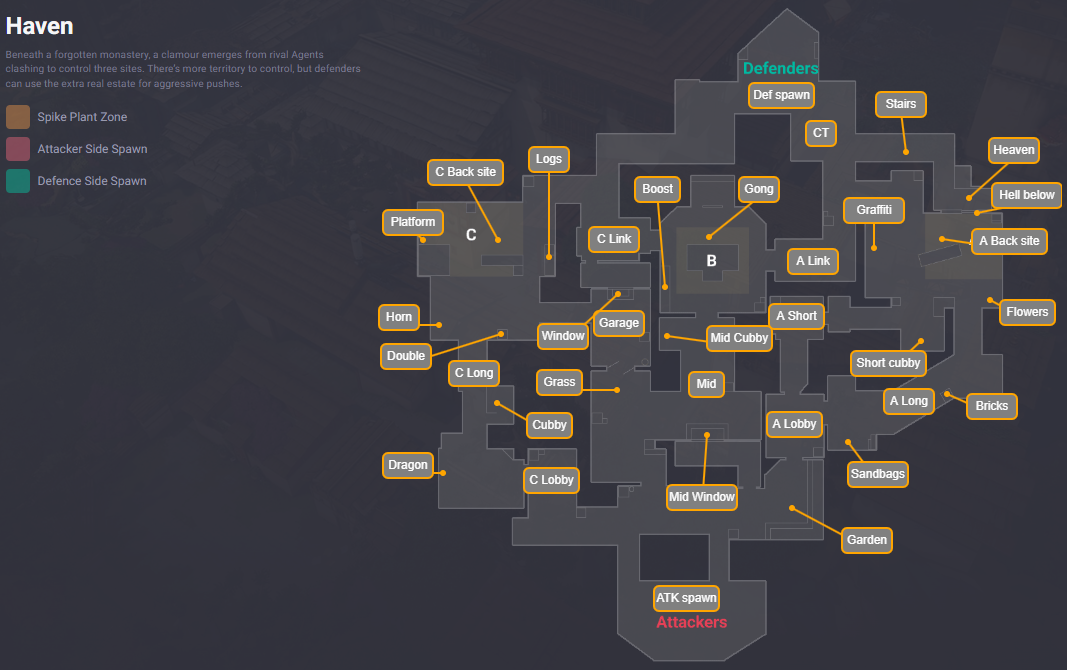
Haven’s main feature is its third spike site, giving attackers more options and forcing defenders to spread out. Despite having three sites, Haven still only has two ultimate orbs. They are located at A Long and C Long.
Haven’s key points:
- A Long
- A Short
- Garage
- B Site
- C Long
The map also has destructible panels in Mid. These panels cover the Garage doors and part of the Window wall. While intact, they block bullets and cannot be wallbanged. Each panel has 400 HP and changes color as it takes damage, moving from blue to yellow, then red. Once destroyed, those areas can be wallbanged for the rest of the round. Let me share a few Haven tips:
- Control Garage: One of the most important points on the map gives you enough control to look after both the B and C sites.
- Use Utility a Lot: There are three sites, which means it’s very hard for defenders to keep track of all of them. Fake out with utilities, then set up the entrance with your team, and take the site immediately.
- Know your Sites: C site is easy to take, but hard to control for that same reason. If you can execute your plan well, try to go for A or B sites. Use the C site as the last measure if all else fails.
The meta agents for Haven are:
- Omen or Brimstone: Smokes work really well here, as the map’s layout is mostly narrow pathways.
- Killjoy or Cypher: They help to hold hard sites like C or B.
- Jett or Raze: I know that Jett appears in every agent list so far, but she’s just a good agent to pick in any situation. Raze is great cause she can rotate between the sites quickly.
Traditionally, three site maps aren’t very loved by the community, but Haven is not the worst of them. It’s pretty dynamic and offers a lot of room for various tactics.
Lotus
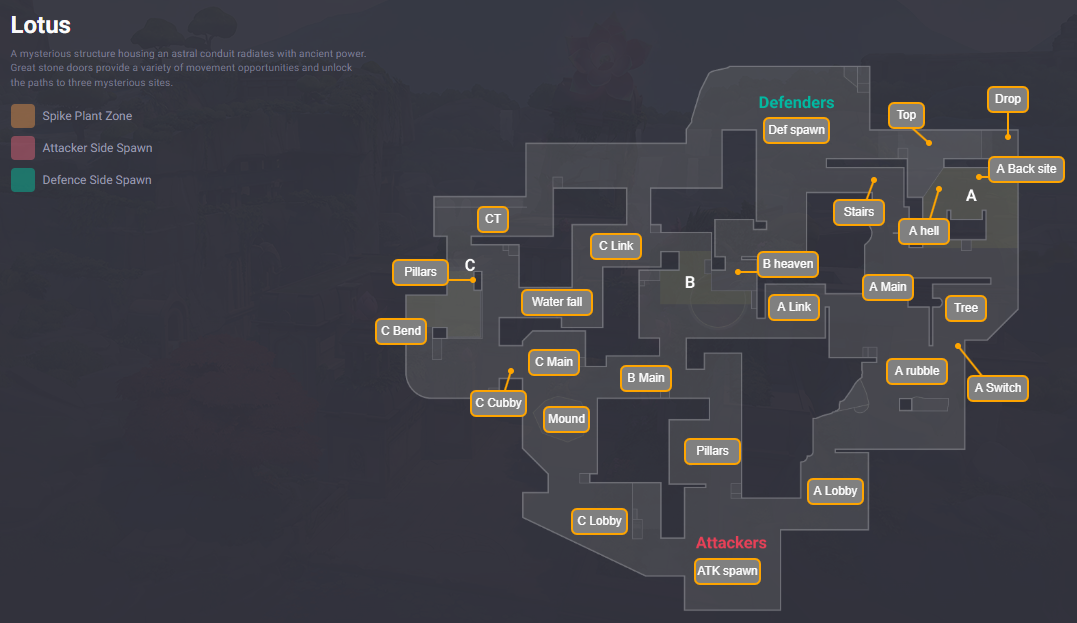
Lotus is the game’s second three-site map, but it still has only two ultimate orbs, located at A Main and C Mound. A Site has a rope that lets players move up to A Top, while dropping from A Top to A Drop can stay silent if players do not run or land too far away.
Lotus’s key points:
- A Main
- Rubble
- Tree
- B Main
- C Main
Lotus also has two rotating doors. One connects A Main and A Tree, while the other connects C Mound and B Main. Each door rotates for 10 seconds after activation. There is also a 400 HP destructible wall between A Main and A Link, which opens a new path once destroyed. A few tips to let you dominate Lotus:
- Fight for Rubble: This is one of the strongest choke points, and if you let attackers on it, it’s almost impossible to peek them. If this happens, the best bet is to take the fight from A Main or A Back Site. For the attacker's side, a common strategy is to smoke A Stairs and A Hell and then push the site immediately.
- Sentinels are Amazing Here: Cypher’s trips or Killjoy’s swarms can hold the narrow paths between B and C sites. The attackers will have to give away their position if they want to get rid of them.
- Use Rotating Doors for Mind Games: You don’t have to go through the door. Just activating it can alarm the enemy. Don’t be afraid to fake out, as they’re very loud and can make an opponent make the wrong choice under pressure.
Top agents for Lotus:
- Viper: The strongest character on this map. Her ability to wall off A Main and B Main is absolutely essential on Lotus.
- Killjoy or Cypher: Killjoy is stronger, but if she’s taken, Cypher will do too. Great for holding tight corners and giving info on B/C sites.
- Any Smoker: I usually take Omen or Astra if I need to play control on this map. Omen is always a great choice on three site maps, and Astra can defend A site on her own. Brimstone can work as well.
Lotus can be an awkward map and cause some stalling, especially fights on C site, but it’s much more compact than Fracture, so three sites here do not feel annoying.
Pearl
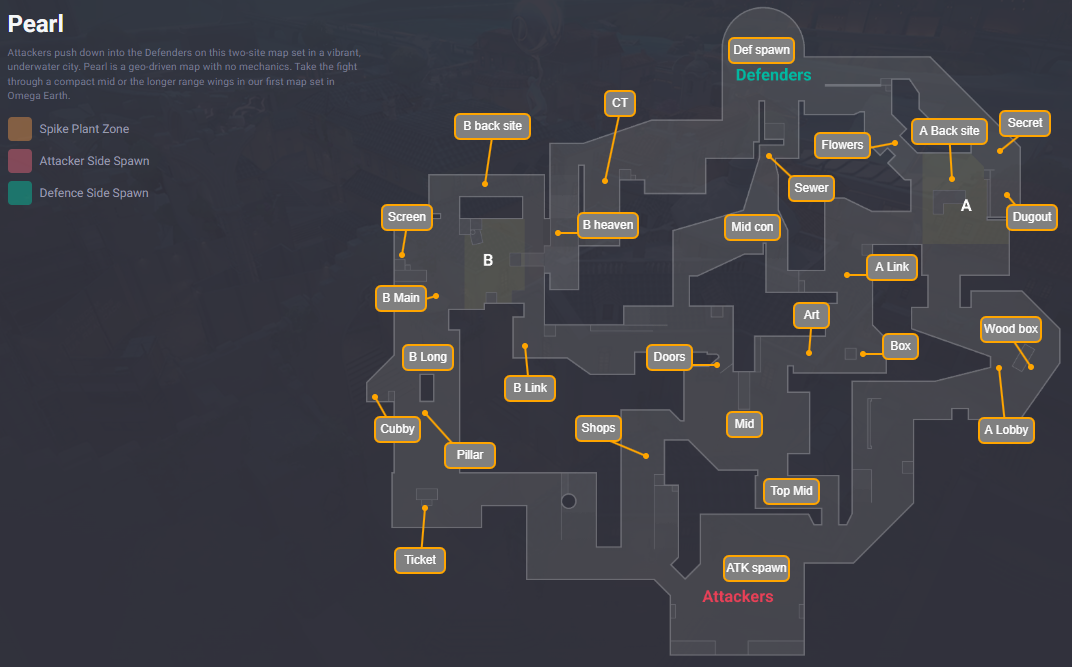
This map is unique in a very unusual way - it doesn’t have any unique elements to it. No hooks, rotating doors, or ziplines. What you see is what you get. You have B Long fights and takeovers, and a labyrinthine layout of A Lobby and A Link, but it feels like a map designed from CS: GO rather than a Valo map. Still, it’s far from being bad, and I actually enjoy playing it as it offers a very straightforward approach. B Site for Op enjoyers, and the Mid area of the map is for close encounters. The key points of Pearl are:
- Mid
- Art
- A Lobby
- B Long
- A & B Links
Here are a few pieces of advice to play on Pearl:
- Play Around B Long: This point is attacker-favored, so as a defender, you should make your first peek safer with utility.
- Contest Mid Early: Do not let attackers in on Mid control. It will be extremely difficult for you to push them out once they inhabit the central portion of the map.
- Have a Lurker on a Team: Since rotations on Pearl are long, have one lurker that controls the mid area to counter enemies.
And finally, some agent advice for this map:
- Viper: Yet another map where this agent is super good. She’s really effective both in attack and defense.
- Sova or Fade: This map has a lot of covers, and that’s why these agents are especially useful here. With them, you minimize the risk of peeking at some unsafe angles.
- Astra or Harbor: Fighting them on Pearl feels like you have at least a couple more enemies against you. They’re very strong, and their utility is super annoying to deal with.
Pearl is a fun and generally fast map where you have to rely only on your shooting skills and utility knowledge. It’s Valo in its cleanest, most stripped-down form, and that’s why many players love it.
Split
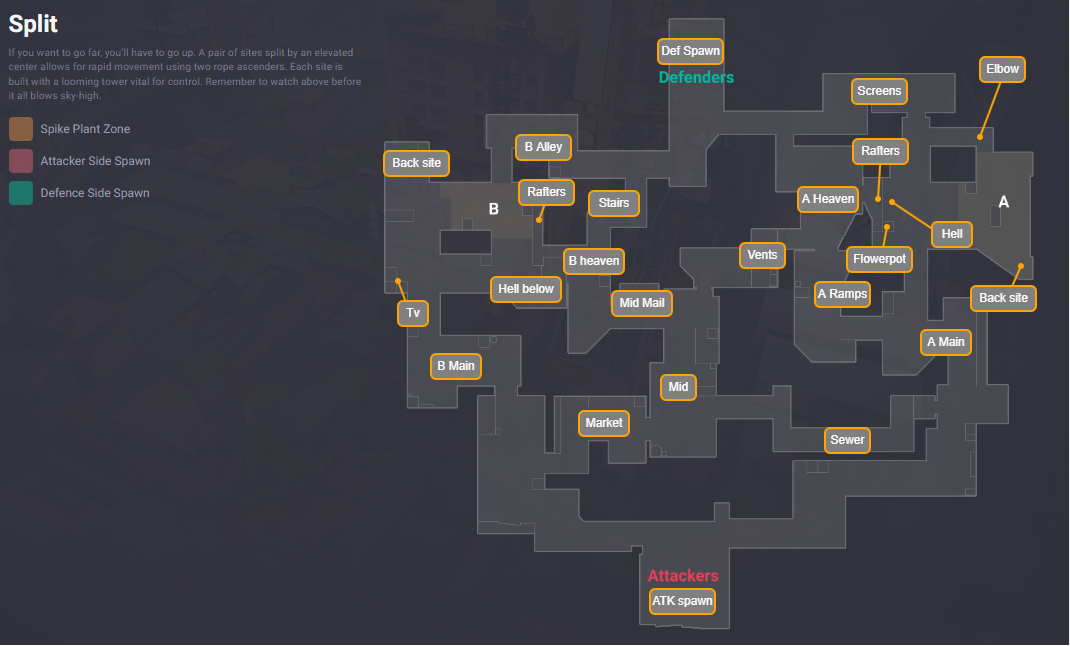
One of the classic maps that has been available since the very launch of the game. It’s very vertical and heavily favors the defender's side. The Split’s key points are:
- Mid
- Vents
- A Heaven
- B Heaven
Heavens are so important here because, as an attacker, you usually want to plant for it cause any other spot will leave defenders at an advantage. Split’s main feature is its use of ascenders. The map has several rope paths that help players move between the lower and upper areas. Two ascenders connect Sewer to A Lobby, one connects B Hell to B Heaven, and four are found inside Vents. These ropes make vertical movement important, especially around Mid, A pressure, and B Heaven control. Some key tips to play on Split:
- Control Mid: Taking Mid is almost as important as securing the site on this map. It lets you safely rotate between the sites.
- Try to Plant for Heaven: Unless you have some specific strategies, it’s always recommended to plant for Heaven.
- Utility is Very Strong: The right utility can drag the time forever, especially on the A Site.
And some agent recommendations for Split:
- Raze: Perfect for clearing angles of the B Site with her utility.
- Sage: If you want to play around Mid, she’s a must-have to delay the enemies’ pushes.
- Omen or Viper: Best controllers to smoke off the choke points on sites.
Despite Split being a very hard map for attackers, it’s very dynamic, and every round here is a nailbiter. It’s one of the best Valo maps to play on and learn the ropes of the game.
Browse our hottest Valo Boosting services


Abyss
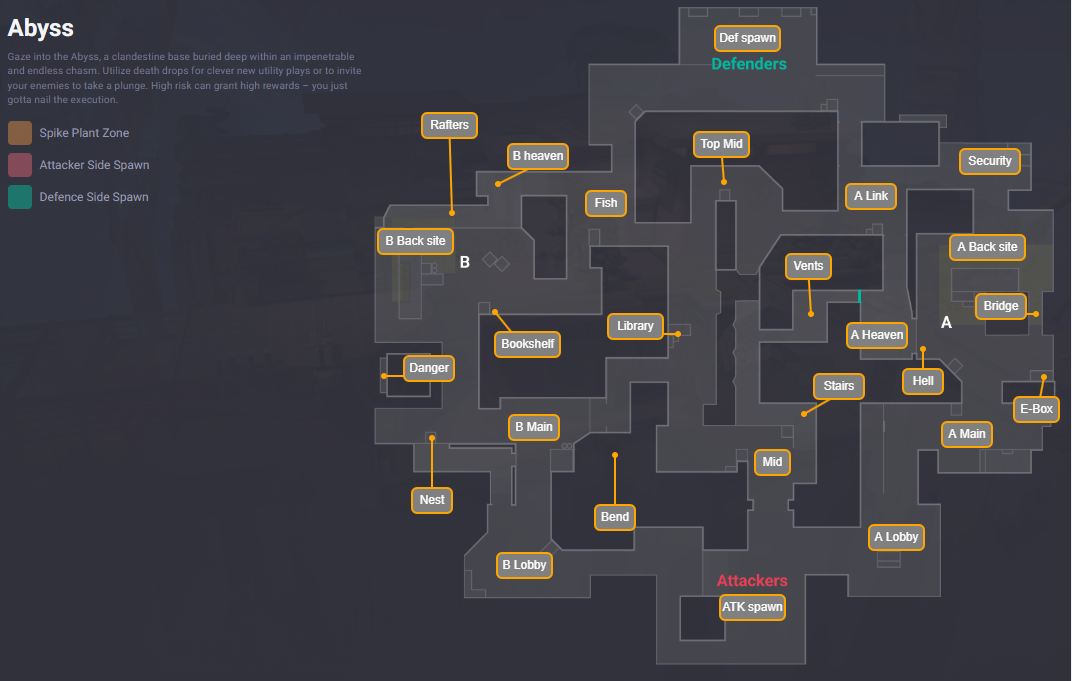
This map starts the list of maps that are out of the competitive pool as of May 2026. It’s a bit gimmicky with bottomless pits. Abyss is the first map in Valo with no outer boundaries, meaning players can fall off the map in certain areas. Mid has a death drop, and some shortcuts, like Danger and Secret, require players to jump across narrow ledges. Reaching the Catwalk from the Top or the Library also requires a jump over the Mid drop to an ascender. The most important points on Abyss:
- Mid
- A Main
- A Heaven
- B Main
- Bridge
The map has several ascenders, including routes from A Site to A Heaven, B Main to Mid Bend, and one in the Attacker spawn. Vent has destructible doors at both entrances. Each door has 120 HP and stays open for the rest of the round once destroyed. Here’s how you win on Abyss:
- Play Around the Verticality: Raze and Jett are really strong on this map, both in attack and defense. Don’t miss out on this crucial element of the map.
- Offense is the Best Defense: Play aggressively early on A and B mains. Your goal here is to make attackers waste their utility.
- Watch Out for Wide Angles: Abyss has multiple wide angles, which Operator players love to use.
The best agents for Abyss:
- Omen or Astra: Great for site control. You know the drill, smoke the narrow passages and drag time.
- Skye and Sova: I’ve seen it one too many times how Skye flashed half the team and won the round for free. Since this map is wide open, Sova’s recon is stronger here than on other maps.
- Jett or Raze: Best duelists for vertical play and mobility.
I think that Abyss is one of those maps that just doesn’t fit into the “competetive” style of Valo cause dying from falling off a cliff is just too stupid and doesn’t really enhance the gameplay in any manner. I don’t hate this map, but I can see where the community’s dislike comes from.
Bind
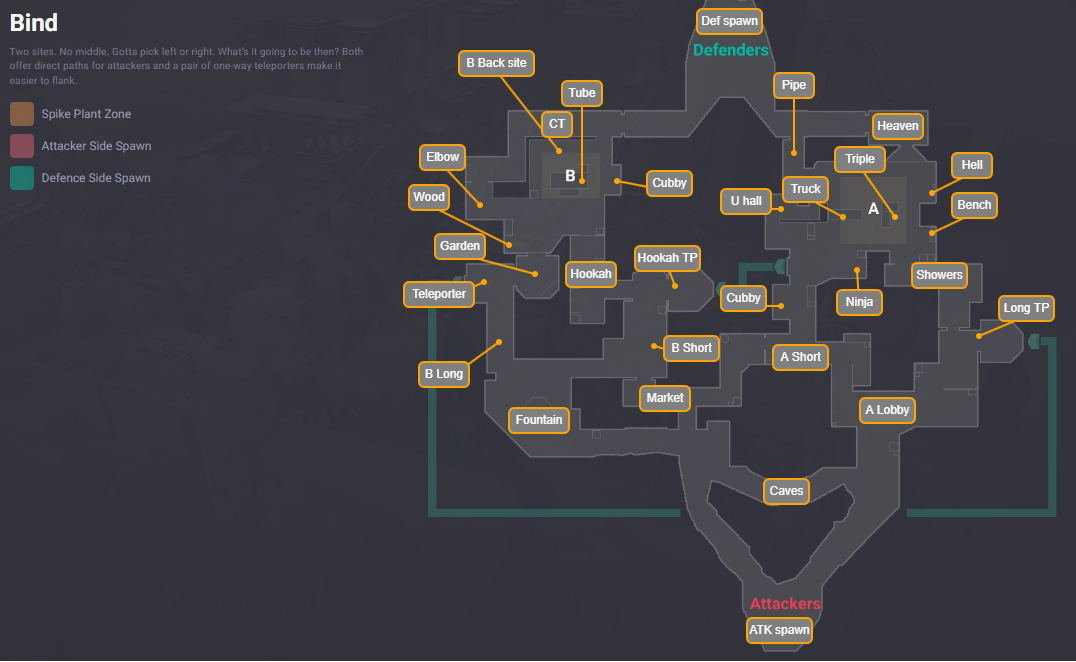
Recently removed from the competitive pool to make way for Ascent. If I’m real, I liked it more than Ascent. Not a hot take, I know. It’s one of a few maps where the gimmick really works. Bind has no Mid section. Instead, it uses two one-way teleporters. One moves players from A Short to B Short, while the other moves players from B Long to A Lobby. Players enter through the teleporter wall and appear in a small exit room. Here are the most important points on Bind:
- A Short
- Showers
- B Short
- B Long
The exit door is closed by default and only opens when someone inside walks near it. Players outside cannot open it, though they can shoot through it. Abilities, dropped weapons, and the spike can also pass through teleporters. Every teleporter use creates a loud audio cue for all players, making fakes strong but unsafe. Key tips for playing Bind:
- Map Control is Essential: Bind is not a map that rewards aggressive play. As an attacker, you don’t have safe entry points, while defenders have a lot of angles to take you out. Play the map steadily and use lots of utility. Take control of Showers and Hookah as soon as possible. B Long is a bit riskier, but lets you cut off defenders.
- Play Around Teleporters: Fake as much as possible, starting from the beginning of the match. Be unpredictable and mix fakes with genuine pushes.
The meta agents for Bind are:
- Raze, Jett, or Neon: Good for open fragging on the attacker’s side. Absolute nightmare when they’re on the defender’s side.
- Brimstone or Clove: Or even both. They can deny plants forever. Clove is especially good on this map.
- Skye or Fade: Haunt is one of the strongest skills for this map and allows pushing narrow paths aggressively. Skye is good for site entries.
Bind is one of the fan-favorite maps. It constantly keeps you on edge with teleporters, and you can outplay the enemy against all odds with them.
Corrode
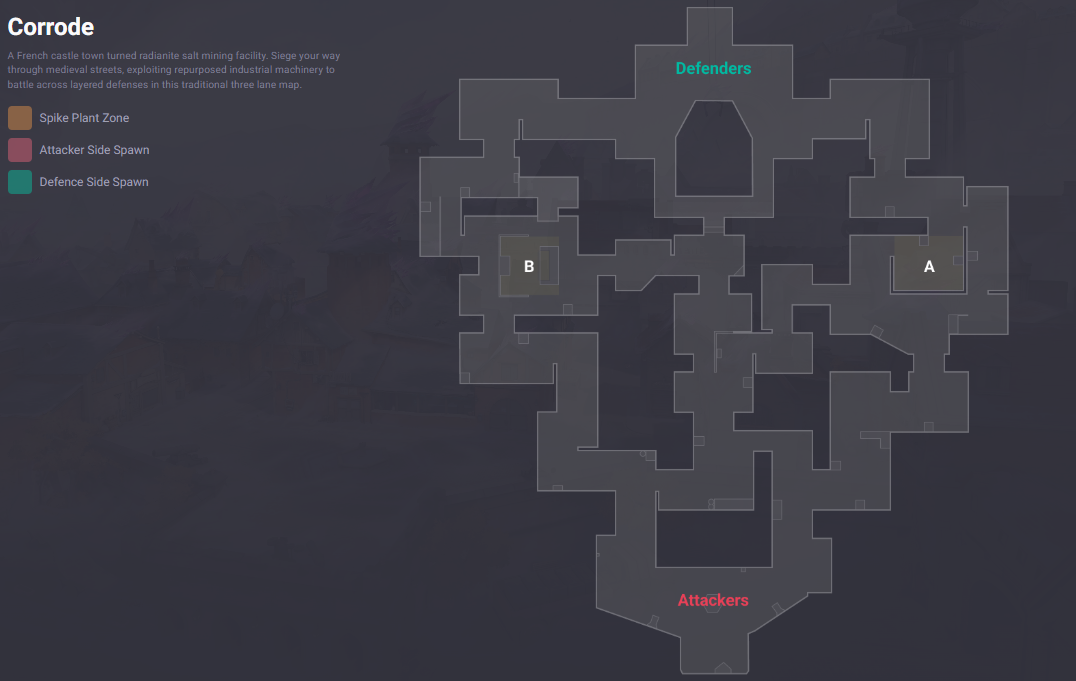
One of the most polarizing Valo maps. Some people like its layout, while others are frustrated by it. It’s another map that doesn’t have any gimmicks and plays very straightforward. Unlike Pearl, however, it’s not as neatly designed. You have very long rotations between the sites, plus taking control of Mid area is super important, so it frequently boils down to deathmatch rounds with no tactical element. Here are the points you need to look out for on Corrode:
- Mid
- A Main
- B Main
As I said, Mid is the most important section of the map. Players who take control of Mid usually win the round. Here are the tips to win on Corrode:
- Do Your Best to Take Mid: This area of the map is split into Shallow and Deep Mid. Taking control of the area is key to winning.
- Anchor B Site: It’s very defender-friendly, to the point that attackers prefer A site in most cases. You can leave one or two players to lock it down and guard A site.
- Avoid Making Noise: The flooded walkways make a ton of noise. If you don’t want to be heard miles away, do not rush through it.
Best agents for Corrode are usually the ones who have a lot of utility or hyper-aggressive duelists:
- Omen or Viper: Omen can take multiple vantage points and kill a few attackers before they find him. He can anchor B site all by himself. Viper is just generally good and can help hold A site for a long time.
- Yoru, Neon, or Jett: The faster you can get around the map, the better. Stacking A site is easier on Corrode than on other maps. If you’re good enough, you can even rush a plant before the enemy realizes anything.
- Cypher and Killjoy: They are very important to pick if you know that your opponent will force A site taking from the get-go.
Corrode is a very strange map that offers quite an uneven experience. It feels like a deathmatch map that sneaked into the main map roster.


You got -20% OFF 
Icebox
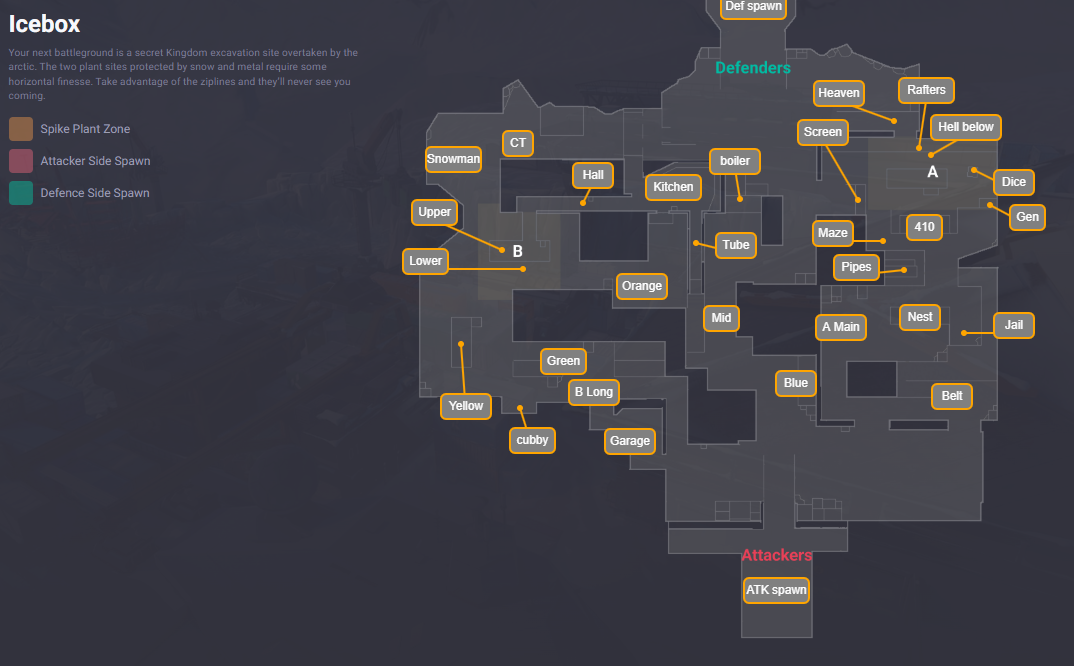
Icebox first introduced horizontal ziplines, mainly seen around A Site. Both spike sites are built with lots of cover, vertical angles, and elevated positions, which makes fights feel more layered than on simpler maps. Its removal from the main modes is easily explainable cause it is really poorly balanced, and Viper was mandatory to pick on this map. Here are the key choke points on Icebox:
- A Pipes
- A Nest
- Mid Tube
- Kitchen
- B Yellow
Icebox was also the first map where plant sites used different elevation levels. Both A and B have raised nest areas that players can reach with ropes. The spike can be planted on these upper nest floors, creating stronger post-plant positions and forcing defenders to clear both ground-level and elevated angles during retakes. Here’s how you want to play Icebox for wins:
- Aggressive Attacks: Stacking an A or B site with the full team is a surprisingly good strategy. Icebox favors fast entries over slow defaults.
- Use Verticality: I mean, the map has verticality whether we like it or not. Breaking the typical lines of sight is useful, though I don’t like this coin-toss element.
- Plant Correctly: On A Site, plant for Belt. On the B Site, plant for Yellow.
While other maps have recommendations on what agents to pick, Icebox requires two agents to win:
- Viper: Absolute meta on Icebox. Use her to cut sites in half. On A, you want to put your wall on top site and screens. On B, block kitchen and back site.
- Sage: If you plan on taking or defending B site, her wall is a must-have. It can block the top site and create a safe zone.
The rest of the agents are up to your preference. Icebox was removed mainly because it forces you to play a specific way instead of giving you creative freedom, which in competitive scenarios doesn’t work at all.
Sunset
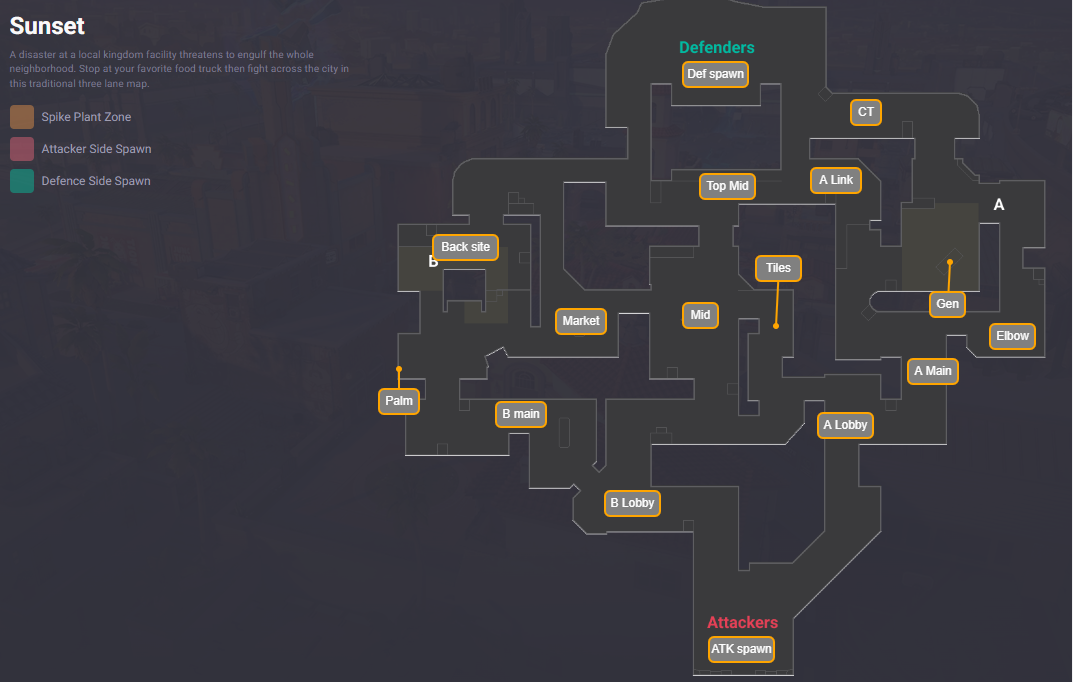
The final map in our list. It’s one of those “love it or hate it” maps. Sunset is a traditional two-site, three-lane map. Its main special feature is the mechanical door between B Market and Mid Courtyard. Players can open or close it using a switch on the Market side, which makes Mid and B control more dynamic. Here are the key points:
- Mid
- Market
- B Main
- A Main
- A Elbow
When closed, the door blocks bullets and cannot be penetrated. However, it has 500 HP, so players can destroy it with enough damage. Once broken, the doorway stays open for the rest of the round. This makes the door important for rotations, retakes, and late-round Mid pressure. Here are some tips to play Sunset:
- Contest Mid: It’s another one of the maps where taking Mid is essential for winning. Losing mid lets defenders rotate easily. Plan your Mid conquering immediately. This map doesn’t like slow defaults.
- Rush A as an Attacker: A Site is easier to take than B, though it requires you to take A Elbow and Main first.
And finally, some agent recommendations:
- Cypher or Killjoy: Crucial for locking down B main and covering the flank.
- Omen or Clove: Good for smokes on mid.
- Raze or Jett: Very good for aggressive Mid takes, and fast B pushes.
Sunset is among the maps I genuinely dislike, as it’s not very engaging and again boils down to close-quarter combat, turning the game into a deathmatch rather than a tactical FPS.
Read our other Valo guides:
F.A.Q
How many Valo maps are there in 2026?
There are 12 Valo maps in 2026, with 7 in the competitive pool and 5 in the casual pool.
Which Valo maps are in the competitive pool?
The competitive pool includes Ascent, Breeze, Fracture, Haven, Lotus, Pearl, and Split.
What is the best map for learning Valo basics?
Split is one of the best maps to learn the ropes. It has a big emphasis on Mid, learning how to control Heaven, and fights that require you to use utility. It has all the essentials of other maps.
Which Valo maps have three spike sites?
Haven and Lotus have three spike sites, giving attackers more options and forcing defenders to spread thinner.
What are the best Valo maps?
The classic triumvirate is Ascent, Haven, and Bind, though I would also add Pearl to this list for its simplicity and back-to-basics approach.