 Rick Flair
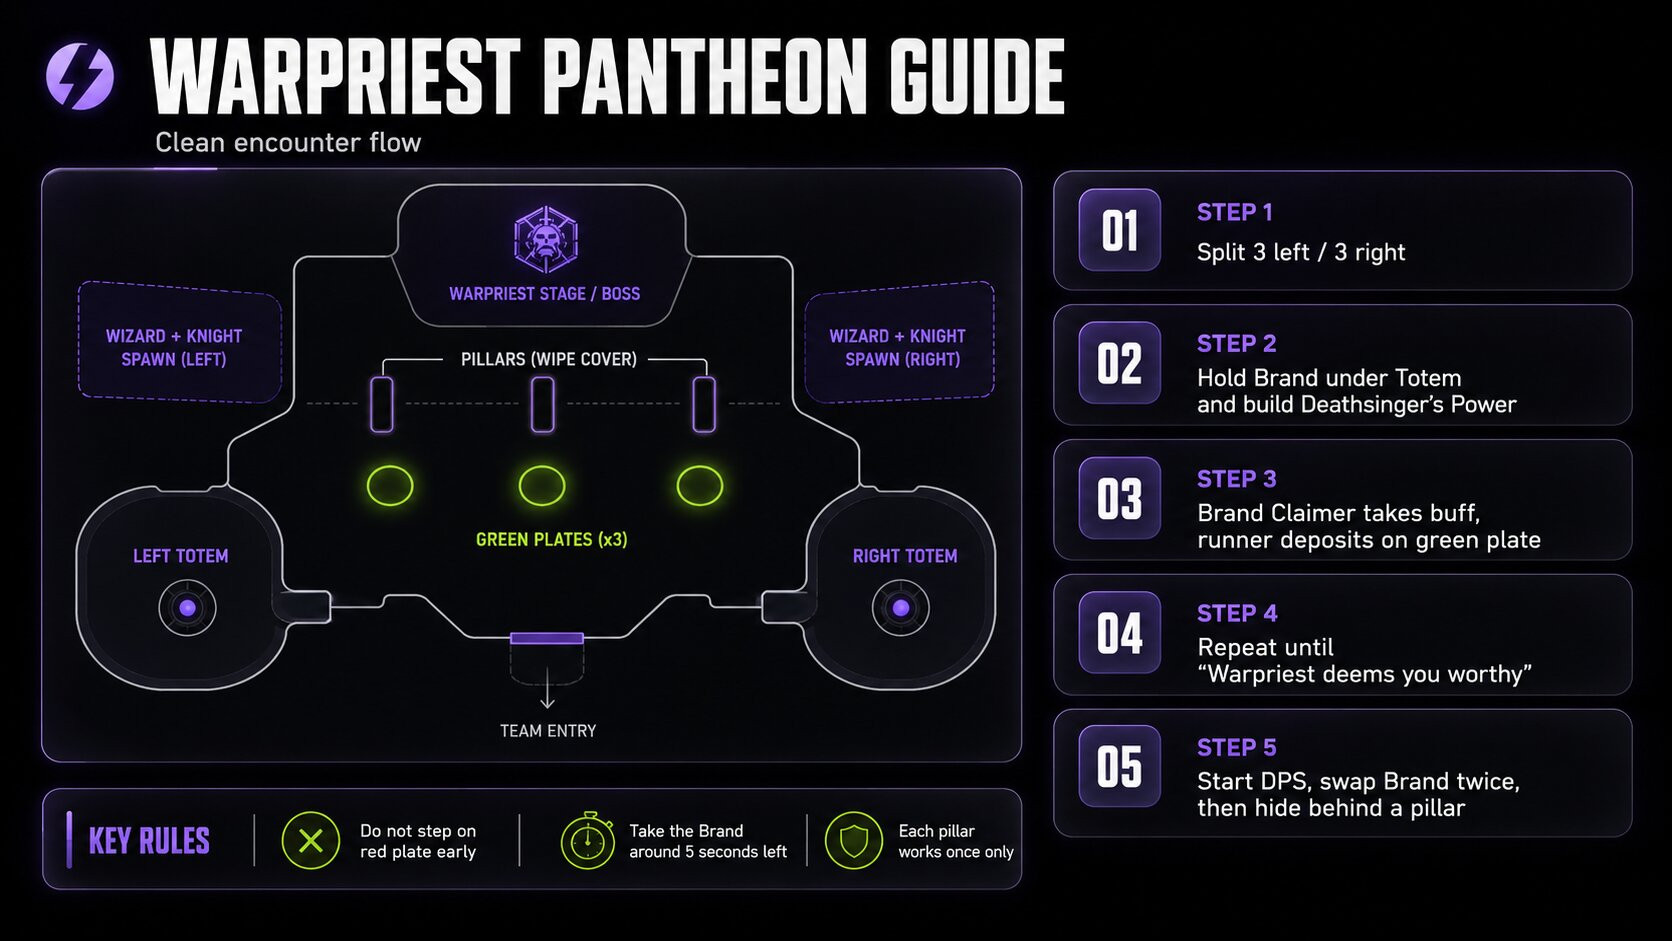
Destiny 2 Pantheon 2.0 Warpriest Guide Quick Overview:
- Split the fireteam into two teams of three, one for each Death Totem room
- Rotate Brand of the Weaver so the left and right totems are always covered
- Kill Hive under the totem to collect Deathsinger’s Power stacks
- Deposit Deathsinger’s Power stacks into green plates in the upper room
- When “The War Priest deems you worthy” message appears, stop depositing and regroup
- Start DPS by picking up Brand of the Initiate from the red plate
- Extend DPS by killing Taken Knights and stealing the brand with Brand Claimer
- Hide behind one of the three pillars when the room turns white to avoid being wiped
Wanna see the raid-exclusive rewards from the Pantheon 2.0 bosses? Buy Pantheon Completion service at Skycoach and team up with our professional D2 players who will lead you through each encounter, saving you the time and nerves with as many wipe-free runs as you want!


Read closely 
Browse our hottest Destiny 2 Boosting services


D2 Pantheon 2.0 Warpriest Strategy
The Pantheon 2.0 is a returning mode from Update 9.7.0. It has returned with some tweaks and changes to make it more gripping. Pantheon 2.0 Warpriest is different from the old King’s Fall encounter. This encounter is a part of the bigger Morgeth Surpassing Pantheon stage. It’s one of the three various encounters, the other two being The Gauntlet, where you face all bosses from other encounters, and Calus Resplendent, which includes Argos, Gahlran, and Calus boss fights. This version is basically Warpriest mashed together with Death Totems. The fight has two main areas: the totem rooms and the DPS room. The first area has two side rooms, each with a Hive Death Totem and a plate beneath it. The DPS room has three green plates and the Warpriest himself. Your goal is to build Deathsinger’s Power in the first area, deposit it in the next room, and repeat this until the boss decides that it’s time to test your gangsta.
Team Setup
Below is a short description of how you’re gonna be doing the encounter. Before the encounter, you need to split into two teams of three:
- Left Totem Team
- Right Totem Team
Each side runs the same relay. Because of that, I’m only going to explain it for three players, not all six. Here’s a brief explanation:
- One player from each team starts by grabbing the Brand of the Weaver and standing under the Death Totem
- The second player focuses on killing the Wizard and Taken Knight to get the Brand of the Unraveler
- The third player’s task is to kill trash and prepare for the next rotation
The complete encounter is not the hardest one. Just make sure everyone understands their current role. The Death Totem section is just a rotation of three players where each of you will go through the same steps, but in a different order. While it’s not hard, wipes will still happen. Most wipes happen because someone from the team forgets where they are in the relay, so make sure to always be aware of your surroundings. Now let’s break down each step in detail.
Death Totem Rotation
Read this section carefully, as this is where most of the wipes happen. At the start of the encounter, one player on each side, in this case, you, grabs Brand of the Weaver from the small black orb and runs to the plate under their Death Totem. You must stay there because if you leave the totem for around 10 seconds, the team wipes.
While standing under the totem, you need to kill Hive mobs to gain Deathsinger’s Power stacks. The more enemies you kill, the more stacks you carry. While you’re doing that, the Brand of the Weaver timer is ticking. If it reaches zero, the brand holder dies. This is where Brand of the Unraveler comes in. Your teammate needs to kill a Hive Wizard and the Taken Knight that spawns after it. Once your teammate kills a Knight, a Taken orb that gives Brand of the Unraveler drops. They need to pick it up. With that buff, the player can take Brand of the Weaver from the current brand holder and replace them under the totem.
You do not steal the brand instantly. Always check how much time you have. If both players have plenty of time, wait for one timer to get to around five seconds, then take it. If you rush the whole relay, it desyncs, and someone gets stuck waiting under the totem with no one ready to save them, and then you wipe and have to start over again. Don’t let that happen.
Depositing Deathsinger’s Power
So what do you do after you’ve been stripped of the Brand if the Weaver debuff? After your brand is taken, leave the totem room and run into the DPS room. Stand on one of the green plates to deposit Deathsinger’s Power. The stacks will drain slowly, so stay there until they are gone.
Once you finish depositing, look for a Hive Wizard in the DPS room. There should be one on each side. Kill any of them, then kill the Taken Knight that spawns after that. Pick up the orb that they drop to get the Brand of the Unraveler buff, then return to your original totem room and steal the Brand of the Weaver from the player.
And that’s the full loop.
- Stand under Death Totem and gain Deathsinger’s Power stacks
- Get buff stolen from you by a Brand of the Unraveler carrier
- Deposit Deathsinger’s Power stacks in the DPS room
- Kill Wizard and Knight, grab Brand of the Unraveler buff, go back to your Death Totem, repeat.
Your progress toward DPS can be seen on the big doorway between both sections. The glowing Hive runes climb higher as you deposit more power. You don’t need to stare at it the whole time, though. When the encounter is ready, the HUD will say: “The War Priest deems you worthy.”
Browse our hottest Destiny 2 Boosting services


Starting DPS
When the “worthy” message appears, stop what you’re doing and regroup in the DPS room. The green plate that was filled last will turn red. Warning! Do not step on it by accident, because stepping on it gives you Brand of the Initiate and starts DPS. If someone starts damage before the full team is ready, your phase gets weaker. Wait until everyone is in position, then have one player run through the red plate and take Brand of the Initiate. My recommendation is to do damage from the stage near Warpriest. It makes landing shots easier. You can technically DPS from other spots, but the stage is just more consistent.


You got -20% OFF 
DPS Phase
Once Brand of the Initiate is active, everyone stacks on the Brand holder and starts damaging Warpriest. The Brand holder has a timer, and when it reaches zero, they die. To extend DPS, two players should kill Taken Knights in the very same room and grab Brand of the Unraveler, just like during the preparation for this phase.
During damage, the Brand holder should announce their timer. Around 10 seconds, the first Brand of the Unraveler player steals the brand. Then they count down, and the second Brand holder player steals it again. This ensures that the damage phase lasts longer.
For loadouts, I recommend using strong boss DPS weapons and burst Supers. Here are some recommendations for the best loadout for Warpriest Pantheon 2.0:
- Refurbished A499 for damage
- Tractor Cannon for debuff
- Well of Radiance for safety
- Celestial Nighthawk’s Golden Gun, Thundercrash with Cuirass, and Needlestorm are all good burst options
Alternatively, you can go for swords as the main DPS source, but only if your team has a specific plan. I’d say that there’s no need for that. The ranged way is more reliable.
Warpriest Wipe Mechanic
When DPS ends, the room starts turning bright white. Stop shooting and hide behind one of the three large pillars in the room. Note that all players must hide behind one of the pillars. There is one in the middle, one on the right, and one on the upper left balcony. Make sure that the pillar is directly between your team and Warpriest. After the wipe blast, that pillar disappears, so you cannot use it again. This means you get three safe pillars total. After that, the next DPS phase is basically kill or be killed. After the damage phase is over, repeat the process from the first stage. Go back to your totem teams, build Deathsinger’s Power, deposit it, start DPS, and finally, the Warpriest is dead.
F.A.Q
What is different about Warpriest in Pantheon 2.0 in Destiny 2?
Warpriest Pantheon 2.0 combines the original Warpriest fight with Death Totem mechanics. Teams need to build and deposit Deathsinger’s Power before starting DPS phase.
How does the Death Totem rotation work in Warpriest stage of Morgeth Surpassing?
One player holds Brand of the Weaver under the totem, another gets Brand of the Unraveler from a Wizard and Taken Knight in a DPS room, then steals the Brand of the Weaver from the player before the timer expires.
How to deposit Deathsinger’s Power in Destiny 2 Warpriest Pantheon 2.0?
After your Brand is taken, run into the DPS room and stand on a green plate until your Deathsinger’s Power stacks fully drain.
How do you extend damage phase during Warpriest encounter in Destiny 2 Pantheon 2.0?
Two players should kill Taken Knights during DPS phase, grab Brand of the Unraveler buff, and steal Brand of the Initiate from the current holder before their timer expires.
How do you survive Warpriest’s wipe mechanic in Destiny 2?
Hide behind one of the three large pillars when the room turns bright white. Each pillar disappears after blocking the wipe blast, so you only get three chances to use it.


