Getting the right settings in Destiny Rising can make a huge difference in how smooth, responsive, and enjoyable the game feels. Small tweaks can boost performance, improve clarity, and even give you an edge in fast-paced combat.
Welcome to our Destiny Rising Best Settings guide. Here we’ll walk you through the optimal settings for both mobile devices and PC emulators. Mobile players will find the best balance between visuals, FPS, and battery efficiency, while emulator players can take advantage of keyboard and mouse support, custom keybinds, and a cleaner HUD.
By the end, you’ll know exactly how to configure Destiny Rising for the smoothest performance and sharpest gameplay on any platform.
And if you need help leveling up in the game, you should check out this Destiny Rising Leveling Boost at SkyCoach. Allow the professional gamers take care of your account and characters by leveling them up as much as you need, so you don't force yourself to spend more time on the grind than you're comfortable with. This service is fast and reliable, which makes it perfect for new Destiny players.
Read our other Destiny Rising guides:
- How to Play on PC
- Characters Tier List
- Leveling Guide
- Weapons Tier List
- Beginner's Guide
- Gacha System Guide
Note: At Skycoach, you can Buy Destiny Rising Boost at the best prices with fast delivery. Use our special PROMO CODE (in green) hidden in this article for a 20% DISCOUNT.
Destiny Rising Best Settings for Mobile
We’re going to start listing the best settings to play Destiny Rising in the same order as they appear in the game. There are several categories of settings, each of which comes with additional tabs and options. But, we’re going to be skipping some of the settings and focusing specifically on these 3 areas:
- Controls
- Grafics
- Effects
These are the ones that will affect the FPS and your overall experience with the game. Also, please keep in mind that some of these settings are left to default, but if those feel uncomfortable for you, feel free to change them.
Controls – Firing Mode Tab
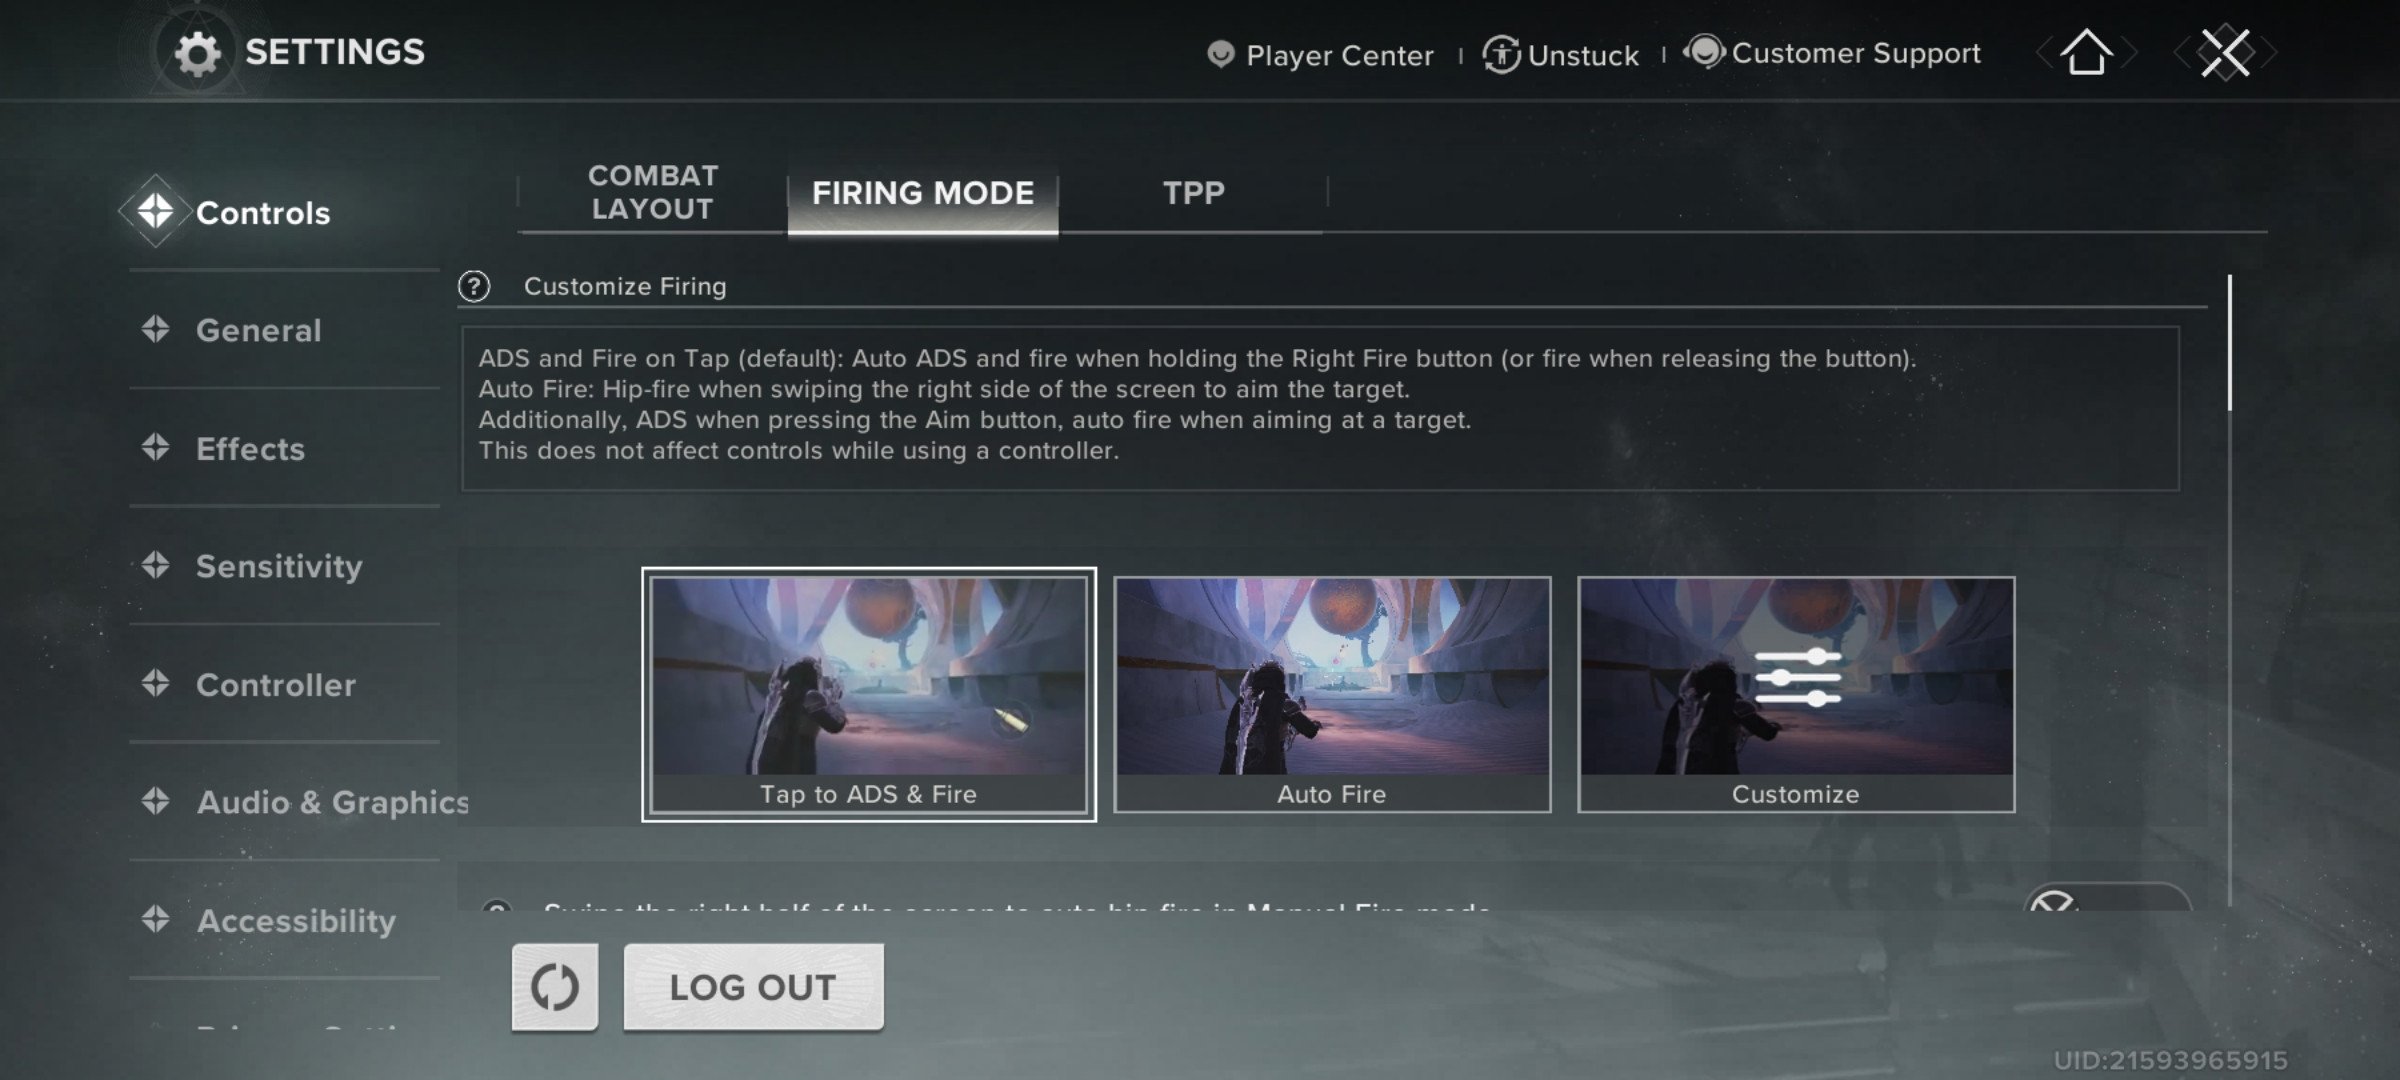
Firing mode best Destiny Rising settings determine how different weapon types behave when you press or hold the fire button. Each weapon class has several options such as Tap to Fire, Tap to Aim and Fire, Hold to Aim Release to Fire, and Auto Fire. The default options aren’t always optimal, especially for precision weapons, so customizing them gives you much more control.
Recommended Firing Mode Settings
| Weapon Type | Recommended Mode | Why Pick This |
| Auto Rifle | Tap to Aim and Fire | Balances control and speed, reliable in PvP |
| Pulse Rifle | Tap to Aim and Fire | Good mix of accuracy and reaction speed |
| Scout Rifle | Tap to Aim and Fire | Best for precision shots at range |
| Hand Cannon | Hold to Aim Release Fire | More control for timing and recoil |
| Sniper Rifle | Hold to Aim Release Fire | Prevents misfires and steadies aim |
| Shotgun | Tap to Aim and Fire | Quick and responsive for close combat |
| Submachine Gun | Tap to Aim and Fire | Keeps hipfire viable but adds precision |
| Sidearm | Tap to Aim and Fire | Same reasoning as SMGs, fast engagements |
| Bow | Hold to Aim Release Fire | Works like Destiny 2 bows, hold for accuracy |
| Grenade Launcher | Tap to Aim and Fire | Simplifies splash aiming |
| Rocket Launcher | Hold to Aim Release Fire | Prevents accidental early shots |
| Fusion Rifle | Tap to Aim and Fire | Reliable charge and shot rhythm |
| Linear Fusion Rifle | Tap to Aim and Fire | Precision-focused but consistent |
| Machine Gun | Tap to Aim and Fire | Keeps sustained fire manageable |
| Crossbow | Tap to Aim and Fire | Easy to line up precision shots |
After setting this up, players will find weapon handling feels far more natural, especially in PvP. Tap-to-Aim-and-Fire is generally the safest, but precision-heavy guns like bows and snipers benefit more from the hold-and-release style. BLOG20
Controls – TPP Tab
The TPP (third-person perspective) aiming mode changes how you switch between views. The recommended choice here is Mixed, since it allows quick toggling between over-the-shoulder aiming and full ADS.
General – Weapons Tab
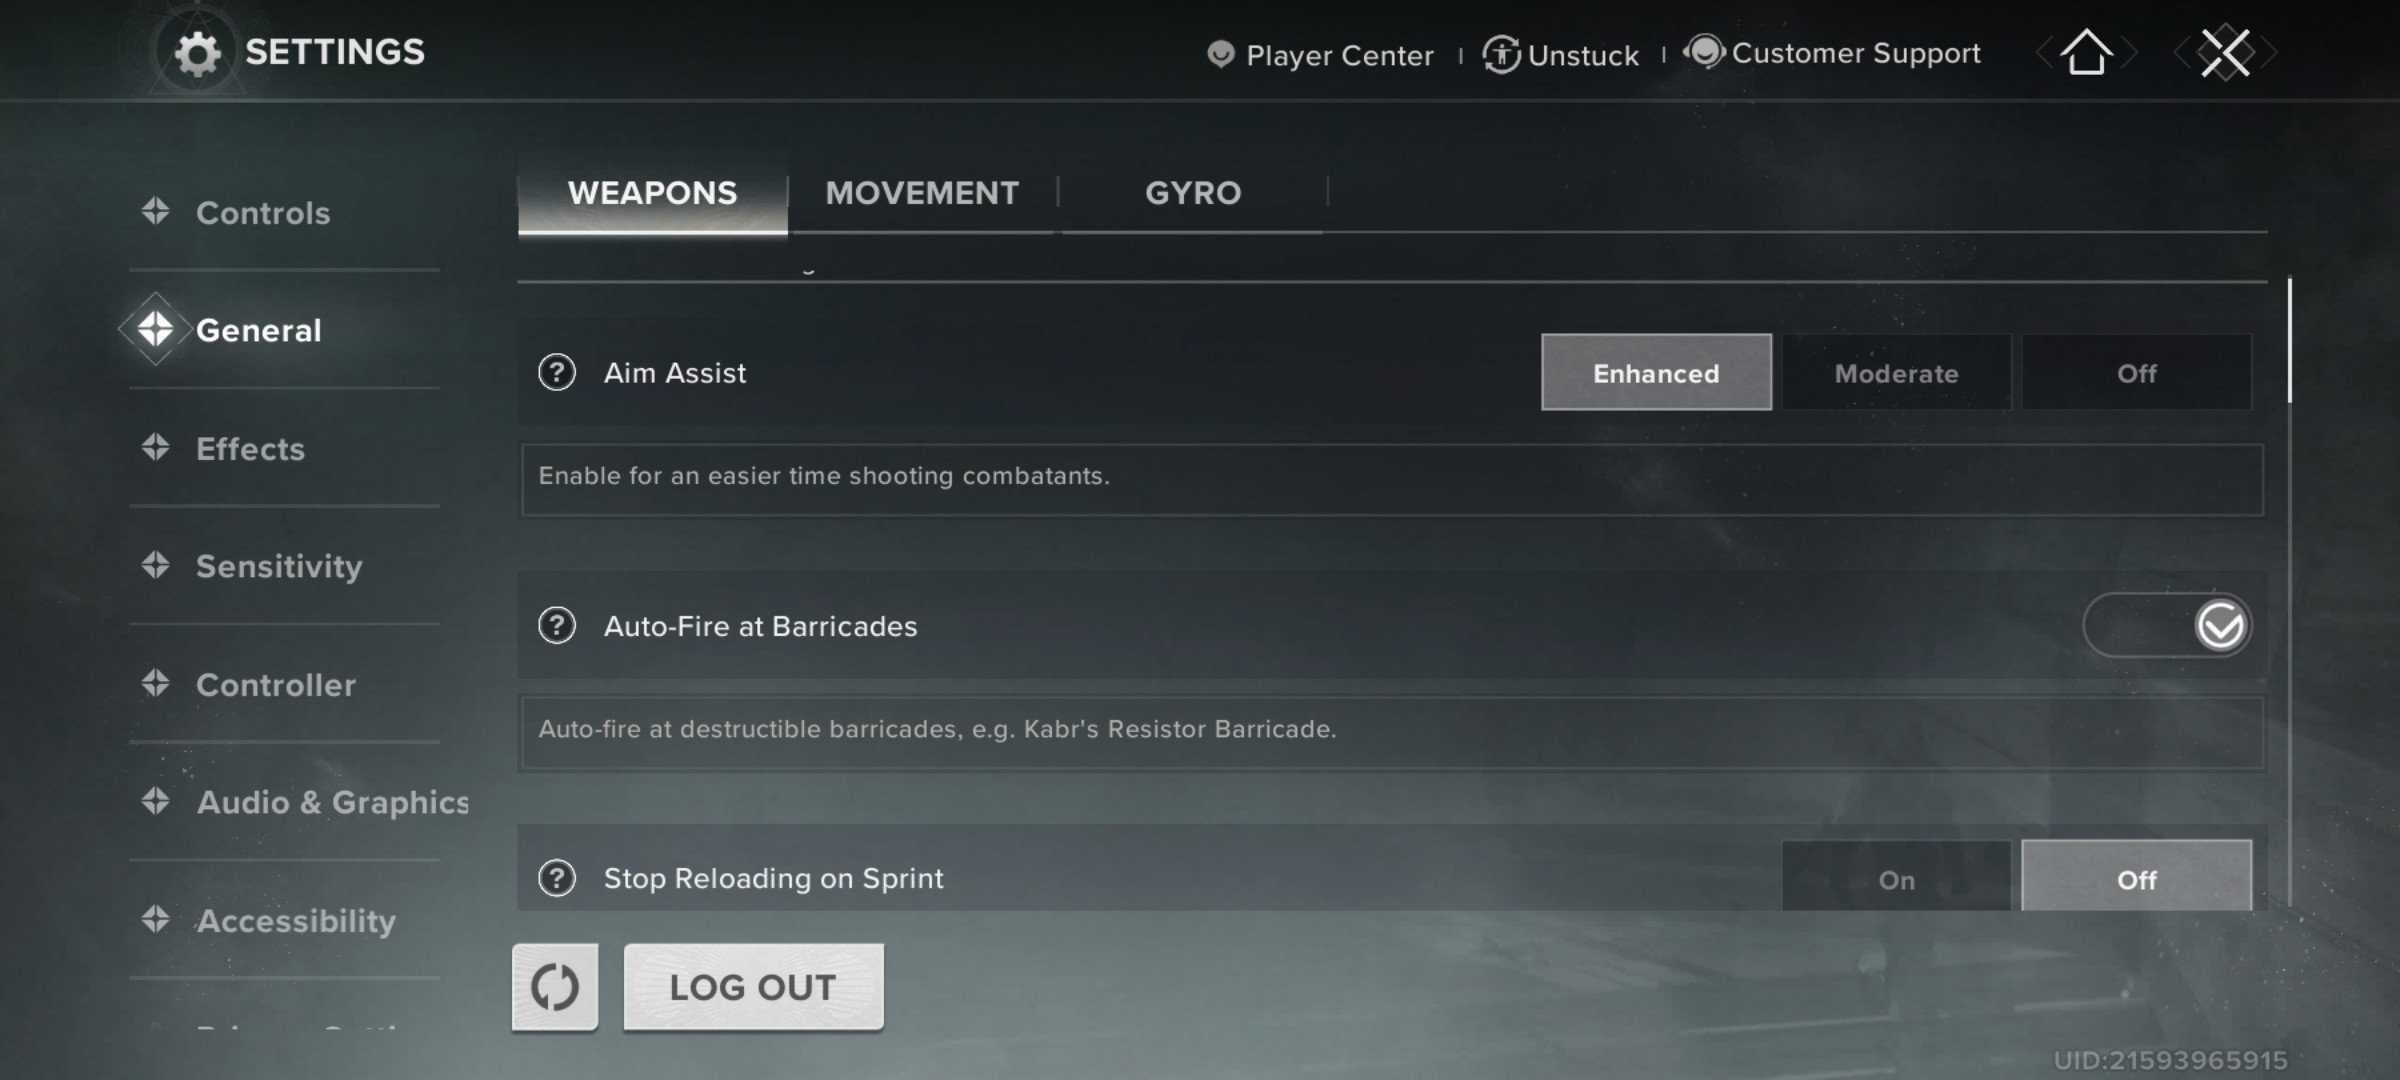
This section fine-tunes weapon behavior, auto-interactions, and reload mechanics. Adjusting these helps avoid frustrating interruptions during combat.
Here are all recommended settings for Destiny Rising in the Weapons Tab:
| Setting | Recommended Value | Why Pick This |
| Aim Assist | Enhanced | Extra help landing shots on mobile |
| Auto-Fire at Barricades | On | Quickly clears destructible cover without wasting time |
| Stop Reloading on Sprint | Off | Prevents reload interruptions during fights |
| Out-of-Ammo Auto-Swap | On | Smoothly switches weapons without manual input |
| Sword Guard Interaction | Tap to Switch | Faster and less clunky than Hold |
| Right Fire Camera Shift | On | Lets you aim while shooting with right button |
| Left Fire Visibility | Always | Keeps fire button available on both sides |
| Left Fire Button | Always Hip-Fire | Keeps it simple and avoids accidental ADS |
| Semi-Transparent UI when ADS | On | Clears screen space when aiming |
| ADS Button Camera Shift | Off | Prevents accidental view shifts |
| ADS after Reload | On | Keeps you scoped in after reloads |
| Simultaneous Aim and Fire | On | Faster shooting without waiting for ADS switch |
| ADS Mode | Tap | Simplest and fastest option on mobile |
| Super Melee Attack Mode | Attack Immediately | Ensures instant melee response |
| Shot Interval Hint | On | Helpful timing cue for Shotguns/Snipers |
| Melee Weapon Attack Direction | Follow Movement | More natural than camera-based aiming |
| Sniper Rifle ADS Settings | 30 (Iron Bar/Instances/Shifting Gates) | Balanced sensitivity for steady aim |
By setting these correctly, you cut down on input mistakes and make the game feel smoother. For example, Simultaneous Aim and Fire is a must for mobile, since it saves precious milliseconds when engaging in PvP. Likewise, keeping Aim Assist Enhanced balances the difficulty of touch aiming with a little extra help to land shots.
General – Movement Tab
Movement settings control how sprinting, aiming, and the left stick behave. Tweaking these options makes movement feel smoother and avoids interruptions in firefights.
Recommended General Movement Settings
| Setting | Recommended Value | Why Pick This |
| Stop Aiming on Sprint | Off | Keeps ADS active while sprinting for smoother transitions |
| Sprint Sensitivity | 100 | Makes sprinting easier to trigger with thumb movement |
| Left Stick Position | Free Movement | More natural and responsive than Fixed Position |
| Fixed Left Stick | Off | Prevents the stick from feeling locked or stiff |
| Left Stick Auto Sprint | On | Saves input effort, lets you sprint faster without holding |
By setting Stop Aiming on Sprint to off, you avoid frustrating interruptions when trying to engage enemies mid-movement. Free Movement and Auto Sprint keep controls fluid, which is crucial on touch screens where every gesture needs to feel natural.
General – Gyro Tab
The Gyro tab controls motion-based aiming. Some players swear by gyro for extra precision, especially in long-range fights, but it can also feel awkward if you’re not used to tilting your phone.
Recommended General Gyro Settings
| Setting | Recommended Value | Why Pick This |
| Gyro Settings | On ADS | Best balance — only active while aiming for precision |
| Gyro Horizontal Flip | Off | Keeps natural left-right control |
| Gyro Vertical Flip | Off | Keeps natural up-down control |
For most players, leaving gyro off entirely is fine, especially if you’re comfortable with touch controls. If you want finer control for sniping or long-range AR duels, setting gyro to On ADS is the sweet spot since it avoids constant motion drift while still giving extra precision when it matters.
Effects – Effects Tab
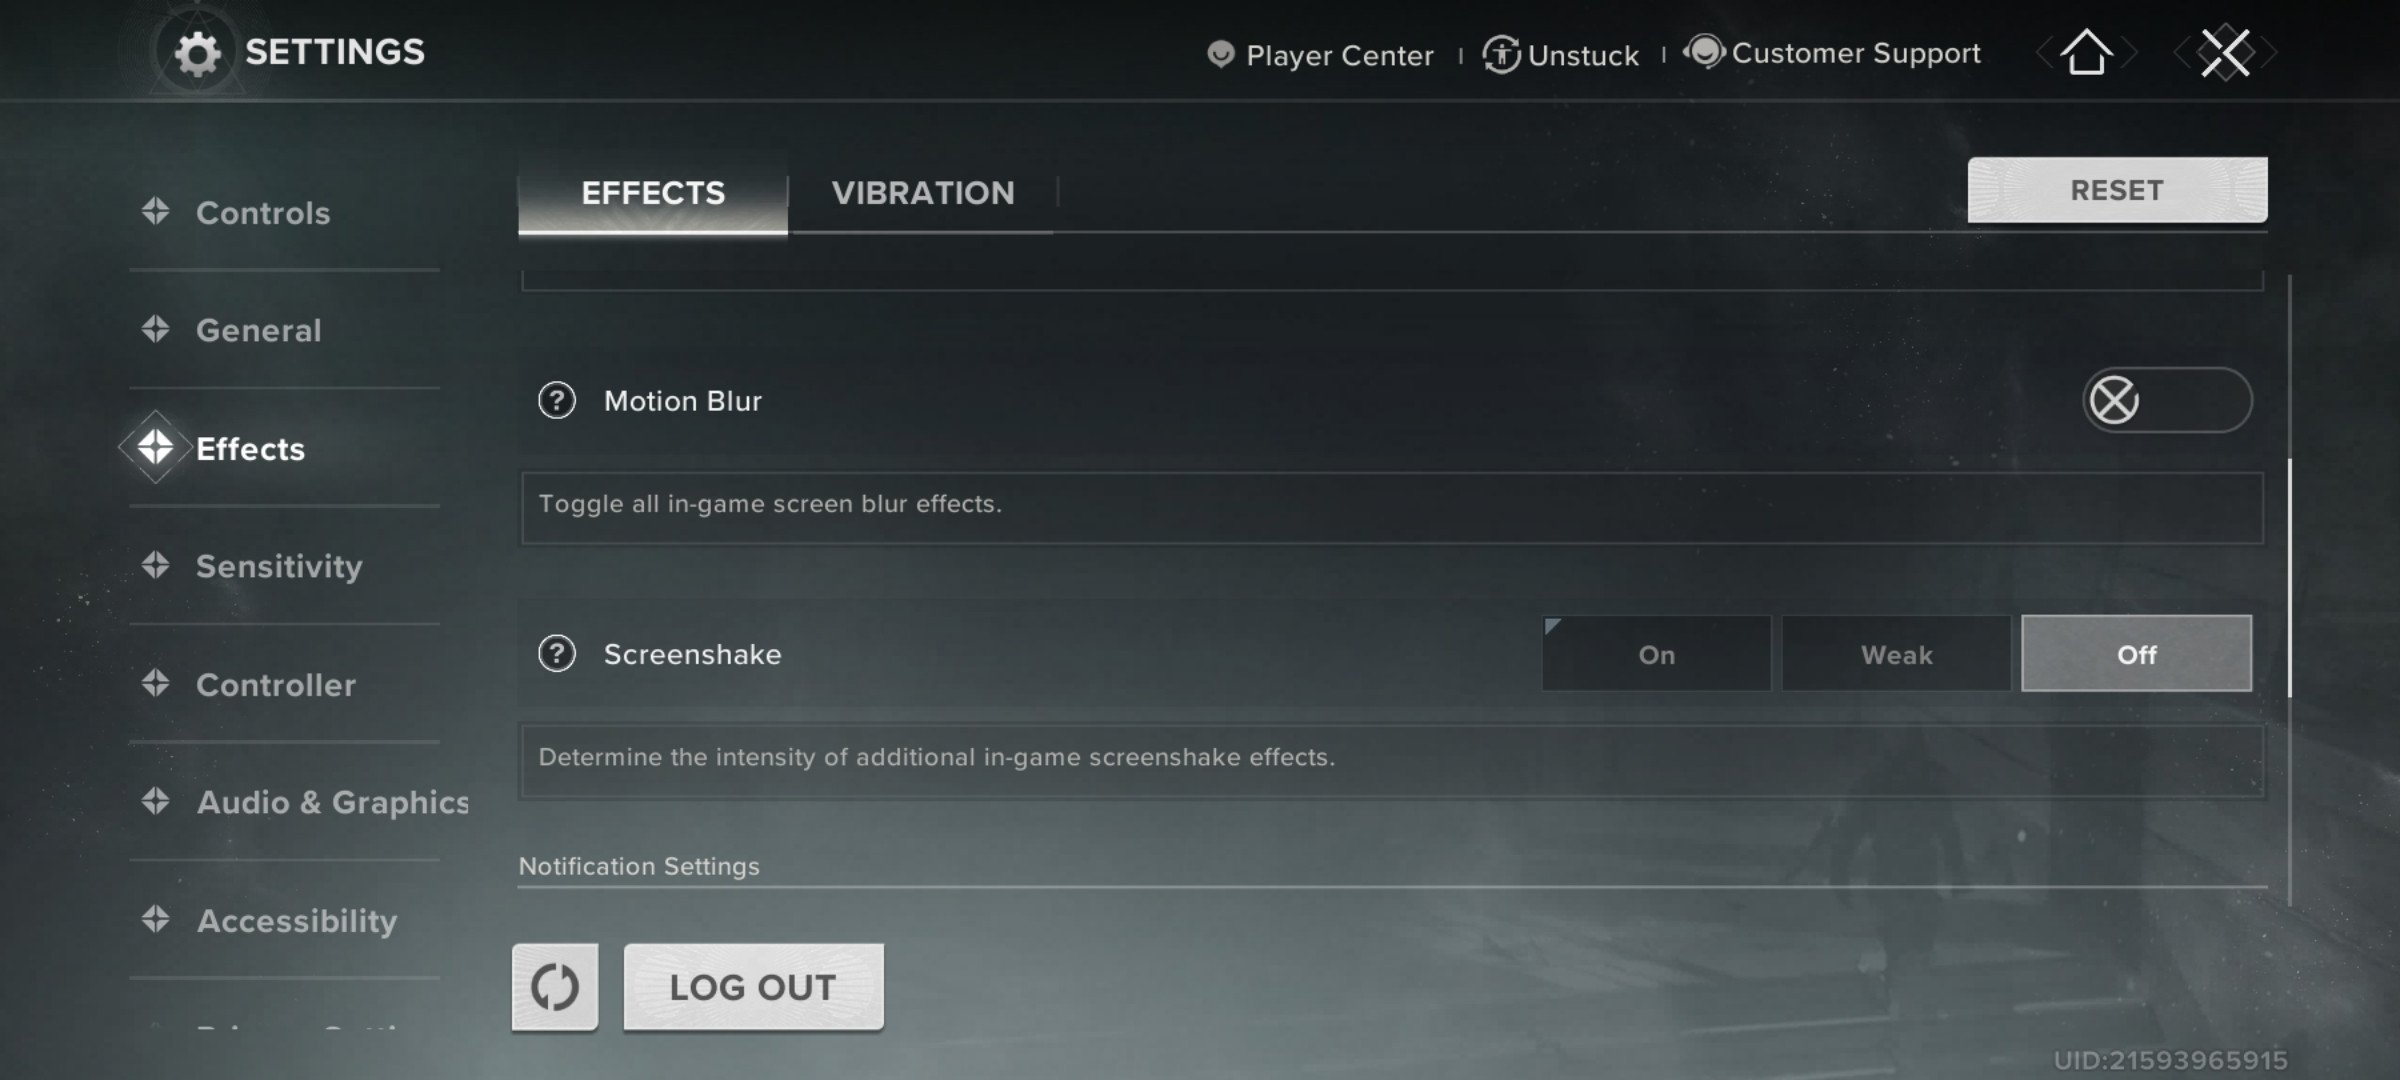
The Effects tab of Destiny Rising settings for FPS is where you fine-tune visual clarity and reduce distractions. These settings don’t directly affect performance as much as graphics quality does, but they make a big difference for visibility and comfort during longer play sessions. A wider field of view and reduced screen clutter will help you track enemies more consistently in both PvE and PvP.
| Setting | Recommended | Reason |
| FPP Field of View | 90 | Maximizes awareness and peripheral vision without shrinking enemies too much. |
| TPP Field of View | 90 | Keeps third-person camera wide and consistent with FPP for smoother transitions. |
| Motion Blur | Off | Removes unnecessary blur, keeping the screen sharp while aiming or moving quickly. |
| Screenshake | Off | Prevents distracting visual jolts during combat and improves aiming precision. |
| Notification Style | 2D | Keeps hit and threat markers simple, reducing clutter around your character. |
| Mini-Map Mode | Rotating | Always orients the map toward your facing direction for faster reaction. |
Pushing FOV higher than the default 85 is one of the best Destiny Rising display settings you can change because you’ll see more of the battlefield, which is especially useful in PvP skirmishes. Disabling blur and shake ensures your aim remains consistent under fire. Lastly, 2D notifications and a rotating mini-map keep the UI clean while still giving you critical awareness of incoming threats.
Sensitivity – Global Sensitivity Tab
Global Sensitivity controls your overall aiming and camera responsiveness. These values form the baseline for all weapons unless you enable Custom Sensitivity. Keeping them balanced ensures smooth tracking and recoil control without oversteering. If unsure, stick to these optimized settings for Destiny Rising sensitivity:
| Setting | Recommended Value | Why Pick This |
| Acceleration Mode | Speed Mode | Natural swipe response, better than Distance mode |
| Acceleration Value | 100 | Keeps movement consistent and quick |
| Adjust Aiming Sensitivity | Immediate | Eliminates delays when switching ADS/hipfire |
| Global Sensitivity | ~80 | Balanced for both close and long-range fights |
| Outside of ADS | 80 | Smooth camera panning without overshoot |
| Short Zoom ADS | 80 | Great for SMGs, sidearms, and shotguns |
| Medium Zoom ADS | 80 | Best for ARs, pulses, and bows |
| Long Zoom ADS | 80 | Keeps snipers stable without dragging aim |
This setup creates a “universal” aiming feel across all weapons, making it easier to switch without retraining your muscle memory.
Sensitivity – Custom Sensitivity Tab
Custom Sensitivity unlocks per-zoom settings for specific weapon classes. By default, the game’s values are well-tuned, and most players should leave them as they are. If you find yourself consistently over- or under-shooting with a certain weapon (e.g., sniper rifles feeling too twitchy), you can experiment by lowering or raising their ADS sensitivity. This process is entirely personal, so it’s best to test values in the practice range before committing. For most players, though, the defaults will perform well enough.
Controller Settings
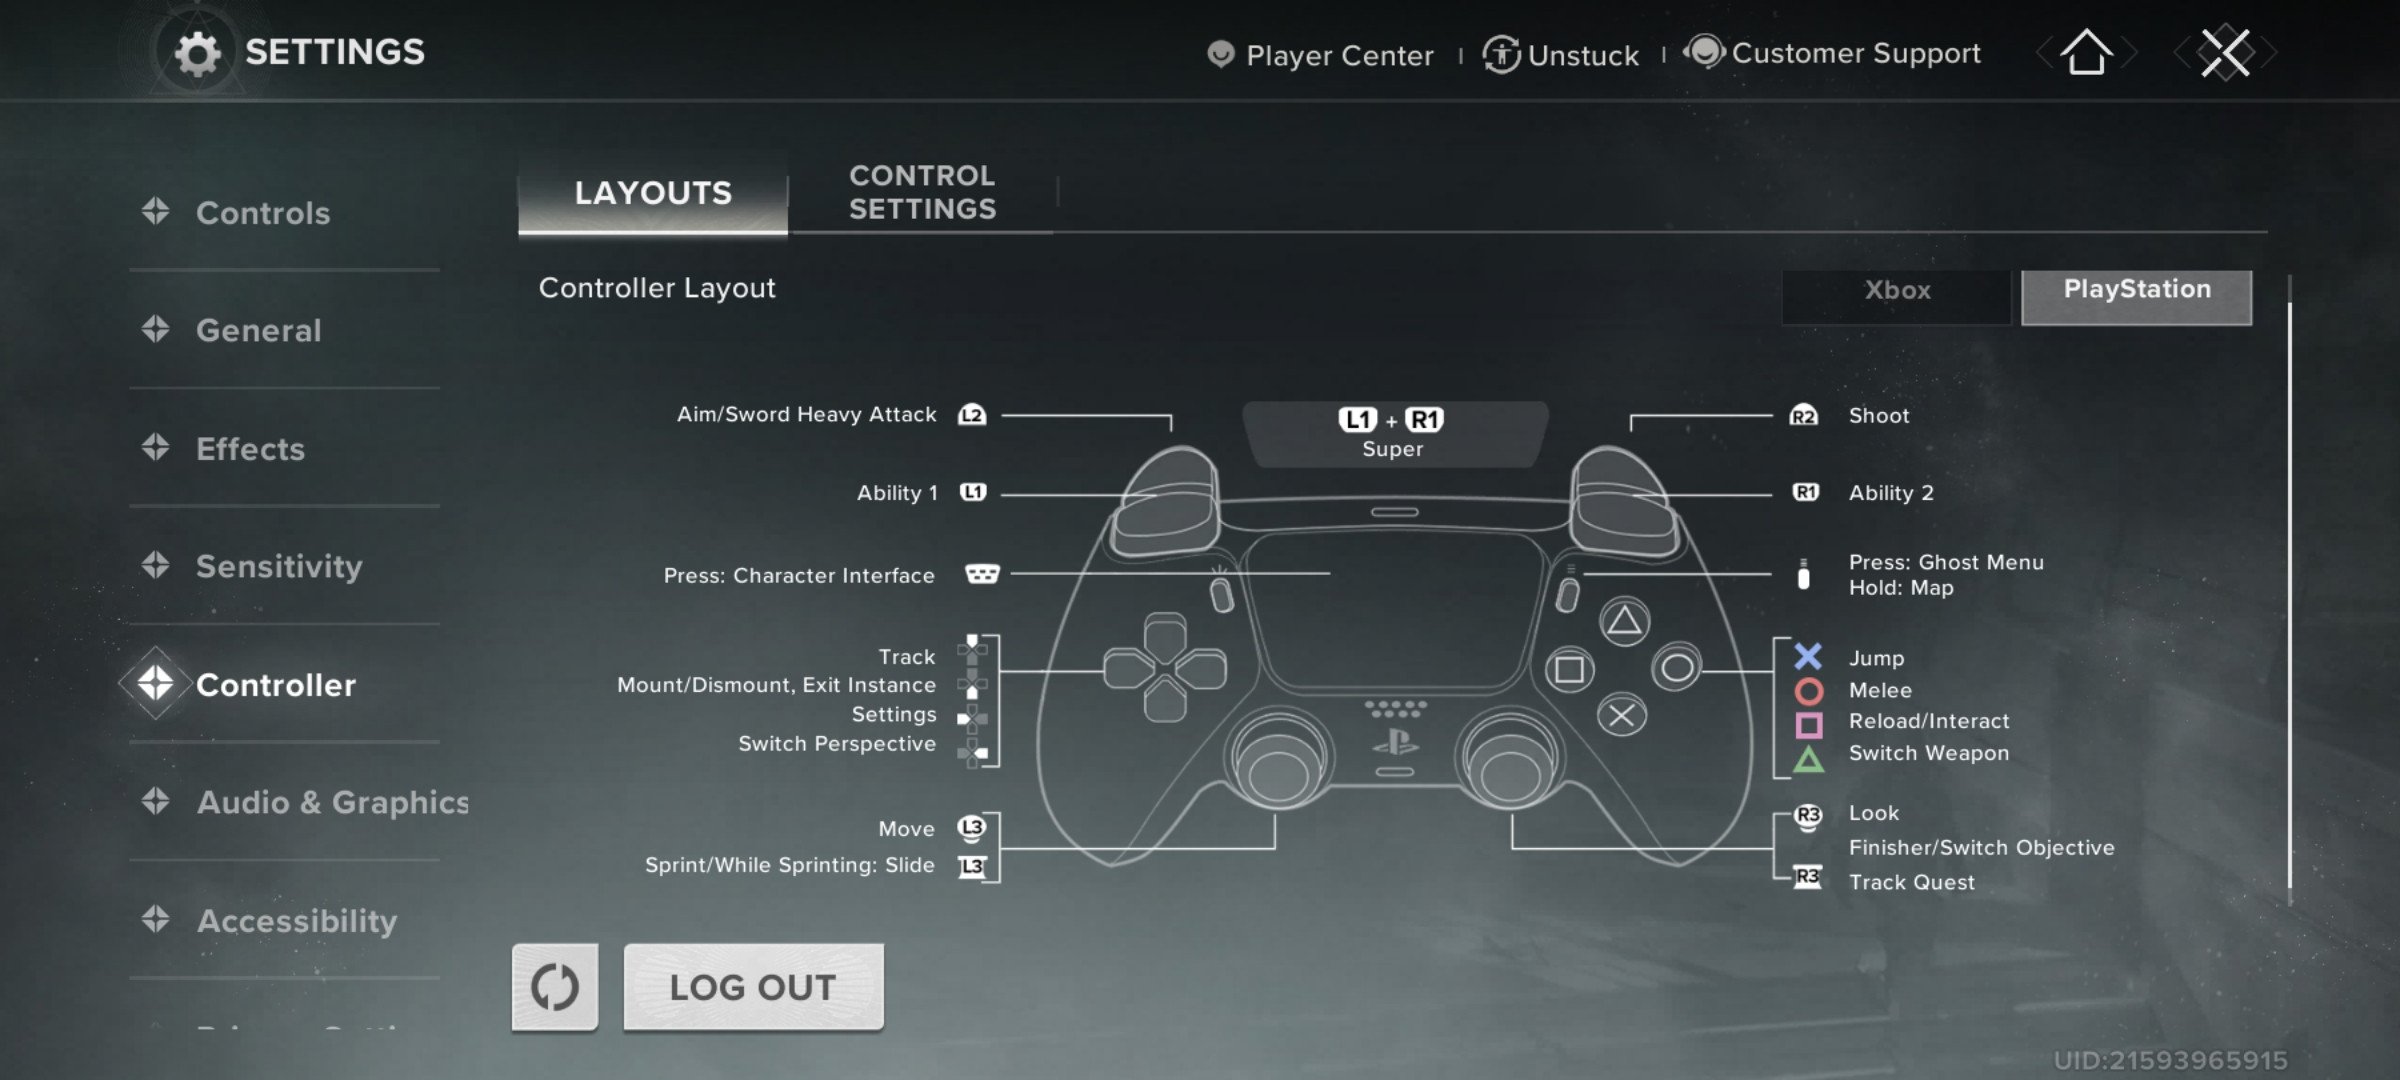
Destiny Rising has full controller support on mobile, offering official button prompts for both Xbox and PlayStation controllers. The game includes preset layouts, fully customizable remapping, and additional settings like controller-specific sensitivity sliders, aim assist tuning, and anti-stick-drift options.
If you’re planning to play with a controller, it’s best to start with the default layout for your platform (Xbox or PlayStation) and only make adjustments where needed. Since controller feel is highly personal, the best approach is to test different sensitivity values and dead zones in the training range until you find what feels most natural.
Audio & Graphics – Graphics Tab
The Graphics tab is one of the most important areas for performance and stability in Destiny Rising. So, if you want to increase fps in Destiny Rising, this is where you need to look first. High-end phones can push visuals close to console quality, but mid-range devices will need careful tuning to avoid overheating and lag.
| Setting | Recommended Value | Why Pick This |
| Graphics Mode | Custom | Lets you manually fine-tune instead of relying on presets |
| Rendering Quality | Ultra | Crisp visuals without the excessive battery drain of Max |
| Frame Rate | High | Smooth performance while avoiding extreme heat from Max |
| Auto-Adjust Graphics when Lagging | On | Automatically reduces load during performance drops |
| Pop-up Reminder for Auto-Adjustment | On | Notifies you if the system tweaks graphics mid-game |
This combination ensures you maintain a high framerate and sharp visuals without pushing your device into constant thermal throttling. If you’re on a lower-end device, drop Rendering Quality to High and Frame Rate to Standard for smoother stability. If you want to see more best Destiny Rising settings for fps, refer to our emulator section of the guide.
Device Requirements
The developers have outlined both minimum and recommended specs for smooth gameplay:
Minimum Specs
- Android: Snapdragon 835 / MediaTek Dimensity 700 or newer
- iOS: iPhone 7 or newer
- Storage: 15 GB
Recommended Specs
- Android: Snapdragon 835 / MediaTek Dimensity 700 or newer
- iPhone: iPhone 7 or newer
- iPads: iPad (8th gen) or newer, iPad Pro 12.9” (2nd gen+) or equivalent
- Storage: 15 GB across all devices
If your phone or tablet is older than these specs, expect to run the game on Performance Mode for stability.
Destiny Rising Best Settings for Emulators
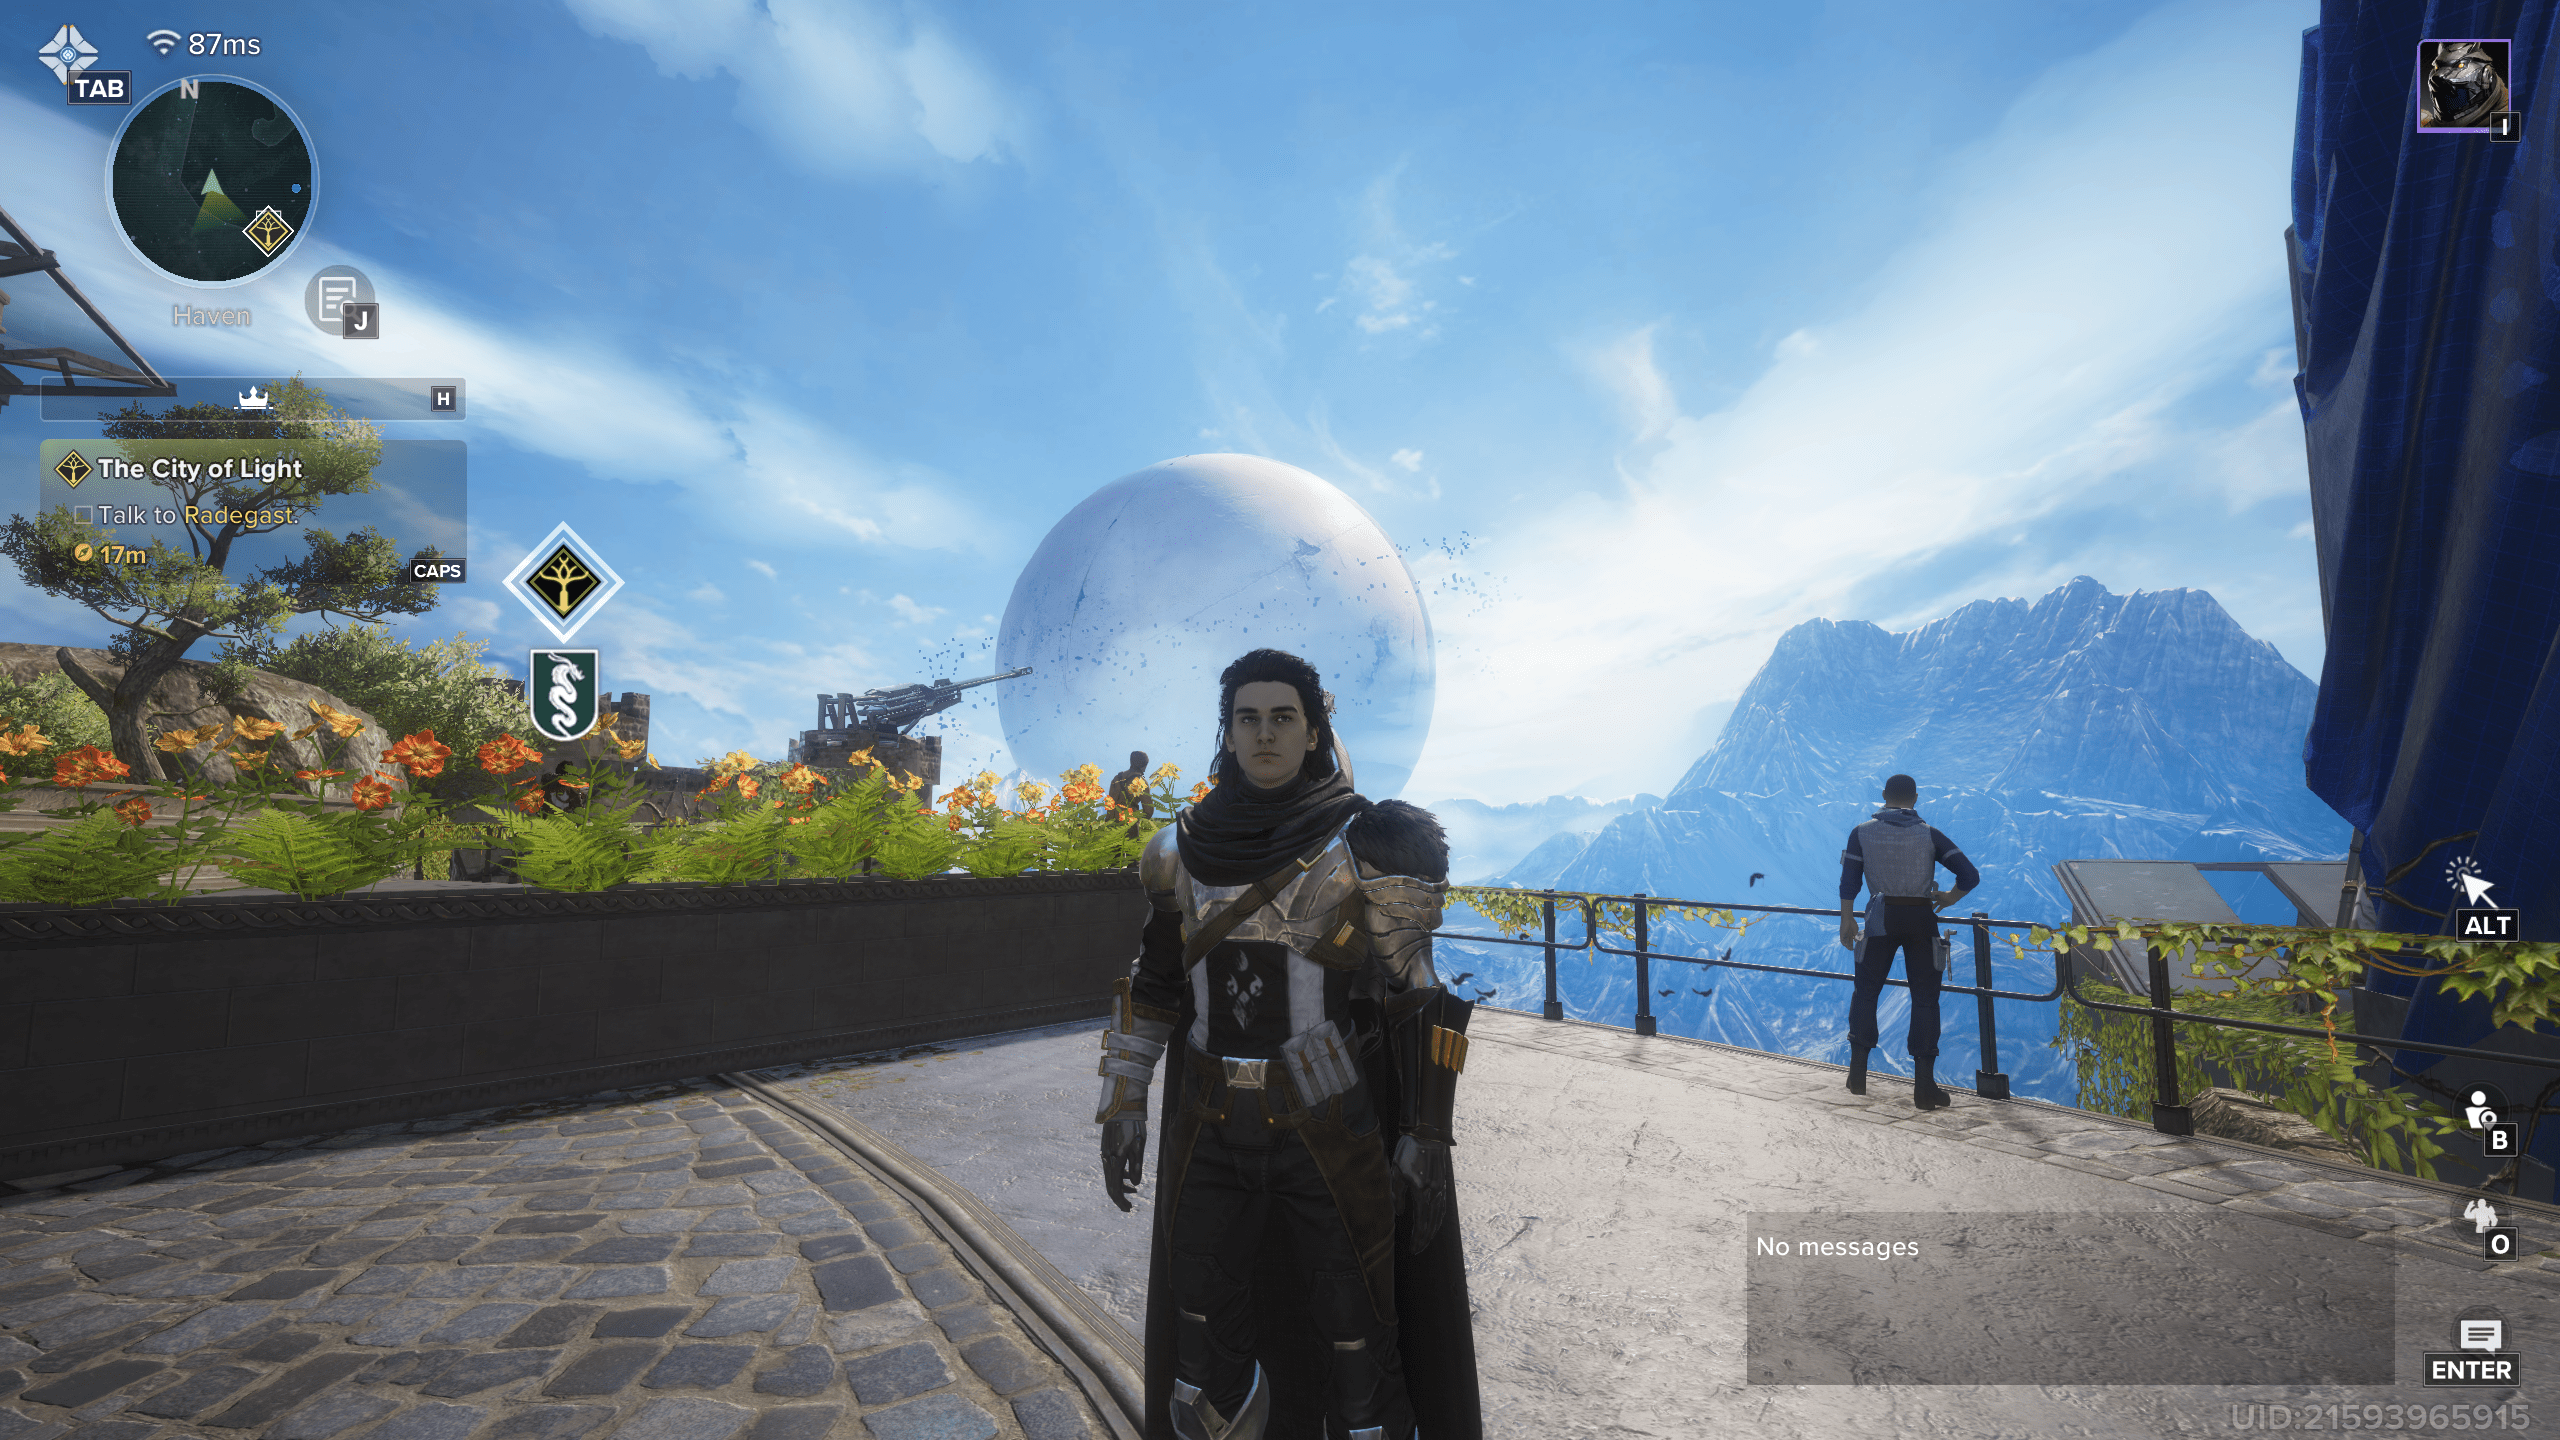
When playing Destiny Rising on PC through an emulator, you gain access to full mouse and keyboard support. This not only cleans up the HUD by removing touch controls but also introduces a dedicated settings tab for customizing sensitivity, ADS options, and keybindings. These settings make the game feel much closer to a traditional PC shooter, giving players more precise control and flexibility.
Mouse & Keyboard – Controls Tab
The Controls tab focuses on how aiming and movement interact, as well as raw mouse sensitivity. Below is an overview of the most important options:
| Setting | Recommended Value | Explanation |
| TPP ADS Mode | Hold | Feels more natural for precise aiming compared to Toggle. |
| Sprint Mode | Toggle | Prevents finger strain and mimics PC shooter movement style. |
| Mouse Horizontal Sensitivity | 13.0 | Balanced for fast turning without being twitchy. |
| Mouse Vertical Sensitivity | 13.0 | Matches horizontal for consistent control. |
| ADS Sensitivity | 0.80 | Keeps aiming stable when zoomed in, reducing overcorrection. |
These values provide a solid baseline for most players, but sensitivity should always be fine-tuned to your own mouse DPI and comfort level.
Mouse & Keyboard – Keybinding Tab
The Keybinding tab lets you fully customize your keyboard layout. Destiny Rising provides defaults that feel familiar to most PC shooter players, but almost every action can be rebound if needed. Below are the grouped defaults:
Movement Controls
| Action | Default Key |
| Move Forward | W |
| Move Backward | S |
| Move Left | A |
| Move Right | D |
| Sprint | Shift (Toggle Sprint also available) |
| Slide | Ctrl |
| Jump | Space |
| Switch Perspective (FPP/TPP) | T |
Combat Controls
| Action | Default Key |
| Fire | Left Mouse Button |
| ADS (Aim Down Sights) | Right Mouse Button |
| Melee | C |
| Sword Light Attack | Left Mouse Button |
| Sword Heavy Attack | Right Mouse Button |
| Sword Defense | C |
| Finisher | G |
| Reload & Switch Weapon Mode | R |
| Previous Weapon | Mouse Wheel Down |
| Next Weapon | Mouse Wheel Up |
Abilities
| Action | Default Key |
| Class Ability 1 | Q |
| Class Ability 2 | V |
| Super & Exit Super | F |
| Switch Drone | Z |
| Interact & Exit Calamity Orb | E |
Interface and Other
| Action | Default Key |
| Open Characters Interface | I |
| Open Destination Interface | M |
| Open Quest Interface | H |
| Open Store Interface | 2 |
| Open Battle Pass Interface | 3 |
| Open Season Interface | 4 |
| Open Fireteam Interface | 5 |
| Open Instance & Activity Page | P |
| Open Instance Details | J |
| Open Chat Interface | Enter |
| Open Emote Screen | O |
| Toggle Voice | ~ |
| Toggle Mic | Y |
| Open Quick Wheel | Middle Mouse Button |
| Nearby (Interact) | B |
| Open Event Activeness Interface | 1 |
These bindings mirror classic Destiny 2 button mapping, making it easy for PC players to adapt quickly. If you’re using a gaming mouse with additional side buttons, rebinding melee, grenade, or ability inputs to those buttons can greatly improve reaction times.
BlueStacks Emulator Settings – Performance & Display Tabs
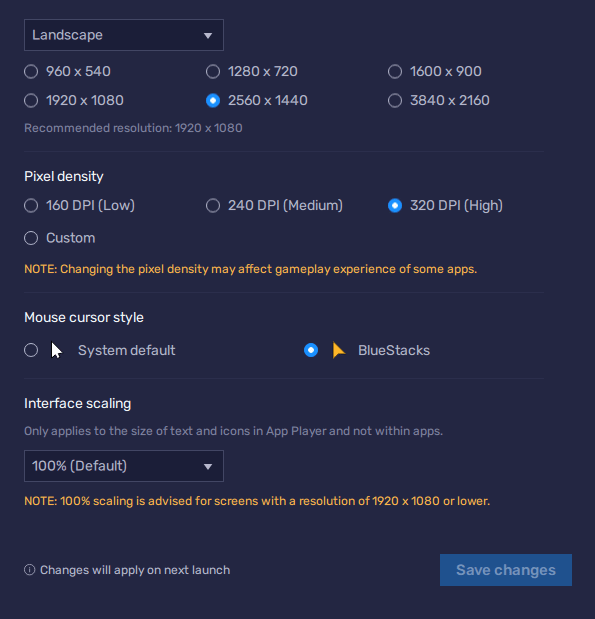
If you want to have the best graphics settings for Destiny Rising when running this game on PC through BlueStacks, the emulator settings heavily influence both graphics quality and responsiveness. These settings often override in-game visuals and frame rate options, so they should be your priority when tuning performance. BLOG20
Here are the recommended Performance and Display settings:
| Setting | Recommended Value | Why |
| CPU Allocation | High (4 Cores) | Ensures stable performance without starving your system of resources. |
| Memory Allocation | Extreme (12 GB) if available | Allocates more memory to reduce stutters and loading times. |
| Performance Mode | High Performance | Fully unlocks system power for smoother gameplay. |
| Frame Rate | 240 (max available) | Pushes the game beyond mobile limitations for ultra-smooth play. |
| Enable High Frame Rate | On | Prevents FPS locking at 60. |
| Enable VSync | Off | Reduces input delay unless you specifically need screen tear control. |
| Display FPS During Gameplay | On | Helps monitor performance in real time. |
| Resolution | 2560×1440 (or higher if monitor allows) | Sharper visuals, especially for UI and text. |
| Pixel Density | 320 DPI (High) | Best balance between crisp image and emulator performance. |
| Mouse Cursor Style | BlueStacks | Keeps it consistent with emulator controls. |
| Interface Scaling | 100% | Prevents UI scaling issues inside Destiny Rising. |
BlueStacks also provides Performance Modes:
- High Performance – Best for gaming if your PC has 16GB+ RAM.
- Balanced Mode – Recommended if you run multiple apps while gaming.
- Low Memory Mode – Use only if your PC struggles or has under 8GB RAM.
For most users playing Destiny Rising, High Performance mode + 240 FPS + 1440p/320 DPI will provide the smoothest and most visually striking experience.
MuMuPlayer Emulator Settings
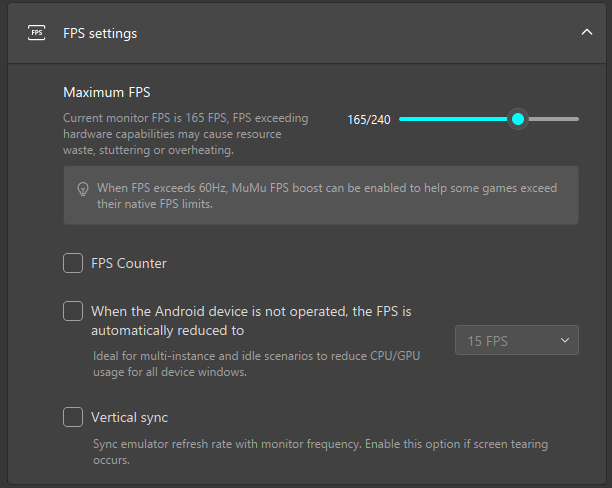
MuMuPlayer is the official emulator for Destiny Rising, developed by NetEase itself. This means the emulator is highly optimized for the game, and with the right configuration, it can outperform most alternatives. Since MuMu directly controls how the game renders, these options effectively override the in-game graphics settings. To achieve the best possible visuals and performance, here are the recommended settings:
For the best Destiny Rising graphics settings on MuMuPlayer, use these:
| Setting | Recommended Option | Why It Matters |
| Graphics Renderer | Vulkan (Exclusive) | Provides the best stability, smoothness, and image quality. Switch to DirectX only if you face issues. |
| Performance Mode | High (6–8 CPU cores, 8–12 GB RAM) | Ensures maximum smoothness. If you have 16 GB+ system RAM, allocate 12 GB for best results. |
| Resolution | 1920×1080 (for standard monitors) or 2560×1440 (for high-res displays) | Higher resolutions give sharper visuals but demand more from your GPU. |
| Frame Rate | 120 FPS (or match your monitor refresh rate) | Ultra-smooth gameplay; avoid setting above your monitor’s limit. |
| Forced Use of Discrete GPU | On | Guarantees the game runs on your dedicated graphics card. |
| Smart Memory Optimization | Off | Disabling prevents potential stutter. Enable only on low-RAM PCs. |
| GPU Usage Strategy | Better Graphics Performance | Prioritizes image quality and smoothness; use “Less Resource Usage” only on weaker PCs. |
| Vertical Sync (V-Sync) | Off | Reduces input lag; turn on only if you notice screen tearing. |
| Screen Brightness & Style | 50–60%, Common | Balanced visibility without washing out colors. |
In-Game Graphics on MuMu
- Once inside Destiny: Rising, fine-tune the graphics menu:
- Graphics Quality: Set to Max for high-end PCs, or lower to Balanced for smoother performance.
- Frame Rate: Ultra (120Hz) if your system and monitor support it.
- HD Textures: Enable if your GPU has 4 GB+ VRAM. Disable on weaker GPUs to avoid crashes.
When paired with the in-game graphics settings, this setup guarantees the sharpest visuals and the smoothest framerates possible on PC. If you want to push graphics beyond mobile limits, combine 2560 × 1440 resolution with High FPS mode. This makes Destiny Rising look and feel closer to a true PC release.
Conclusion
Destiny Rising is not just another mobile slop; it feels like a true Destiny spin-off made for mobile devices. And as if to confirm this feeling, the game features a highly extensive list of settings with the most customizable options. But why would anyone need this many settings, you might ask? Well, if someone makes this game their main one and spends a lot of time playing it, it’ll start feeling like some things need to change. Maybe you’d wish some controls were different, or HUD elements were displayed differently. Well, you can do all of that and then some!
And with the emulator settings, you can push the visual fidelity of the game even further and enjoy the benefits of playing with keyboard and mouse thanks to the native support. This all means that the game is taking these things seriously and allows its players to make it their own.
F.A.Q.
What are the best settings for Destiny Rising on mobile?
Use Ultra rendering quality and High frame rate if your device supports it. Lower to Balanced or Standard on weaker devices to reduce lag.
What are the best settings for Destiny Rising on PC with emulator?
On MuMuPlayer or BlueStacks, set:
- Resolution: 1920×1080 or higher
- Frame Rate: 120–165 FPS
- Renderer: Vulkan (MuMu) or High Performance (BlueStacks)
Does Destiny Rising support controllers?
Yes, it fully supports Xbox and PlayStation controllers with customizable layouts. Controller settings also include sensitivity options and aim assist.
What is the recommended FPS for Destiny Rising?
The game runs best at 60–120 FPS. Higher FPS (up to 240 on emulators) improves smoothness but demands more system power.
How much storage does Destiny Rising need?
The game requires 15 GB of free storage across Android, iOS, and emulator setups.
What are the minimum device requirements for Destiny Rising?
- Android: Snapdragon 835/MediaTek Dimensity 700 or newer
- iOS: iPhone 7 or newer
- Storage: 15 GB
What are the recommended device specs for Destiny Rising?
- Android: Snapdragon 835/Dimensity 700+ with 8 GB RAM
- iOS: iPhone 11 or newer
- iPad: 8th gen or newer
Can I play Destiny Rising on iOS and Android with the same account?
Yes, accounts are cross-platform, and progress is shared between devices.
Is MuMuPlayer better than BlueStacks for Destiny Rising?
Yes. MuMuPlayer is the official NetEase emulator, offering exclusive rewards and optimizations. BlueStacks still works well if you prefer its ecosystem.
How do I fix lag in Destiny Rising?
- Lower rendering quality to Balanced
- Set FPS to 60
- Close background apps to free RAM
- Use emulator settings like Better Graphics Performance
Does Destiny Rising support Ultra HD graphics?
Yes, if your device or PC hardware can handle Max graphics with HD textures. Low VRAM GPUs should disable HD textures to prevent crashes.
What is the best sensitivity setting for Destiny Rising?
Start with Global Sensitivity at Medium and tweak ADS zoom settings individually. Use Custom mode if you want per-weapon sensitivity control.


