 Crispy Jackie
Welcome to our complete Monster Hunter Wilds Hammer guide, hunters! If you love smashing monsters into the ground and creating massive openings for your team, the Hammer is your choice. This weapon delivers staggering impact damage and stunning monsters, leaving them wide open for follow-ups.
Monster Hunter Wilds has made the Hammer even more satisfying with new moves, improved mobility, and better charge attacks. In this guide, we’ll break down everything you need to master the art of bonking – from mechanics and the best combos to advanced moves and beyond.
Stuck on killing a particular monster? Skycoach is here to help you with this and other in-game challenges. Our PROs can assist you with Killing Any Monster in MH Wilds in a jiffy. We work with any platform and guarantee the best price on the market.
Read our other articles:
- Great Sword Guide
- Long Sword Guide
- Switch Axe Guide
- Leveling Guide
- Best Armor Sets
- Best Weapons Tier List
- Beginner's Guide
Note: At Skycoach, you can Buy Monster Hunter Wilds Boost at the best prices with fast delivery. Use our special PROMO CODE (in green) hidden in this article for a 20% DISCOUNT.
Browse our hottest Monster Hunter Wilds Boosting services


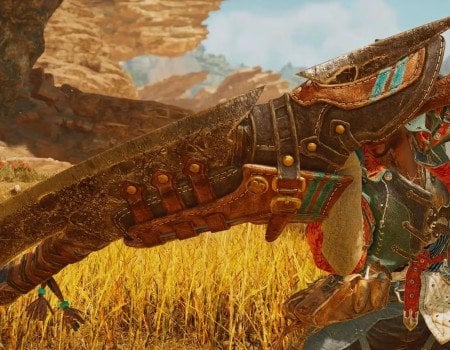
Hammer Overview
The Hammer is great for stunning monsters and delivering overwhelming damage to their heads. Unlike other heavy weapons, the Hammer allows full movement while charging, giving you the ability to reposition and unleash powerful blows whenever you need it.
Thanks to its blunt damage, the Hammer specializes in KO’ing monsters. This makes it a key weapon for controlling fights and setting up opportunities for teammates. With Monster Hunter Wilds introducing new charge attacks, better mobility, and improved flow between combos, the Hammer is now more versatile than ever. Prepare to smash, stagger, and experience a whole new playstyle in every hunt.
Hammer Pros & Cons
Before we get to the question of how to use Hammer in Monster Hunter Wilds, let’s see what this is all about. No matter what weapon you choose to play in the game, it will be ideally balanced. The developers have done a great job of making them more or less equal. They will always have a range of strengths and weaknesses to keep in mind. We have done an analysis to ensure you understand if the Hammer is your weapon to choose at all.
Beginning with Hammer Pros, they include:
- High Stun Potential – The Hammer is one of the best weapons for KO’ing monsters, making it invaluable for locking them down and creating huge openings for extra damage.
- Full Mobility While Charging – Unlike other slow heavy weapons, the Hammer allows movement while charging, letting you reposition and strike at the right moment without being locked in place.
- Massive Raw Damage – With powerful charge attacks and combos, the Hammer delivers some of the highest burst damage in the game, especially when landing fully charged Mighty Charge Slams.
Speaking of Hammer Cons, remember about the following:
- Short Range – Being a melee weapon with no cutting damage, the Hammer relies on close-range attacks and cannot sever tails, limiting its versatility.
- Requires Precise Positioning – Since most of its power comes from hitting the head, bad positioning or mistimed attacks can cause you to miss valuable stun opportunities.
- Stamina-Intensive – The Charged Step and constant charging can quickly drain stamina, making stamina management an important skill to master for Hammer users.
Keep those points in mind whenever entering another fight. Most of the downsides can be leveled by playing with the Hammer a lot. Just like any other weapon, it requires a lot of practice to master it. Otherwise, you might struggle and die more often than you should.
Hammer Mechanics
The Hammer mechanics in Monster Hunter Wilds revolve around charged attacks, stunning monsters, and high-impact combos. While it lacks the cutting capabilities of other weapons, it makes up for it with overwhelming concussive force. It also goes with the ability to keep monsters staggered with well-placed head strikes.
Check out what Hammer mechanics you need to know for sure:
- Charged Attacks for Increased Power – The Hammer has multiple charge levels, each leading to different attacks with increasing power. Holding the charge for too long can waste stamina, so knowing when to release is crucial.
- Stun and Exhaust Damage – Hitting a monster's head accumulates stun damage, leading to knockdowns. Body hits apply exhaust, slowing down the monster and forcing it to tire out faster.
- Charge Step for Mobility – Unlike most heavy weapons, the Hammer allows fluid movement while charging, letting you reposition for better strikes while dodging attacks.
- Spinning Bludgeon for Sustained Damage – This move can now be used after most charge attacks, making it easier to chain into powerful combos while keeping up the pressure.
- Golf Swing as an Offset Attack – The Golf Swing can now be timed for counterattacks, making it a devastating tool to interrupt monsters and land huge punishing blows.
The most important ones here are Charged Attacks and the ability to stun monsters. This is what makes the Hammer a truly unique weapon with a ton of utility. By mastering this weapon, you literally become a God of controlling monster movements and delivering constant pressure without getting punched back. BLOG20
Charged Attacks Explained
The Hammer’s charged attacks are the core of its damage output and effectiveness in battle. Unlike most weapons, the Hammer can move while charging, allowing for aggressive positioning and well-timed strikes. Each charge level modifies the attack, making it essential to understand when and how to use them:
- Level 1: Charged Side Blow – A quick horizontal swing that deals solid damage with minimal charge time. Great for quick follow-ups or when repositioning.
- Level 2: Charged Upswing – An uppercut-style attack with good vertical reach, ideal for hitting a monster’s head and stunning it.
- Level 3: Charged Big Bang – A devastating overhead smash, delivering high damage and heavy stun build-up, perfect for punishing openings.
- Mighty Charge Upswing – A multi-hit wind-up slam that takes longer to execute but delivers massive damage, best used after a monster’s big recovery animation.
Charged Attacks have their own mechanics to memorize and master. Here are the most important ones to start with:
- Charge While Moving – Unlike other weapons, the Hammer allows hunters to move freely while charging, making it easier to dodge attacks and reposition.
- Use Charge Step for Mobility – Pressing the dodge button while charging lets you reposition and retain charge levels, ensuring you don’t waste time building up power again.
- Transition Into Combos – Charge attacks don’t have to be single strikes. They can seamlessly transition into combos, like Spinning Bludgeon or Golf Swing, for even higher damage output.
- Watch Your Stamina – Charging drains stamina, so managing it properly with food, armor skills, or brief pauses between charges is crucial.
Mastering the timing of charged attacks is the first step to make. We’re going to emphasize this throughout our Monster Hunter Wilds Hammer tutorial several times. This is an extremely important mechanic. These attacks can deal insane damage while controlling the monster’s movement with frequent knockdowns. It all comes down to how well you move around your enemy in a close-range combat and execute your combos.
Hammer Moves
The Hammer moves in Monster Hunter Wilds are all about being aggressive and pushing monsters non-stop for further stuns and overwhelming DPS. You have charged attacks, powerful swings, and mobility-focused repositioning. Mastering these moves will allow you to consistently knock out monsters and be victorious in every hunt.
This part of the guide is devoted to Hammer moveset, where we will describe everything you need to know. Starting from the basic controls and getting to move advanced moves.
| Name | PS5 | Xbox | Description |
| Overhead Smash → Golf Swing | A powerful downward strike that can transition into a Golf Swing for high damage. | ||
| Side Smash | A quick side attack that helps reposition while dealing moderate damage. | ||
| Big Bang | A heavy-hitting combo of multiple hammer strikes, ideal for sustained damage. | ||
| Spinning Bludgeon | A spinning attack that deals multiple hits before ending with a strong strike. | ||
| Charge | Hold |
Hold |
Allows you to build up power for stronger attacks while maintaining mobility. |
| Charge Step | Hold |
Hold |
A movement ability that lets the hunter reposition while retaining charge levels. |
| Mighty Charge | A devastating charge attack that leads into a heavy-hitting combo. | ||
| Mighty Charge Slam | Hold |
Hold |
A crushing slam attack that delivers massive damage when fully charged. |
| Focus Blow: Earthquake |  + + |
A special hammer attack that targets monster wounds and deals powerful impact damage. |
These are the basics you want to start with before moving to another section of our guide. As you become a better Hammer wielder, you can get to a higher level and begin training something new.
Browse our hottest Monster Hunter Wilds Boosting services


Advanced Hammer Moves
The Hammer is more than just swinging and smashing – it has powerful advanced techniques that give you more mobility, damage potential, and strategic depth. These moves take the Hammer’s playstyle to the next level, making it a weapon capable of both high burst damage and sustained pressure. Below are four key advanced moves that every Hammer user should master. One of the main Monster Hunter Wilds Hammer tips we can share is to master them prior to anything else.
- Charge Step: It allows Hammer users to move while keeping their charge levels intact. This is crucial because the Hammer relies on charge levels to unleash its strongest attacks. Without this move, repositioning would force players to restart their charge, lowering overall damage output. The Charge Step also includes invincibility frames, making it a perfect tool for dodging monster attacks while preparing for a powerful counterattack.
- Mighty Charge: This is a new addition to Monster Hunter Wilds that acts as a bridge to some of the Hammer’s highest-damage attacks. Once the hammer is charged to Level 3, players can initiate Mighty Charge to prepare for a devastating follow-up. This move retains charge momentum, ensuring that your attack hits at full power, making it an essential mechanic for maximizing the Hammer’s potential.
- Mighty Charge Slam: It’s one of the heaviest-hitting moves in the Hammer’s arsenal. After executing a Mighty Charge, holding
 /
/  builds up further energy, leading into a crushing downward slam. This attack deals massive stun and exhaust damage, making it one of the best moves for knocking out monsters. It requires careful timing but is an absolute game-changer when executed correctly.
 - Focus Blow: Earthquake: This is a powerful Focus Strike move that allows the Hammer to target monster wounds and deal extra damage. It is particularly useful for staggering monsters, breaking tough parts, and setting up follow-up attacks. If performed on a wounded area, this move provides an additional damage boost, making it an essential tool for capitalizing on openings.
These advanced Hammer moves give you everything you need – mobility, power, and the ability to keep up the pressure. Charge Step keeps you moving without losing your charge, while Mighty Charge and Mighty Charge Slam let you dish out some of the hardest-hitting attacks in the game. And when you need to break through defenses, Focus Blow: Earthquake is the perfect way to stagger monsters and create big openings. Master these, and you'll be bonking monsters into the dirt like a true Hammer pro. BLOG20
Best Hammer Combos
We have prepared several combos for you to learn to smash all the monsters on your way. Most of them revolve around right and timed attacks to stun and take down mobs. Check out what best Hammer combos in Monster Hunter Wilds we have prepared for you:
| Name | PS5 | Xbox | Description |
| Side Smash to Mighty Charge | ( |
( |
This is one of the fastest ways to set up Mighty Charge, taking only about 6.5 seconds to execute while dealing 324 MV (Motion Value). It allows for quick repositioning and follow-ups, making it an excellent go-to combo for quick punishes. |
| Charged Upswing Poke Combo | (Hold  → → |
(Hold  → → |
A fast and efficient way to poke at monsters, perfect when you need a quick punish or to close the distance. It also deals more damage than a regular Charged Big Bang, making it a safer alternative while keeping mobility. |
| Overhead Smash to Mighty Charge |
This high-damage combo deals 346 MV in 7.25 seconds, making it ideal when a monster is staggered or knocked down. Since the final Mighty Charge Slam takes some time, it’s best used when you know the monster won’t move for a few seconds. |
||
| Focus Blow Combo |
The perfect combo for exploiting wounded monsters. When you land Focus Blow: Earthquake, it sets up an easy Mighty Charge follow-up, dealing massive damage while keeping the monster staggered. |
||
| Looping Spinning Bludgeon | Any Charge Attack → |
Any Charge Attack → |
This lets you chain multiple powerful hits together while staying in motion. If you get the timing down, you can keep looping into Mighty Charge, creating an endless cycle of destruction. |
These Monster Hunter Wilds Hammer combos are designed to maximize damage and stun while keeping you in control of the fight. Use Side Smash combos for quick attacks, Overhead Smash for big damage, and Focus Blow for breaking through tough monsters. Learn when to cancel into Charged Step for mobility, and you’ll be a bonk master in no time.
Stunning Monsters
The Hammer is the best weapon for stunning monsters, making it a powerful tool for controlling fights. A well-placed bonk to the head can leave a monster dazed, giving you and your team free damage opportunities. Here are three key tips to maximize your stun potential and keep monsters on the floor:
- Use Charged Attacks for More Stun: Not all hammer swings are equal – charged attacks build up stun much faster. Charge Levels 2 and 3 (especially the Charged Upswing and Mighty Charge Slam) are your best tools for staggering and stunning. Use Charge Step to reposition and keep your charge active while dodging incoming attacks.
- Take Advantage of Monster Openings: Stunning a monster isn’t just about hitting it hard – you need good timing too. Wait for roars, attack cooldowns, or knockdowns to land your biggest stun moves. If you already have KO buildup, a well-timed Mighty Charge Slam or Spinning Bludgeon can be the final hit that knocks the monster out cold.
- Chain Attacks to Build Up Stun Faster: Stunning isn’t about just one big hit – it’s about consistently landing blows on the head. The stun meter builds up over time, so stringing together combos like Spinning Bludgeon into Mighty Charge will help you KO monsters faster. Stay aggressive and keep the pressure up.
A stunned monster is a defenseless monster. Use every stun window wisely. Land charged hammer blows to the head, take advantage of monster openings, and keep up constant pressure to get multiple knockdowns per fight.
Aiming for the Head
When using the Hammer, the golden rule is simple: always aim for the head. This isn’t just about dealing high damage – it’s about maximizing stun potential and keeping the monster locked in place. Every hit to the head builds up stun damage, and once that threshold is reached, the monster gets KO’d, giving you and your team free damage time.
- Stuns the Monster – The more blunt damage you land on the head, the faster you’ll knock the monster unconscious.
- Maximizes Damage Output – The head is usually one of the weakest hit zones, meaning your attacks do more damage compared to hitting other body parts.
- Controls the Fight – A stunned monster is completely immobile, letting you and your team unleash powerful combos without worrying about counters.
Use Charge Step to quickly reposition and keep your attacks lined up with the monster’s head. Attack right after a monster finishes an attack, during roars, or when it’s toppled to ensure you land clean headshots. Moves like Mighty Charge Slam and Charged Upswing do massive stun damage, so make sure they connect with the head for maximum effect.
Conclusion
This brings us to the end of our Hammer guide in Monster Hunter Wilds. This weapon is all about big hits, big stuns, and big damage. Mastering charged attacks, using Charge Step for positioning, and always aiming for the head will make you an unstoppable force. With the right combos and timing, you can KO monsters, control fights, and deal devastating damage. Keep practicing, perfect your bonk game, and enjoy smashing your way through Monster Hunter Wilds.
F.A.Q.
Is Hammer hard to use in Monster Hunter Wilds?
The Hammer is easy to pick up but hard to master. While its moveset is straightforward, learning charged attacks, positioning, and head targeting is key to maximizing its potential.
What is the best weapon in Monster Hunter Wilds?
There isn’t a single best weapon, as it depends on playstyle. The Hammer excels at stunning monsters and dealing massive damage, making it one of the best choices for aggressive, melee-focused players.
How to get good with Hammer in Monster Hunter Wilds?
Focus on charging your attacks, aiming for the head, and using Charge Step for positioning. Learning monster patterns and timing your stuns will also greatly improve your gameplay.
How to use Hammer properly in Monster Hunter Wilds?
Use Charge Step to reposition, land charged swings on the monster’s head, and take advantage of Mighty Charge for high-damage attacks. Mixing in combo finishers and stuns will maximize your effectiveness.
Is Hammer good in Monster Hunter Wilds?
Yes! The Hammer is great for stunning enemies, breaking monster parts, and dealing high burst damage, making it a strong weapon choice, especially in multiplayer hunts.
What are the best Hammer combos in Monster Hunter Wilds?
The Side Smash to Mighty Charge combo is the fastest way to get into a powerful charged slam, while Overhead Smash to Mighty Charge offers higher overall damage. The Charged Upswing Poke Combo is great for quick punishes, and the Focus Blow Combo helps set up devastating follow-ups.