 Dallon Avery
Greetings, aspiring Hunters! In this Monster Hunter Wilds Switch Axe guide, we’ll talk about everything you could possibly want to know about this particular weapon, from the basic moves available to you all the way up to the most efficient combos you should be using. We’ll explain the weapon mechanic, which will help any players new to the Monster Hunter series understand how to use Switch Axe, and we will also explain the new moves and mechanics added to this weapon in MH: Wilds.
Before we start, if you want to get a specific weapon from the weapon crafting tree but don’t have enough materials or Zenny, you can Buy Weapons Farming service at Skycoach. Just pick any weapon type and then the desired weapon from the crafting tree, and you’ll get it as soon as possible. It’s the fastest and safest way to get a cool-looking weapon that will also increase your build’s damage.
Note: At Skycoach, you can Buy Monster Hunter Wilds Boost at the best prices with fast delivery. Use our special PROMO CODE (in green) hidden in this article for a 20% DISCOUNT.
Browse our hottest Monster Hunter Wilds Boosting services


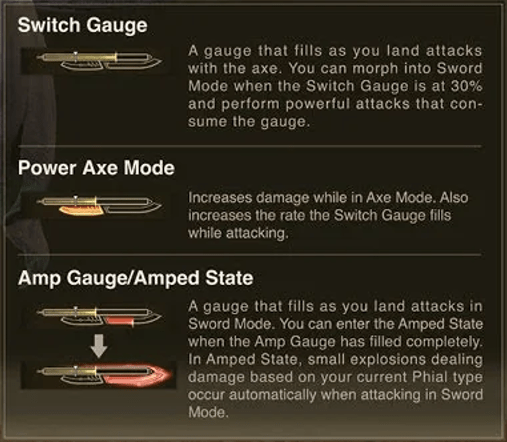
Switch Axe Basics: Modes & Mechanics
If you’re new to the game and wondering how to use Switch Axe in Monster Hunter Wilds, you might get confused by the controls and moves of this weapon.
Switch Axe is a powerful melee weapon that uses momentum to switch between its two modes – Axe and Sword.
- Axe mode – offers great mobility and high-reaching attacks.
- Sword mode – offers great damage by using phials to deal additional raw, elemental, or status damage.
At first glance, it might seem a little too technical, but in truth, the Switch Axe is a relatively simple weapon once you understand how the two modes work together. One downside is that it lacks any blocking options, making positioning crucial. However, Wilds introduces new counter-based mechanics to offset this drawback.
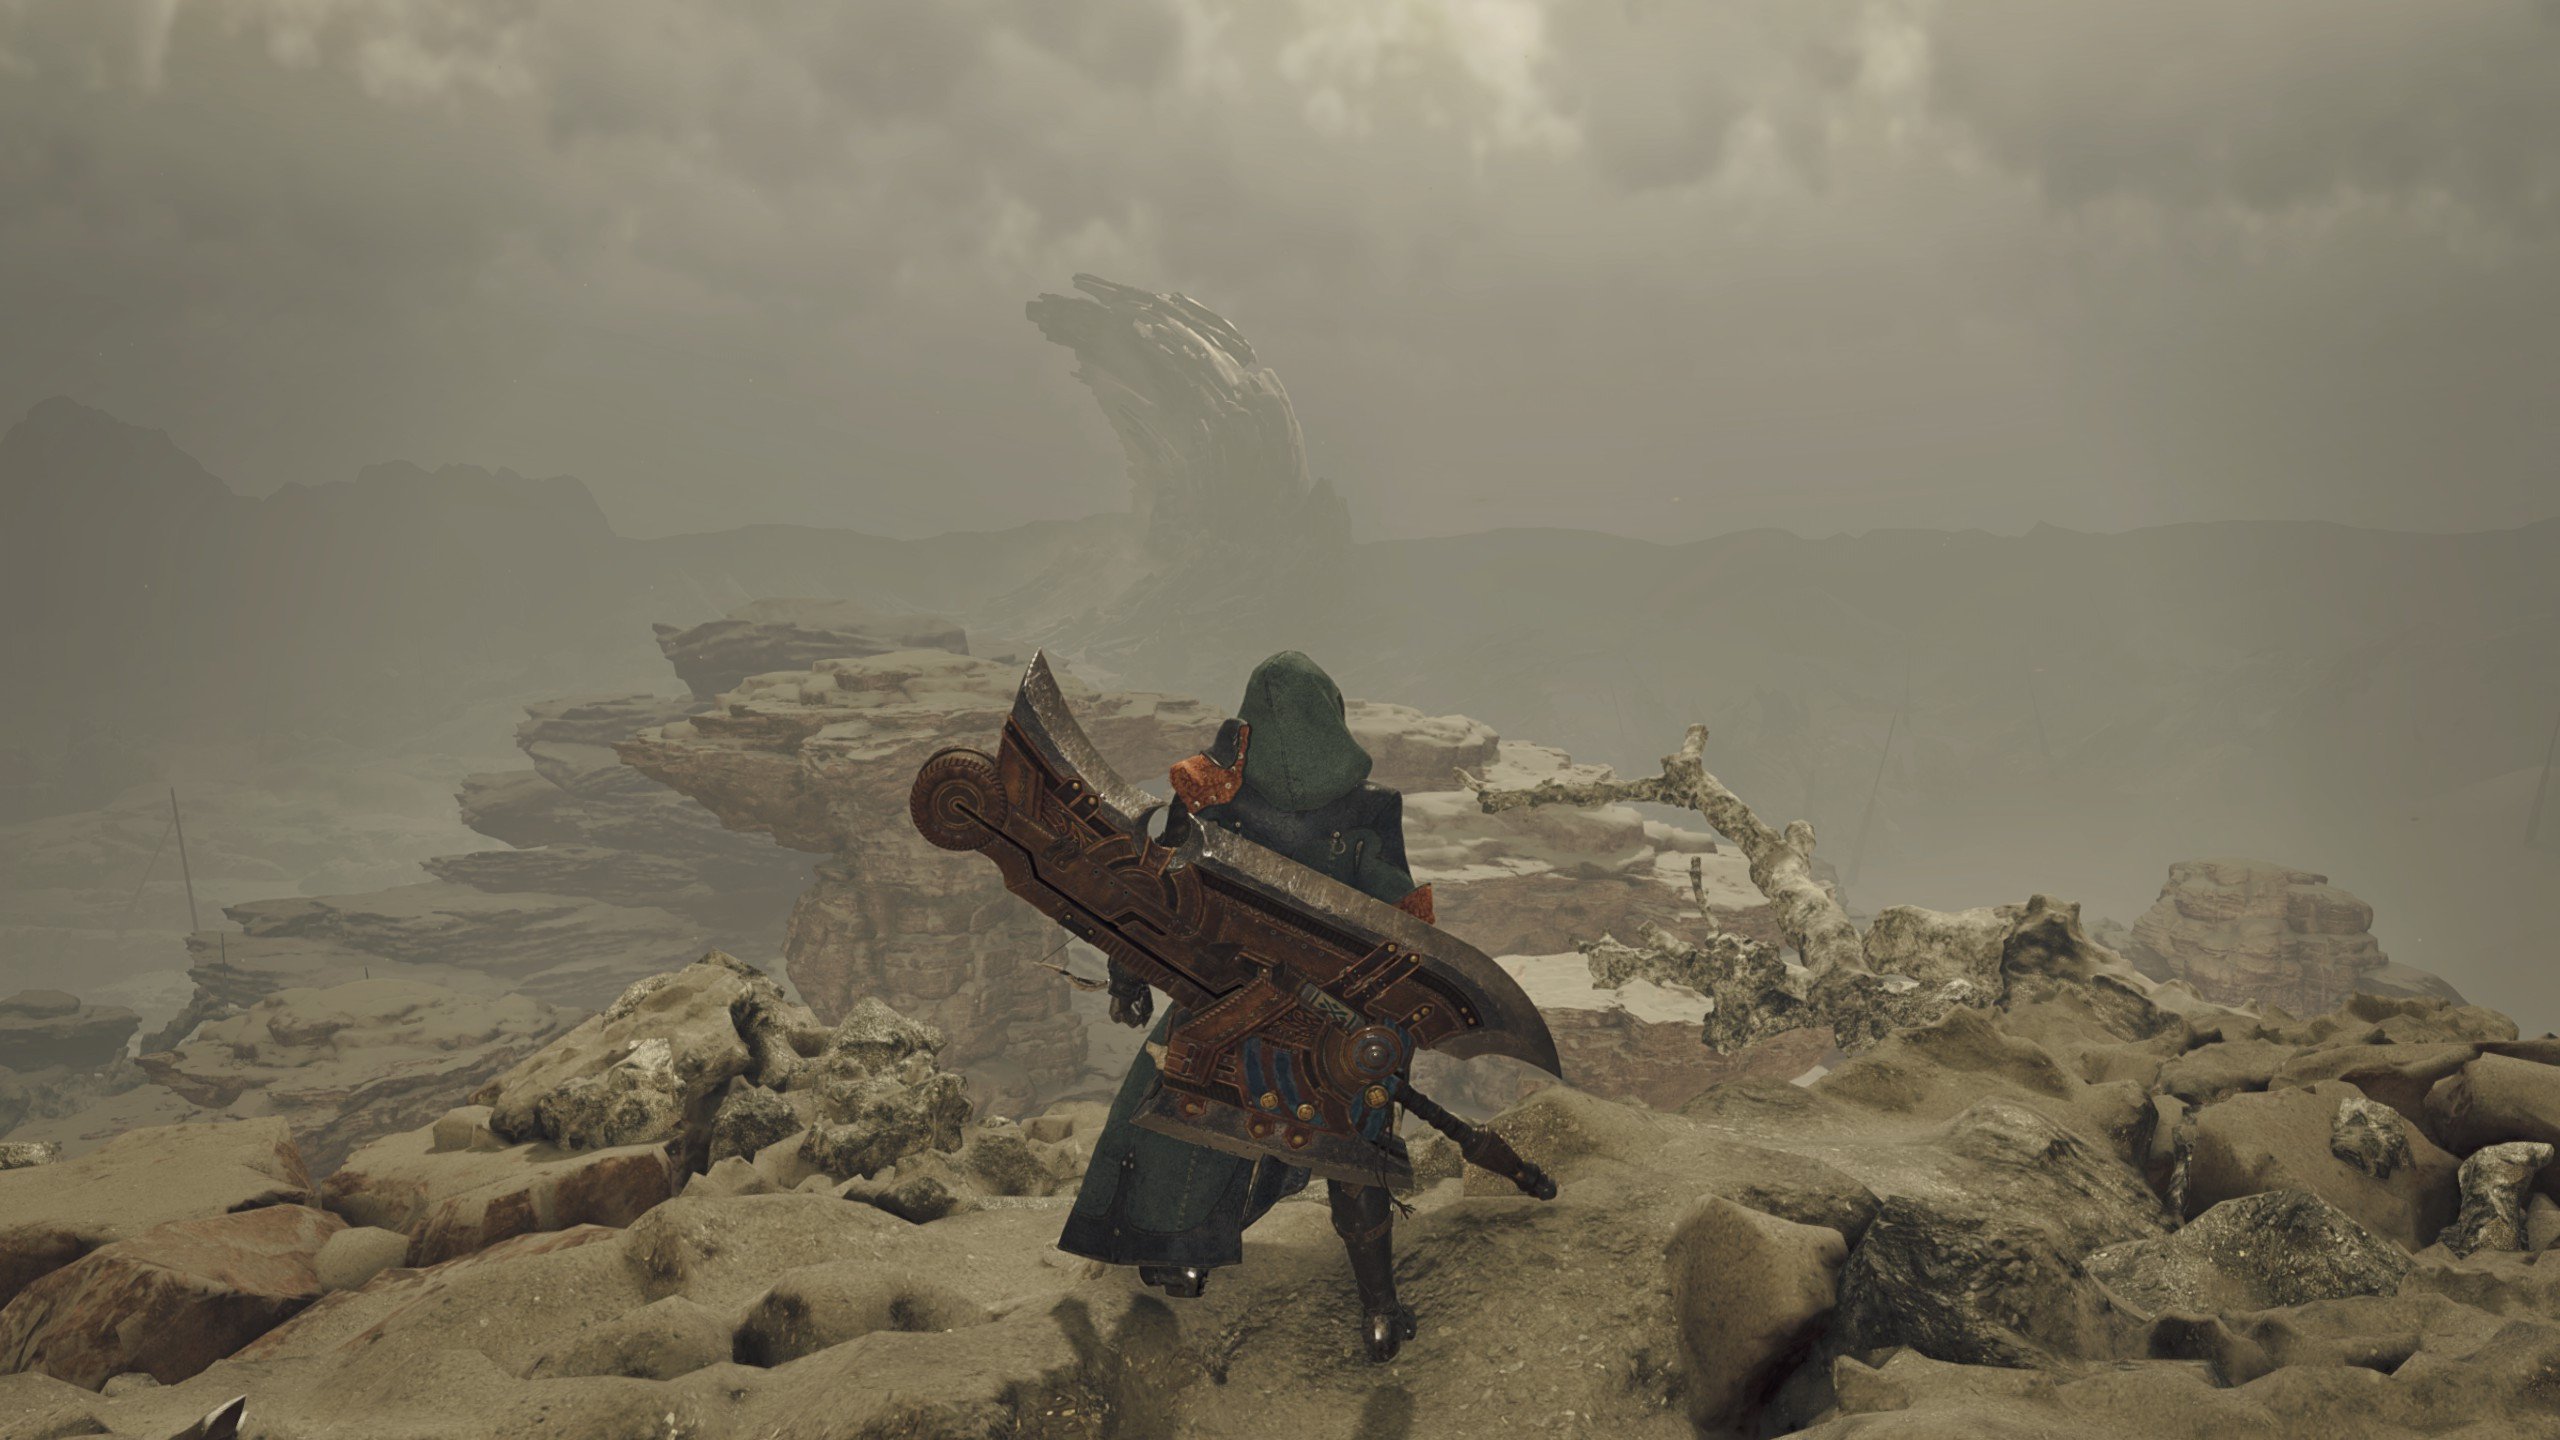
It also happens to be one of the most stylish weapons when used correctly. It’s a sight to behold seeing someone flow from axe mode into sword mode to dish out massive damage and then seamlessly flow back into axe mode.
Mechanics Explained
Switch Axe is both an Axe and a Sword. In axe mode, you move faster, and in sword mode, you only walk but can deal more damage. Besides, sword mode attacks have natural Mind’s Eye (skill name), which means you can attack monsters in locations that would normally see other weapon attacks bounce off.
While both modes are important, you’ll be dealing most of your damage in sword mode and switching to axe mode for mobility and to manage your meter.
The main Monster Hunter Wilds Switch Axe mechanics have to do with its unique UI. Switch Axe has three gauges at the top of the screen, displayed under Health, Stamina, and Sharpness that look like this - 
The thin bar in the middle is your Phial meter, sometimes called the Switch Gauge. In order to attack in sword mode, you need to have this meter filled. Any attack in sword mode you do depletes it. When this meter is empty, you will be returned to axe mode, and if you sheathe your weapon, the meter will begin to regenerate automatically. That white line marks 33% of the meter, and if you attempt to switch to sword mode below it, you’ll see a forced reload animation. This is something you want to avoid doing at all costs. BLOG20
So, the good use of this weapon will require good meter management. After all, it’s called a SWITCH Axe, and the SWITCH portion of this weapon is key to good gameplay. Use the sword mode to dish out the damage, and then seamlessly switching back into the axe mode when the meter runs low allows you to keep your combos going and manage your meter without being forced to reload.
There’s also something called the Amped state (added in MH World). You might notice that attacking in sword mode fills the red meter, aka the Amp Meter – 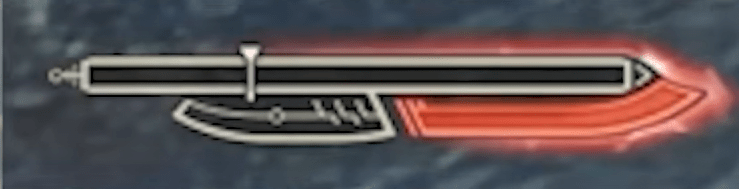
Once that bar is filled, your sword attacks enter the Amped State, making your attacks cause small explosions that deal damage based on the phial type currently equipped.
The small bar on the left increases damage in axe mode, and when filled, your weapon enters the Power Axe Mode. In this mode, the Switch Gauge fills up much faster.
Summary
The most important thing to remember from this Monster Hunter Wilds Switch Axe tutorial is that this weapon operates in two modes: Axe Mode for mobility and Sword Mode for high-damage phial attacks. Sword Mode naturally ignores hitzone resistance, allowing attacks to land without bouncing.
Managing the Switch Gauge & Amped State
- The Switch Gauge (Phial Meter) is required for Sword Mode attacks and depletes with use.
- If the meter is below 33%, switching to Sword Mode triggers a forced reload.
- The Amp Meter fills as you attack in Sword Mode, entering Amped State once full.
- Amped State attacks trigger phial explosions, adding extra damage.
Power Axe Mode
- The Power Axe Meter increases with certain attacks.
- When full, it boosts Axe Mode damage and speeds up Switch Gauge build up, ensuring smoother transitions between modes.
Effective Switch Axe gameplay relies on balancing these meters, cycling between modes, and avoiding downtime from forced reloads.
Phials explained
Each Switch Axe comes with a built-in phial type. Attacking in Sword Mode will consume Switch Gauge (as already explained) and add an effect based on the phial type. Some phials will fill the gauge easier than others. Here are all phial types that the Switch Axe could have:
- Power Phial: more raw damage, good for attack-focused builds.
- Element Phial: Boosts elemental damage.
- Poison Phial: Adds Poison.
- Paralysis Phial: Adds Paralysis.
- Dragon Phial: Adds an additional amount of dragon damage to your sword attacks.
- Exhaust Phial: Adds Stun/Energy Drain, allowing your sword attacks to drain monster stamina. Plus, Exhaust damage dealt to the head of a monster counts as K.O. damage, so it can K.O. monsters, too.
All of these Monster Hunter Wilds Switch Axe phials damage is only present when attacking in sword mode, meanwhile, the natural element of the weapon is present in axe mode, too.
Mounted Combat & Seikret Riding Attacks
Monster Hunter Wilds introduces new mounted combat mechanics for the Switch Axe, enhancing its mobility and offensive capabilities while riding Seikret or attacking from a mount. These changes improve Switch Gauge regeneration and allow for seamless attack transitions, keeping you in the fight without interruptions.
Attacks While Riding Seikret
- Riding Attacks Replenish Switch Gauge
- Pressing
 while mounted swings the axe repeatedly, building up Switch Gauge with each hit.
 - This allows for longer Sword Mode uptime and reduces the need for manual recharges.
- Dismount Attacks Transition into Combos
- Dismounting with (
 +
+  ) initiates a mid-air attack, leading to immediate follow-ups after landing.
 - If
 is pressed during dismount, you land directly in Sword Mode, ready to continue attacking.
Mounted Attacks on a Monster
- Weapon Strikes While Mounted Regenerate Switch Gauge
- Hitting a wounded part of a monster while mounted builds Switch Gauge, ensuring fluid combat.
- Mounted Finisher: Plunging Element Discharge
- Attacking a wound on a monster while mounted triggers a plunging explosion attack.
- This damages the weak point, creating an opening for follow-up attacks.
These mounted combat upgrades make the Switch Axe more fluid and aggressive, letting hunters maintain offensive pressure while managing Switch Gauge efficiently.
Browse our hottest Monster Hunter Wilds Boosting services


Switch Axe Moves in Monster Hunter Wilds
Since there are two forms to this weapon, we'll start with Monster Hunter Wilds Switch Axe moveset for the Axe Mode, as it is the default stance, before transitioning into Sword Mode, where most of the weapon's damage output comes from.
Axe Mode Moves
Axe Mode allows for greater mobility and wide-reaching attacks, making it useful for positioning and managing the Switch Gauge before transitioning into Sword Mode for damage.
| Move | Input | Effect |
| Overhead Slash Combo | Ends with Spiral Burst Slash, regenerating Switch Gauge. | |
| Forward Slash | Moves forward, useful for closing distance. | |
| Wild Swing | Deals stagger damage, leads into Heavy Slam. | |
| Heavy Slam | Activates Power Axe Mode. | |
| Offset Rising Slash | A counter that staggers monsters. | |
| Fade Slash | Moves backward while attacking. |
This little summary should be enough to get you started. Below, we’ll provide more background for each of the moves. As you might notice, each single press of a button performs a move that has a name, which you can witness appearing on your screen. It really helps to learn the moves when practicing with a weapon.
Basic Axe Mode Attacks
While each single attack has unique properties, it is much more useful to look at the more complex moves with more than one input.
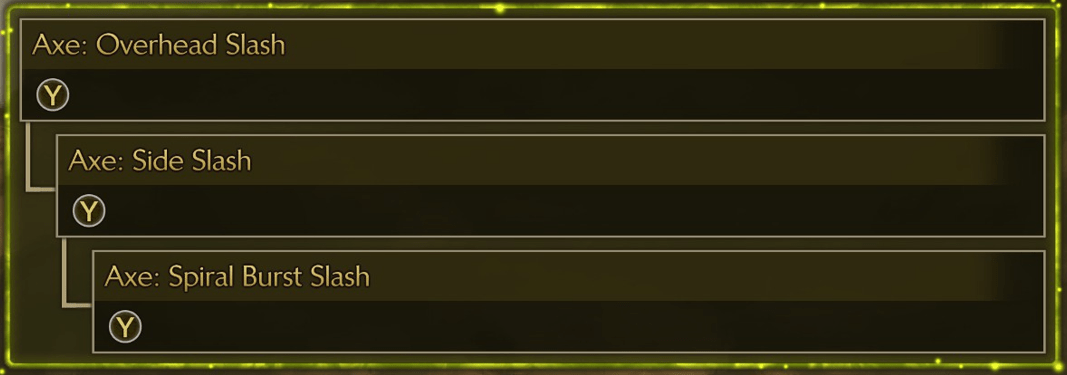
Overhead Slash (![]() ) → Side Slash (
) → Side Slash (![]() ) → Spiral Burst Slash (
) → Spiral Burst Slash (![]() )
)
A three-hit combo where the final hit replenishes a large amount of Switch Gauge.
Good for keeping your meter up while dealing damage.
Forward Slash (![]() +
+ ![]() )
)
A mid-range attack that moves your hunter forward that can be followed up by standard axe combos.
Wild Swing (![]() →
→ ![]() →
→ ![]() ... unlimited)
... unlimited)
A stamina-draining infinite combo that deals consistent stagger damage. It leads into Heavy Slam (![]() ) after two Wild Swings), which activates Power Axe Mode.
) after two Wild Swings), which activates Power Axe Mode.
Heavy Slam (![]() after Wild Swing)
after Wild Swing)
A high-damage downward slam that activates Power Axe Mode. Power Axe Mode increases axe attack power and speeds up Switch Gauge fill rate.
New Axe Mode Attacks
These moves were added or changed in Wilds.
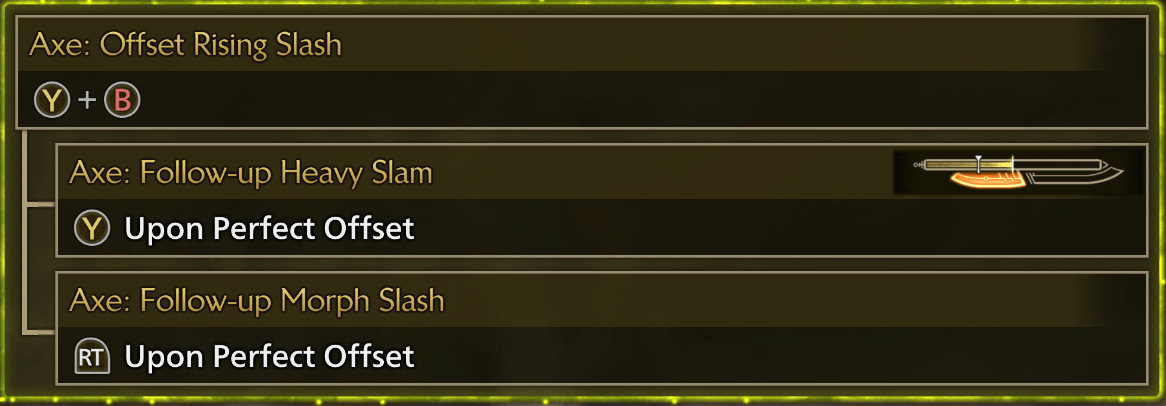
Offset Rising Slash (![]() +
+ ![]() )
)
A counterattack move that staggers monsters if timed correctly.
If successful, follow up with:
- Follow-up Heavy Slam (
 ) → Activates Power Axe Mode.
 - Follow-up Morph Slash (
 ) → Morphs into Sword Mode.
Fade Slash (↓ + ![]() during a combo)
during a combo)
A defensive backstep slash that helps with repositioning. BLOG20
Morphing Into Sword
Morphing efficiently between Axe Mode and Sword Mode is key to maximizing damage and meter management.
Morph Slash (![]() )
)
Morphs into Sword Mode (requires at least 30% Switch Gauge). If the gauge is too low, perform a reload instead.
Focus Assault: Morph Combination (![]() +
+ ![]() )
)
A multi-hit morph attack that is effective on wounds or weak points.
- Morphing into Sword Mode → Access Element Discharge Finisher.
- Morphing into Axe Mode → Triggers Power Axe Finisher.
Sword Mode Moves
Sword Mode is where most of the Switch Axe’s damage comes from, allowing you to utilize phial explosions and powerful finishers.
Here’s a quick reference table summarizing all Sword Mode moves, their inputs, and effects.
| Move | Input | Effect |
| Overhead Slash → Right Rising Slash → Left Rising Slash | A basic looping combo for consistent DPS. | |
| Double Slash → Heavenward Flurry | A fast combo that fills the Amp Gauge quickly. | |
| Counter Rising Slash | A counter that prevents knockback and leads into Heavenward Flurry if successful. | |
| Element Discharge | A phial explosion attack that can be chained into an Element Discharge Finisher. | |
| Zero Sum Discharge | Hold |
Latches onto a monster, dealing continuous phial explosions before a final burst. No longer chains into Full Release Slash. |
| Unbridled Slash | A high-damage sword attack that deals extra explosion damage when Amped. Returns to Axe Mode after use. | |
| Full Release Slash | Hold |
The strongest Sword Mode finisher. Can be used anytime or after an Element Discharge Finisher. Returns to Axe Mode after use. |
| Morph Slash | Morphs into Axe Mode. Can be performed mid-combo to extend Switch Gauge duration. | |
| Focus Assault: Morph Combination | Multi-hit morph attack that can end in Element Discharge Finisher (Sword Mode) or Power Axe Finisher (Axe Mode). |
Same as before, we’ll explain each move in a bit more detail next.
Basic Sword Mode Attacks
Overhead Slash (![]() ) → Right Rising Slash (
) → Right Rising Slash (![]() ) → Left Rising Slash (
) → Left Rising Slash (![]() )
)
This is a simple looping combo that delivers consistent DPS. It consists of a series of fast, fluid slashes that allow continuous pressure on the monster, making it an essential combo for maintaining damage output in Sword Mode.
Double Slash (![]() ) → Heavenward Flurry (
) → Heavenward Flurry (![]() )
)
A rapid attack sequence that efficiently fills the Amp Gauge. The Heavenward Flurry finisher is especially useful for quickly building up the Amped State, allowing for enhanced phial explosions in Sword Mode.
Counter Rising Slash (![]() +
+ ![]() )
)
This move acts as a counterattack, preventing knockback from a monster's attack if timed correctly. If the counter is successful, it immediately transitions into two rapid follow-up slashes, which can then be chained into Heavenward Flurry (![]() ) for additional damage and faster Amp Gauge buildup.
) for additional damage and faster Amp Gauge buildup.
Special Sword Mode Attacks
Element Discharge (![]() +
+ ![]() )
)
A powerful phial explosion attack that consumes the Switch Gauge to unleash significant burst damage. After executing Element Discharge, pressing ![]() again will trigger an Element Discharge Finisher, which deals even more phial-based damage before automatically switching back to Axe Mode.
again will trigger an Element Discharge Finisher, which deals even more phial-based damage before automatically switching back to Axe Mode.
Zero Sum Discharge (Hold ![]() +
+ ![]() in Amped State)
in Amped State)
This move latches the hunter onto the monster, allowing continuous phial explosions while attached. Rapidly pressing ![]() prolongs the attack before unleashing a final, high-damage explosion. Unlike in Monster Hunter World, Zero Sum Discharge now has a longer recovery time and does not chain into Full Release Slash, making its use riskier if not executed at the right moment.
prolongs the attack before unleashing a final, high-damage explosion. Unlike in Monster Hunter World, Zero Sum Discharge now has a longer recovery time and does not chain into Full Release Slash, making its use riskier if not executed at the right moment.
Unbridled Slash (![]() +
+ ![]() +
+ ![]() )
)
A devastating, high-damage sword attack that deals an additional explosive burst if used while in the Amped State. This move automatically transitions the hunter back into Axe Mode after execution, making it a strong finisher when Switch Gauge is running low.
Full Release Slash (Hold ![]() +
+ ![]() +
+ ![]() in Amped State)
in Amped State)
The most powerful finishing move available in Sword Mode. This attack can be performed at any time by pressing ![]() +
+ ![]() +
+ ![]() , or it can be chained directly after an Element Discharge Finisher (Hold
, or it can be chained directly after an Element Discharge Finisher (Hold ![]() ) for a more fluid transition. Once executed, the hunter automatically returns to Axe Mode, making it a great option when looking to reset positioning while dealing maximum burst damage. BLOG20
) for a more fluid transition. Once executed, the hunter automatically returns to Axe Mode, making it a great option when looking to reset positioning while dealing maximum burst damage. BLOG20
Morphing Into Axe
Morph Slash (![]() )
)
Pressing ![]() in Sword Mode transitions the hunter back into Axe Mode. This move can be performed mid-combo, allowing seamless meter management by extending the duration of the Switch Gauge without interrupting the flow of attacks.
in Sword Mode transitions the hunter back into Axe Mode. This move can be performed mid-combo, allowing seamless meter management by extending the duration of the Switch Gauge without interrupting the flow of attacks.
Focus Assault: Morph Combination (![]() +
+ ![]() )
)
A multi-hit morph attack that functions as an aggressive transition between modes. If morphing into Sword Mode, this move leads directly into Element Discharge Finisher, offering immediate access to a powerful burst attack. If morphing into Axe Mode, it triggers the Power Axe Finisher, granting increased attack power and faster Switch Gauge regeneration.
Switch Axe Combos in Monster Hunter Wilds
You might be wondering – haven’t we already covered combos? Those combos that are mentioned in the in-game tutorial for any given weapon are nothing more than elements of longer, true combos. Only by combining these short combo moves will you get what Monster Hunter players call combos. So, here are some of the Monster Hunter Wilds best Switch Axe combos based on different combat situations.
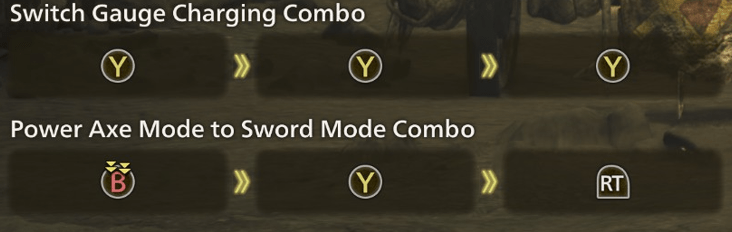
1. Gauge Booster Combo
Input: ![]() →
→ ![]() →
→ ![]() (Spiral Burst Slash)
(Spiral Burst Slash)
Restores a large amount of Switch Gauge, keeping Sword Mode available longer.
2. Power Shift Combo
Input: ![]() →
→ ![]() (Wild Swing) →
(Wild Swing) → ![]() (Heavy Slam) →
(Heavy Slam) → ![]() (Morph Rising Double Slash) →
(Morph Rising Double Slash) → ![]() (Triple Slash)
(Triple Slash)
Activates Power Axe Mode, then morphs into Sword Mode for phial explosions.
3. Offset Counter Combo
Input: ![]() +
+ ![]() (Offset Rising Slash) →
(Offset Rising Slash) → ![]() (Follow-up Heavy Slam) OR
(Follow-up Heavy Slam) OR ![]() (Follow-up Morph Slash)
(Follow-up Morph Slash)
Blocks incoming attacks and leads into Power Axe Mode (for damage) or Sword Mode (for offense).
4. Amped Overdrive Combo
Input: ![]() (Double Slash) →
(Double Slash) → ![]() (Heavenward Flurry)
(Heavenward Flurry)
Rapidly fills Amp Gauge, allowing stronger phial explosions.
5. Counter Punisher Combo
Input: ![]() +
+ ![]() (Counter Rising Slash) →
(Counter Rising Slash) → ![]() (Heavenward Flurry) →
(Heavenward Flurry) → ![]() (Morph Slash)
(Morph Slash)
Negates knockback, punishes monster attacks, and builds Amp Gauge.
6. Focus Assault Finisher
Input: ![]() +
+ ![]() (Focus Assault: Morph Combination) →
(Focus Assault: Morph Combination) → ![]() (Element Discharge Finisher) OR
(Element Discharge Finisher) OR ![]() (Power Axe Finisher)
(Power Axe Finisher)
High-risk, high-reward morph attack that chains into Element Discharge (Sword Mode) or Power Axe Finisher (Axe Mode).
7. Relentless Sword Chain
Input: ![]() (Overhead Slash) →
(Overhead Slash) → ![]() (Right Rising Slash) →
(Right Rising Slash) → ![]() (Left Rising Slash)
(Left Rising Slash)
Keeps continuous pressure on the monster with consistent DPS.
8. Full Burst Execution
Input: ![]() +
+ ![]() (Element Discharge) →
(Element Discharge) → ![]() (Element Discharge Finisher) →
(Element Discharge Finisher) → ![]() +
+ ![]() +
+ ![]() (Unbridled Slash) OR Hold
(Unbridled Slash) OR Hold ![]() +
+ ![]() +
+ ![]() (Full Release Slash)
(Full Release Slash)
The strongest damage combo, with Full Release Slash dealing the highest damage in Amped State.
As soon as you try out these Monster Hunter Wilds Switch Axe combos one by one, you’ll learn them naturally, because they feature unique moves when you execute them the right way.
Controls Reference
In this guide you saw Xbox controller button icons for moves and combos. The game supports and lets you choose between PlayStation, XBOX, and keyboard+mouse buttons. In this table we'll list all icons for your reference.
| Controls While Drawn | Xbox | PlayStation |
| – (Hold) Focus Mode | ||
| – (Hold) Item Bar | ||
| Up – Call Seikret (Auto) Left – View Seikret Pouch Right – Switch weapons Down – Call Seikret (Manual) |
||
| Open map | ||
| Open menu | ||
| - Special Attack / Guard | ||
| - Focus Strike (while in Focus Mode) | ||
| Overhead Slash | ||
| Sheathe weapon | ||
| Wild Swing / Double Swing | ||
| Evade | ||
| Adjust camera | ||
| Move | ||
| Switch Target | ||
| Sheathe Weapon |
We didn't include the keyboard and mouse controls, as this is the least popular choice of controls for this game. You can look up the controls for it in the official game manual or in in-game settings.
Conclusion
The Switch Axe in Monster Hunter Wilds has evolved into a faster, more versatile, and more aggressive weapon than ever before. With its refined mechanics, new counters, Focus Assault attacks, and improved mobility, it offers a deeper level of control and power for those who master its unique playstyle.
Balancing Switch Gauge, Amped State, and Power Axe Mode is key to maximizing damage output, while new mounted combat options allow for seamless aggression even while riding Seikret or attacking from a monster. The introduction of Offset Rising Slash and Counter Rising Slash provides defensive options, making up for the weapon’s lack of a shield.
So, just learn to manage your meter, execute optimal combos, and take advantage of new mechanics—and you’ll turn every hunt into a high-speed, explosive spectacle.
F.A.Q.
Is Switch Axe hard to use in Monster Hunter Wilds?
No, Switch Axe is actually a pretty straightforward weapon in terms of mechanics. As soon as you understand how the meters work, managing them will become almost intuitive.
What is the best weapon in Monster Hunter Wilds?
The best weapon depends a lot on personal preference in combat style. If you love something flashy, then a Switch Axe or a Longsword are the best choices for melee weapons.
What do Phials do in Monster Hunter Wilds?
Some weapons come with built-in phials, which add extra damage depending on their type when certain attacks or a weapon mode is used. The Switch Axe phial types are:
- Power Phial
- Element Phial
- Poison Phial
- Paralysis Phial
- Dragon Phial
- Exhaust Phial
How to get good with Switch Axe in Monster Hunter Wilds?
Most new players struggle with weapons in Monster Hunter because of button-mashing. Instead, try reading online guides or watching some video tutorials to understand how a weapon works, then try out each attack one by one, and you’ll become much more efficient.


