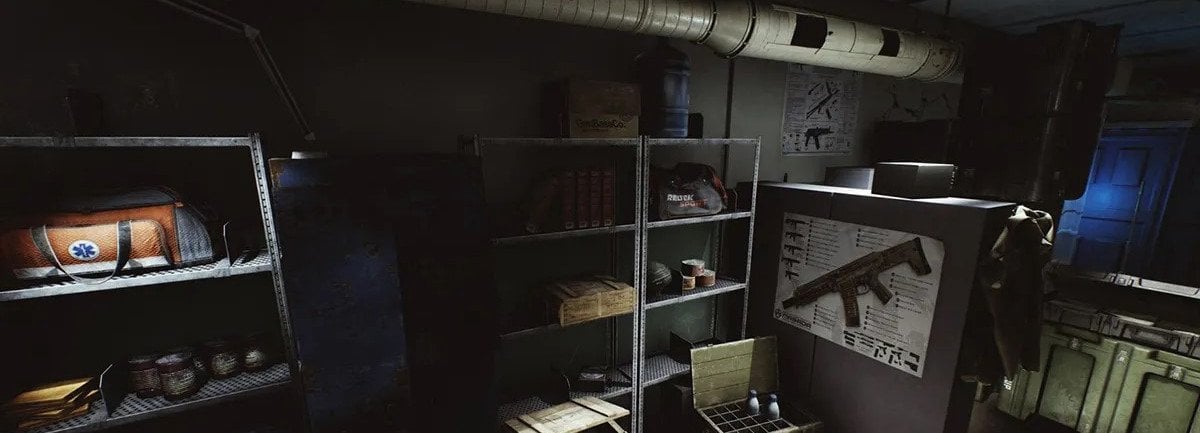
Welcome, survivors of Tarkov. This is the most complete Tarkov hideout guide for 2026 and the most current patch in the game. The hideout system was introduced a while back in the game, and for those of you who don’t know what it is, essentially, this is something between a menu and a location. Hideout is a gameplay mechanic that allows you to spend various items you find during the raid to build various sections of your hideout that provide all sorts of benefits from passive bonuses to allowing you to craft items on your own. This mechanic has become essential to your core gameplay because the benefits it provides are invaluable. You can make quest items with it, craft extremely rare and expensive items that you can push on the Flea Market, and extend your main inventory space where you put all of your goodies after a raid, even if you have the most barebones edition of the game with the smallest stash.
Patch 0.16.0.0 introduces the ability to customize your Hideout. Players can now personalize their Hideout by modifying floors, walls, ceilings, and Shooting Range targets. Additionally, you can add posters and collectibles found in raids or earned through Prestige levels.
Skip the grind and Get EFT Roubles at Skycoach at the best market price, as well as with the fastest delivery.
Check out our other EFT articles:
Note: At Skycoach, you can Buy Escape from Tarkov Boost at the best prices with fast delivery. Use our special PROMO CODE (in green) hidden in this article for a 20% DISCOUNT.
Browse our hottest EFT Boosting services
At the same time, upgrading or building something in the hideout is an extremely tedious and complex process that involves finding a wide range of extremely rare items and using what seems to be absolutely random combinations to build something. Unfortunately, this is why a lot of EFT players ignore Hideout altogether. This Escape From Tarkov hideout guide aims to alleviate this issue and help you understand how to use and upgrade your personal bunker to your advantage. In this guide, we will go over each section and name what is needed to upgrade it. Then we’re going to give you the best order in which you should try to upgrade your vault because different upgrades rely on each other. So, without further ado, let’s get started.
All Hideout Sections And What They Do
Let’s start off our EFT hideout guide with some general information. There are 25 stations you can build in your hideout, with the 25th being the Christmas Tree, which usually appears after the December wipe and gets put away after a couple of weeks, on the 7th of January each year. The Christmas Tree allows you to create various items, from guns to some pretty rare things like LEDEX, by combining a certain number of tree ornaments. In patch 0.16 the Christmas Tree module is updated with festive ornaments that can be used to craft new items during the Khorovod event. Themed rewards, such as winter clothing for PMCs, are available for completing event tasks.
The rest of the stations can be divided into 3 simple categories:
- Crafting Stations - these quite simply let you make your own items that will be tagged as “Found in Raid,” which is exactly the tag that traders require for their quest items. In other words, you no longer have to find specific items in the raid, as instead, you can make them in the right station and then submit them to complete your quests!
- Passive Bonus Stations - these stations don’t allow you to make items. Instead, they provide passive benefits such as increased health and energy regen when out of raid or bonus XP gain to certain skills. These station bonuses only apply to PMCs and not Scavs, so keep that in mind.
- Other stations - stations like Hall of Fame and Shooting range serve different What it Provides other than crafting and passive bonuses.
All items required to build and upgrade Hideout modules must be "Found in Raid" only as of patch 0.16! Look for a little checkmark icon on the item if its marked as found in raid.
Air Filtering Unit
This is kind of a late-game module that you will build to give yourself a boost in a number of skills related to physical activities.
| Level | Required Items | What it Provides | Time to Build |
| 1 |
|
|
48 Hours |
This module goes well with the Gym, which is also built later on in the game. We’ll get to what the Gym is used for below (as if you can’t guess), but the point is that the Gym is more effective when you have the Air Filtering Unit.
Bitcoin Farm
For most players, making the Bitcoin farm is a long-term investment, as it requires a pretty substantial set of Tarkov hideout items, most of which are incredibly difficult to obtain. On the other hand, the bitcoins that it lets you craft cost a lot of money.
| Level | Required Items | What it Provides | Time to Build |
| 1 |
|
|
34 Hours |
| 2 |
|
|
50 Hours |
| 3 |
|
|
106 Hours |
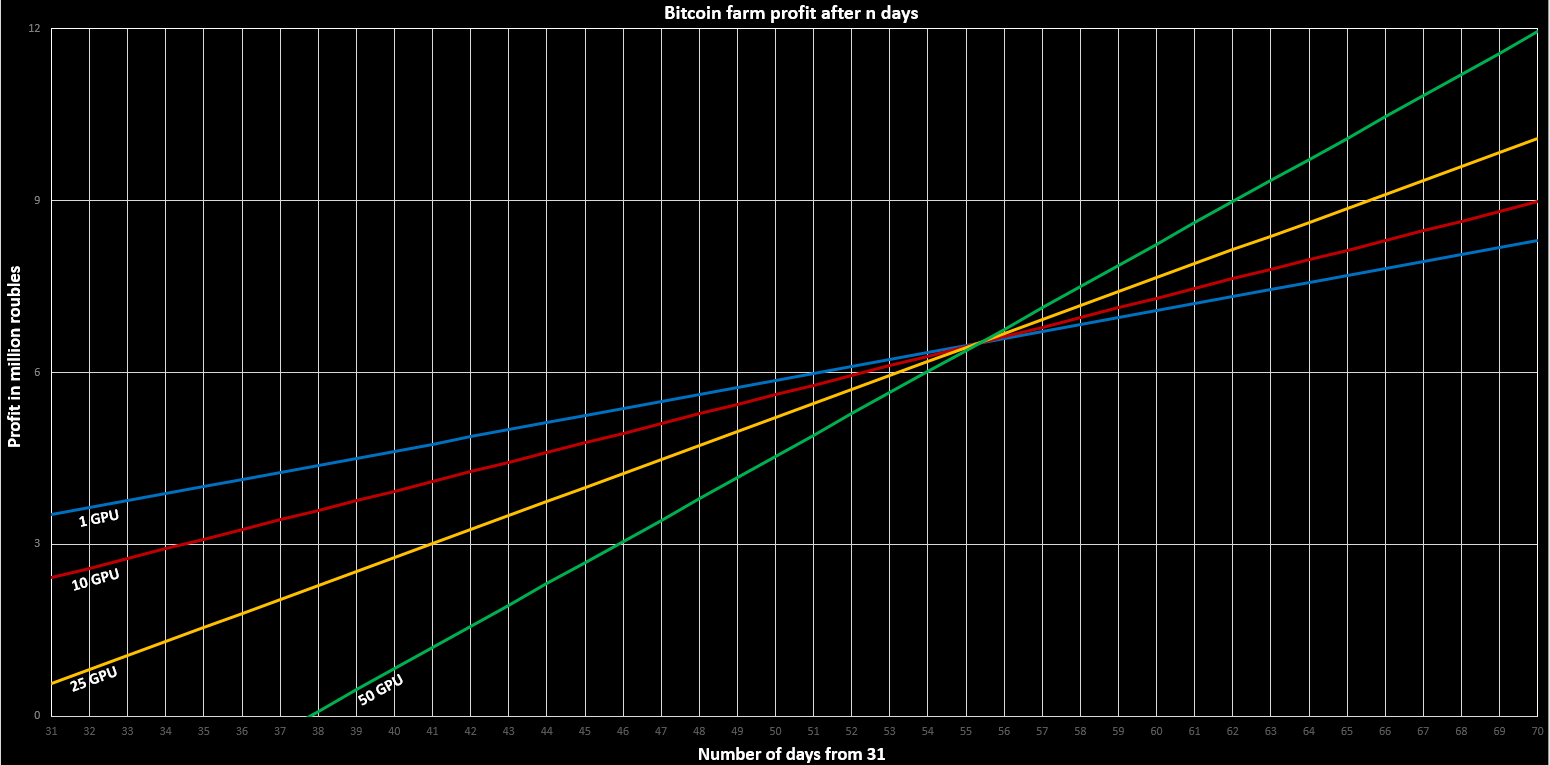
Selling bitcoins is an incredibly lucrative and profitable thing in the game. However, the deeper into the wipe, the less value is put on that item. There’s a graph that displays the correlation between the number of days from the wipe and the change in the price of the physical bitcoin. BLOG20
Booze Generator
This module has a very specific purpose; its product, the Moonshine, is used to power the Scav container. Essentially, you’ll be paying the Scavs with moonshine to bring you EFT hideout items. To build it, you’ll need the following:
- 2 Metal spare parts
- 2 Pressure gauge
- 3 Radiator helix
- 4 Silicone tube
- 1 Pipe grip wrench
- 2 Analog thermometer
- 5 Corrugated hose
- Level 3 Water Collector
- Level 3 Nutrition Unit
It only has one level and no further upgrades, so get it built as soon as you can.
Defective Wall
This is not entirely a module like the rest. Instead, this is a part of your bunker that, if left unattended, causes passive debuffs. In order to mitigate the effects it's causing, you can spend one Fleece fabric to “wipe the floor.” Essentially, when you have the right tool for the job, this wall can be brought down to unlock a new area that will be used in your hideout to build a Gym.
| Level | Required Items | What It Provides | Time to Build |
| 1 | Level 1 Medstation Level 1 Water Collector |
None | Instant |
| 2 |
Mop the floor for 2 mins to upgrade and reduce penalties.
Fuel consumption -2%Energy regeneration rate +1.2 EP/hr |
|
12 Hours |
| 3 |
Mop the floor for 5 mins to upgrade and reduce penalties.
Fuel consumption -5% |
|
24 hours |
| 4 |
x1 Fierce Blow sledgehammer
Mop the floor for 5 mins to reduce penalties.
Fuel consumption -8% |
|
3 hours |
| 5 |
x1 Metal cutting scissors
Mop the floor for 5 mins to reduce penalties.
Fuel consumption -10% |
|
3 hours |
| 6 |
x2 Corrugated hose x1 Duct tape x1 Toolset x1 Pliers Elite x5 Metal spare parts x1 Xenomorph sealing foam x2 Bundle of wires x2 Light bulb |
|
12 hours |
Until you can completely break down the wall, you can only temporarily reduce the negative effects by spending on the fabric item.
Generator
This is your main station that you must build ASAP! It powers up other stations, allowing you to craft items. You can’t craft items when the generator is off or out of fuel. On top of that, you’ll have lights in your bunker which also work of off the generator power.
| Level | Required Items | What it Provides | Time to Build |
| 1 |
x1 Spark plug 100,000 Roubles |
|
Instant |
| 2 |
x1 Bulbex cable cutter x5 Phase control relay x1 Electric motor x15 Bundle of wires Level 2 Security Level 2 Vents |
|
5 Hours |
| 3 |
x5 Power supply unit x6 Phase control relay x3 Electric motor x10 Spark plug x7 Metal spare parts |
|
16 Hours |
Even though each tier of the generator only increases the fuel slots, the more stations you have, the more power they will consume. So, while it might not seem like upgrading to Levels 2 and 3 is a big deal, you should plan to upgrade in the future.
Gym
This lets you increase your character’s physical skills by engaging in a little mini-game. When you interact with the gym, your character will perform some exercises where you, as a player, will have to complete a series of quick-time events by pressing the right buttons at the right time.
| Level | Required Items | What it Provides | Time to Build |
| 1 |
x1 Toolset x1 Electric drill x1 Metal cutting scissors x3 Screw nuts x3 Bolts x1 WD-40 (100ml) x1 Insulating tape Level 6 Defective wall Level 2 Illumination Level 2 Vents |
- 1.5 once reaching skill level 10 |
4 hours |
This will be the only direct way to level up your Strength and Endurance when you’re not in a raid. Patch 0.16 - scales better with Prestige, unlocking faster skill leveling benefits.
Hall of Fame
This is the latest addition to the game, and much like the weapon rack, it allows you to put your most valuable possessions on display. You can put there the dog tags, bitcoins, new collectible plushies, and much more! The new Prestige system released in patch 0.16 allows you to add more customization items including posters and collectible display options. Plus there are new Prestige-level dogtag rewards that you can put on display from your fallen foes!
| Level | Required Items | What it Provides | Time to Build |
| 1 |
x2 Insulating tape x5 Pack of nails x5 Light bulb x1 Cat figurine x5 Fleece fabric x1 Round pliers Mechanic LL2 |
|
12 Hours |
| 2 |
x1 Tech manual x1 Pliers Elite x1 Toolset x1 Golden rooster figurine x10 Energy-saving lamp x6 Pack of screws x3 Duct tape x2 Xenomorph sealing foam x2 Ortodontox |
|
18 Hours |
| 3 |
x1 Set of files "Master" x1 Electric drill x1 Bronze lion figurine x15 Energy-saving lamp x3 KEKTAPE duct tape x3 T-Shaped plug x15 Metal spare parts x5 Power cord |
|
24 Hours |
Be aware that unlike anything else, this stand actually needs a certain kind of tarkov hideout required items - the dog tags of an opposite faction in order to operate. Weird, but it’s true.
Heating
Heating is essential for your hideout EFT and not just from a logical standpoint. Staying worm in your shelter has a positive effect on your PMC's recovery rate.
| Level | Required Items | What it Provides | Time to Build |
| 1 |
25,000 Roubles x2 Classic matches |
|
Instant |
| 2 |
x3 Dry fuel 50,000 Roubles x2 Hunting matches x3 Crickent lighter Endurance Level 1 Level 1 Vents |
|
2 Hours |
| 3 |
x8 Radiator helix x8 Bundle of wires x4 Phase control relay x2 Military corrugated tube Ragman LL2 Level 2 Generator Level 2 Workbench |
|
8 Hours |
It’s one of the stations that provide passive bonuses to your PMC’s recovery rate, specifically the energy regen which you would otherwise replenish by consuming food.
Browse our hottest EFT Boosting services
Illumination
Illumination is kind of hard but also important. We all want our hideout to be lit up with lamps instead of measly candles, but it is not so easily accomplished. Still, when it comes to it, turning on the light in your bunker goes a long way, so do not sell those lamp bulbs.
| Level | Required Items | Bonuses | Time to Build |
| 1 |
10,000 Roubles x1 Crickent lighter |
|
Instant |
| 2 |
x14 Light bulb x10 Bundle of wires Level 1 Generator |
|
Instant |
| 3 |
50,000 Roubles x7 Capacitors x12 Energy-saving lamp x6 Bundle of wires Mechanic LL2 Level 2 Generator Level 1 Workbench |
|
6 hours |
Lamp bulbs are really hard to find, which is why they are super valuable until you unlock the Flea Market at level 15. Before that, try to bring back from the raid as many bulbs as possible. The wires are craftable, so they’re not as difficult to obtain.
Intelligence Center
This module provides a number of benefits. First and foremost, it's a crafting station that allows you to craft very specific items that you will be glad you have crafted for the quests. Secondly, it provides some pretty essential bonuses - reduced Scav cooldown (so you can make more runs for that sweet, sweet loot) and reduced Flea Market commission for all transactions which is a dream come true for any trader. Here’s what you need to build one:
| Level | Required Items | Whati t Provides | Time to Build |
| 1 |
x1 Factory plan map x1 Intelligence folder x1 Topographic survey map Level 2 Security Level 2 Vents |
Scav cooldown timer -15% Quest money reward boost +5% Unlocks Scav Quests from Fence |
Instant |
| 2 |
x3 Intelligence folder x3 Secure Flash drive x7 Power cord x4 Damaged hard drive Mechanic LL2 Attention Level 3 Level 3 Security Level 3 Medstation Level 3 Nutrition Unit |
Craft Digital secure DSP radio transmitter Craft Topographic survey maps Craft Secure Flash drive Craft Virtex programmable processor Craft Military COFDM Wireless Signal Transmitter Craft UHF RFID Reader Craft VPX Flash Storage Module Craft Object 11SR keycard Quest money reward boost +10% (+15% in total) Insurance return time -20% |
6 Hours |
| 3 |
x5 Military cable x2 Military COFDM Wireless Signal Transmitter x1 Far-forward GPS Signal Amplifier Unit x2 VPX Flash Storage Module x5 Military flash drive x2 Secure magnetic tape cassette Prapor LL3 Level 3 Workbench Level 3 Generator |
Craft Military flash drive Craft Intelligence folder Craft Graphics card Craft TerraGroup Labs keycard (Violet) Scav cooldown timer -20% (-35% in total) Flea market commission -30% |
24 Hours |
Even on the first level, this module is a big upgrade to your overall experience in the game. By the time you can unlock it, you will probably already be level 15 and be able to trade using the Flea Market. So, that reduced scav timer will be just perfect!
Lavatory
The toilet is one of the most essential things in the bunker, just like a proper door for security, heating, and a resting place. Apart from the obvious, this is also a crafting station that lets you create a number of interesting items, such as soap, different kinds of fabric, some low-level vests, and backpacks.
| Level | Required Items | What it Provides | Time to Build |
| 1 |
2,000 Roubles x1 Toilet paper x1 Toothpaste x1 Soap x1 Awl |
Craft Gas mask air filter Craft Army bandage Craft Toilet paper Craft Aseptic bandage Craft Aramid fiber fabric Craft Cordura polyamide fabric Craft Ripstop fabric Craft Cordura polyamide fabric 2nd craft Craft Soap Craft Aluminum splint Craft Scav backpack Craft BNTI Kirasa-N body armor Craft LShZ light helmet Craft Corrugated hose Unlocks armor repair via repair kits |
Instant |
| 2 |
x1 KEKTAPE duct tape x3 Corrugated hose x5 Pack of screws x1 Electric drill x2 Sewing kit Level 1 Water Collector Level 1 Vents |
Craft Schaman shampoo Craft Ox bleach Craft Clin window cleaner Craft Fleece fabric Craft Splav Tarzan M22 chest rig Craft BNTI Module-3M body armor Craft BlackRock chest rig Craft Expeditionary fuel tank Craft KEKTAPE duct tape Craft AK-74 5.45x39 6L31 60-round magazine Craft WD-40 (100ml) Craft Pilgrim tourist backpack Craft 6B5-16 Zh-86 Uley armored rig Craft Paracord Craft Magazine case Craft 6B5-15 Zh-86 Uley armored rig Craft Lucky Scav Junk box Craft Water filter Craft Grenade case Reduces armor repair cost using repair kits -3% |
3 hours |
| 3 |
x3 Xenomorph sealing foam x6 Corrugated hose x2 Pressure gauge x1 Toolset Level 2 Vents Level 2 Water Collector |
Craft FORT Redut-T5 body armor Craft Velocity Systems MPPV Multi-Purpose Patrol Vest Craft FP-100 filter absorber Craft 6Sh118 raid backpack Craft WARTECH TV-110 plate carrier Craft ANA Tactical M1 plate carrier Craft Body armor repair kit Reduces armor repair cost using repair kits -6% (-9% in total) |
7 hours |
As you upgrade this crafting station, you’ll be able to make yourself many cases and containers as well as a bunch of other useful items.
Library
The library does one thing - passively increases the amount of EXP you get for everything you do in the raid like killing, looting, consuming items, healing etc. This becomes super important for anyone who wants to reach the max level before the next wipe. The list of Required Items to build one is below:
- x1 BakeEzy cookbook
- x2 Slim diary
- x2 Diary
- x5 Tech Manual
- x2 Chainlet
- x1 Horse figurine
- 400,000 Roubles
- Memory Level 8
- Level 3 Rest Space
The Library takes 54 hours of real-time to build, so keep that in mind as well!
Medstation
Medstation does two very important things - it increases the rate at which your character recovers after the raid, and it also lets you craft medicine.
| Level | Required Items | What it Provides | Time to Build |
| 1 |
50,000 Roubles x1 Disposable syringe x1 Pile of meds x2 Aseptic bandage x1 Bottle of OLOLO Multivitamins |
Craft AI-2 medkit Craft CALOK-B hemostatic applicator Craft Salewa first aid kit Craft CMS surgical kit Health regeneration rate +27.4 HP/hr |
Instant |
| 2 |
x3 Bottle of saline solution x2 Medical bloodset x5 Esmarch tourniquet x3 Medical tools 150,000 Roubles Therapist LL2 Health Level 2 Level 1 Generator |
Craft Medical bloodset Craft Pile of meds Craft IFAK individual first aid kit Craft xTG-12 antidote injector Craft Morphine Craft SJ1 TGLabs combat stimulant injector Craft M.U.L.E. stimulant injector Craft ETG-change regenerative stimulant injector Craft Portable defibrillator Health regeneration rate +54.8 HP/hr (82.2 HP/hr in total) |
3 Hours |
| 3 |
x1 Ophthalmoscope 500,000 Roubles x4 Bottle of saline solution x1 LEDX Skin Transilluminator Therapist LL3 Skier LL2 Vitality Level 3 Level 2 Generator Level 2 Lavatory |
Craft Vaseline balm Craft AFAK tactical individual first aid kit Craft Grizzly medical kit Craft Surv12 field surgical kit Craft SJ6 TGLabs combat stimulant injector Craft Propital regenerative stimulant injector Craft LEDX Skin Transilluminator Health regeneration rate +91.3 HP/hr (173.5 HP/hr in total) |
12 Hours |
The value and importance of the Medstation are hard to underestimate as it might as well be the most important section of your Hideout.
Nutrition Unit
This is another must-have base section that will serve you as a kitchen where you’ll be able to make all sorts of food and drinks. Nothing too fancy at first.
| Level | Required Items | What it Provides | Time to Build |
| 1 |
x1 Can of white salt x1 Power cord x2 Phase control relay 25,000 Roubles Level 1 Generator |
Craft Iskra ration pack Craft Bottle of "Norvinskiy Yadreniy" premium kvass (0.6L) Craft Emergency Water Ration Craft Can of beef stew (Small) Craft Can of Max Energy energy drink Energy regeneration rate +6 EP/hr |
Instant |
| 2 |
x4 Wrench x2 Corrugated hose x2 Alkaline cleaner for heat exchangers x1 Phase control relay Level 2 Lavatory |
Craft Can of Majaica coffee beans Craft Slickers chocolate bar Craft Can of condensed milk Craft Pack of sugar Craft Wilston cigarettes Craft Aquamari water bottle with filter Energy regeneration rate +12 EP/hr (18 EP/hr in total) |
4 Hours |
| 3 |
125,000 Roubles x3 Can of Majaica coffee beans x3 Pack of sodium bicarbonate x2 Smoked Chimney drain cleaner Metabolism Level 3 Level 2 Generator Level 3 Lavatory Level 2 Stash |
Craft Bottle of Tarkovskaya vodka Craft Bottle of Dan Jackiel whiskey Craft Bottle of water (0.6L) Craft Bottle of Pevko Light beer Craft Can of Hot Rod energy drink Energy regeneration rate +18 EP/hr (36 EP/hr in total) Hydration regeneration rate +12 WP/hr |
14 Hours |
Rest assured that food will be needed in many quests, so even if you’re not planning a long raid where you’d want to bring some food and water with you, this is still a very useful section of your bunker.
Rest Space
Another section that is one of the essential ones in your Hideout early on in the wipe. As the game describes it - rest is very important, especially in a city like Tarkov. This section increases the rate at which your PMC recovers from negative effects. There are negative effects that you can bring with you after a particularly difficult raid, like dehydration, broken limbs, headache, pain, etc. This is the station that removes these effects.
| Level | Required Items | What it Provides | Time to Build |
| 1 |
10,000 Roubles x1 Duct tape x1 Classic matches Level 1 Vents |
|
Instant |
| 2 |
x3 Energy-saving lamp 35,000 Roubles x1 DVD drive x1 Magnet Ragman LL2 Level 2 Generator Level 2 Heating |
|
2 Hours |
| 3 |
x5 GreenBat lithium battery x4 Power cord x5 Capacitors x7 Bundle of wires Skier LL3 Level 3 Generator Level 3 Heating |
|
10 Hours |
Scav Case
This is another unique module in your bunker. Essentially, this is a drop box that you make for Scavs to bring you random items. The way it works is - that you make a payment, either with Roubles by spending your own produced Moonshine or by giving away the Intelligence folder. Depending on what you’ve given, a certain amount of time will need to pass, and you will receive random items that usually have the same value in total that you have spent. Plus, the Scav Case now (patch 0.16) has potential new loot tied to Hidden Exfils, adding variety to what players can gain from scavenger missions. Results may vary, and it all depends on what your reputation is with the Fence feller.
In order to build this in your bunker, you’ll need:
- x1 Golden rooster figurine
- x1 Lucky Scav Junk box
- x3 Bottle of Fierce Hatchling moonshine
- x4 Roler Submariner gold wrist watches
- x8 Golden neck chains
- x6 Gold skull ring
- x3 Bronze lion figurine
- Level 2 Intelligence Center
You won’t need to upgrade this station, but it will take you some time to accumulate these items, so it’s best to start gathering these items early.
Security
This module is one of the prerequisite ones. It doesn’t do anything by itself, but it's a requirement for most early-game and essential stations. This is one of the first things players build to ensure the rest of the hideout. Here’s all you need to upgrade it:
| Level | Required Items | What it Provides | Time to Build |
| 1 |
20,000 Roubles x1 Construction measuring tape |
|
Instant |
| 2 |
x1 WD-40 (100ml) 45,000 Roubles x1 Pliers Elite x1 TP-200 TNT brick Endurance Level 2 Level 1 Illumination |
|
3 Hours |
| 3 |
x8 NIXXOR lens x2 Working LCD x4 Bundle of wires x1 SSD drive Mechanic LL2 Level 3 Illumination |
|
17 Hours |
Build the first level as soon as you start the game so you can build other essential modules.
Shooting Range
Shooting range serves one purpose - it lets you test out your guns before you head into the raid. Assuming how many weapons and modification options this game offers, a shooting range is a must. Every mod you install on your gun affects its characteristics and it behaves differently with each one.
| Level | Required Items | What it Provides | Time to Build |
| 1 |
x1 Metal spare parts x1 Bolts x1 Screw nuts Level 1 Illumination |
|
1 Hour |
| 2 |
x6 Electric motor x1 Construction measuring tape x1 Tube of Poxeram cold welding x1 Toolset x3 Pack of screws x1 Electric drill x5 Metal spare parts x3 WI-FI Camera x3 Bundle of wires x6 Energy-saving lamp Level 3 Illumination Level 2 Workbench |
|
24 Hours |
| 3 |
x1 Set of files "Master" x3 Printed circuit board x5 Bundle of wires x5 Metal spare parts x5 Capacitors x3 Phase control relay x5 Power cord x1 Leatherman Multitool x1 Tech manual |
|
24 Hours |
When building this, you might also make sure that you have the Lighting upgraded at least to level 2, otherwise, you’ll be testing your guns in complete darkness. As of patch 0.16 you can now unlock new targets and training programs for the Shooting Range. These upgrades are tied to Shooting Range zone levels and tasks, improving combat training and weapon testing options.
Solar Power
This module is like your second generator. All it does is decrease the fuel consumption by 50%. You’ll need to have these to make one:
- x4 Phased array elements
- x1 Advanced current converter
- 25,000 Euros
- x3 Working LCDs
- x10 Military cables
- x10 Military power filters
- Peacekeeper LL4
- Level 3 Generator
- Level 3 Workbench
This module can’t be upgraded, but at the same time, it’s not an easy build and its certainly one for the late game.
Stash
The only pre-built station that determines the size of your stash that you use to store your stuff when not in the raid. Levels 2 and 3 increase the size of that stash. Seeing how fast you can run out of free space (cells) in your inventory, this section is kind of the game-changer.
| Level | Required Items | What it Provides | Time to Build |
| 1 | None |
|
Already built |
| 2 |
x4 WD-40 (100ml) x1 Hand drill x5 Pack of nails x10 Pack of screws 2,500,000 Roubles Level 1 Vents |
|
24 Hours |
| 3 |
x2 Electric drill x15 Pack of screws x7 Pack of nails 8,500,000 Roubles Prapor LL3 Ragman LL3 Level 2 Vents Level 2 Heating |
|
48 Hours |
| 4 |
200,000 Euros x10 Screw nuts x10 Bolts x5 Shustrilo sealing foam x2 Ratchet wrench Peacekeeper LL4 Ragman LL4 Level 3 Generator Level 3 Workbench Level 3 Heating Level 2 Intelligence Center |
|
96 hours |
As you can this, this station can be upgraded beyond level 4 which is not very common in terms of hideout upgrades Tarkov. Sure, you can always mitigate having fewer cells in your stash by buying and using various containers, but it's not as effective as one might think.
Vents
This unit in your bunker doesn’t do anything by its own lonesome and doesn’t provide any immediate passive bonuses, but it is a requirement for most other stations, so you will have to build and upgrade it when the time comes.
| Level | Required Items | What it Provides | Time to Build |
| 1 | 25,000 Roubles |
|
Instant |
| 2 |
x2 Metal spare parts x3 CPU fan x1 Car battery x1 Electric motor |
|
3 Hours |
| 3 |
x5 Printed circuit board x4 Electric motor x5 Metal spare parts x14 Bundle of wires x4 Car battery Strength Level 2 Level 2 Generator |
|
10 Hours |
Vents level 2 are required for the generator level 2 which gives you an idea of how important this section is.
Water Collector
This thing provides a water system running in and out of your bunker. Clean water can be used for cooking and hygiene in general. In terms of gameplay value, this station increases the hydration regen rate when out of the raid, and it is also one of the starting stations that you need to build at least to the first level to have other stations unlocked for you.
| Level | Required Items | What it Provides | Time to Build |
| 1 |
x3 Duct tape x5 Screw nuts x5 Bolts x4 Corrugated hose Level 1 Security |
|
2 Hours |
| 2 |
x2 Toolset x6 Corrugated hose x2 Electric motor x2 KEKTAPE duct tape Jaeger LL2 Attention Level 3 Level 2 Workbench |
|
8 Hours |
| 3 |
x1 Ratchet wrench 20,000 Roubles x2 Pliers Elite x5 Shustrilo sealing foam Jaeger LL3 Level 3 Generator Level 3 Heating |
|
16 Hours |
One thing you need to know is that once you upgrade this to level 3, this thing will require a water filter in order to operate.
Weapon Rack
Is an entirely optional module that lets you put on display your weapons. You can use any weapon you want for that, but most players use it to display their own presets.
| Level | Required Items | What it Provides | Time to Build |
| 1 |
x1 Hand drill x1 Metal cutting scissors x5 Energy-saving lamp x3 Xenomorph sealing foam x15 Bolts x5 Insulating tape x5 Pack of nails Mechanic LL2 Level 3 Illumination Level 2 Stash |
|
12 Hours |
| 2 |
x1 Electric drill x1 Set of files "Master" x10 Energy-saving lamp x10 Pack of screws x5 Duct tape x10 Bundle of wires x5 Metal spare parts x5 Weapon parts x3 Tube of Poxeram cold welding Mechanic LL3 Level 2 Shooting Range Level 2 Workbench Level 3 Stash |
|
18 Hours |
| 3 |
x1 Electric drill x15 Energy-saving lamp x10 Metal spare parts x5 KEKTAPE duct tape x15 Bundle of wires x3 Shustrilo sealing foam x1 Tech manual x1 FireKlean gun lube Mechanic LL4 Level 3 Shooting Range Level 3 Workbench |
|
24 Hours |
As you upgrade this, you’ll get more and more slots ready to be used for showcasing you weapons. Once again, it's not a super important module to install, but a lot of players love it.
Workbench
This station has several crucial What it Providess. First of all, it allows you to fully modify your weapons through a special in-game menu. If you’ve heard about Tarkov’s famous weapon modification system, where you can replace practically every piece of your gun, this is the system, and it needs a level 1 workbench.
| Level | Required Items | What it Provides | Time to Build |
| 1 |
x2 Screw nuts x2 Bolts x1 Leatherman Multitool |
Craft Round pliers Craft PM 9x18PM 84-round makeshift drum magazine Craft Broken LCD Craft Piece of plexiglass Craft PP-9 "Klin" 9x18PMM submachine gun Craft Printed circuit board Craft Power cord Craft Gunpowder "Hawk" Craft Magnet Craft Printed circuit board 2nd craft Craft Weapon parts Craft T-Shaped plug Craft Weapon parts 2nd craft Craft Kalashnikov AK-74N 5.45x39 assault rifle Craft Kalashnikov AKM 7.62x39 assault rifle Craft Gunpowder "Kite" Craft Radio repeater Craft 12/70 8.5mm Magnum buckshot Craft Broken GPhone smartphone Craft VOG-25 Khattabka improvised hand grenade Craft 9x18mm PM RG028 gzh Craft Bundle of wires Craft Capacitors Craft Gas analyzer Unlocks off-raid full weapon customization via presets and the modding screen Unlocks weapon repair via repair kits |
Instant |
| 2 |
x6 Bolts x3 Toolset x1 Set of files "Master" x2 Electric drill x3 Weapon parts Mechanic LL2 Level 2 Illumination |
Craft Rechargeable battery Craft "Zarya" stun grenade Craft VOG-17 Khattabka improvised hand grenade Craft Electric motor Craft Kalashnikov AK-74M 5.45x39 assault rifle Craft Geiger-Muller counter Craft Gunpowder "Eagle" Craft Gunpowder "Hawk" Craft Spark plug Craft 12/70 Piranha Craft Military circuit board Craft NIXXOR lens Craft Car battery Craft 9x18mm PM PBM gzh Craft 12/70 RIP Craft GreenBat lithium battery Craft 5.45x39mm PP gs Craft Can of thermite Craft Bulbex cable cutter Craft .45 ACP AP Craft 9x19mm AP 6.3 Craft 9x39mm SPP gs Craft 7.62x54mm R SNB gzh Craft 5.56x45mm M856A1 Reduces weapon repair cost using repair kits -3% |
3 Hours |
| 3 |
395,000 Roubles x2 Pliers Elite x1 FireKlean gun lube x2 Can of thermite Mechanic LL3 Level 2 Generator Level 2 Stash |
Craft 23x75mm Zvezda flashbang round Craft 12/70 AP-20 armor-piercing slug Craft 5.56x45mm MK 318 Mod 0 (SOST) Craft RGD-5 hand grenade Craft 9x19mm RIP Craft FLIR RS-32 2.25-9x 35mm 60Hz thermal riflescope Craft 9x39mm BP gs Craft OFZ 30x160mm shell Craft 9x19mm PBP gzh Craft Microcontroller board Craft Weapon repair kit Craft 5.56x45mm M995 Craft 7.62x51mm M61 Craft .300 Blackout CBJ Craft 7.62x39mm PP gzh Craft 5.45x39mm PPBS gs "Igolnik" Craft 12.7x55mm PS12B Craft 4.6x30mm AP SX Craft Trijicon REAP-IR thermal scope Craft 12/70 flechette Reduces weapon repair cost using repair kits -6% (-9% in total) |
11 Hours |
As you can see, besides unlocking the weapon modification system, this station allows you to craft various devices and ammo.
The Order Of Building Hideout Modules and Upgrades
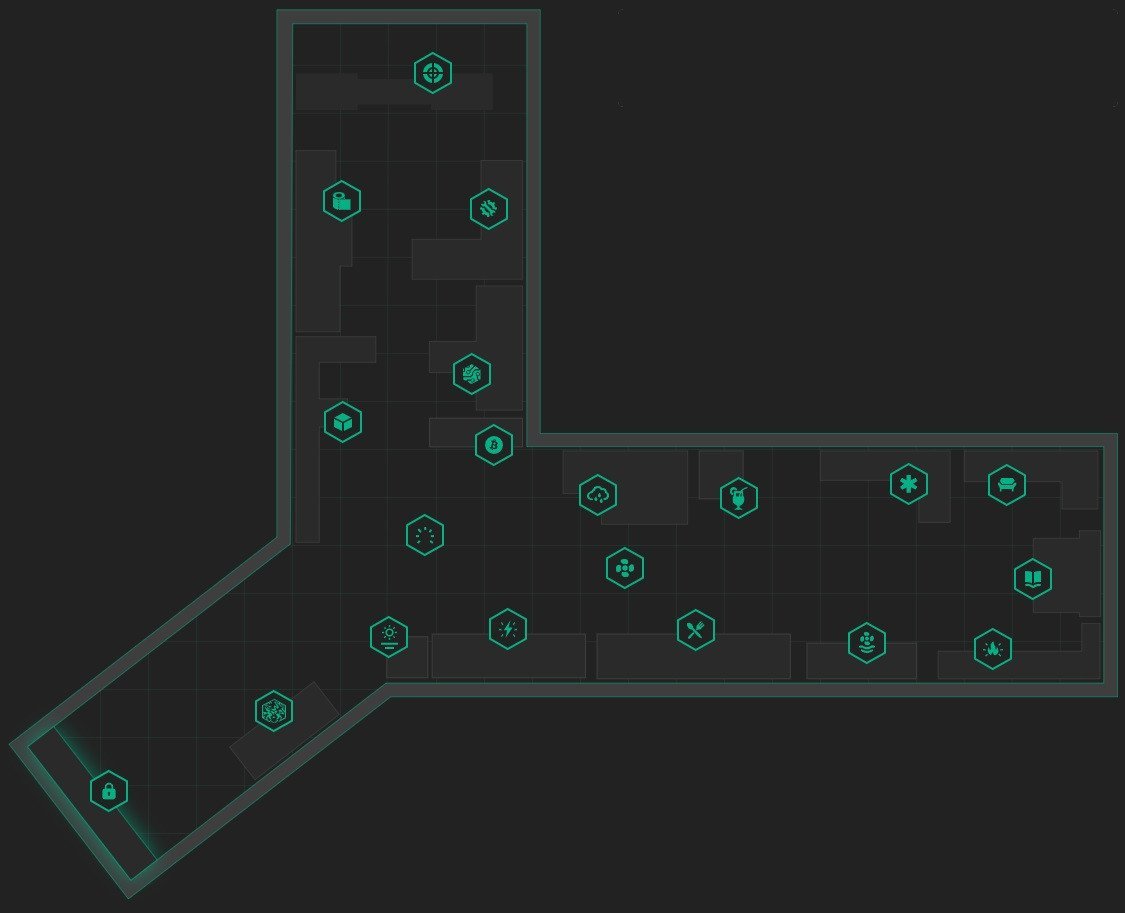
The Tarkov hideout upgrade order in which you should unlock or build and expand your hideout is completely subjective. Different players prefer to focus on different things, build what is useful for them first, and then make the rest. So, the general notion is to first build the most basic and essential modules that we listed above at level 1 and then follow your heart. However, we are going to share a list where we name upgrades from best to worst. You can use it to determine your own order of modules to build from the most useful to the most useless. Here it is:
- Medstation level 2 - Significant for crafting IFAKs at a lower cost. Requires Therapist at loyalty level 2, Health skill at level 2, Generator, and around ~150,000 rubles worth of parts.
- Lavatory level 2 - Enables crafting of space-saving cases (magazine case, grenade case, lucky scav junkbox) at a cost-effective rate. Upgrading is relatively easy, requiring only Water Collector 1 and around ~200,000 rubles.
- Stash level 2 - Expands stash size by 100 slots, providing more storage flexibility. Requires a significant investment of at least 3.5 million rubles.
- Scav Case - Allows gambling with rubles or items to claim rewards after a few hours. Requires a substantial initial investment of around ~3 million rubles with approximately 30% return on investment.
- Bitcoin Farm - Becomes viable late in the wipe and offers a long-term return on investment. Requires a significant upfront cost and constant fuel maintenance.
- Shooting Range - Enables free testing of weapons in the hideout, offering convenience. Benefits include speed and no need to wait for map loading, but may be skipped if cash is tight.
- Security, Vents, and Illumination modules - Essential prerequisites for many higher-tier stations. It is not a primary focus, but items required for these modules should be held onto when available.
- Solar Power - Cuts down on fuel costs, particularly useful with a What it Providesing Bitcoin Farm.
- Water Collector level 3 - Produces Purified Water, essential for crafting "Fierce Hatchling" moonshine. Patch 0.16 - produces more purified water for Moonshine crafting.
- Booze Generator - Powers the Scav Case and is considered a good investment.
- Air Filtering Unit - Expensive with underwhelming benefits, doesn't contribute to other important upgrades.
- Heating Unit level 3 - Provides passive energy regeneration but lacks substantial benefits or connections to other important modules. Patch 0.16 - increased energy regeneration rate.
This should give you some idea of what to build first and what you can leave for last.
Conclusion
The Hideout system in Escape from Tarkov is a huge part of the game. Without it, 90% of the loot in the game would have no purpose whatsoever. But with it, every player gets a personal corner in Tarkov that they can equip as they see fit. It is no wonder why in the latest patch, they added another personalization module - the developers clearly want you to make this place your own. Plus, the latest patch, 0.16, introduced the first iteration of personal customization functionality, making it possible to personalize your hideout. There's no more to do in the Hideout than ever, and in the future, the number of things where it is involved will only grow.
There is a huge list of all hideout items Tarkov that you will need to acquire to build everything. This guide listed and explained each module of the bunker, what it does, and how to build it. The rest is up to you. As we’ve said before, the best approach is to start with the essential ones and slowly expand and upgrade your base. Good luck, PMCs. The escape is real!
F.A.Q.
How important is the Hideout in Tarkov?
The Hideout system in Escape from Tarkov is a core gameplay system in the game. It puts a value on so many items that aren’t something you would use directly in combat and turns them into building blocks for various crafting stations and other useful modules.
What do you do in the Hideout Tarkov?
You can craft items in the Hideout, even the ones required for the quests. Moreover, you can play a little mini-game in the Gym to increase your PMC’s Strength and Endurance. During Christmas time, you can decorate your own Christmas tree!
Does the Hideout Wipe in Tarkov?
Yes, it wouldn’t make much sense otherwise. Part of the appeal of the game is that every once in a while, everybody starts from a clean slate when the progression and your Hideout are reset.
What does the Hideout key do in Tarkov?
While it is not directly related to the player’s hideout, this particular key is important for the quest called the Missing Informat which will take you to the Streets of Tarkov.

