Fellow Guardians, welcome to our comprehensive Destiny 2 Prophecy guide devoted to one of the most exciting dungeons this title has ever known. Within the following pages, you will find literally everything concerning this activity. Despite being released many years ago, it still remains a great source of loot for all categories of players. It does not matter if you are an experienced veteran or this is your first time ever entering this instance, our article has you covered!
If you have not played the Prophecy dungeon before, you should be aware that it is not just an average run-of-the-mill activity you can complete that easily. This activity will serve as a serious test of your fireteam skills. Luckily for you, we have prepared a complete Prophecy walkthrough to share below and it is in your best interest to complete it to get unique rewards available within this activity only.
Speaking of Prophecy dungeon loot, it is definitely worth your attention. Since the activity’s very inception in 2020, it attracted players of all levels since the activity itself is free and does not require you to buy any expansions. With that it mind, we can say that it stays a perfect choice for weekly farming even after all these years.
Apart from learning how to complete all the encounters within the dungeon, we are going to share other details like Destiny 2 how to unlock Prophecy and so on. So, ready your weapons, gather your teammates and let’s see what awaits us within this time-tested yet superbly exciting activity.
Before we delve deeper into the topic, we would like to share one of the most popular products on our website. At Skycoach, you can Buy Destiny 2 Prophecy Dungeon Boost available at a low price. Our PROs will gladly help you complete this instance and get all the desired loot. Trust this job to us and spend your time on other pursuits you like indeed. We are here so that you forget about the endless grinding forever!
IMPORTANT NOTE: Apart from learning about how to unlock operators, you can also Buy Destiny 2 Boost from Skycoach. We offer a wide range of products at the lowest market price and with the fastest delivery. You can make your first purchase even CHEAPER if you find a special PROMO CODE (highlighted in green) hidden in this article and get a 20% DISCOUNT.
Check out some of our most popular Destiny 2 Boosting services below:
Prophecy Release Date
As we have already mentioned, the Prophecy dungeon was released years ago. However, this does not say anything for new players who have just started to explore the vast world of Destiny 2. On top of that, this instance has been recently updated, meaning it has got a revival of its spirits again.
Originally, Prophecy release date was on June 9, 2020. However, as we have just said, it has been noticeably updated with the release of the 7.3.5 patch in March, 2024. Therefore, many players are eager to complete this dungeon once again and get their hands on new rewards.
Prophecy Location
Getting into new activities in Destiny 2 can sometimes feel like untangling a web of prerequisites and quests. But fear not, because the Prophecy location is extremely easy to find. Unlike some other content, you do not need to jump through hoops or complete lengthy quests to access it. Simply put, when you are ready to dive into the mysteries of the Prophecy dungeon, you can do so at your own pace.
Now, do not let that casual accessibility fool you into thinking this is a walk in the park. The Prophecy dungeon packs a punch, with a recommended Power level of 1600. So, strap in and get ready for a challenge that will test your mettle as a Guardian. If you are not prepared well enough, you will definitely ask yourself how hard is the Prophecy dungeon later on after you get wiped several times in a row.
If you are new to the game and do not know about Destiny 2 how to get to Prophecy, we are going to fix that in a jiffy. Just fire up your Director and head to the Tower. Once there, glance over to the left-hand side where the Bazaar is located. You will spot a new node on the Tower map, signaling the entrance to the Prophecy dungeon. BLOG20
Hover your cursor over it to confirm that you have found the right location and know exactly where is Prophecy, then select the dungeon. From there, you can choose to reset your progress if needed or simply hit “Launch” to kick off the adventure.
In case you are still unsure about Destiny 2 where to find Prophecy, check out the screenshot below to make things easier for you:
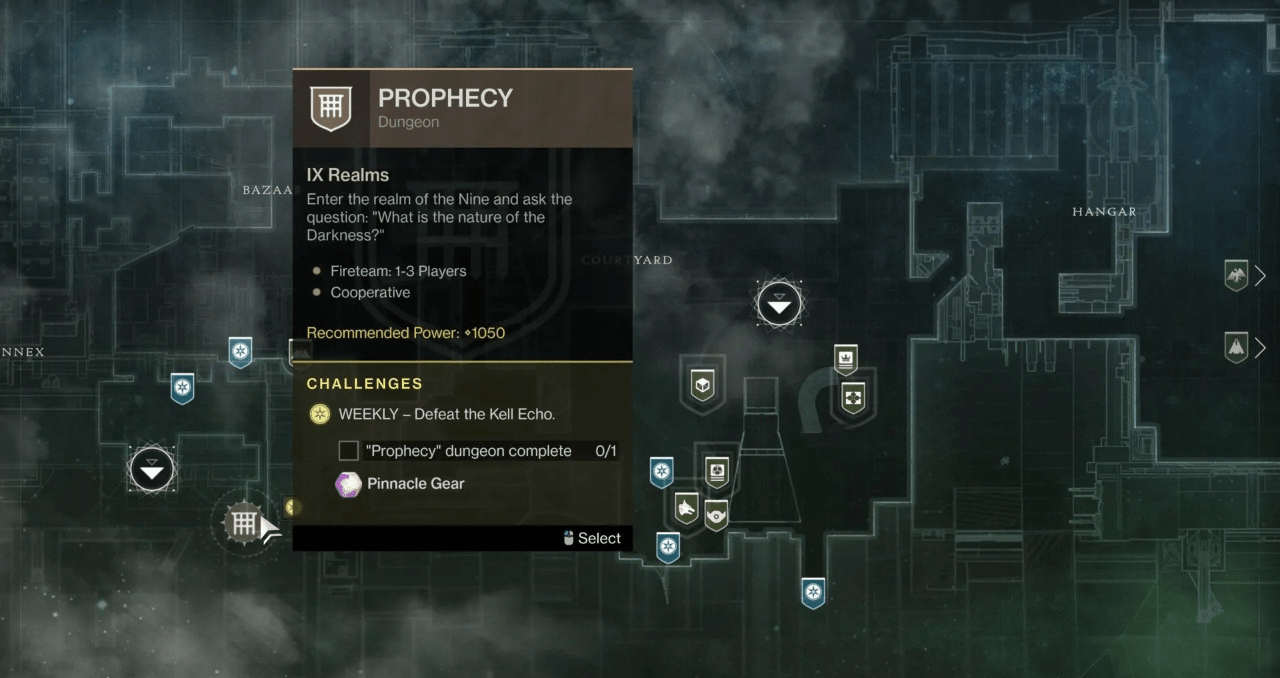
By looking at this Prophecy map, you can easily discover its location and test your skill when trying to grab the most powerful loot this instance has to offer. Just make sure you have hit the required level before delving into this challenging activity! If you need help leveling up your character, you can check out our Destiny 2 Power Leveling service, where our PROs are ready to boost you up to 1810 power level. We offer a cheap price and guarantee the fastest completion time.
Prophecy Loot Table
Before we jump straight to sharing detailed strategies to complete every encounter within this instance, let’s talk about something more pleasant – what rewards you are going to get for finishing this dungeon.
NOTE: The following Prophecy dungeon loot table you are going to see below has been updated on March 5, 2024 with the 7.3.5 patch release. So, do not be surprised if you see big changes here as a veteran player. In fact, it is a great chance to come back and try your skills once again!
| 1st Encounter – Phalanx Echo | 2nd Encounter – The Cube | Final Boss – Kell Echo | Final Chest – The Emissary |
| Relentless | A Sudden Death | Moonfang-X7 Helm | Judgment |
| Prosecutor | Adjudicator | Moonfang-X7 Gauntlets | Darkest Before |
| Crushing Greaves | Crushing Guard | Moonfang-X7 Chassis | Crushing Helm |
| Mark Judgment | — | Moonfang-X7 Greaves | Crushing Plate |
| — | — | Moonfang-X7 Mark | Mark Judgment |
To ensure you understand better how much this loot table has been updated with the 7.3.5 release, we have prepared a quick list of patch notes for you to get acquainted with:
A List of the Removed Weapons:
- A Swift Verdict Sidearm
- The Long Walk Sniper Rifle
- The Last Breath Auto Rifle
A List of the Added Weapons:
- Prosecutor Auto Rifle, Precision Frame, Arc
- Adjudicator Submachine Gun, Precision Frame, Kinetic
- Relentless Pulse Rifle, High-impact Frame, Damage type changed from Kinetic to Strand
A List of the Updated Weapons:
- Judgment: Damage type changed from Kinetic to Stasis
- Darkest Before: Damage type changed from Arc to Solar
- A Sudden Death: Damage type changed from Arc to Void
Undoubtedly, the entire loot table looks interesting. However, the majority of players are particularly interested in Prophecy weapons since they are the main reason for completing this instance over and over again:
- The Last Breath Kinetic Auto Rifle
- Judgment Stasis Hand Cannon
- Relentless Strand Pulse Rifle
- Adjudicator Kinetic Submachine Gun
- A Sudden Death Void Shotgun
- A Swift Verdict Void Sidearm
- Darkest Before Solar Pulse Rifle
- The Long Walk Solar Sniper Rifle
- Prosecutor Arc Auto Rifle
We bet you have not had enough time to get your hands on some of these guns yet. So, make sure to read the detailed strategies we have prepared for you below. By doing so, you can surely complete this dungeon in a blink of an eye and get the rewards you have been looking for this whole time!
Prophecy Boss Guide
The following part of the article is devoted to Prophecy boss guide section where we will teach you how to complete every encounter you are going to face within this instance. However, you will have to learn a bit more about this dungeon’s core mechanic first – Motes.
On top of that, we would like to answer the question of how long is the Prophecy since many players do not understand exactly what they should be prepared for. This dungeon features 5 separate encounters you will have to complete with the final boss, Kell Echo, waiting for you at the end.
Alright, so when you are diving into the Prophecy dungeon, you will come across these columns of Light and Dark. To clean them up, you have to snag yourself either 5 Light Motes or 5 Dark Motes. Once you have got those in your pocket, you will switch to a third-person view and do your cleansing thing.
Now, here is the kicker: figuring out which Motes drop where. It is all about your location. Hang out in the bright spots, and you will snag some Light Motes. Darker corners? That is where the Dark Motes come into play. Keep an eye on those little wisps on the edges of your screen; they will clue you in on whether you are basking in the light or lurking in the shadows.
Oh, and here is the most important advice we can give to you among other Prophecy tips – you have got a couple of rooms to navigate before you hit the first big encounter. Use this time to get cozy with the Mote mechanic because, spoiler alert, it is going to be your bread and butter throughout this whole dungeon crawl. BLOG20
Check out some of our most popular Destiny 2 Boosting services below:
Phalanx Echo
Alright, buckle up, Guardians, because this encounter is a quick one – and we mean lightning-fast. Picture this: you have got these Light and Dark columns hovering over specific platforms. Your job? Cleanse each column to kickstart the boss beatdown. Usually, it is an even split between Light and Dark columns, but sometimes you might find yourself dealing with a 3/1 split instead.
To kick things off, sprint over to the orb smack dab in the middle of the arena. That is your cue to get this party started. Once the fight is underway, focus on clearing out as many adds as you can while keeping those pesky Knights in check. And remember the golden rule: bright spots mean Light Motes, while shadows mean Dark Motes.
Now, here is where teamwork really shines. Coordinate with your squad on which pillar to tackle first, then designate one or two players to grab those Motes and cleanse away once they have got a tidy stack of 5. Rinse and repeat until all those columns are gleaming clean.
Once that final pillar gets a good scrubbing, it is go time. The boss will be ripe for the picking, so drop a Well of Radiance and unleash the fury with damage-dealing supers like Golden Gun, Burning Maul (especially if you have got those Pyrogale Gauntlets), and any heavy-hitting weapons you have got in your arsenal. Trust me, this boss is not exactly a tank – a solid combo of Super and heavy firepower will have them waving the white flag in no time.
The Wasteland
After you have given that Phalanx Echo a taste of defeat, it is time to scoop up your loot and head on down into The Wasteland. Picture this place as a vast desert landscape, with a few things on your checklist before you can move forward.
Tip: Summon your trusty vehicle to zip around this sandy expanse and make your life a whole lot easier.
Your first order of business? Track down the area swarming with Taken Blights. Clear out any baddies lurking nearby, then set your sights on those pesky Blights and give them a good whack until they are nothing but space dust. Once they are toast, head over to the shiny orb sitting pretty in the center of it all. That'll trigger the appearance of another batch of Blights in a different spot.
Rinse and repeat this process three times, clearing out Blights in different areas each time. Keep your eyes peeled for big yellow-bar Minotaurs stomping around – while they might look intimidating, you can usually give them the slip. No need to waste your time and ammo on them when you have got bigger fish to fry.
Once you have cleared out the third area, keep an eye out for that magic phrase, “The way is open…”, popping up in the bottom left of your screen. That is your cue to mosey on over to the next encounter and keep this adventure rolling.
Hexahedron
Alright, let's kick off this encounter by planting yourself firmly on the plate with the orb perched on top. Get ready, because this is where the action starts heating up. You will see a whole bunch of enemies spawning in, including those pesky Taken Hobgoblins. Take them down, and you will trigger the appearance of a Mote-dropping Knight.
Now, here is the scoop: each side of the room sports its own plate, and that orb? It will be chilling by one of them. Your job is simple – cleanse the pillar under the orb and hop onto the lift stationed on the middle plate to move things along. Keep your eyes peeled, though – sometimes that sneaky orb might be hanging out on the plate up on the ceiling. No biggie, just means you will have to complete two cycles, but it will only tack on a couple of extra minutes to the clock.
You will need to locate the orb and cleanse a pillar a grand total of six times to move the needle on this encounter. Once you have wrapped up that process, brace yourselves because two Centurion Echos are about to crash the party. Luckily, these guys are about as tough as a marshmallow in a campfire, so they will go down quickly. Once they are toast, get your hands on the loot and get ready to move on to the next leg of your journey.
Deadsea
Once you have wrapped up the Hexahedron encounter, it is time to pack up and make your way back through the Wasteland to the Deadsea.
Now, this part is more about navigation than tricky mechanics. It is easy to get turned around, but do not sweat it. Just keep your eyes peeled for those ribbons fluttering in the breeze and follow them as far as they will take you. Stick to that plan, and you will find your way without a hitch.
If you're feeling a bit more adventurous – or just want to make the journey a bit more exciting – hop on one of those new Skimmers. These babies let you glide down to the bottom with style. Just aim for that giant pyramid looming in the sky at the back, give it all you have got, and leap down to the platform waiting at the bottom. From there, it is a quick ride up the lift and into the heart of the pyramid. Easy peasy!
Kell Echo
It is time to dive into the thick of it with this encounter. Start things off by strolling over to that trusty orb hanging out in the middle of the arena. Just like before, you are going to need to give each pillar a good cleanse to kick off the damage phase. As you cleanse, keep an eye out for the Ogres that will spawn – they are more of a nuisance than a real threat. Plus, every time you cleanse a pillar, you will bid farewell to a chunk of the boss's health, so things get a tad easier as you go along.
Once you have worked your magic on all three pillars, it is time to make your grand entrance into the boss arena. Get ready to get sucked down into the heart of the action.
Now, here is where the real fun begins. In this room, you have to lay on the hurt while hopping between platforms, because that boss will not stick around for tea and biscuits. Oh, and here is the kicker – you have to stay within spitting distance of the boss to avoid racking up stacks of a nasty little debuff called “Dark Entropy.” Let that stack reach 11, and you will be joining the ghost club. Keep an eye on the big ring around the boss – as long as you are within that ring, you are in the clear.
Want to keep the boss hanging around a bit longer? Keep the damage coming to stagger her. Sure, she will try to make a break for it eventually, but staggering her animations will buy you some precious time.
Now, do not sweat it if you cannot knock her out in one fell swoop. Just rinse and repeat those steps for another crack at her in the next damage phase. Persistence pays off, Guardian!
Best Weapons to Use for Prophecy
Once you have got acquainted with all the dungeon bosses closer and given this instance a few attempts, you might start wondering what weapons you want to use for this activity to ensure you complete it effortlessly and quickly.
Therefore, we have prepared a list of Destiny 2 best weapons for Prophecy dungeon:
- Legend of Acrius Power Shotgun
- The Fourth Horseman Energy Shotgun
- The Lament Power Sword
- Xenophage Power Machine Gun
- Sleeper Simulant Power Linear Fusion Rifle
The first three weapons you see in this list are perfect for rushing through the 1st encounter – Phalanx Echo. As you can see, we primarily recommend that you use close-range weapons like shotguns and the sword. The main reason for this is that you will be running right next to the boss throughout the fight. Therefore, you will have no problem dealing damage to them up close.
Up next, we recommend that you use Xenophage for the Wasteland encounter to get rid of hordes of annoying mobs who will be coming to damage you. At least one of the members of your fireteam should equip this weapon and get in a distant position to do this more effectively.
Finally, you want to use Sleeper Simulant during the Kell Echo fight since it is a great tool to hit constant headshots when fighting the final boss. However, you can use any weapon you like here, but this is just our recommendation. BLOG20
Prophecy Solo Guide
While attempting to complete Prophecy solo is possible, you will have to spend quite a lot of time to get well prepared for a journey like this. Nonetheless, you can finish this dungeon on your own, and we are going to give a few tips on how you can do this easier.
Starting with what class you want to stick to, we highly recommend that you pick the Warlock. The main reason for this is that this class features strong healing abilities, which is arguably the most vital thing when completing any activity solo. However, you might be having problems to deal enough damage. In this case, you can rely on Nova Bomb, as well as Chaos Reach, both being incredibly powerful supers to use throughout soloing Prophecy.
Here is a list of the weapons you want to use when trying to do Prophecy on your own:
- Machine Guns
- Submachine Guns
- Snipers, particularly with perks Triple Tap or Vorpal Weapon
- Anarchy
- The Lament
- Witherhoard
- Thunderlord
- Xenophage
- Tractor Cannon
- Trinity Ghoul
- Riskrunner
- Izanagi's Burden
- Rocket Launchers
At the same time, you can make your life much easier when trying to do Prophecy solo by using the following mods:
- Protective Light
- Concussive Dampener
- Solar Resistance
- Arc Resistance
- Warmind's Protection
- High Energy Fire
- Lucent Blade
- Global Reach
- Wrath of Rasputin
- Strength of Rasputin
Make sure to use the mods that can help you stay alive longer and protect you from incoming damage. Trust us, they are absolutely necessary when you intend to do Prophecy as a single player.
Conclusion
As we wrap up our journey through the depths of the Prophecy Dungeon, it is clear that this adventure is as thrilling as it is challenging. From navigating the mysterious corridors to facing off against formidable foes, every step is a testament to your skill as a Guardian.
Throughout this guide, we have covered everything you need to know to conquer this enigmatic dungeon. Whether you are a seasoned veteran or a fledgling Guardian, our walkthrough and loot table have provided the tools and strategies to tackle each encounter with confidence.
Remember, the loot you will find within these walls is just the cherry on top of the satisfaction of overcoming each trial. So, gather your fireteam, hone your skills, and dive back into the fray. The Prophecy Dungeon awaits, and the fate of the universe hangs in the balance.
May your Light guide you through the darkness, Guardian. Until next time, keep fighting, keep exploring, and keep chasing that sweet, sweet loot. Eyes up!
F.A.Q.
How hard is Prophecy dungeon?
Compared to other instances released throughout Destiny 2 history, Prophecy remains one of the easiest dungeons you can currently complete.
How do I start Prophecy dungeon?
To start the Prophecy dungeon in Destiny 2, open the Director, navigate to the Tower, locate the dungeon node on the left-hand side in the Bazaar and click Launch to begin it.
How do I get to the Prophecy dungeon in Destiny 2?
Head to the Tower and find the dungeon icon in the Bazaar. The latter is located on the left side. Click on it and you will start the activity.
Can you solo Prophecy?
Since Prophecy is quite an easy dungeon, you can complete it solo when playing any class.
Is Prophecy a good dungeon?
Yes, the Prophecy dungeon in Destiny 2 is widely regarded as one of the best dungeons in the game due to its challenging encounters, unique mechanics, and rewarding loot.
What level should I be at Prophecy?
You can easily enter the Prophecy dungeon at power level 1600, which means you do not need to spend any time to level up any further from the lowest level available in the game.


