 Dallon Avery
Monster Hunter Wilds is packed with hidden mechanics and settings that are easy to miss. Even veteran hunters might not know every new detail that Wilds added. Today, we’re naming all the Monster Hunter Wilds tips and tricks and most overlooked mechanics. We’ll go over everything, including secret mechanics and the most useful but overlooked settings. Knowing about these things will make your gameplay much more enjoyable because there are a lot of quality-of-life things that you can change to tailor how the game works to your preference.
If you’d rather spend less time grinding and more time enjoying those hidden mechanics, the Monster Kills Service at Skycoach is the perfect solution. Instead of getting stuck on tough hunts or endlessly farming for materials, let expert players handle the heavy lifting. You’ll get the loot, progression, and monster kills you need—without the frustration—so you can focus on exploring everything Monster Hunter Wilds has to offer.
Read our other articles:
Note: At Skycoach, you can Buy Monster Hunter Wilds Boost at the best prices with fast delivery. Use our special PROMO CODE (in green) hidden in this article for a 20% DISCOUNT.
Browse our hottest Monster Hunter Wilds Boosting services


Hidden Gameplay Mechanics and Overlooked Systems
Even new players know from the trailers and the beta version that Monster Hunter Wilds has a lot of details and systems that work together to create the unique experience that you get from exploring the game’s world and fighting its monsters. What players might not know is how customizable everything is in the game.
Furthermore, there are some useful gameplay mechanics that aren’t obvious or aren’t just mentioned in the gameplay tutorials that you see when you start the game. With that being said, we’ll start with some commonly overlooked gameplay, controls, and UI settings that will help you become more effective in this game.
Settings You Should Change Immediately
There’s no denying that the amount of options in this game is overwhelming. Given how impactful some of these settings can be and the fact that there are some settings that can harm your gameplay and enjoyment of the game that are turned on by default, here, we will showcase all the Monster Hunter Wilds tips for settings that will improve your gameplay experience and make sure that the game itself doesn’t stand in your way of having fun.
Changing Menu Tabs
Most of you don’t know this, but you can actually add or remove menu tabs that you see when you press ESC on the keyboard or the Options button on your gamepad. By default, you have:
| Menu Tabs | Menus |
| Favourites Menu | Custom list of menus |
| Items and Equipment | Crafting List |
| Check Item Pouch | |
| Field Pouch | |
| Customize Radial Menu | |
| Equipment Info | |
| Mission and Quests | Quest Results |
| Info | Map |
| Palico Info | |
| Hunter Profile | |
| Play Guide | |
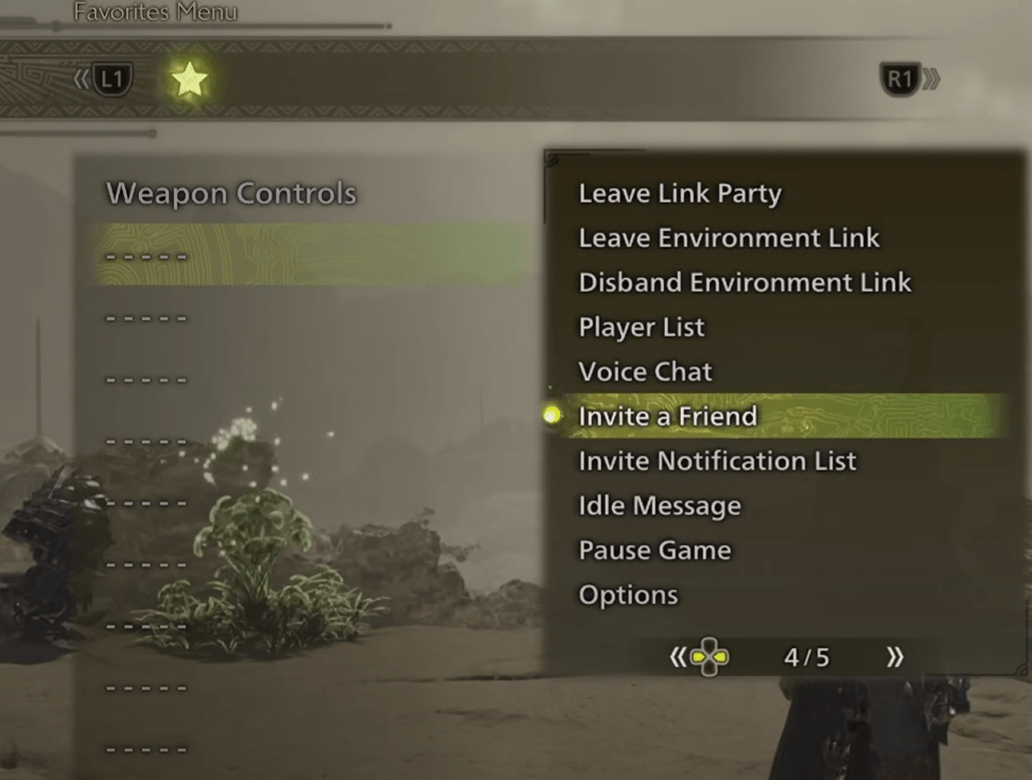
| Communication | Communication |
| Chat Log | |
| Link Party | |
| Player List | |
| Voice Chat | |
| Invite a Friend | |
| Invite Notification List | |
| Idle Message | |
| Recently Viewed | Shows the list of last visited menus |
| System | Pause Game |
| Options | |
| Keyboard Configuration | |
| Photo Mode | |
| Save | |
| Return to Title Screen |
These menu tabs or categories can actually be modified, added, or removed completely. The Favorites Menu can be created and populated with the menus you’re most interested in to have quick access to them.

If you press R on your keyboard ![]() /
/![]() on the gamepad, you’ll see that you can freely edit all of the tabs. So, here’s all you can do with your tabs:
on the gamepad, you’ll see that you can freely edit all of the tabs. So, here’s all you can do with your tabs:
- Edit Tabs – enable or disable them BLOG20
- Reset Tab Edits – return to default settings
- Edit Favorites – add favorite menus for quick access
- Edit Widgets – options for displaying the widgets on the right side of the screen, which include things like your currently equipped gear, skills, status, etc. The available options for it are:
- Default
- Hide – hides the widgets completely.
- Status – shows your equipment, skills, and status info.
- Link Members – shows your current party.
While setting up menu tabs might not directly improve your minute-to-minute gameplay, these are still great quality-of-life features that you will appreciate in the long run. In other words, if you plan to spend a lot of time in the game, you might as well customize these tabs to your liking.
Damage Numbers
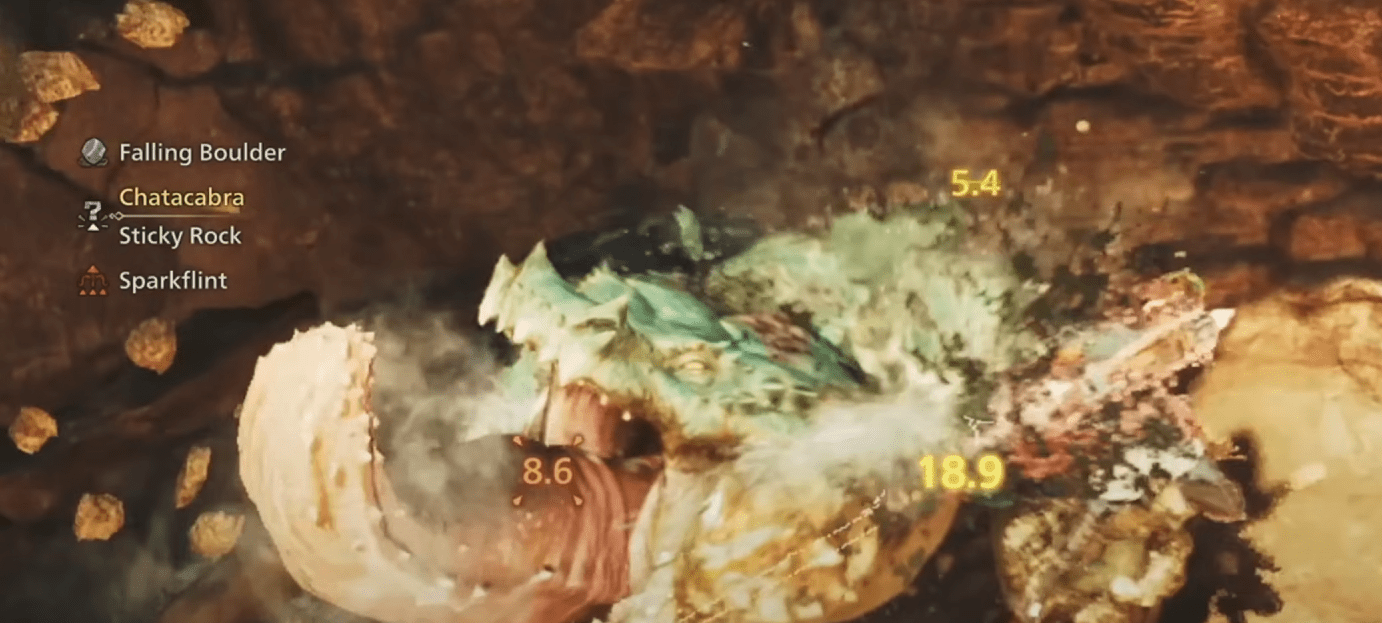
In the first tab of Options, under the Game Settings category, the very first option is Damage Numbers. This is a pretty useful option, and you’re going to want to take a closer look at it, and potentially change it. This setting adjusts whether and how the damage numbers are displayed when you’re attacking something. You have three options:
- Display (With Decimals) – displays numbers on the screen indicating the damage dealt to monsters with decimal values included.
- Display (Whole Values Only) – displays numbers on the screen indicating the damage dealt to monsters with only whole values.
- Does not display – hides the numbers, which is better for immersion.
By default, the game displays whole values only, which is to say rounded numbers, which aren’t very accurate. This is the middle-ground for the options available, but if you really want to know what's changed when you equip a new weapon, you’ll want to enable the option to show the damage numbers with decimals for the most accurate amount of damage you’re dealing.
Seikret Auto-Explore
There are a few handful of Monster Hunter Wilds tricks for your trusty mount Seikret that you might want to try out. Seikret’s Auto-Explore setting adjusts whether your Seikret mount automatically enters Auto-explore mode when no waypoint has been set. This is a behavior similar to Monster Hunter World’s mounts, where they would just start moving from monster footprints to monster footprints.
Since in Monster Hunter Wilds, you have large, open maps, and controlling Seikret on your own is such a smooth experience, you’ll be better off turning this feature off.
Call Seikret Controls
There are a few more settings regarding your fellow companion, the Seikret, who is super helpful and integral to the main game loop, but it might be tricky to control him sometimes. Specifically, the logic behind calling him could be confusing.
There are three ways in which you can call Seikret:
- Type 1 – Call Seikret with D-pad up or D-pad down or a custom Radial Menu Shortcut
- Type 2 – In addition to Type 1 controls, holding
 , with your weapon sheathed, calls your Seikret in Auto-move Mode.
 - Type 3 – In addition to Type 1 controls, holding
 , with your weapon sheathed, calls your Seikret in Manual Movement Mode.
Types 2 and 3 offer one additional way of calling upon the Seikret, and both of these work by holding down the ![]() button, which works well in tandem with the setting that determines how long you need to hold down a button to confirm an action.
button, which works well in tandem with the setting that determines how long you need to hold down a button to confirm an action.
The difference between the options is that in Type 2, you call the Seikret, which immediately starts moving toward whoever you have selected as your target. In Type 3, you’ll have full control over the mount without being forced into following the pursued monster. Once again, these settings are purely preferential, but they could make your life easier if you prefer one way over the other. Speaking of preferences, you can also customize how secret moves in manual and route modes.
HUD & Display Settings
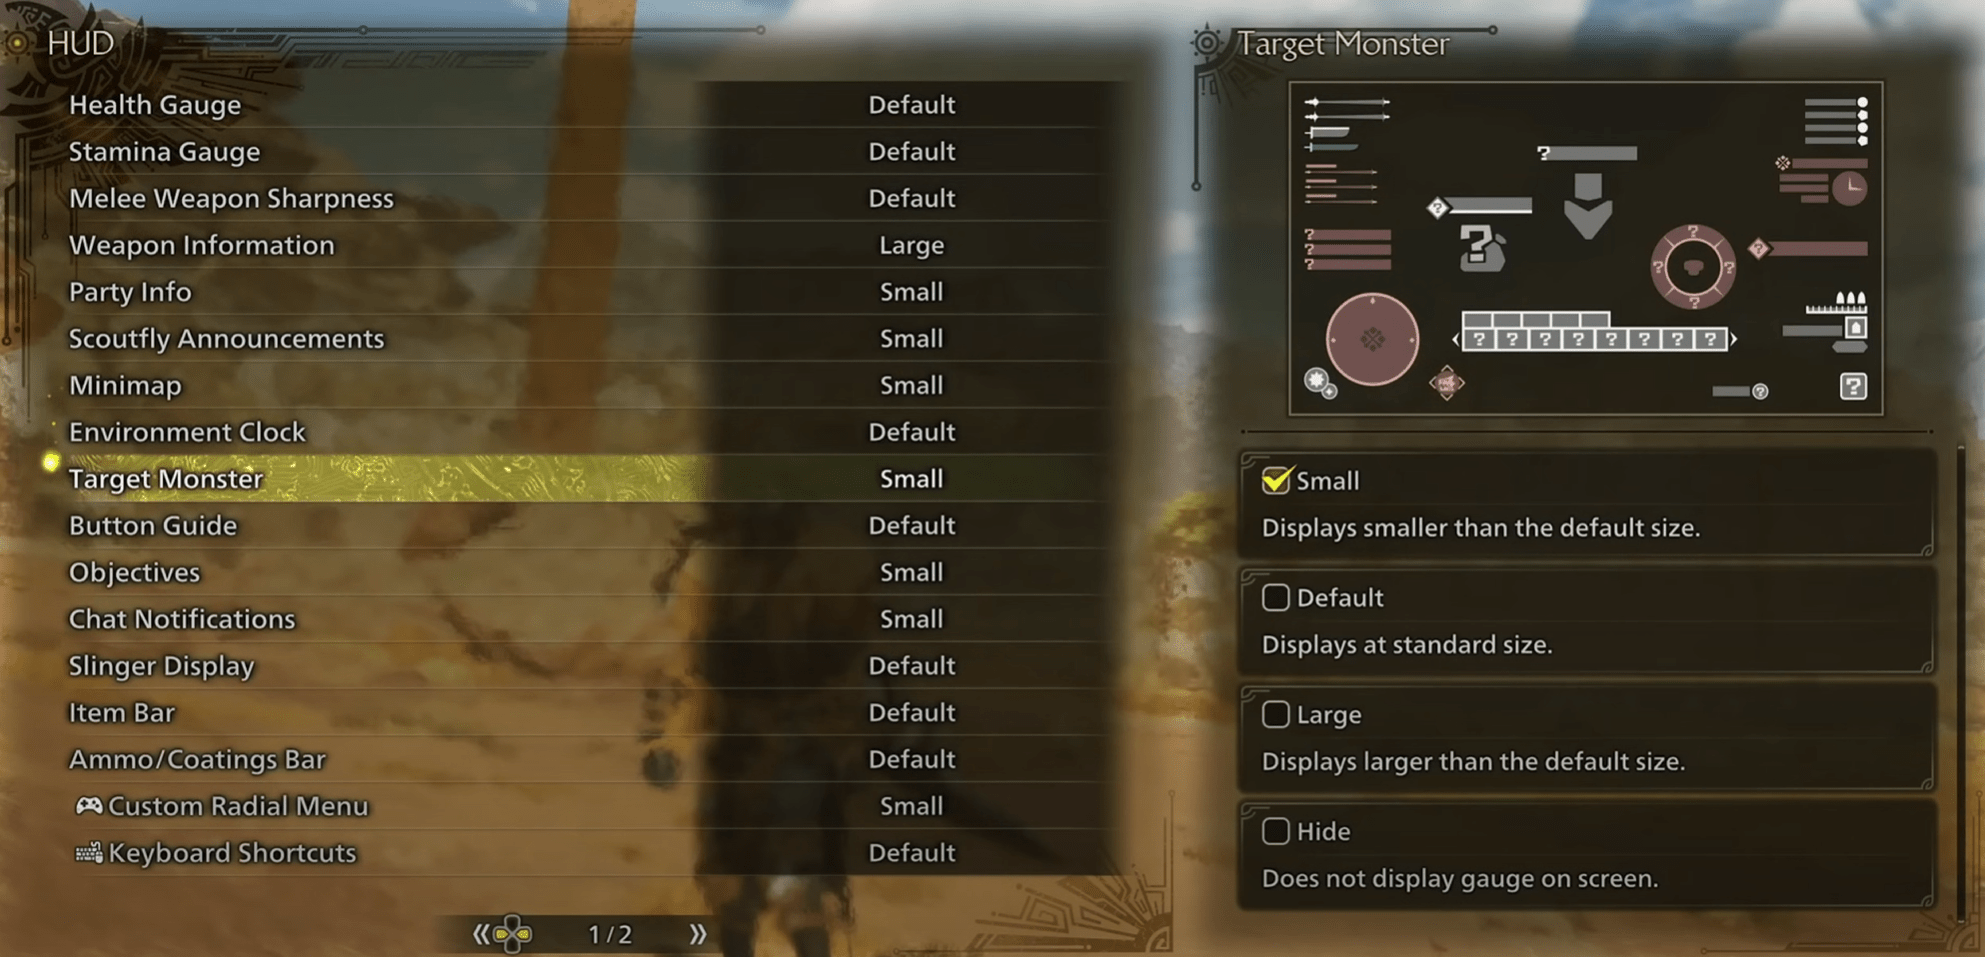
Right after the Damage Numbers, you have the HUD option, which contains a whole host of settings that allow you to customize every element you see on the screen. It’s a very nice thing to have because the developers know that seeing so much information and HUD elements on your screen could be too much for new players. So, luckily, you can change how these things are displayed. Each element has a few display options you can choose from:
- Small – displays the element in a smaller size than the default
- Default – the default size of the element.
- Large – displays the element in a larger size than the default
- Hide – hides the element completely.
- Dynamic – displays a minimized version of the element by default. The element expands to its full display in response to certain situations.
It’s also very nice that you have a preview screen where you can check out the HUD schematic and what different options will look like.
You might want to enlarge the “Weapon Information” gauge, which is a gauge specific to the chosen weapon. For example, the notes queue for the hunting horn, the phials gauge for the charge blade, etc. This is integral info to your performance, so you might want to make it more visible than other elements.
Things that you could hide or make smaller are the target monster, since you know which monster you’re currently targeting anyway, and the Environment Clock, which only shows the current time of in-game day.
Browse our hottest Monster Hunter Wilds Boosting services


Control Settings
Some default control settings can actually make your experience worse, and one such example is the Auto Sheathe setting.
Auto Sheathe adjusts whether your weapon is automatically sheathed once a set amount of time passes after drawing it. This is enabled by default. The setting doesn’t work when you’re in combat, but when out of combat, it’s best just to disable it.
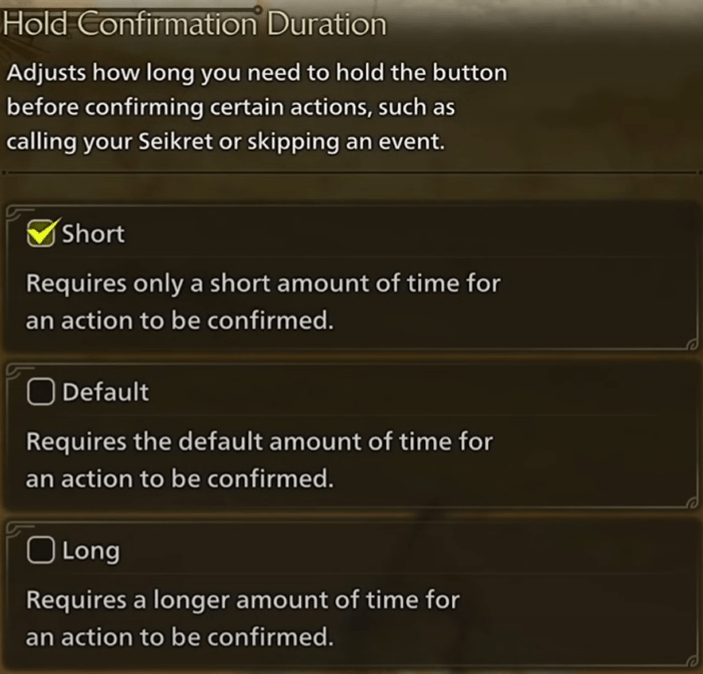
Hold Confirmation Duration
This is an extremely useful setting that you want to look into and potentially change.
This changes how long you need to hold down a button to confirm certain actions like calling your Seikret, skipping a cut scene, or something of the sort. It will not affect combat controls where you need to hold down buttons to perform certain moves, but it will help you save some time doing other things.
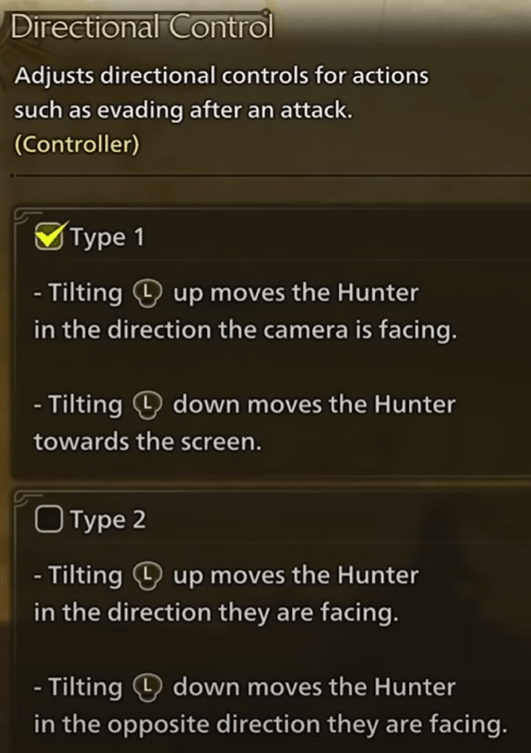
Directional Control
One of the most quality-of-life improving Monster Hunter Wilds overlooked tricks is the Directional Control setting. While this is a pretty controversial setting, it adjusts directional controls for actions like evading after an attack for controllers. For some players, changing this setting will be very helpful, while for others, it's actually going to be harmful and deteriorating to the experience. The two types are:
Type 1 (Default)
- Tilting the left stick up moves the Hunter in the direction the camera is facing.
- Tilting the left stick down moves the Hunter towards the screen.
This setting is ideal for players who prefer camera-based movement—common in modern action games. If you’re used to games like Dark Souls or Elden Ring where the camera dictates movement direction, Type 1 will feel natural.
The default Type 1 setting is great for general play and especially helpful for players who rely on the Focus Mode in Monster Hunter Wilds, as the camera-centered control pairs well with it.
Type 2
- Tilting the left stick up moves the Hunter in the direction they are facing.
- Tilting the left stick down moves the Hunter in the opposite direction they are facing.
Players who want a character-oriented movement will prefer this option. This setting allows you to move relative to the Hunter’s facing direction, which can be advantageous when lining up precise attacks. Some players, particularly those using weapons like the Charge Blade or Great Sword, find Type 2 helps with attack positioning—especially for big, slow, directional attacks. BLOG20
Meanwhile, Type 2 has its fans, especially among players who prioritize manual positioning for certain weapon combos. At the same time, there’s less need for it in Wilds, thanks to Focus Mode. Unless you’re consistently struggling with lining up attacks or come from games with character-based movement controls, sticking to Type 1 is recommended.
Slinger Auto-Load
This setting can potentially speed up some of the tediousness related to scrolling through the item bar. Specifically, it adjusts whether an item that is selected in the item bar and can be used with the Slinger, will auto-load when closing the Item Bar. Let’s explain.
So, for those of you new to the Monster Hunter Wilds, your Hunter has a grappling hook device attached to their left hand called the Slinger that is utilized a lot both in combat and outside of it. The Slinger can be used as a little crossbow that uses various ammo found in the environment that all have their unique effects. Some slinger ammo can be crafted and added to your Item bar for quick access. However, by default, to equip the Slinger ammo from the item bar, you need to press one more button, so the whole process looks like this:
- Hold
 to open the Item Bar
 - Scroll through the Item Bar with
 or
or  to find the Slinger Ammo
 - Press
 to equip said ammo
If you keep this option on, you won’t need to press A to equip ammo. Instead, just release ![]() to close the Item Bar when the ammo is selected, and it will be equipped on your Slinger.
to close the Item Bar when the ammo is selected, and it will be equipped on your Slinger.
But this could be annoying if you equip the Capture Net by accident.
Item Use Controls
This setting determines how you activate the items selected in the Radial Menu. Radial Menus in Monster Hunter Wilds are used for even quicker access to the most important items. It’s even faster to use the Radial menu rather than scrolling through the Item Bar. These menus are all completely customizable and you can have multiple radial menus with any amount of items for quick access.
This particular setting adjusts how items are selected (or activated) from the Radial Menu.
- Type 1 (default) – Releasing
 selects items.
 - Type 2 – Pressing
 selects items.
Some long-time players hate the default option because it can lead to some problems in combat if you’re not careful. When you have the Radial Menu open, tilting the ![]() in a direction is going to activate the item there, whether it's a consumable, an emote, a sticker, or whatever else you put there. There are good chances that you could do that by accident mid-combat and pop an item that you don’t need or sharpen a weapon when you don’t need to.
in a direction is going to activate the item there, whether it's a consumable, an emote, a sticker, or whatever else you put there. There are good chances that you could do that by accident mid-combat and pop an item that you don’t need or sharpen a weapon when you don’t need to.
The second type requires you to press the ![]() to confirm the selection, which is one extra step in accessing items from the Radial Menu, but at least you will never use any of these items on accident.
to confirm the selection, which is one extra step in accessing items from the Radial Menu, but at least you will never use any of these items on accident.
Aim/Focus Mode Controls
This setting can be very handy in your gameplay, as it determines how the Focus Mode is enabled in the game. There are two options here:
- Hold
 to Activate Mode – when your weapon is drawn, holding
  activates Focus Mode for melee weapons and Aim/Focus Mode for ranged weapons. When your weapon is sheathed, this will aim the Slinger instead.
 - Press
 to Toggle Mode – when your weapon is drawn, pressing
  toggles Focus Mode ON/OFF for melee weapons and Aim/Focus Mode for ranged weapons.
This setting works similarly to how first-person shooters handle their Aim Down Sights (ADS) mechanics, where players can choose between holding a button or toggling it. Which option you pick comes down to personal preference. Holding the button is faster for quick engagements while toggling frees up your fingers for sustained combat.
Additionally, under the Advanced Aim/Focus Mode Controls, you can separately configure this setting for melee and ranged weapons. This allows you to hold ![]() for melee weapons (for quick disengagements) while using the toggle for ranged weapons (to maintain steady aim without holding the button). Having this flexibility can improve comfort and responsiveness depending on your preferred playstyle and weapon choice.
for melee weapons (for quick disengagements) while using the toggle for ranged weapons (to maintain steady aim without holding the button). Having this flexibility can improve comfort and responsiveness depending on your preferred playstyle and weapon choice.
The Best Setting to Change for PC Version of Monster Hunter Willds
If you’re on PC, there’s one setting that will make your experience much better and it’s called “Disable Alt+F4 Force Quit”. Disabling it will allow you to quit the game by pressing Alt+F4. When the option is enabled, you won’t be able to quit the game this quickly.
Camera Controls
There are quite a few camera control options that you’re definitely going to want to change from default values.
- Camera Distance Zoom (4 out of 10) – the default value has the character too close to the camera, which is immersive, but in a fast-paced game such as this, you want to see as much as possible, so set it to 10.
- Camera Distance Pan (1 out of 10) – the camera pan’s default value makes sure that the character is at the center, but if you increase it, the character will move to the left. Change this to your preference.
- Camera Shake – adjusts the intensity of camera shake caused by in-game events and actions. Set to max value by default. You should reduce it to the minimum because high intensity can make it harder to track monster movements or your character’s position, especially during large monster attacks or explosions. Reducing it helps you maintain a steady view, making dodging and aiming more precise.
- Ambient Camera Sway – adjusts the intensity of the camera’s ambient sway effect. Set to max value by default. Minimize it because it is primarily a cosmetic effect meant to simulate natural camera movement, but at higher settings, it can introduce unnecessary motion that distracts you during exploration or combat. Lowering it ensures the camera remains stable, which is particularly helpful during long hunts or when aiming ranged weapons.
- Focus Camera – enabled by default, it adjusts whether automatic camera lock-on for the monster you have targeted is enabled. Disabling it prevents the camera from locking onto a targeted monster and only faces it when using the Target Camera.
Disabling the Focus Camera changes the behavior to the Target Camera, which keeps the monster locked-on but allows for free camera movement. With this setting off, you can better observe your surroundings, react to environmental hazards, and track multiple monsters more effectively. Pressing the lock-on button (LB by default) will still snap the camera toward the target, giving you the best of both worlds—quick targeting when needed without sacrificing full situational awareness.
- Camera Terrain Adjustment – adjusts how the camera reacts to slopes and other angled terrain. This can be turned off if you dislike the automatic camera adjustment when moving over uneven terrain.
- Target Filtering – let’s you lock on to all monsters or only large ones. It’s best to have it lock onto the large monsters only because there are too many small ones that sometimes get in the way during the fight, and you can accidentally miss attacks when locking onto them instead of the monster you’re actually fighting.
Monster Hunter Wilds Things You Didn’t Know About
Besides the settings, which offer a seemingly endless amount of ways to customize your gameplay experience, Monster Hunter Wilds is packed with hidden and overlooked gameplay mechanics, overlooked features, and subtle quality-of-life systems that many players—both newcomers and veterans—tend to miss. While the core gameplay loop of hunting, gathering, and crafting is familiar to long-time fans, Wilds introduces new layers of depth and convenience that aren’t always explained upfront. BLOG20
Whether it’s small details in how exploration works, hidden functions of your gear, or lesser-known uses for in-game mechanics, knowing these secrets can make your hunts smoother, faster, and more rewarding. In this section, we’ll explore some of the most surprising things about Monster Hunter Wilds—from mechanics that can save you crucial seconds in combat to subtle changes that improve overall gameplay flow.
Get ready to discover a whole new level of mastery with these overlooked systems and features you didn’t know existed!
Hook Slinger Auto-gather Function
Your Slinger has a hidden menu that you can use to mark items for auto-gather while riding on your Seikret.
This works by holding the ![]() button on the gamepad to enter focus mode and scrolling through the items available in the vicinity. After finding the one that you like, just press B and your character will grab it without having to directly aim at anything.
button on the gamepad to enter focus mode and scrolling through the items available in the vicinity. After finding the one that you like, just press B and your character will grab it without having to directly aim at anything.
Environment Overview
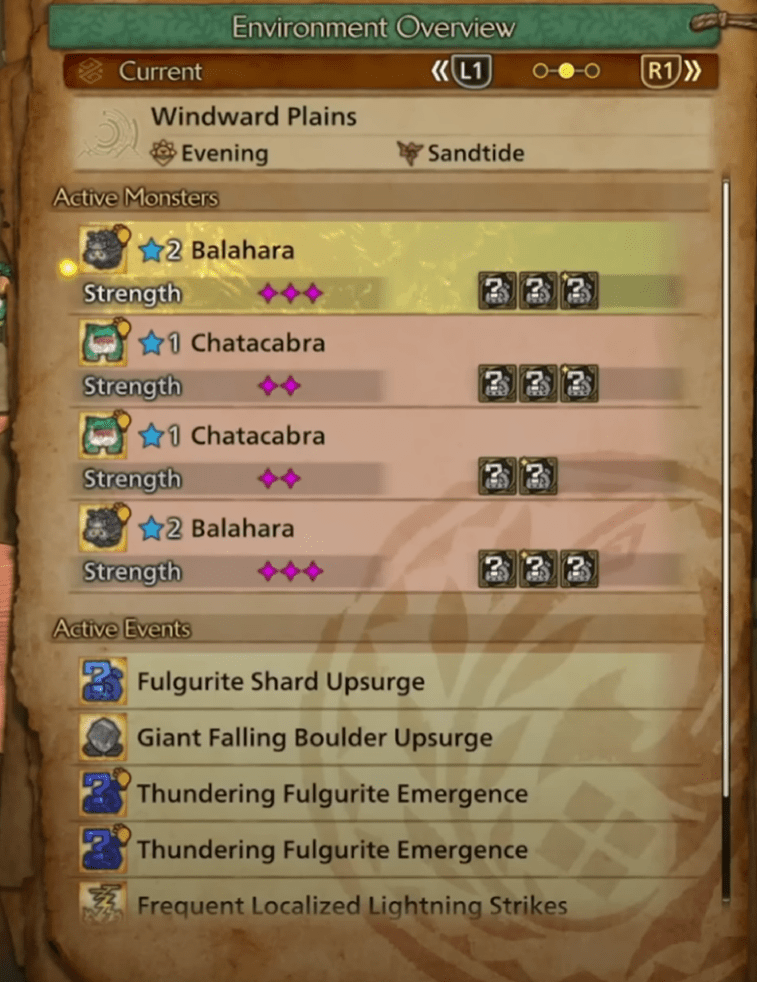
The environments in the game are dynamic – the weather changes, large monsters come and leave the locale at certain points, and even different materials appear and disappear under certain conditions. But did you know that you can actually see the full list of monsters, available resources, and currently active events through the Environment Overview window?
Open the big map and press ![]() /
/![]() on your gamepad to open it. This menu will list and highlight the location of all currently available monsters and events. Plus, the forecast tab will demonstrate what will happen after some time. This includes things:
on your gamepad to open it. This menu will list and highlight the location of all currently available monsters and events. Plus, the forecast tab will demonstrate what will happen after some time. This includes things:
- Upcoming day cycle changes
- Upcoming weather changes
- Incoming monsters
It also says that some player actions can change the forecast, which is something to keep in mind.
Some Weapons Open Wounds With One Focus Attack
You might already know the amazing new focus attacks designed to deal massive damage when monsters have opened wounds. You might also know that to open a wound, you need to hit the same part of a monster several times. First, you’ll see a white spot that will mark the weakened part, and if you keep hitting it, you’ll see a flesh wound with a bloody cut. That’s when you use the aimed Focus Attack to destroy the wound.
But you likely didn’t know the fact that some weapons can turn white spots into open wounds with one Focus Strike! The weapons that can do that are:
- Great Sword
- Sword and Shield
- Insect Glaive
- Switch Axe (sword mode)
- Light Bowgun (can open and destroy wounds at the same time)
- Gunlance (can open and destroy wounds at the same time)
There might be more weapon types that can do that, but additional testing is required. Plus, some craftable weapons might be better at this than others. We’ll update this section after the game’s release.
Multi-Purpose Focus Attacks
Besides opening wounds, focus attacks for some weapons have other unique properties and interesting gameplay mechanics. Examples:
- Hammer – allows you to charge the next attack while in Focus Mode
- Insect Glaive – has a different focus attack when performed in the air.
- Sword and Shield – has a different focus attack when performed in the air.
- Great Sword – has a different focus attack animation when performed in the air.
Knock Down Recovery Attack
Great Sword and Sword and Shield both have unique animation attacks that can be performed after being knocked to the ground.
Longsword Dismount Attack is a Counter!
We all know that you have unique dismount attacks for all weapons, but some of these attacks have additional properties. For example, the Longsword’s dismount attack performed by pressing ![]() +
+![]() while on Seikret can counter the monster attack if timed correctly. It will also build up the spirit gauge as a normal counterattack performed on the ground.
while on Seikret can counter the monster attack if timed correctly. It will also build up the spirit gauge as a normal counterattack performed on the ground.
Maps Have Hidden Areas With Lots of Resources!
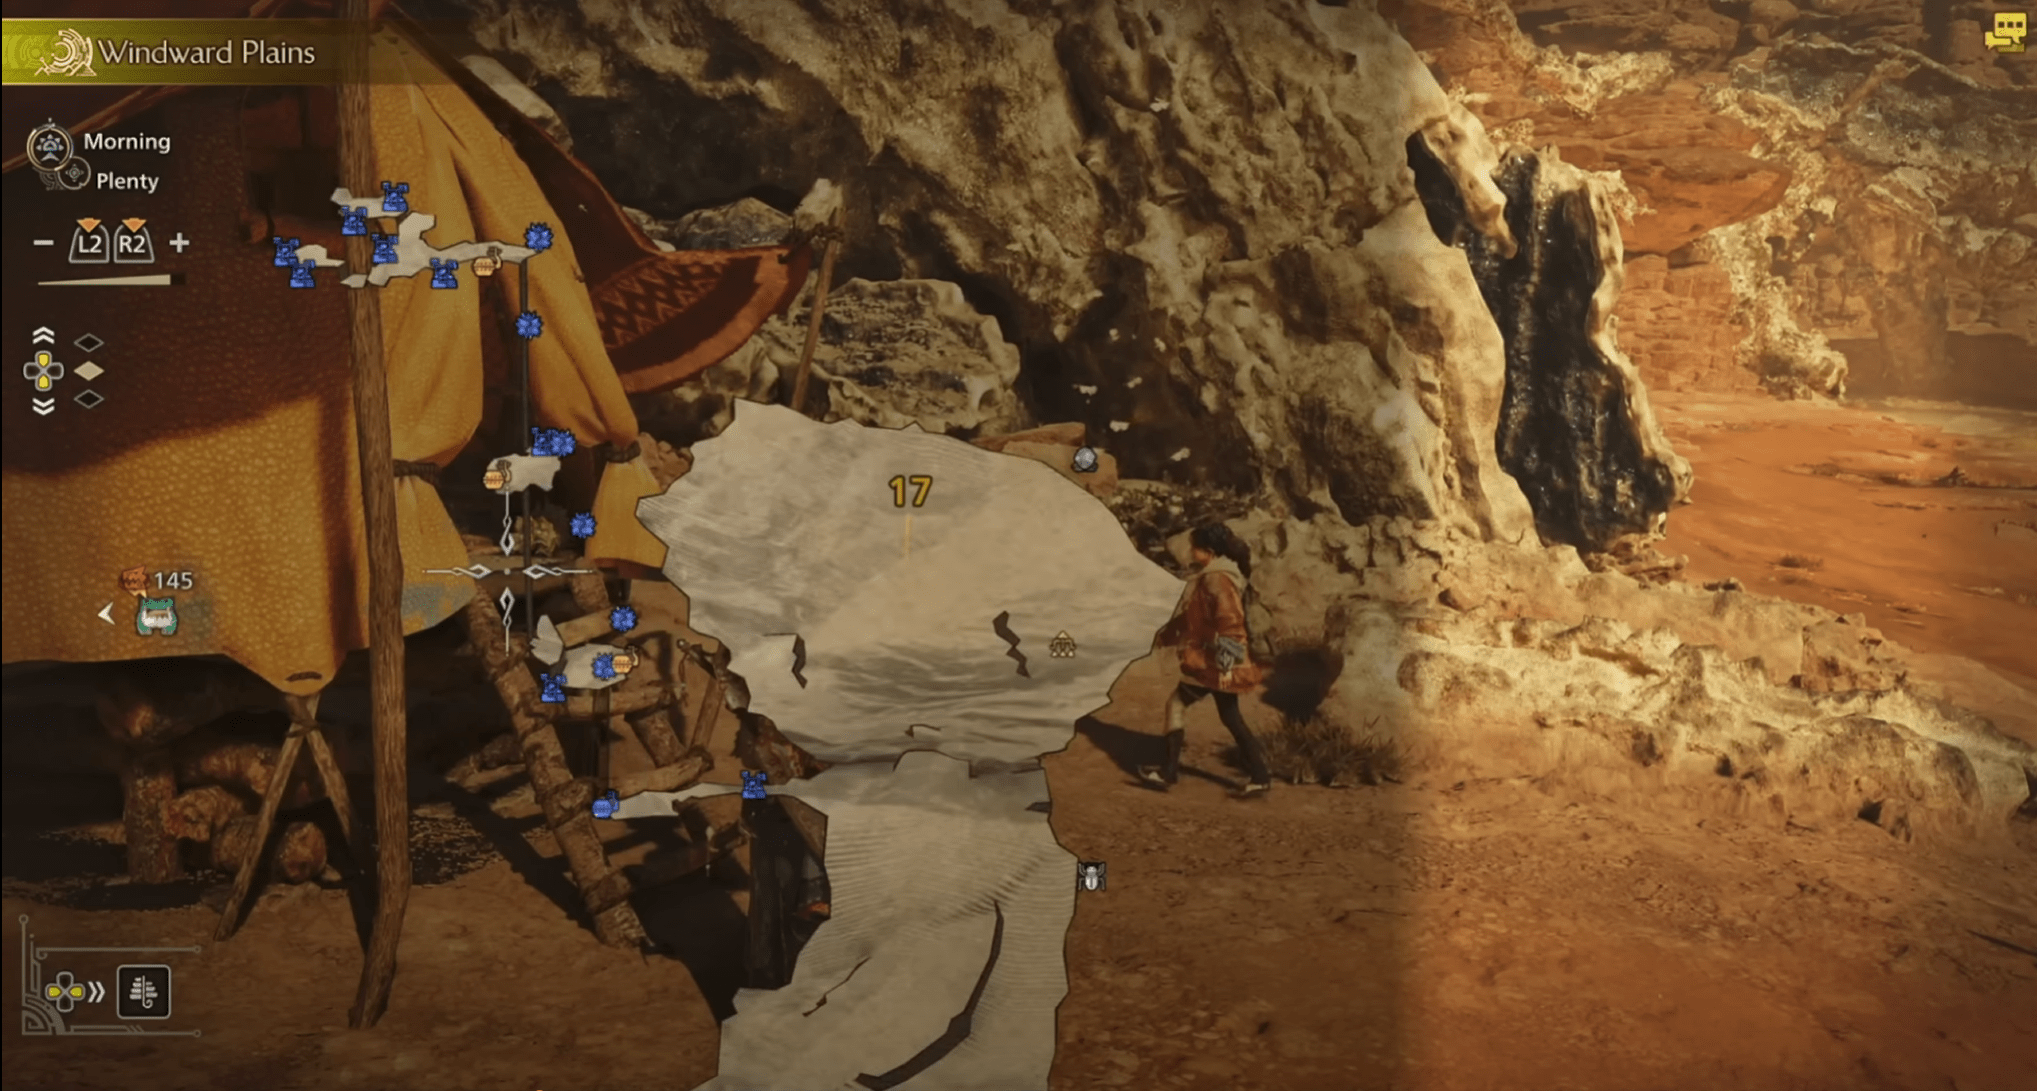
The locales in Monster Hunter Wilds are much larger than in previous games. This means that there are many more hidden places and corners that you can find by exploring the map thoroughly.
For instance, on the way to the Rey Dau, area 17, there’s a little cave that you can crawl through and discover a path upward using multiple Wedge Beetles. The whole path is filled with mineral nodes that you can farm.
Cook and Eat Food Anywhere + Food Buffs Last Multiple Hunts
New and veteran players both might have missed this, but your portable grill is no longer just grilling raw meat and turning it into steaks. One of the Monster Hunter Wilds new mechanics for the portable grill is that it can be used to cook any meal and get its buffs as long as you have the ingredients for it. We explain how cooking works in our dedicated cooking guide, but just remember that you don’t have to return to any camp if your food buffs expire.
What’s more, it could not be as obvious, but the food buffs now have a time limit instead of being active for only one hunt. This is because the hunts are no longer separated from the main game loop, and you can dynamically start new hunts just from roaming locations.
You can see how long the food buffs last by looking at the small timer located at the top left corner of the screen, just above the health bar.
There Are Secret Cooking Ingredients
During the beta version of the game, there was a limited range of cooking ingredients available for making meals. What most players missed is the fact that you could unlock a secret ingredient, the cheese, famously produced by the Kunava Village people, simply by speaking with one of the NPC villagers. It goes to show that some cooking ingredients will be harder to find, and when the game comes out, there’ll be more of them.
Conclusion
Monster Hunter Wilds is brimming with hidden mechanics, overlooked settings, and subtle gameplay features that can dramatically enhance your hunting experience. From customizing menus and tweaking camera controls to discovering secret cooking ingredients and mastering lesser-known weapon properties, there’s a lot beneath the surface that even seasoned players might miss. Taking the time to explore these settings and hidden features can improve your gameplay flow, make combat more manageable, and unlock new levels of efficiency in your hunts.
Whether you’re a new player looking for ways to streamline your experience or a veteran hunter hoping to uncover every detail, knowing these secrets will put you one step ahead. So, take advantage of these tips, adjust the settings that suit your playstyle, and dive deeper into the world of Monster Hunter Wilds. Happy hunting!
F.A.Q.
Which gameplay settings should I change in Monster Hunter Wilds?
Some of the most impactful settings to change include camera distance, camera shake, ambient camera sway, item use controls, and auto-sheathe. Adjusting these improves visibility, prevents accidental item usage, and streamlines gameplay.
How do I make Monster Hunter Wilds easier to play?
Change camera settings for better visibility, turn off auto-sheathe, and adjust the radial menu to prevent accidental item use. Customizing the HUD and control options can also make the game more beginner-friendly.
How do I gather items faster in Monster Hunter Wilds?
Use the Slinger’s auto-gather function while riding Seikret. Mark the item from the menu, and your character will pick it up automatically, saving time during hunts and exploration.
Can you cook food anywhere in Monster Hunter Wilds?
Yes, you can use the portable grill to cook meals anywhere, as long as you have ingredients. Food buffs now last for multiple hunts, making them more useful during extended exploration.
Are there secret mechanics in Monster Hunter Wilds?
Yes! There are hidden features like auto-gathering with the Slinger, opening wounds with a single focus attack, and discovering hidden caves rich in resources. Some weapons also have unique focus attack properties.


