 Crispy Jackie
Welcome to our full Gate of the Setting Sun Challenge Mode guide for MoP Classic. This dungeon throws bombs and deadly mechanics from start to finish. It is not a slow crawl. It is a test of how fast and clean your group can move.
You only get 13 minutes to take down four bosses and a whole army of trouble. Every second counts. Every mistake hurts. This guide shows the fastest route, best strats, and what to do at every turn. Follow it, and you will smash the timer and earn your Gold.
Can’t beat the specified timer? At Skycoach, we can help you Complete Challenge Mode and get the Gold medal easily. Our PROs will take care of this job for you while you’re chilling and enjoying the content the game has for you. Get the best price and the fastest delivery time for your order!
Read our other Mists of Pandaria Classic guides:
- Leveling Guide
- Gold Farming Guide
- Class Tier List
- Mogu'shan Palace Challenge Mode Guide
- Temple of the Jade Serpent Challenge Mode Guide
- Siege of Niuzao Temple Challenge Guide
- Scarlet Halls Challenge Mode Guide
- Scarlet Monastery Challenge Mode Guide
- Scholomance Challenge Mode Guide
Note: At Skycoach, you can Buy MoP Classic Boost at the best prices with fast delivery. Use our special PROMO CODE (in green) hidden in this article for a 20% DISCOUNT.
Browse our hottest MoP Classic Boosting services


Gate of the Setting Sun Location

Gate of the Setting Sun location in MoP Classic is placed right on top of the mighty Serpent’s Spine wall. You’ll find it between the Vale of Eternal Blossoms and the Dread Wastes. The closest point is the southern tip of the Vale.
To reach it, fly or ride to the Vale of Eternal Blossoms, then head south until you see the wall. The portal sits up top at coordinates /way 15.8 74.4. There’s a shared flight point nearby for both Horde and Alliance, so getting there is quick and painless once unlocked.
Gate of the Setting Sun Challenge Mode Gold Medal
Gold in Gate of the Setting Sun means speed, control, and zero mistakes. This dungeon is short, but it does not forgive sloppy pulls or messy boss fights. To earn that Gold medal, you need to move fast, stay sharp, and know your route inside out. Check out the requirements for Gate of the Setting Sun Challenge Mode Gold medal in MoP Classic:
- Complete the dungeon in 13 minutes or less
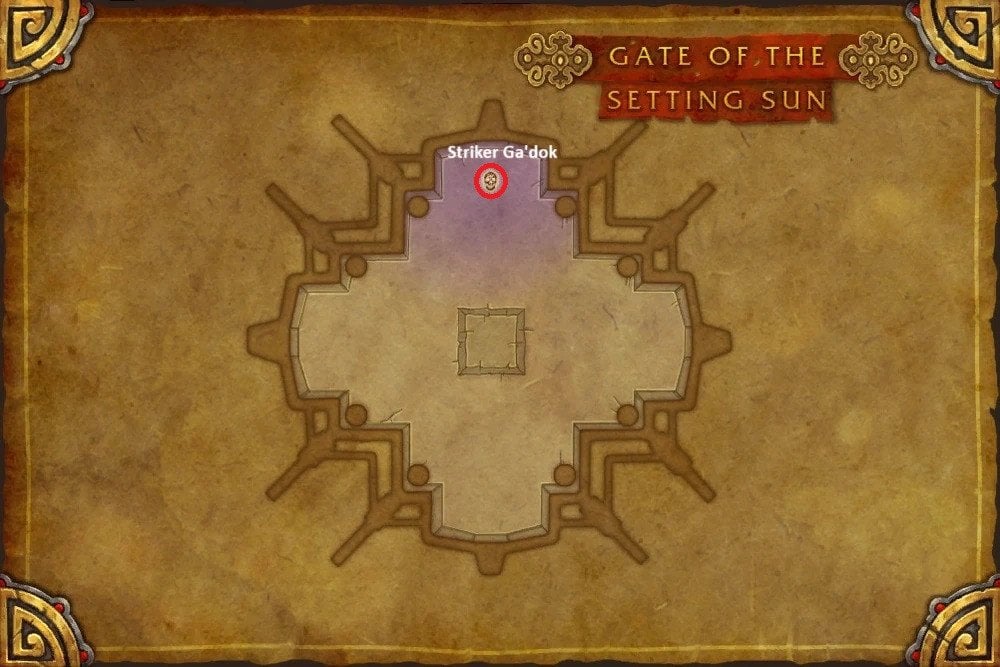
- Defeat all four bosses: Saboteur Kip'tilak, Striker Ga’dok, Commander Ri’mok, Raigonn
- Kill 25 trash enemies minimum (no skipping too much)
Yes, the whole run has to be finished in under 13 minutes. That includes clearing all required trash and killing all four bosses without slowing down. You don’t need overpowered gear. Challenge Modes bring all item levels down to 463. What matters is clean play, great cooldown usage, and a route that avoids risky pulls. Pull tight, kill fast, and never stop moving. Use tools like crowd control, mobility, and smart damage to stay ahead of the timer. This dungeon might be short, but there’s zero room for mistakes.
Gate of the Setting Sun Challenge Mode Bosses
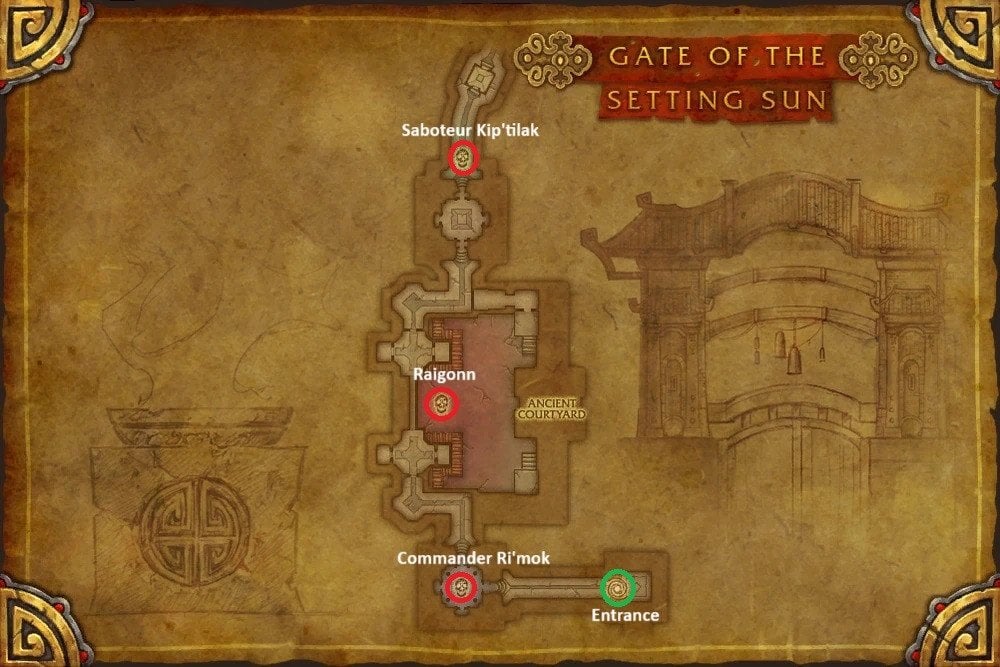
This dungeon has four bosses for you to fight against. They come one after another, with barely any downtime. Each one has deadly mechanics that get even nastier in Challenge Mode. Most of your wipes will happen on these bosses, not the trash. Learn what they do, plan your cooldowns, and move with purpose. Here’s a list of Gate of the Setting Sun Challenge Mode bosses in MoP Classic:
All four bosses come with mechanics that punish slow reactions. Bombs, fire, swarms, and chaos fill every fight. The first and last bosses are especially dangerous because of how much AoE they put out. You’ll need strong healing, perfect movement, and tight DPS windows to survive.
In Challenge Mode, nothing is scaled down but your gear. The boss damage is real, and so are the wipes. Knowing each boss inside and out is how you stay ahead of the timer. Stay sharp, don’t panic, and execute every pull with confidence.
Saboteur Kip'tilak

Kip'tilak is your first real test in Gate of the Setting Sun. He fills the room with bombs and punishes anyone who panics. His damage ramps up fast if players mess up positioning. It’s easy to lose control here if someone detonates the wrong explosives.
Smart movement and clean reaction describe your approach to this boss better than anything. You’ll need to play tight and avoid turning the room into a firestorm. Bloodlust works well here to shorten the chaos.
Saboteur Kip'tilak Abilities:
- Throw Explosives: Kip'tilak throws packs of Stable Munitions onto the ground at random spots. These don’t explode unless triggered by another blast.
- Stable Munitions: These are the bombs thrown on the floor. If one explodes, it can trigger a chain reaction. They blast out in four directions and hit hard.
- Mantid Munition Explosion: When one bomb detonates, nearby bombs explode in straight lines, dealing heavy fire damage to anyone caught. Standing in the path equals pain.
- Sabotage: He sticks explosives onto a random player. When they explode, they shoot out in all directions and also hurt the player wearing them. Huge damage if not handled right.
- World in Flames: At 70% and 30% health, Kip’tilak blows up all bombs in the room. No way to avoid it except by staying clear of everything.
To beat Kip’tilak without panic, the player targeted by Sabotage should run to a far corner before the bombs go off. Everyone else needs to stay clear of the explosion paths and leave open space around themselves. When World in Flames happens, defensives should already be up, and healers need to top people fast. Bloodlust works well here if your team struggles with survival early on. The fight is all about avoiding the chain blasts and not losing your head when the bombs start flying.
Striker Ga'dok

Striker Ga’dok is pure chaos with wings. He doesn’t stay still, throws fire, and rains acid from the sky. You’ll spend half the fight dodging and the other half hoping your healer can keep up. This boss hits fast and leaves no room for slow reactions. If your group isn’t quick, things can fall apart really fast. Prey Time, Strafing Runs, and acid puddles all want to ruin your run.
Striker Ga’dok Abilities:
- Prey Time: Ga’dok grabs a random player and chews on them for five seconds. It deals Physical damage every second and stuns the target so they can’t use defensives.
- Impaling Strike: A strong hit on the tank that deals 50% of their health in one shot. If the tank isn’t topped off, this can kill them.
- Strafing Run: At 70% and 30% health, Ga’dok flies away and bombards the platform with fire. Standing in it melts you quickly. It’s one of the deadliest moments in the whole dungeon.
- Krik’thik Disruptor – Acid Bomb: Flying mobs drop acid pools at random players. These puddles deal Nature damage every second if you stand in them.
- Krik’thik Striker: They join the fight during strafing runs and add pressure on the group.
To survive Ga’dok, you need a plan for every strafing run. Group up fast on one side of the platform before he starts bombing, then shift cleanly to the other side when the flames spread. Always interrupt Gale Force from the Wind Shaper mobs when possible. Make sure healers track Prey Time and respond instantly. You can use cooldowns or externals to keep that player alive.
Save Bloodlust if needed, but don’t waste time. Ga’dok doesn’t wait around, and the longer the fight lasts, the worse things get. The faster you push through his health checkpoints, the fewer disasters you deal with. Clean movement and tight healing are the keys here.
Commander Ri'mok

Commander Ri’mok brings nonstop trash waves and ground clutter. He doesn’t hit hard right away, but if you slip up, it snowballs fast. This fight is all about keeping control. His room fills with enemies, green goo, and bombs. If your group isn’t sharp, it turns into chaos quickly. The boss also does a good chunk of cleave damage. Melee players need to stay alert and move with the tank.
Commander Ri’mok Abilities:
- Viscous Fluid: Ri’mok drops green slime around him. Standing in it reduces your damage and boosts his. The effect stacks, so avoid it as much as possible.
- Frenzied Assault: He channels a wide cleave in front of him for six seconds. It deals damage every 0.3 seconds. Tanks should aim this away from the group.
- Krik’thik Swarmer: These small enemies keep coming over the wall in waves. They pile up fast and need to be cleaved down quickly.
- Krik’thik Saboteur – Bombard: These enemies show up later and throw bombs around the room. The explosions cause significant damage to everyone nearby.
To handle this boss well, your tank needs to keep Ri’mok moving to safer spots. You should always try to keep the boss out of slime puddles. This lowers his damage and keeps ranged DPS safe. Melee players need to follow cleanly and avoid standing in the fluid.
Healers should be ready for waves of damage when Saboteurs show up. Those bombs hurt the whole group, so pop cooldowns early if needed. It’s also smart to use AoE stuns or slows on swarmers to control them. The faster you kill this boss, the easier it is. If adds pile up, the fight gets out of control fast. Clean pulls and steady movement are what make this fight manageable.
Raigonn

Raigonn is the last boss and the biggest threat in Gate of the Setting Sun. It’s a two-phase fight that mixes add control, movement, and burst damage. You’ll need a clear plan and sharp execution to finish it within the time limit. Things get messy fast if you fall behind. In Phase 1, you deal with nonstop adds while trying to break Raigonn’s armor. Phase 2 is all about burning him down before he overwhelms the group.
Abilities during Stage 1:
- Impervious Carapace: Reduces damage taken by 99%. You need to break the weak spot to deal real damage.
- Vulnerability: This weak spot appears on Raigonn’s head. Two players can mount up and attack it. Destroying it removes the armor and starts Phase 2.
- Battering Headbutt: Raigonn charges the inner gate. If players are nearby, they take big damage and get knocked down. The charge also knocks off anyone on his back.
- Krik’thik Protectorate – Hive Mind: Eight adds jump in. At 20% health, they gain 150% attack speed. They hit very hard and can quickly overwhelm the tank. Slow, root, or kite them.
- Krik’thik Engulfer – Engulfing Winds: These enemies fly overhead and drop tornadoes that deal Nature damage over time. Stay out of the swirlies.
- Krik’thik Swarm Bringer – Screeching Swarm: Applies a DoT that absorbs healing and deals Shadow damage. If not removed, it detaches and becomes a new mob.
Abilities during Stage 2:
- Broken Carapace: Raigonn takes 300% more damage. This is your burn phase. Use cooldowns here.
- Fixate: Raigonn locks onto one player for 15 seconds. That player gains movement speed and has to kite carefully.
- Stomp: Deals damage in melee range and gives Raigonn a stacking Frenzy. He hits harder with each stomp.
In Phase 1, focus on crowd control. Use roots, stuns, and slows on adds. Don’t let Protectorates stack up or enrage. Break the weak spot quickly. Rotate DPS up top to handle it fast and clean.
Save Bloodlust for Phase 2. That’s when you want every cooldown blowing. Fixate targets must kite smart. Don’t lead Raigonn into other players. Healers should remove Screeching Swarm quickly. Keep group movement tight to stay in range. If your team handles adds and breaks armor fast, Raigonn drops clean. If not, it turns into a messy wipe fast. BLOG20
Gate of the Setting Sun Challenge Mode Strategy for Gold
Getting Gold in Gate of the Setting Sun is only possible if you focus on speed and control. This dungeon is short but doesn’t leave much room for mistakes. Trash can hit hard, and bosses punish sloppiness fast. Knowing which parts to push through and where to hold back helps a lot. Here’s the best Gate of the Setting Sun Challenge Mode strategy for Gold in MoP Classic:
| Boss | Strategy |
| Saboteur Kip’tilak | This boss is a clean opener if your group spreads well. His bombs are dangerous, but the fight is simple with good movement. The trick is avoiding chain reactions and placing sabotage explosions in safe corners. Keep pressure up and burn him before the room fills up. |
| Striker Ga’dok | He has more chances to mess you up. Strafing Run and Acid Bombs deal heavy damage fast. Prey Time needs immediate healing. Plan your movement and group positions ahead of time. This fight can stall a run if players panic or get caught out of range. |
| Commander Ri’mok | The boss brings waves of adds and a subtle DPS race. Viscous Fluid zones ruin damage output and need careful tank movement. Frenzied Assault hurts, but it also helps clear trash. Kill the saboteur fast, or the raid-wide bombs will eat your run. Manage adds, keep up pressure, and rotate cooldowns well. |
| Raigonn | This is the final test. The first phase is hectic and full of adds. Crowd control is key here. Break his weak spot fast to avoid getting swarmed. Once his armor drops, blow cooldowns and finish the job. If you wait too long, Fixate and Frenzy start making the fight harder by the second. |
The overall strategy is to move fast, skip smart, and never stall. Save time with tight skips and keep your healer free to drink often. When done clean, this run leaves just enough room for comfort. When messy, it becomes a wipefest fast.
Browse our hottest MoP Classic Boosting services


Best Classes for Gate of the Setting Sun Challenge Mode
The truth is that you can go with any class/spec setup you like for this dungeon. However, it can be cleared much faster if you pick the classes that just click better with the instance. You’ll feel the difference right away when your group has the right toolkit. It’s not only about raw damage. You want movement, interrupts, utility, and ways to deal with trouble fast. These are the best classes for Gate of the Setting Sun Challenge Mode in MoP Classic:
- Rogue: This class shines here thanks to Smoke Bomb and Shroud of Concealment. Smoke Bomb forces ranged mobs into melee, saving you from annoying line-of-sight pulls. Shroud lets your group skip some trash cleanly. Rogues also bring great single-target damage and stuns.
- Paladin: Huge utility and survival are what have always characterized this class. Hand of Protection can fully block abilities like Strafing Run. Divine Shield, stuns, and strong off-healing all make Paladins great for emergencies. Retribution also brings solid burst for quick boss burns.
- Mistweaver Monk: Mobility and smart healing make Mistweavers strong in this dungeon. They can keep up with the group while dodging bombs, fires, and acid. Renewing Mist and Uplift cover the team well, even during split moments like the elevator.
- Mage: The class brings Time Warp, great AoE, and control tools like slows and snares. Frost Mages especially help with add-heavy phases like Raigonn. They’re also quick on their feet and survive well in messy pulls.
- Windwalker Monk: They bring burst AoE and mobility that fits the fast pace of this dungeon. Flying Serpent Kick and Roll help reposition quickly. Their cleave damage clears trash packs fast, and Touch of Death skips annoying moments when timed well.
These classes fit the pace and pressure of Gate of the Setting Sun. If you build your group with them in mind, getting Gold becomes a lot smoother. Other classes work too, but these five really shine in this run. You can regroup your party if you feel like getting stuck; otherwise, you’ll keep wondering how to win Gate of the Setting Sun in Challenge Mode MoP Classic forever. Though, don’t rely on your party comp only, since this isn’t the only key to success. In the end, your personal skill matters more than anything else.
Gate of the Setting Sun Challenge Mode Rewards
Clearing Gate of the Setting Sun on Gold is more than just bragging rights. You get a reward that’s both stylish and useful. It marks you as someone who crushed the clock in one of the tightest dungeons in Mists of Pandaria. See the list of Gate of the Setting Sun Challenge Mode rewards in MoP Classic:
The Gold medal gives you the Gate of the Setting Sun: Gold achievement. You also unlock the special teleport spell Path of the Setting Sun. It sends you straight to the dungeon with an 8-hour cooldown.
This is handy for farming, practicing routes, or just showing off. The teleport is fast, free, and saves you from long flights or complex paths. It’s a cool flex and a practical shortcut rolled into one.
Getting Gold here also adds to your full Challenge Mode completion. That’s what unlocks the Challenge Conqueror: Gold meta achievement. Finish all nine dungeons with Gold, and you get the epic Phoenix mount as a final prize. So each run matters. And Gate of the Setting Sun, despite being short, puts up a strong fight. But with a clean clear, your rewards are well worth the effort.
Gate of the Setting Sun Challenge Mode Tips
Here are five sharp and less obvious tips that can save your run or shave big seconds off the clock. These aren’t the usual “watch your feet” type tips. These are the weird, tricky, clever moves that actually help you win. Check out these Gate of the Setting Sun Challenge Mode tips in MoP Classic:
- Mark your tank and stand on them always: Smoke Bombs from Infiltrators ruin damage output fast. If your group is always stacked tight on the tank, you won’t waste time chasing mobs or dodging spells blindly. Assign a raid marker and glue yourself to it.
- Use CC to skip elevator mobs without potions: Right before the elevator to Ga’dok, you can CC two mobs and kill just one. That meets kill count and lets you hop the lift without fighting the whole pull. Roots, Cyclone, Sap, or Repentance all work.
- Drink right after saboteur Kip’tilak dies: The second the boss dies, the exit door opens. That’s your tiny window for a free mana drink before the next trash. Even a 3-second drink can save you from going dry mid-run.
- Have an assigned cannon team after Ga’dok: Split your group early: two stay up top to use cannons, one rushes down to light the fire. Don’t wait to decide after the boss dies. That delay eats up precious seconds during the cinematic skip.
- Rotate DPS cooldowns on Raigonn weak point: Only two people can hit Raigonn’s weak spot at a time. Set a plan to rotate who goes up and when. Stack cooldowns in waves instead of all at once for better uptime and more consistent phase control.
Use these five tips, and you’ll play smoother, safer, and much faster. Every little move helps when the timer’s tight and every second matters.
Conclusion
This is the end of our Gate of the Setting Sun Challenge Mode guide for Mists of Pandaria Classic. This is definitely a fast and brutal dungeon that comes full of chaos if you let it be. But with the right group, good planning, and clean execution, it becomes one of the most manageable Challenge Mode dungeons in MoP Classic.
Bosses are deadly but fair, the layout is straightforward, and every second saved adds up quickly. If you bring the right classes, stay stacked, use CC smartly, and handle each boss with purpose, the Gold medal is within reach. Now gear up, step in, and crush that timer like it owes you loot.
F.A.Q.
How to get gold in Gate of the Setting Sun Challenge Mode in MoP Classic?
Kill all four bosses and enough trash within 13 minutes without wiping or delays.
What are the Gate of the Setting Sun Challenge Mode bosses?
You’ll meet the following bosses in Gate of the Setting Sun:
- Saboteur Kip'tilak
- Striker Ga'dok
- Commander Ri'mok
- Raigonn
Where is Gate of the Setting Sun Challenge Mode in MoP Classic?
It’s located on the wall between Vale of Eternal Blossoms and Dread Wastes at /way 15.8 74.4.
What is the best strategy for Gate of the Setting Sun Challenge Mode?
Keep movement tight, skip smart, use class cooldowns, and avoid avoidable damage at all times.
Is Gate of the Setting Sun Challenge Mode hard in Pandaria Classic?
It’s considered one of the easier Challenge Modes, but still punishes mistakes and slow pulls.


