 Crispy Jackie
Welcome to our complete Scholomance Challenge Mode guide for MoP Classic. Get ready for a race against the clock where every pull, spell, and second matters. One slow move can ruin your entire run. But this place has more wiggle room than most. You can play smart without needing to do wild skips or risky pulls.
If your team knows the tricks, Gold becomes very doable. This guide will show you every route, boss, and tip you need. No fluff, just a straight path to victory. Get your potion ready. You are going to crush this place.
In case you’re stuck, Skycoach can help you Complete Challenge Mode and claim the best rewards. This is your chance to skip the grind and enjoy the content you like rather than chasing the tough stuff. Get the best price and the fastest completion time for your order.
Read our other Mists of Pandaria Classic guides:
- Leveling Guide
- Gold Farming Guide
- Class Tier List
- Mogu'shan Palace Challenge Mode Guide
- Temple of the Jade Serpent Challenge Mode Guide
- Siege of Niuzao Temple Challenge Guide
- Gate of the Setting Sun Challenge Mode Guide
- Scarlet Halls Challenge Mode Guide
Note: At Skycoach, you can Buy MoP Classic Boost at the best prices with fast delivery. Use our special PROMO CODE (in green) hidden in this article for a 20% DISCOUNT.
Browse our hottest MoP Classic Boosting services


Scholomance Location
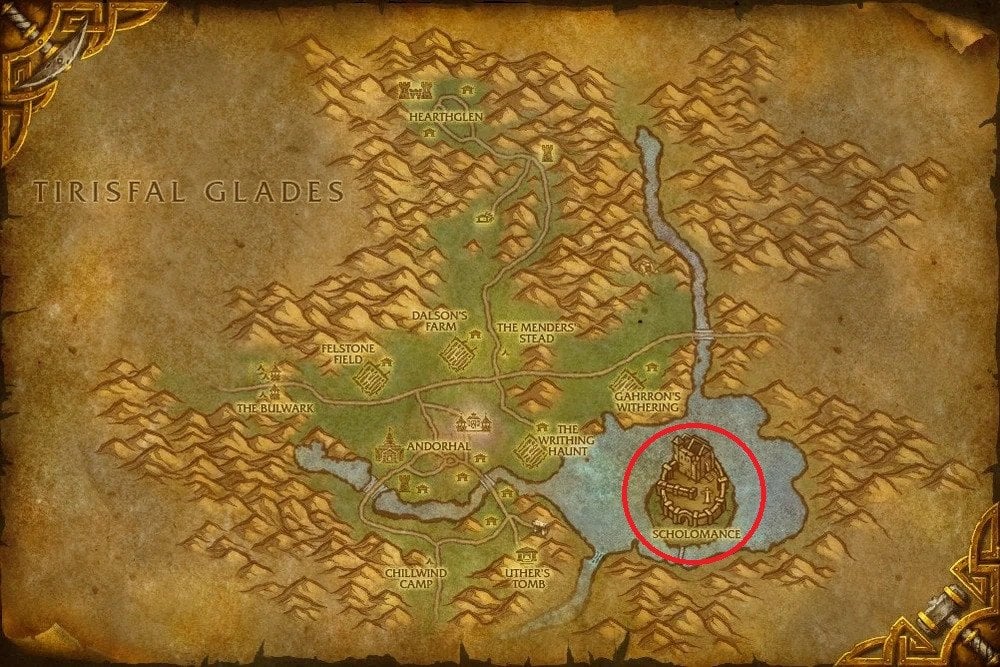
Scholomance location in MoP Classic is in the Western Plaguelands, inside a worn-out crypt crawling with dark magic. The exact coordinates are /way 69.0 73.0. You will find the entrance on the island in the middle of Darrowmere Lake.
The fastest way to get there is by flying to The Mender’s Stead, which is close for both factions. Alliance players can also use Chillwind Camp, while Horde players have Andorhal nearby. Once you land, head northeast. Cross the broken bridge leading onto the lake island, walk up the stairs, and step into the old mausoleum. That’s your doorway into Scholomance.
Scholomance Challenge Mode Gold Medal
To earn the Gold medal in Scholomance Challenge Mode, your team needs to move fast and play smart. The dungeon allows more breathing room than some other Challenge Modes, but you still need solid execution. Knowing where to push harder and where to play safe is key here. We’ve gathered the requirements for Scholomance Challenge Mode Gold medal in MoP Classic for you:
- Complete the run in 19 minutes or less
- Defeat all five bosses: Instructor Chillheart, Jandice Barov, Rattlegore, Lilian Voss, Darkmaster Gandling
- Kill at least 35 enemies
The time window in Scholomance is more forgiving than in most dungeons. You don’t need to pull everything at once, but you still have to keep the pace up. Take advantage of clever pulls and skip tricks to shave off extra time. Save cooldowns where it matters and avoid any messy deaths.
Scholomance Challenge Mode Bosses
Scholomance has five bosses, each with their own nasty tricks and pressure points. You’ll fight your way through undead teachers, angry spirits, and one moody headmaster. Some bosses hit harder than others, but none of them are pushovers. Each one tests something different – group movement, target swapping, or raw DPS. Below, you can see a list of Scholomance Challenge Mode bosses in MoP Classic:
There’s no wasted space in this dungeon. Between bosses, trash pulls hit just as hard. Many groups lose more time to mobs than the bosses themselves. Use your stuns, interrupts, and crowd control to keep pulls clean. Know when to slow down and when to push hard. The better you manage the space between bosses, the more time you’ll have to handle the fights themselves.
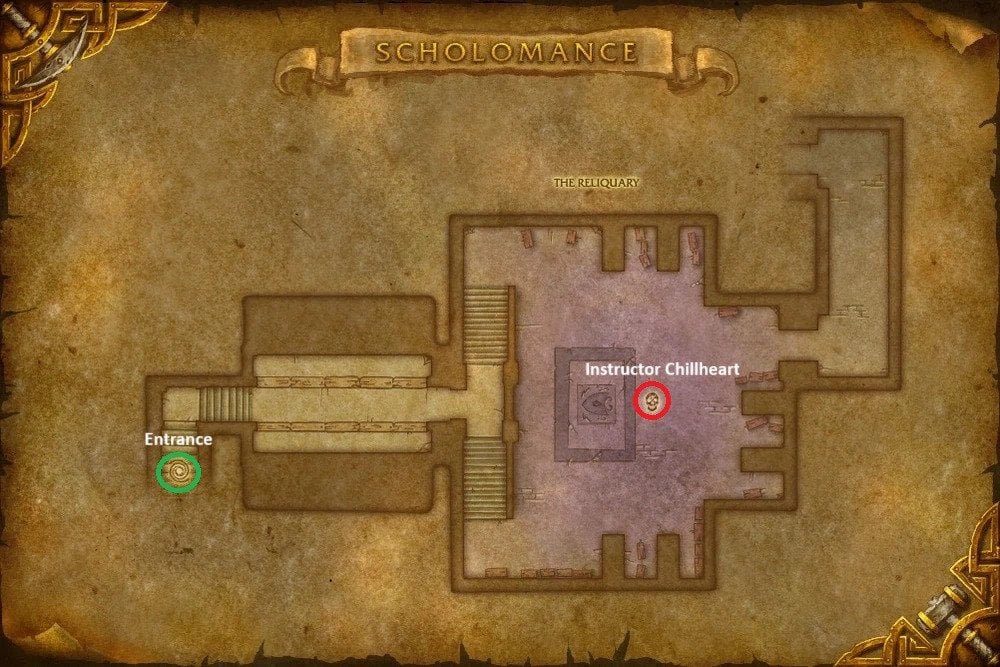
Instructor Chillheart
Instructor Chillheart is the first boss in Scholomance. She teaches pain, not patience. The fight is split into two parts and happens fast. In Phase One, she throws deadly ice at the group. In Phase Two, she hides behind magical books that fire off random chaos. The room gets messy, so clean movement is key.
Abilities during Stage 1:
- Frigid Grasp: A patch of ice forms under a random player and explodes after a few seconds. If you’re still standing there, it deals huge Frost damage.
- Ice Wrath: She targets a player with a Frost aura that ticks heavy damage to nearby allies every second for ten seconds. It doesn’t hurt the target, just everyone else. If you get this, take two steps away from the group. Don’t run, just separate.
- Touch of the Grave: Her next ten melee attacks deal bonus Frost damage. If your tank isn’t paying attention, this burst can stack up with other mechanics and kill them. Healers need to be alert when this lines up with other effects.
- Wrack Soul: This is a shadow DoT that lasts ten seconds. When it expires, it jumps to another random player. It keeps going until the group’s spaced out. You can’t let it bounce between stacked players. If you see this on someone, shift formation.
- Ice Wall: She summons a giant wall of ice that sweeps across the room. It one-shots anyone in its path. It moves slowly but never stops. Always keep an eye on it. Never tunnel-vision. A single miss and you're dead.
Abilities during Stage 2:
Her ghost possesses the books, and each one casts a dangerous spell. You need to destroy them one by one, but not too slowly.
- Arcane Bomb: A book launches an orb that explodes on contact. Anyone near it takes big Arcane damage. It’s easy to see, and even easier to avoid, but in tight corners it can get messy. Don’t stand too close together.
- Burn: Another book sets the floor on fire. It doesn’t chase you. It just sits there and melts your health. Stay out. Don’t try to squeeze by it. Just wait or go around.
- Shadow Bolt: This book hurls shadow missiles at random players. There’s no cast timer and no pattern. Healers need to top people up between casts. If multiple players get hit back to back, pop defensives.
Start this fight ready to move. You’ll need clean footwork in both phases. Use Heroism or Bloodlust early to get through Phase 1 quickly while the room is still clear. Keep Chillheart near the middle so the wall and ground effects are easier to dodge.
For Phase Two, focus your damage and rotate cooldowns. Don’t let the fight drag. The faster you clear the books, the safer everyone is. This boss sets the pace for the whole dungeon. Beat her clean, and you’re off to a good start.
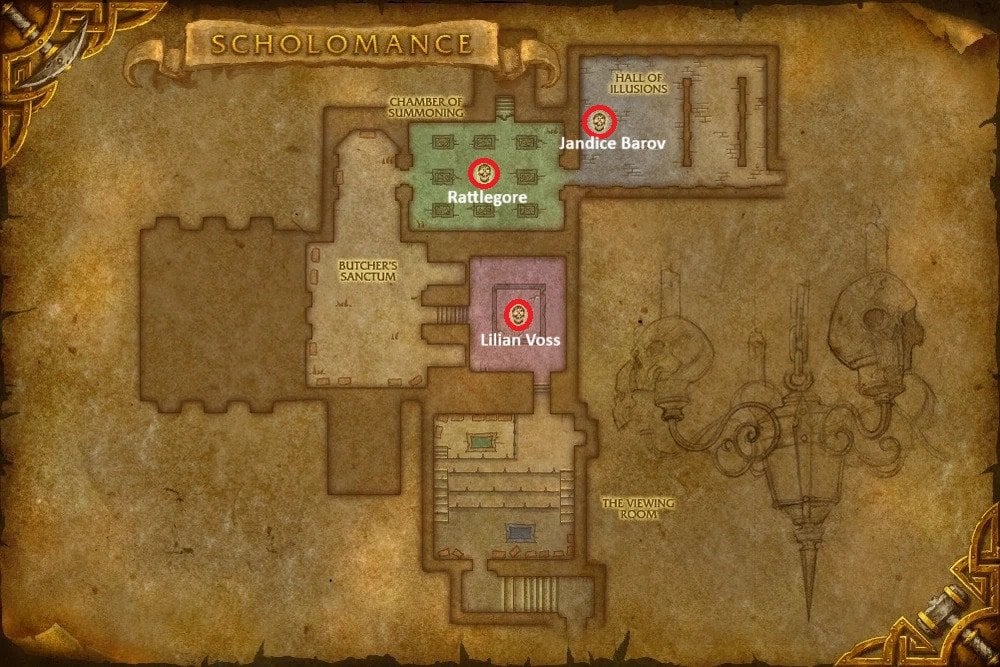
Jandice Barov

Jandice teaches illusions, but she prefers pain over lectures. She hides behind mirrors, duplicates herself, and turns the fight into a blur of images and magic. Her room is tight and twisted, with bones on the floor and shadows in the corners. You barely get a second to breathe. This fight is all about focus. Lose track of her, and the whole group falls apart.
Jandice Barov Abilities:
- Wondrous Rapidity: She channels a flurry of Arcane blasts in a cone in front of her. It hits hard and fast, and it keeps going for a few seconds. Tanks must turn her away from the group at all times.
- Whirl of Illusion: At 66 percent and again later, Jandice vanishes and spawns nine clones. The room becomes a dance floor of fake Jandices, and only one is real. The fake ones deal small damage, but every wrong kill explodes and hurts everyone. You have to find the real one fast.
- Gravity Flux: She drops a swirling zone that blinds and knocks back anyone who enters it. It’s usually near melee range, right under her or a clone. Avoid it at all costs. If your tank or melee gets caught inside, they’re out of the fight for a moment.
The fight is short if done clean, but it’s unforgiving. Burn her hard at the start. Save AoE cooldowns for the clone phases. Have each DPS pick a section of the room and scan quickly for the real Jandice. The faster you find her, the safer the group stays. One mistake with clones can wipe you. One good ID can carry the fight.
Use slows and stuns if you’re struggling during illusions. If your group has a Death Knight, use Dark Simulacrum on her during the main phase. It steals Wondrous Rapidity and melts the clone wave instantly. The more comfortable your group is with illusions, the easier this fight gets. It’s all muscle memory and sharp eyes. Once Jandice drops, the rest of the dungeon feels lighter.
Rattlegore

Rattlegore stomps around like a pile of bones looking for his next victim. This boss is simple but deadly. Every mistake hits like a truck. If you’re late on a mechanic, you die. The room is full of bone piles and soul fire. It feels like you're in a furnace made of skeletons. This is a survival test wrapped in a DPS check.
Rattlegore Abilities:
- Rusting: Every melee swing stacks this debuff on himself. It increases his damage by 25%, but also slows his attack and movement speed. If the stacks go too high, the tank gets shredded. Healers get no breathing room. The tank must kite him every few stacks to reset Rusting.
- Bone Spike: A massive spike of bone shoots at a random player. It hits for massive Physical damage and knocks them back. The only way to survive is to have Bone Armor active. No Bone Armor means instant death. Grab it from one of the bone piles before the fight and refresh it every time it gets consumed
- Soulflame: Random patches of fire appear and grow. If you stand in them, you melt. They’re hard to see at first, but they grow fast. Stay mobile. Don’t corner yourself. If Soulflame spawns under the tank during a kite, you’re in trouble.
- Bone Armor: Clicking a bone pile gives you a swirling shield that blocks one Bone spell. It’s essential. No one should pull the boss without it. Refresh it immediately if you lose a charge.
This is one of the cleanest fights in the dungeon – until it isn’t. You win by doing the basics. Get Bone Armor. Dodge fire. Reset Rusting. That’s it. But if your tank misses a kite or someone forgets Bone Armor, it falls apart fast. Use cooldowns during heavy stack phases or if a Bone Spike lands in a bad spot.
Healers can throw in DPS here, since most of the damage is predictable. Just be ready to panic-heal if the Bone Armor timing is off. If your group can coordinate the kiting and stay aware of Soulflame, Rattlegore becomes a smooth, short fight. Mess it up, and it’s a boneyard.
Lilian Voss

Lilian Voss is a race – you burn her down before she tears your group apart. The room is big, but it doesn’t feel safe. She blinks, leaps, pulls, and drops fire under your feet. Everything about this fight screams “go faster.” The secret to winning is skipping her transformation. If you push enough damage, she never gets the chance to power up.
Abilities during Stage 1:
- Shadow Shiv: She blinks to a random player and hits everyone around them. The hit range is big. It’s pure Shadow damage. If your group stacks too tightly, she slams multiple people. Spread out just enough to stay safe but close enough for healing.
- Death’s Grasp: Lilian yanks everyone into her space. It messes up positioning and can combo into other abilities. If she follows this with Dark Blaze, it gets ugly. After every Grasp, the whole group needs to spread again immediately.
- Dark Blaze: She leaves pools of Shadowfire under players. These hurt a lot and tick fast. Move as soon as you see one spawn. It’s tempting to stay in and finish a cast, but one tick is enough to push you low.
Abilities during Stage 2:
- Blazing Soul: If you let her transform, this starts. It’s ticking AoE Fire damage on the entire group. It ramps up the pressure. Healers won’t catch a break.
- Unleashed Anguish: Every time her soul lands a melee hit, it releases a blast of AoE damage. This chains out fast and hard. You can’t stop it once it starts. The best strategy is to never get here.
- Fixate Anger: She picks a player and locks on. You can’t taunt it. If that person runs into fire or panics, they go down. It’s manageable if the group is calm, but things can fall apart quickly.
This fight is all about one thing: damage. Burn her to 1% before the second phase starts and you win. That means cooldowns, Bloodlust, and no mistakes. Everyone needs Bone Armor before the fight, and all dots, procs, and long-cast nukes should be ready right as she hits 58%. She moves to the middle, and you blast her before she gets going.
If you skip the transformation, you save time and avoid the most dangerous mechanics in the dungeon. It’s the cleanest shortcut to Gold. If you can’t skip it, the fight becomes messy. Healers will get strained. Random damage starts flying. Stay ahead with DPS, and Lilian becomes one of the fastest kills in Scholomance. Fall behind, and she’ll bury your run in fire and shadows.
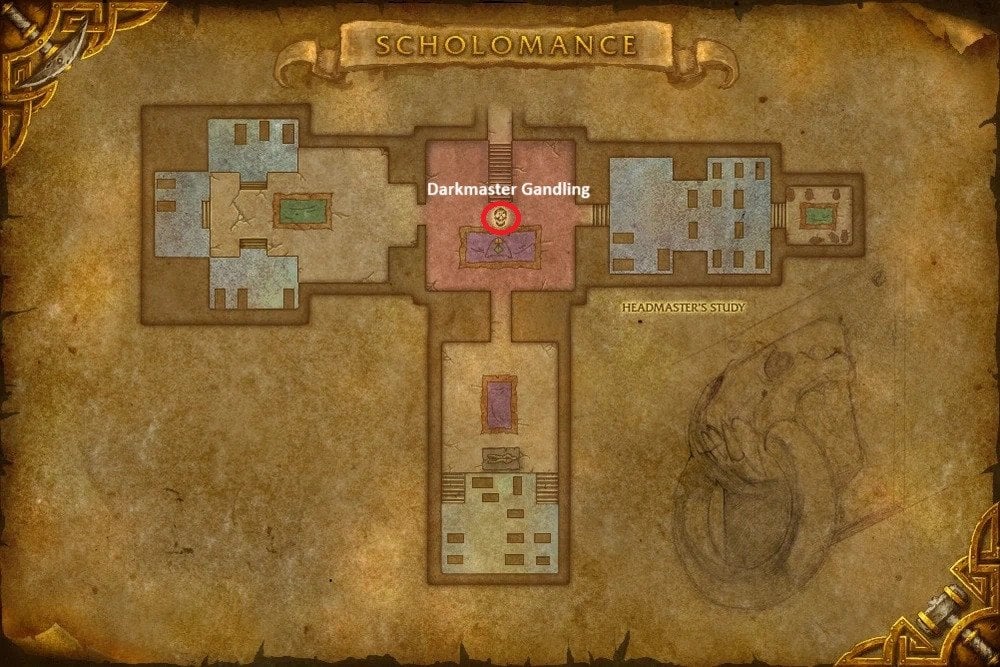
Darkmaster Gandling

Darkmaster Gandling is the final boss in Scholomance. He hits harder than anyone else and throws constant problems at your team. The fight feels busy from the start. He casts fast, summons mobs, and teleports players into side rooms where they have to fight their way out. If your healer or tank gets pulled, it turns into a scramble. Everything here wants to go wrong at the same time. Staying calm is the only way to survive.
Darkmaster Gandling Abilities:
- Incinerate: He casts this nonstop on the tank. It does steady, strong Fire damage. There’s no trick, just high output. Healers need to stay alert the whole time. If you fall behind, it snowballs fast.
- Immolate: This DoT burns over time and needs to be dispelled quickly. If your healer is in a study room and no one else can dispel, it sticks around and becomes a real problem. Your group should always plan who can clear this.
- Rise!: He summons waves of Failed Students during this cast. While he channels it, he takes 50% less damage. If your tank or healer is teleported, Gandling will keep summoning until they escape. These mobs explode after 8 seconds and deal big damage. You either kill them fast or avoid them entirely.
- Harsh Lesson: Gandling sends a random player into one of his study rooms. In there, you have to kill a couple mobs to escape. If it’s the healer or tank, things get risky. Everyone else needs to stay alive long enough for them to break out.
- Failed Students: These guys rush the group and explode if they’re not killed fast. Ranged groups can cheese them by standing on the ledge above Gandling. This forces the mobs to run all the way around and explode harmlessly before reaching anyone. Melee-heavy groups need to AoE them down on the spot.
This fight gets rough when players start disappearing. The study rooms are short but intense. Healers need to dispel the mobs inside to kill them quickly. Two dispels will usually finish the job. If your healer doesn’t know that, they can get stuck, and Gandling will just keep summoning adds.
The hardest part is what happens when people come back. Gandling stops summoning and goes back to burning the tank. That switch is dangerous. There’s always a few seconds of chaos before everything resets. Tanks should pop cooldowns here. Healers should focus on the group until the rhythm returns.
The best groups use the ledge to dodge the adds, plan their cooldowns around the study room phases, and never let Gandling get momentum. If you mess up the dispels or lose control of the Failed Students, this fight drags out and kills your run. But if you stay organized and deal with the phases cleanly, Gandling goes down without drama. BLOG20
Scholomance Challenge Mode Strategy for Gold
Scholomance has a generous timer, but that doesn’t mean it’s easy. The dungeon gives you time to breathe, but it also throws tight mechanics and rough trash at you. Most deaths come from rushing pulls, not bosses. You can go gold without using every skip or trick, but you’ll need smart routing and clean execution. Here’s your Scholomance Challenge Mode strategy for Gold in MoP Classic:
| Boss | Strategy |
| Instructor Chillheart | This is a warm-up. The mechanics are sharp, but predictable. Phase 2 with the flying books is the real danger. Avoid the bad zones, burn her down fast, and this fight stays easy. |
| Jandice Barov | Things get tricky if your group fumbles the illusion phase. Identifying the real boss quickly makes the fight safe. If your team hesitates or guesses wrong, the damage gets out of hand fast. A confident group clears her without trouble. |
| Rattlegore | He punishes slow reactions. Forgetting Bone Armor is a wipe. Managing his Rusting stacks and dodging Bone Spikes are the keys here. With good tanking and awareness, he’s not hard, but he doesn’t forgive mistakes. |
| Lilian Voss | This is the make-or-break moment. If you can skip Phases 2 and 3 by burning her down during the transition, you save a ton of time. If you fail the skip, the fight drags, and the damage spikes. Groups that save cooldowns and burst hard here gain a huge advantage. |
| Darkmaster Gandling | He disrupts your group, pulls players into rooms, and keeps the pressure high. If you know how to manage the adds and handle study room phases, he becomes manageable. But slip up, and the fight can spiral quickly. |
Each boss has its moment, but trash is still the true challenge. Plan your big pulls, use cooldowns wisely, and save time where you can. Gold is in the pacing, not the panic. It’s unlikely that you’ll manage to complete this instance with the first attempt. But once you learn the mechanics, its layout, and more, you’ll see how things become easier.
Browse our hottest MoP Classic Boosting services


Best Classes for Scholomance Challenge Mode
As always, specific classes fit some dungeons better and make your run overall smoother. Scholomance isn’t an exception here, as there are things you need to build your gameplay around. We’ve got the classes that bring control, speed, survivability, or utility that fits this dungeon perfectly. Picking the right ones makes the whole run faster and more forgiving. See the best classes for Scholomance Challenge Mode in MoP Classic:
- Death Knight: One of the best tanks for this dungeon. Death Grip helps with tight trash packs and keeps ranged mobs in line. Anti-Magic Zone is great for soaking AoE from Candlestick Mages and bosses. Dark Simulacrum also lets you steal big spells like Jandice’s Wondrous Rapidity for bonus damage. Their control and damage make them a gold-tier pick.
- Druid: The class shines in many ways here. Bear tanks are sturdy and mobile. Resto Druids can heal on the move and drop solid HoTs before heavy pulls. Boomkins help with AoE and offer great utility. Stampeding Roar is huge for saving seconds across the run, and Cyclone or Typhoon can clutch control moments. They’re flexible and reliable throughout.
- Rogue: Great for skips, strong for survival. Rogues can use Shroud of Concealment to sneak past one of the rougher pulls, saving time and risk. Feint helps soak AoE, Cloak of Shadows clears debuffs, and Smoke Bomb forces mobs to move. They melt trash with AoE and handle boss mechanics with ease. Every group loves a good Rogue here.
- Paladin: Another class that covers multiple roles well. Prot Paladins are fantastic for their self-healing, interrupts, and stuns. Ret brings burst, control, and Blessing of Freedom for trash with slows. Holy Paladins can pump out strong single-target heals during chaotic moments like Gandling’s study rooms. Divine Shield is also perfect for dodging key mechanics like Lilian’s death grip fire.
- Hunter: Especially Beast Mastery. They bring consistent ranged damage and strong cooldowns. Primal Rage acts as a second Bloodlust, which helps for burning bosses like Lilian. Misdirection makes trash pulls cleaner, and traps give extra crowd control. They’re mobile, durable, and safe. This is what you need for tight Challenge Mode timers.
With the right classes, everything feels lighter. You get more room for error and more options for success. Though, the answer to how to win Scholomance in Challenge Mode MoP Classic remains the same – know the class you’re playing. You can play anything, whatever spec you like. Just make sure you know what buttons to press and when to do this, and you’re a winner.
Scholomance Challenge Mode Rewards
Finishing Scholomance on Gold is more than just bragging rights. You walk away with some real stuff that matters both in looks and function. We’ve got a list of Scholomance Challenge Mode rewards in MoP Classic for you:
A teleport spell that takes you straight to Scholomance. It has an 8-hour cooldown but is perfect for quick runs or flexing in front of friends.
You also earn Challenge Mode points toward exclusive transmog sets and leaderboard rankings. Finishing Scholomance on Gold helps unlock the full set, and each piece looks incredible. These aren’t just recolors. They stand out, and players notice.
Scholomance Challenge Mode Tips
We’ve discovered some things you figure out after wiping, testing, and running Scholomance dozens of times. Check out these Scholomance Challenge Mode tips in MoP Classic:
- Save Lilian’s walk time by burning her early: If your group can burn Lilian Voss from 58% to 1% during the transition, you skip two whole phases. That alone saves you over a minute. Use Heroism here, dump cooldowns, pre-load dots, and start nuking the second she drops under 60%. Time it perfectly, and she’ll never reach the center of the room.
- Pull Chillheart from the balcony: Instead of walking into her room and clearing everything slowly, pull Chillheart from above with a ranged ability. This instantly despawns most of the trash, skipping a rough fight and saving healing effort. Just watch the Risen Guards left behind. Leave them out of combat if possible.
- Abuse the Carver debuff in the Flesh Horror room: Each time a Carver dies, nearby Carvers take a stacking damage-taken debuff. Pull the entire room, group them, and kill a few low ones early to start spreading stacks. Once the debuff bounces around, mobs melt. Use all your AoE cooldowns here. It’s one of the biggest time saves in the dungeon.
- Take a free mana break before Jandice: Right before Jandice, there’s a safe moment after the Candlestick Mages. Use this to drink and reset. It gives your healer full mana for one of the harder fights. Don’t rush straight in unless your group is already experienced and clean.
- Control your pet before invis skip to Gandling: If you use Invisibility Potions to skip to Darkmaster Gandling, dismiss your pet first. It doesn’t go invisible with you and can ruin the entire skip. If the pet aggroes a mob, it breaks invis and pulls the group into a wipe. Save the run by being smart here.
Conclusion
This brings us to the end of our Scholomance Challenge Mode guide for Mists of Pandaria Classic. This dungeon can actually be one of the smoothest runs compared to other challenges. The timer is forgiving, the bosses are predictable, and the trash can be mastered with some practice. Smart routing, tight pulls, and a bit of creativity go a long way.
You don’t need to play perfect, just clean and focused. Skip what you can, burn where it counts, and handle trash with control. If your group knows when to push and when to play safe, you’ll lock in Gold without stress. With enough runs, this dungeon starts to feel like home.
F.A.Q.
How to get gold in Scholomance Challenge Mode in MoP Classic?
Kill all five bosses and hit 35 enemies total, finishing the run in under 19 minutes.
What are the Scholomance Challenge Mode bosses?
Here’s a list of the bosses you’ll encounter in Scholomance:
- Instructor Chillheart
- Jandice Barov
- Rattlegore
- Lilian Voss
- Darkmaster Gandling
Where is Scholomance Challenge Mode in MoP Classic?
It’s in Western Plaguelands at coordinates 69.0, 73.0, inside the old manor building.
What is the best strategy for Scholomance Challenge Mode?
Use cooldowns wisely, manage trash carefully, and burn Lilian hard to skip phases.
Is Scholomance Challenge Mode hard in Pandaria Classic?
It’s one of the easier ones, with a generous timer and manageable boss mechanics.


