 Crispy Jackie
Welcome to our full Scarlet Monastery Challenge Mode Guide for MoP Classic. This is another dungeon you need to complete out of all nine available within this activity. Every pull counts in this instance. One mistake slows everything down. The timer does not wait, and the bosses hit harder than expected. This dungeon is tight on space and tighter on time.
Enemies stun, burn, and throw mechanics that punish slow reactions. Movement, cooldowns, and interrupts all need to be clean. It is not just about speed. It is about control and planning. With the right team and a solid route, Gold is possible. We’ll help you reach that desired 13-minute timer to get it.
If you wanna skip the grind, our PROs at Skycoach can Do Challenge Mode for you easily. We’ll earn the Gold medal for you and the best rewards you can think of. You’ll not be able to find a better price and faster delivery time for your order! Chill while Skycoach takes care of your gaming routine.
Read our other Mists of Pandaria Classic guides:
- Leveling Guide
- Gold Farming Guide
- Class Tier List
- Mogu'shan Palace Challenge Mode Guide
- Temple of the Jade Serpent Challenge Mode Guide
- Siege of Niuzao Temple Challenge Guide
- Gate of the Setting Sun Challenge Mode Guide
- Scarlet Halls Challenge Mode Guide
- Scholomance Challenge Mode Guide
Note: At Skycoach, you can Buy MoP Classic Boost at the best prices with fast delivery. Use our special PROMO CODE (in green) hidden in this article for a 20% DISCOUNT.
Browse our hottest MoP Classic Boosting services


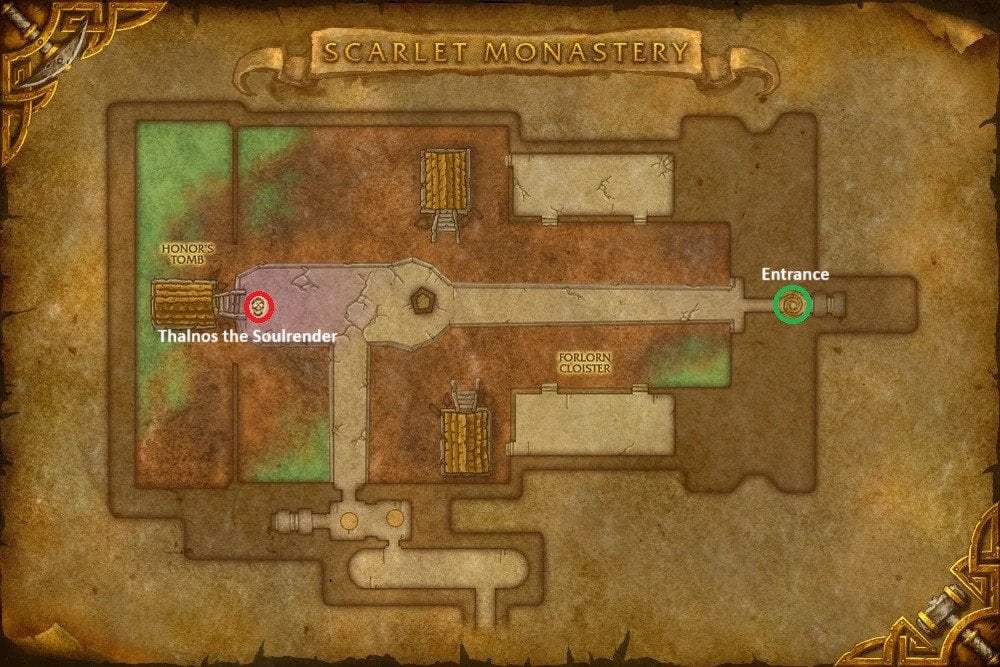
Scarlet Monastery Location

Scarlet Monastery location in MoP Classic is deep in Tirisfal Glades, surrounded by shadows and old ruins. You will find the entrance at coordinates 85.0, 30.0. Walk into the large outer building and take the first portal on the left side. That portal leads straight into the dungeon.
Horde players have easy access. You can fly in from Brill, The Bulwark, or even Undercity. For Alliance, the closest point is Andorhal in Western Plaguelands. The ride takes longer, so plan ahead.
Scarlet Monastery Challenge Mode Gold Medal
Similarly to other Challenge Mode dungeons, you need to meet the three main requirements to earn one of the medals, particularly the Gold one. The timer is tight, as always. Mistakes hurt. Every pull counts. But once you learn the flow, it becomes a smooth ride. This dungeon rewards clean execution and sharp awareness over raw damage.
To earn the Gold Medal, you need to finish the run in 13 minutes or less. That’s not much time, especially with three bosses standing in your way. Here are the requirements for Scarlet Monastery Challenge Mode Gold medal in MoP Classic:
- Defeat all three bosses: Thalnos the Soulrender, Brother Korloff, High Inquisitor Whitemane
- Kill at least 40 enemies along the way
- Complete everything before the 13-minute timer expires
There are no checkpoints, no shortcuts that skip objectives. Every second matters. Planning your pulls, using cooldowns smartly, and avoiding wipes is the key to winning Gold.
Scarlet Monastery Challenge Mode Bosses
Scarlet Monastery packs three bosses, each with their own chaos to deal with. None of them are overly complex, but they will punish sloppy play fast. If you lose control of any part of these fights, the timer won’t forgive you. Check out Scarlet Monastery Challenge Mode bosses in MoP Classic:
These fights don’t last long if your group has solid single-target damage. But things can get wild when mechanics start stacking up. Expect adds, fire, interrupts, and group-wide damage. The less panic, the better. Every mistake means lost time, and you won’t have much to spare.
Thalnos the Soulrender

Thalnos is the first boss in Scarlet Monastery, and he sets the tone fast. You’ll find him lurking past the graveyard, surrounded by ghostly mobs and piles of bones. He doesn’t have tons of health, but he brings a steady stream of chaos with him. The real threat here is how quickly things can spiral. If your group loses control, the fight turns into a mess.
Thalnos the Soulrender Abilities:
- Raise Fallen Crusader: Summons undead crusaders every second for 5 seconds. These adds stick around after death, so clear them quickly.
- Mind Rot: Fallen Crusaders apply this with melee attacks. It stacks, and it hurts. Healers need to keep an eye on anyone getting swarmed.
- Spirit Gale: Thalnos hurls a spirit that creates a damaging zone when it lands. Move out right away. Staying in it melts your health.
- Evict Soul: Targets a random player and pulls out their soul. It ticks damage and spawns an Evicted Soul that attacks nearby players. This needs to be dispelled fast to prevent spawns.
- Evicted Soul: Spawns from Evict Soul. They deal splash damage around their target. It can cause a lot of trouble in melee if ignored.
- Summon Empowering Spirit: These spirits move toward the nearest Fallen Crusader. If they reach one, it turns into an Empowered Zombie, which is tankier and more dangerous.
- Empowered Zombie: Big, slow, and deadly. Keep it slowed or stunned if one spawns, and burn it fast.
One of the biggest priorities is dispelling Evict Soul before it ticks. That alone can save your group from being overwhelmed by extra adds. During the pull, stack the Frenzied Spirits on top of the boss and root them. Once they slow down enough, cleave everything together with Thalnos to save time.
Watch for Empowering Spirits, too. Do not let them reach any Fallen Crusaders, or you’ll be dealing with much tougher enemies. If you have a Death Knight in the group, using Control Undead on a high-stacked Frenzied Spirit can help speed up the fight. It’s not required, but it can shave off a lot of time if done well.
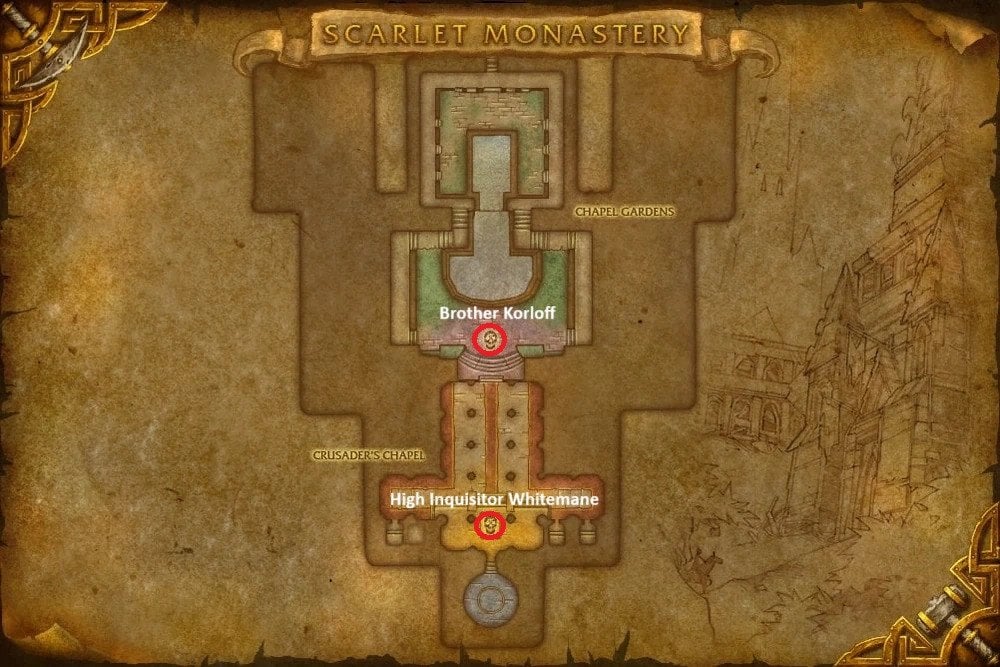
Brother Korloff

Brother Korloff guards the courtyard after Thalnos and brings nonstop movement and pressure. He trained in the monk arts, and now he’s all about fire kicks, flame trails, and surprise bursts of damage. He also punishes sloppy positioning. If someone pulls nearby monk packs, the fight gets out of hand fast. This boss doesn’t have many mechanics, but he hits hard and fast. The room is tight. There’s not much space to run. That means positioning and timing are everything.
Brother Korloff Abilities:
- Blazing Fists: Unleashes a flurry of fiery punches in a frontal cone. It ticks every second for 6 seconds. Don’t ever stand in front of him.
- Firestorm Kick: He charges the farthest player and explodes with fire damage around him. It’s big and it hurts. One player should always stand away to bait it safely.
- Rising Flame: Every 10% of health lost, Korloff gets stronger. He does more fire damage as the fight goes on. This stacks and gets scary near the end.
- Scorched Earth: Once he hits 50% health, he leaves trails of fire behind as he moves. These zones deal heavy fire damage every second. Don’t stand in them.
Pull him when he’s between the monk packs so he can’t call them for help. That saves you a wipe. Use one ranged DPS to stand back and bait Firestorm Kick every time. The tank should always position him near the fountain or a wall to keep Blazing Fists aimed away from the group. When the trail of fire begins at 50%, make sure he only moves between two spots. That way the flames stay out of the way and the fight stays clean.
Korloff hits harder the lower he gets. That final 30% can be rough. Healers need to stay alert. Ranged players should never stop moving during Firestorm Kick. If you’ve got any damage cooldowns, use them late to burn through his rising damage and avoid a slow, painful death.
High Inquisitor Whitemane

High Inquisitor Whitemane is the final test in Scarlet Monastery Challenge Mode. She waits at the end with her trusted companion, Commander Durand. This is a two-phase fight with plenty of danger and no room for mistakes. She hits hard, she revives allies, and she has one of the worst abilities you can face in a timed run.
This encounter starts when you pull Durand, but Whitemane joins in later. The whole cathedral joins the fight too, so be ready for chaos right away.
Phase One – Commander Durand
Durand opens the fight solo. He bounces around and slashes people quickly.
Abilities:
- Flash of Steel: Dashes around the room hitting players with physical damage.
- Dashing Strike: Charges through enemies and slices everything in his path.
Durand moves a lot, and your task is to get him ASAP. Stay grouped so he doesn’t run wild. The faster you kill him, the safer it is when Whitemane joins in.
Phase Two – Whitemane Revives
At 50% health, Whitemane puts everyone to sleep for 10 seconds. Then she revives Durand and joins the fight herself.
Abilities:
- Power Word: Shield – Puts a shield on an ally to block incoming damage.
- Holy Smite: Blasts her current target with holy magic.
- Mass Resurrection: Revives all fallen Scarlet troops in the room. Must be interrupted.
- Dominate Mind: Mind controls a player for 30 seconds. Interrupt this or lose control.
The second half of this fight is the real deal. She hits hard, and Mass Resurrection will flood the room with enemies if it’s not stopped. Dominate Mind is a wipe if it lands, especially on a tank or healer.
Use Bloodlust right after Whitemane revives Durand. That’s your burn window. You’ll be fighting both bosses at once, and things get rough. Keep them together for cleave damage. Assign interrupts to both Mass Resurrection and Dominate Mind.
Don’t rely on random interrupts or panic kicks. If you miss even one, your run is probably done. This fight is long. It chews up more than three minutes of your timer. You need to enter with at least six and a half minutes left to stay on pace for Gold. BLOG20
Scarlet Monastery Challenge Mode Strategy for Gold
Scarlet Monastery is a short and punishing dungeon. It’s packed with tight corridors, heavy-hitting trash, and bosses that punish every mistake. To earn a Gold Medal, your group needs strong single-target damage, clean interrupts, and well-timed cooldowns. Every second counts, and every pull needs to be planned. Here’s the best Scarlet Monastery Challenge Mode strategy for Gold in MoP Classic:
| Boss | Strategy |
| Thalnos the Soulrender | Thalnos summons adds nonstop, and if you let them pile up, they’ll ruin your run. His Evict Soul cast must be dispelled before it ticks. This fight is manageable if everyone focuses, but it gets out of hand fast if ignored. |
| Brother Korloff | This one’s a mobility check. His kicks hit hard, his fists cleave, and the fire on the ground can trap your group. Pull him when he’s between monk packs to avoid extra adds. He’s not a hard boss, but if your positioning slips, he’ll start burning people down. |
| High Inquisitor Whitemane | Whitemane and Durand are a big step up. This fight is long, it pulls the whole room, and any missed interrupt will set you back. Dominate Mind and Mass Resurrection can destroy your run if they go off. It’s a true stress test to close the dungeon. |
The biggest challenge isn’t a boss. It’s the trash. Judicators, Fanatics, Zealots, and Purifiers all have nasty abilities. If you don’t plan your stuns, interrupts, and skips well, you’ll waste time or worse, wipe. Most failed gold runs die here.
Scarlet Monastery is a simple layout, but a brutal race. The gold timer is tight, and there’s almost no room for mistakes. The best runs come from careful pulls, heavy boss damage, and knowing every enemy that’s coming next. The route is easy. Execution is not.
Browse our hottest MoP Classic Boosting services


Best Classes for Scarlet Monastery Challenge Mode
The dungeon is fast, full of nasty trash, and loaded with boss mechanics that punish slow reactions. The strongest classes bring strong interrupts, great mobility, and huge single-target damage. We’ve picked the best classes for Scarlet Monastery Challenge Mode in MoP Classic:
- Rogue: They bring two powerful tools that are game-changers here. First is Shroud of Concealment, which lets your group skip trash without wasting Invisibility Potions. Second, their Kick is one of the best interrupts in the game. Add in Smoke Bomb to control casters, and high single-target damage, and they’re a top choice.
- Paladin (Holy or Retribution): Paladins offer a bit of everything. Hammer of Justice is great for locking down dangerous enemies, and Cleanse removes key debuffs. Holy Paladins can deal damage while healing, and Retribution Paladins bring reliable single-target damage plus off-heals. Devotion Aura adds a safety net against heavy AoE.
- Warrior (Arms or Protection): Warriors are great at controlling trash and disrupting spellcasters. Disrupting Shout can silence multiple enemies at once, and Shockwave helps lock down large pulls. Protection Warriors are fast and mobile, making them ideal tanks for pulling big and moving quickly between fights.
- Death Knight (Unholy or Blood): DKs have strong control tools for this dungeon. Gorefiend’s Grasp helps group enemies up for AoE, and Control Undead is useful on some trash mobs like Frenzied Spirits. Blood DKs are solid tanks with huge self-healing, and Unholy offers great cleave on bosses and adds.
- Monk (Mistweaver or Brewmaster): Mistweaver brings solid healing with damage support, while Brewmaster makes a top-tier tank for this dungeon. Their Leg Sweep stun is great for locking down Judicators and Fanatics before they cause problems. Monk mobility also makes them fast at repositioning for kicks, interrupts, or line-of-sight pulls.
The answer to the question of how to win Scarlet Monastery in Challenge Mode MoP Classic is simple – know what you’re playing and have a reliable strategy. Any comp can earn Gold with enough practice, but these five classes make it smoother, faster, and much more forgiving. Bring interrupts, bring control, and damage.
Scarlet Monastery Challenge Mode Rewards
Finishing Scarlet Monastery Challenge Mode on Gold feels good, and it pays off, too. You don’t just get bragging rights – you unlock a unique reward that sticks with your character forever. Check out what Scarlet Monastery Challenge Mode rewards in MoP Classic await you:
That teleport is more than just a cool effect. It sends you straight to Scarlet Monastery from anywhere in the world, and it works every 8 hours. If you’re trying to improve your time or help friends, it saves you a long flight or run. Gold rewards aren’t just about cosmetics. They’re proof that you mastered one of the most precise, punishing dungeons in Mists of Pandaria Classic.
Scarlet Monastery Challenge Mode Tips
We’ve already covered the basic stuff many players know about. You’ve learned about the boss mechanics, abilities, and so on. But the little things matter too. Follow these Scarlet Monastery Challenge Mode tips in MoP Classic for an even smoother run:
- Use Symbiosis creatively for key spell swaps: If you’ve got a Druid and an Elemental Shaman, give Symbiosis to the Shaman. It grants them Solar Beam, which is huge for locking down caster packs. This helps control the rough trash after Thalnos without needing a second hard stun.
- Pull the Frenzied Spirits before Thalnos – not after: Don’t clear them after the boss. Instead, pull both sides early and stack them with Thalnos. Their damage ramps, but their speed slows. Use Vortexes, Typhoon, or slows to clump them, then blow everything up together for a fast and efficient pull.
- Let Earth Elemental tank a Judicator while your tank stays mobile: During the brutal triple-Judicator trash, have your Shaman pop Earth Elemental early. Let it tank one Judicator while your tank positions for the Leg Sweep. This keeps your stun rotation clean and prevents opening stuns from wrecking the group.
- Use fountain geometry to skip courtyard mobs: After Korloff, there’s a narrow safe path between monk packs into the final cathedral. Use the little corner by the fountain and the middle line of the staircase to aim your route. Stay exactly in the center, and you won’t pull a thing.
- Time your Heart of the Wild or Tree Form for post-sleep DPS: Whitemane sleeps the group before the final burn phase. Save your big healing or DPS cooldowns until after that. You’ll get full uptime with no wasted seconds, and that final push is where Gold runs often live or die.
Conclusion
This is the end of our Scarlet Monastery Challenge Mode guide for Mists of Pandaria Classic. As always, the bosses hit hard, the trash pulls get messy, and even one mistake can wreck a Gold run. But with smart routing, tight coordination, and just a little creativity, this dungeon becomes one of the most rewarding Challenge Modes to clear.
Use the strengths of your group, stick to a practiced path, and time your cooldowns where they count. Focus on smooth execution, not just damage meters. Scarlet Monastery can feel tight on time, but it is absolutely beatable with practice and teamwork.
F.A.Q.
How to get gold in Scarlet Monastery Challenge Mode in MoP Classic?
Clear all three bosses and 40 enemies in under 13 minutes without wipes or delays.
What are the Scarlet Monastery Challenge Mode bosses?
You’ll fight the following three bosses in Scarlet Monastery:
- Thalnos the Soulrender
- Brother Korloff
- High Inquisitor Whitemane
Where is Scarlet Monastery Challenge Mode in MoP Classic?
It’s in Tirisfal Glades at coordinates 85.0, 30.0 inside the main Scarlet Monastery building.
What is the best strategy for Scarlet Monastery Challenge Mode?
Plan a clean route, avoid unnecessary trash, use invis pots smartly, and master boss mechanics.
Is Scarlet Monastery Challenge Mode hard in Pandaria Classic?
It’s tight on time and punishes mistakes, but with solid practice it’s fully doable.


