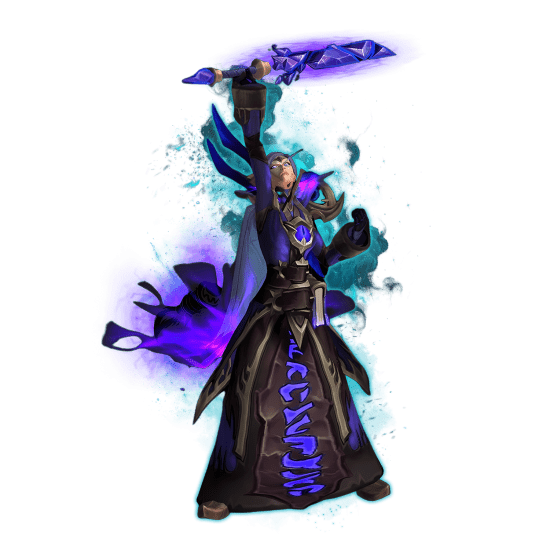
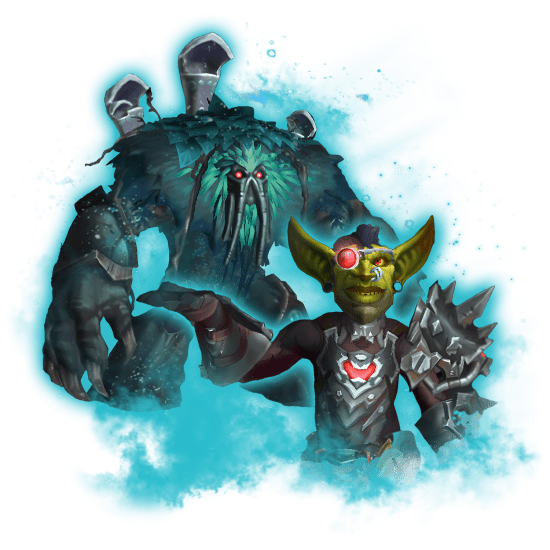
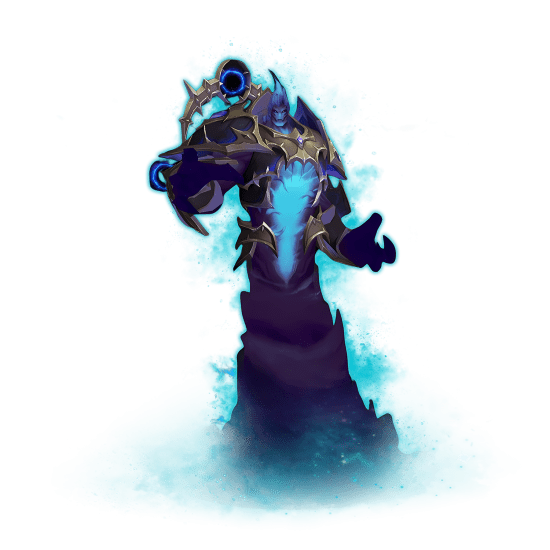
Fellow heroes, are you excited to test your skills in the brand-new Amirdrassil, the Dream’s Hope raid? We bet you are! There are 9 more powerful bosses for you to face off against off. Every one of them features unique and deadly mechanics you are to learn to play around and counter.
In this comprehensive Amirdrassil, the Dream’s Hope guide, we will delve into all the details you need to know about the main activity back in the 10.2.5 patch. Starting from the raid’s location and ending up with a detailed strategy to defeat every boss, we have you covered. On top of that, you will find information on what loot you can hope to get from this raid and so much more.
Before we delve into our Amirdrassil guide, if you are not sure you can defeat all the bosses by yourself or simply do not have enough time for this, you can count on us. At Skycoach, we are always ready to help you complete the most challenging in-game activities, including raids. Therefore, you can Buy Amirdrassil Raid Boost from our company and trust this job to our professional players. We offer the best market price and premium service!
IMPORTANT NOTE: At Skycoach, you can also Buy WoW Boost at the lowest prices and with the fastest delivery. You can make your first purchase even CHEAPER if you find our special PROMO CODE (highlighted in green) hidden in this article and get a 20% DISCOUNT.
Browse our hottest WoW Boosting services
What is the Amirdrassil, the Dream's Hope Raid?
We would like to start our WoW Amirdrassil, the Dream’s Hope guide by explaining what this fresh addition to the raid lineup represents. Within the lush confines of the Emerald Dream, a foreboding presence has emerged in the form of Fyrakk, fueled by malevolent ambitions and supported by the nefarious Zaqali Djaradin and rejuvenated Druids of the Flame.
The perilous outcome of Fyrakk's potential control over the World Tree, Amirdrassil, looms as a dark era of flames and pandemonium threatening to consume Azeroth. The responsibility to thwart his plans and rescue the world once more rests squarely on your shoulders!
All Amirdrassil, the Dream’s Hope Bosses Listed
As you can see, you have got a challenging task to overcome. After all, the safety of the entire Azeroth depends on you, hero! Before we get into details, explaining all the tactics and strategies, let us take a quick look at what Amirdrassil bosses are waiting for you in this raid:
- Gnarloot;
- Igira the Cruel;
- Volcoross;
- Council of Dreams;
- Larodar, Keeper of the Flame;
- Nymue, Weaver of the Cycle;
- Smolderon;
- Tindral Sageswift, Seer of the Flame;
- Fyrakk the Blazing.
Now that you have acquainted with all Amirdrassil, the Dream’s Hope bosses, it is high time to add a few words on what difficulty modes are available to players to complete this raid. As usual, you can choose between LFR, Normal, Heroic, and Mythic difficulties. Depending on what option you decide to go for, you can hope for higher-level rewards. However, we will talk about the possible loot later in our article. BLOG20
Where is Amirdrassil, the Dream’s Hope Raid
To access the raid, you will need to make your way to the Wellspring of Life. The nearest flight point can be found at the Wellspring Overlook, which is located on the northern side of the Emerald Dream zone, just across the Field of Flames.
Amirdrassil, the Dream’s Hope Boss Guides
You have already read a brief description of every one of the 9 mighty bosses you are going to encounter within the Amirdrassil raid. While your chances to gain the upper hand mainly depend on the difficulty level you choose, we still highly recommend that you group up with the most skillful players to throw out a challenge to Fyrakk the Blazing.
The following part of the article is devoted to Amirdrassil, the Dream’s Hope boss guide where we provide you with a detailed description of every boss encounter you can find in this raid.
Gnarloot
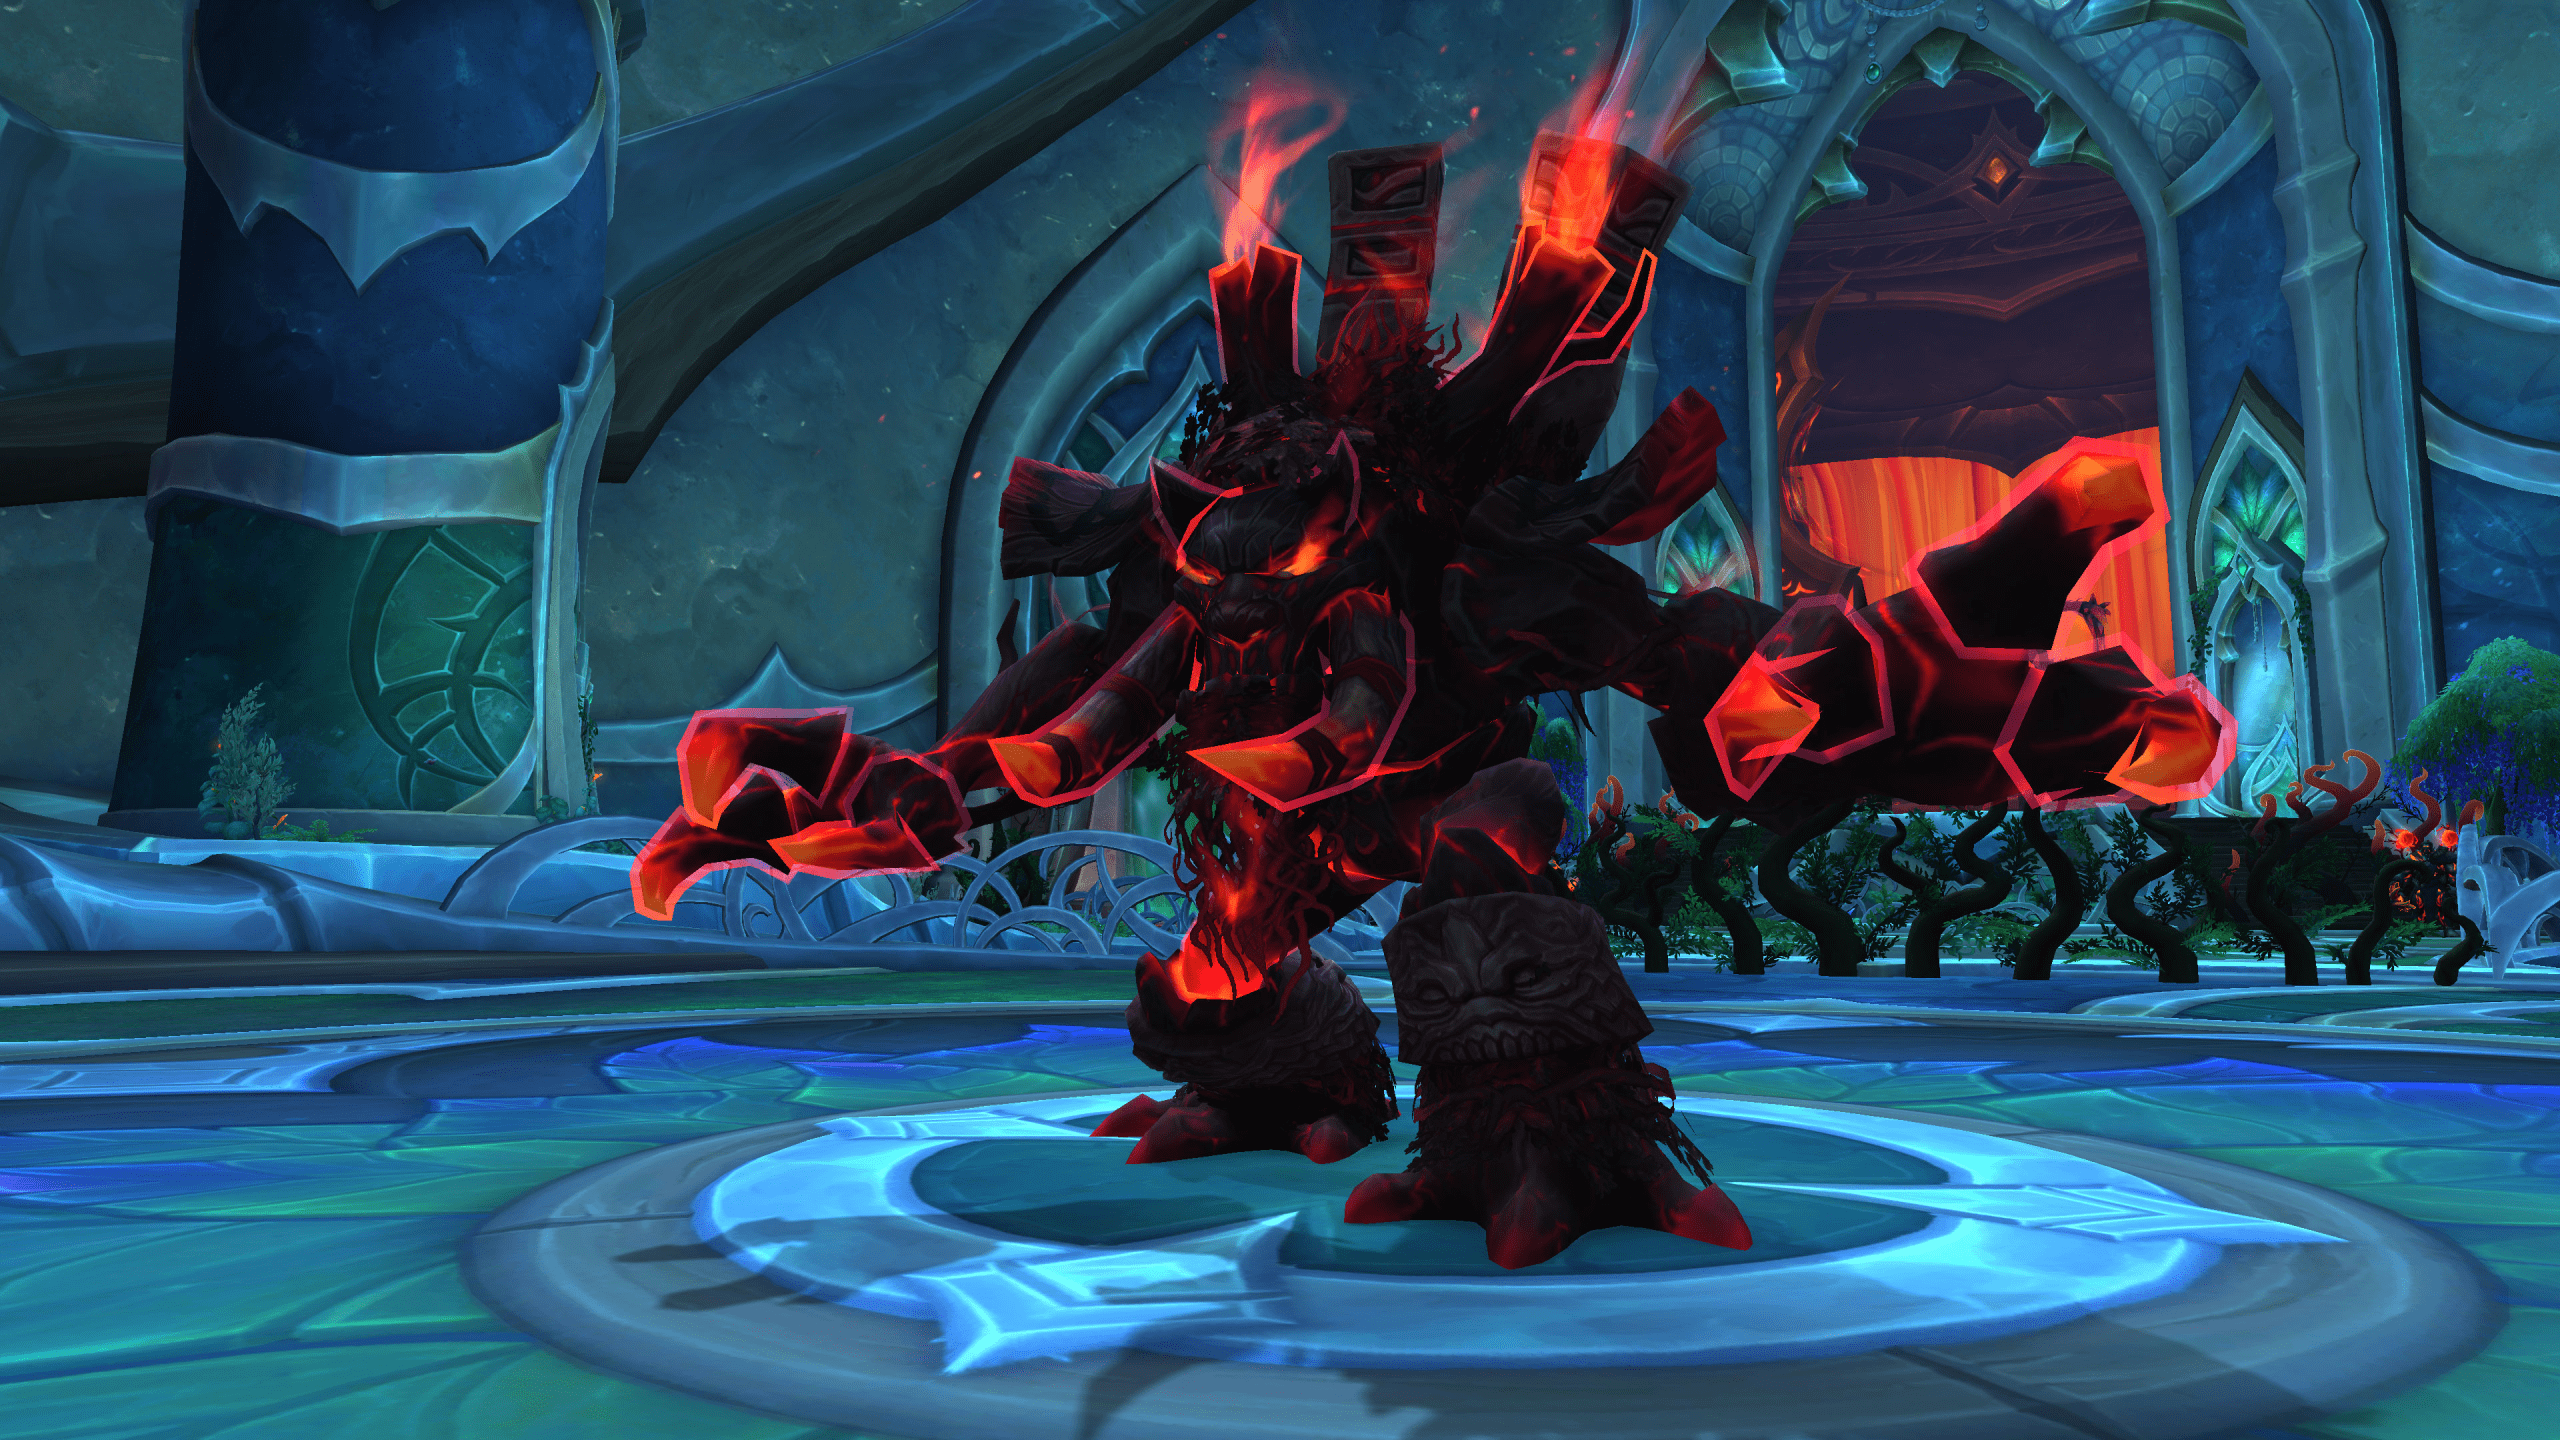
Once a stalwart guardian of the Emerald Dream, this former ancient has been ravaged by fire and now hungers solely for destruction. Looking at our Amirdrassil boss order, he acts as the first encounter in the raid. Gnarloot is relatively easy to defeat yet still poses a great threat to unprepared travelers.
The encounter represents a single-target fight with a ton of adds you need to deal with along the way. We recommend that you use the following Gnarloot raid setup when fighting this boss:
- 2 Tanks;
- 4 Healers;
- 14 DPS.
Gnarloot Abilities
| Tainted Lasher | While active, those adds significantly increase damage you take while also applying DoTs and Bleeds to everyone they hit. |
|---|---|
| Flaming Pestilence | Unleashes four swirling beams, and any player struck by these beams will suffer moderate damage. Furthermore, each beam has the potential to spawn several initially dormant Tainted Lasher adds. |
| Controlled Burn |
Four players will be singled out with sizable circles that deal minor continuous damage to any nearby players. After a brief 6-second countdown, these marked players will detonate, leaving hazardous puddles on the ground. Additionally, upon detonation, they will awaken any Tainted Lasher adds they come into contact with. |
| Dreadfire Barrage | Acts as a usual Tank swap mechanic. |
| Tortured Scream | An inescapable AoE attack that inflicts a moderate amount of damage to the entire raid over a span of 10 seconds. |
| Shadowflame Cleave | Acts as a frontal attack, dealing a ton of damage to players hit. |
Gnarloot Strategy & Tactics
As we have already in our Amirdrassil, the Dream’s Hope raid guide before, Gnarloot can be considered a relatively easy encounter to get through. However, the entire fight consists of two stages:
- Fighting Phase;
- Intermission.
Starting with the Fighting Phase, the first thing you want to do is not stand together and split up around the boss to take the strategic positioning from the very beginning. This will help you deal with the Controlled Burn ability, which is triggered quite often.
Do remember that you want to keep Hero/Lust until you get to the conclusion of the Intermission part. This is necessary to ensure you get the maximum value out of the 100% damage boost against the boss.
During this stage, your main goal is to evade all swirling mechanics and the frontal attack, and position the four Controlled Burn circles on the dormant Lasher adds. Missing a few circles isn't a major concern, but ensuring you hit all of them will significantly aid healers during the intermission phase.
Continuing the fight, you will inevitably come to the Intermission Phase. You can realize it is starting when the boss is casting Potent Fertilization. The latter will make him immune to any damage type. This is also the moment when all dormant adds become active and your task is to get rid of them ASAP.
Enormous roots will emerge in the vicinity of the boss, requiring prompt elimination. To achieve this, players must absorb the Splintering Charcoal circles and then make contact with the roots. Once the burning process commences, transition to the next section of the root until your Ember-Charred debuff dissipates. Continue executing the Soak & Burn combination until every root has been eradicated.
- Healer Tip: Remain vigilant during this phase, as there is an ongoing, incremental damage effect affecting the entire raid. This damage can rapidly intensify if certain circles are left unsoaked.
Getting rid of the roots will make Gnarloot take 100% increased damage for as many as 20 seconds. Ensure that all of your cooldowns are primed and ready, and unleash your full firepower when the boss is in this heightened susceptibility phase.
Additionally, it is crucial to note that after each intermission, the boss's damage output will increase by 10%. Be prepared to adapt to this escalating threat. After every intermission is over, the fight continues as before.
Igira the Cruel
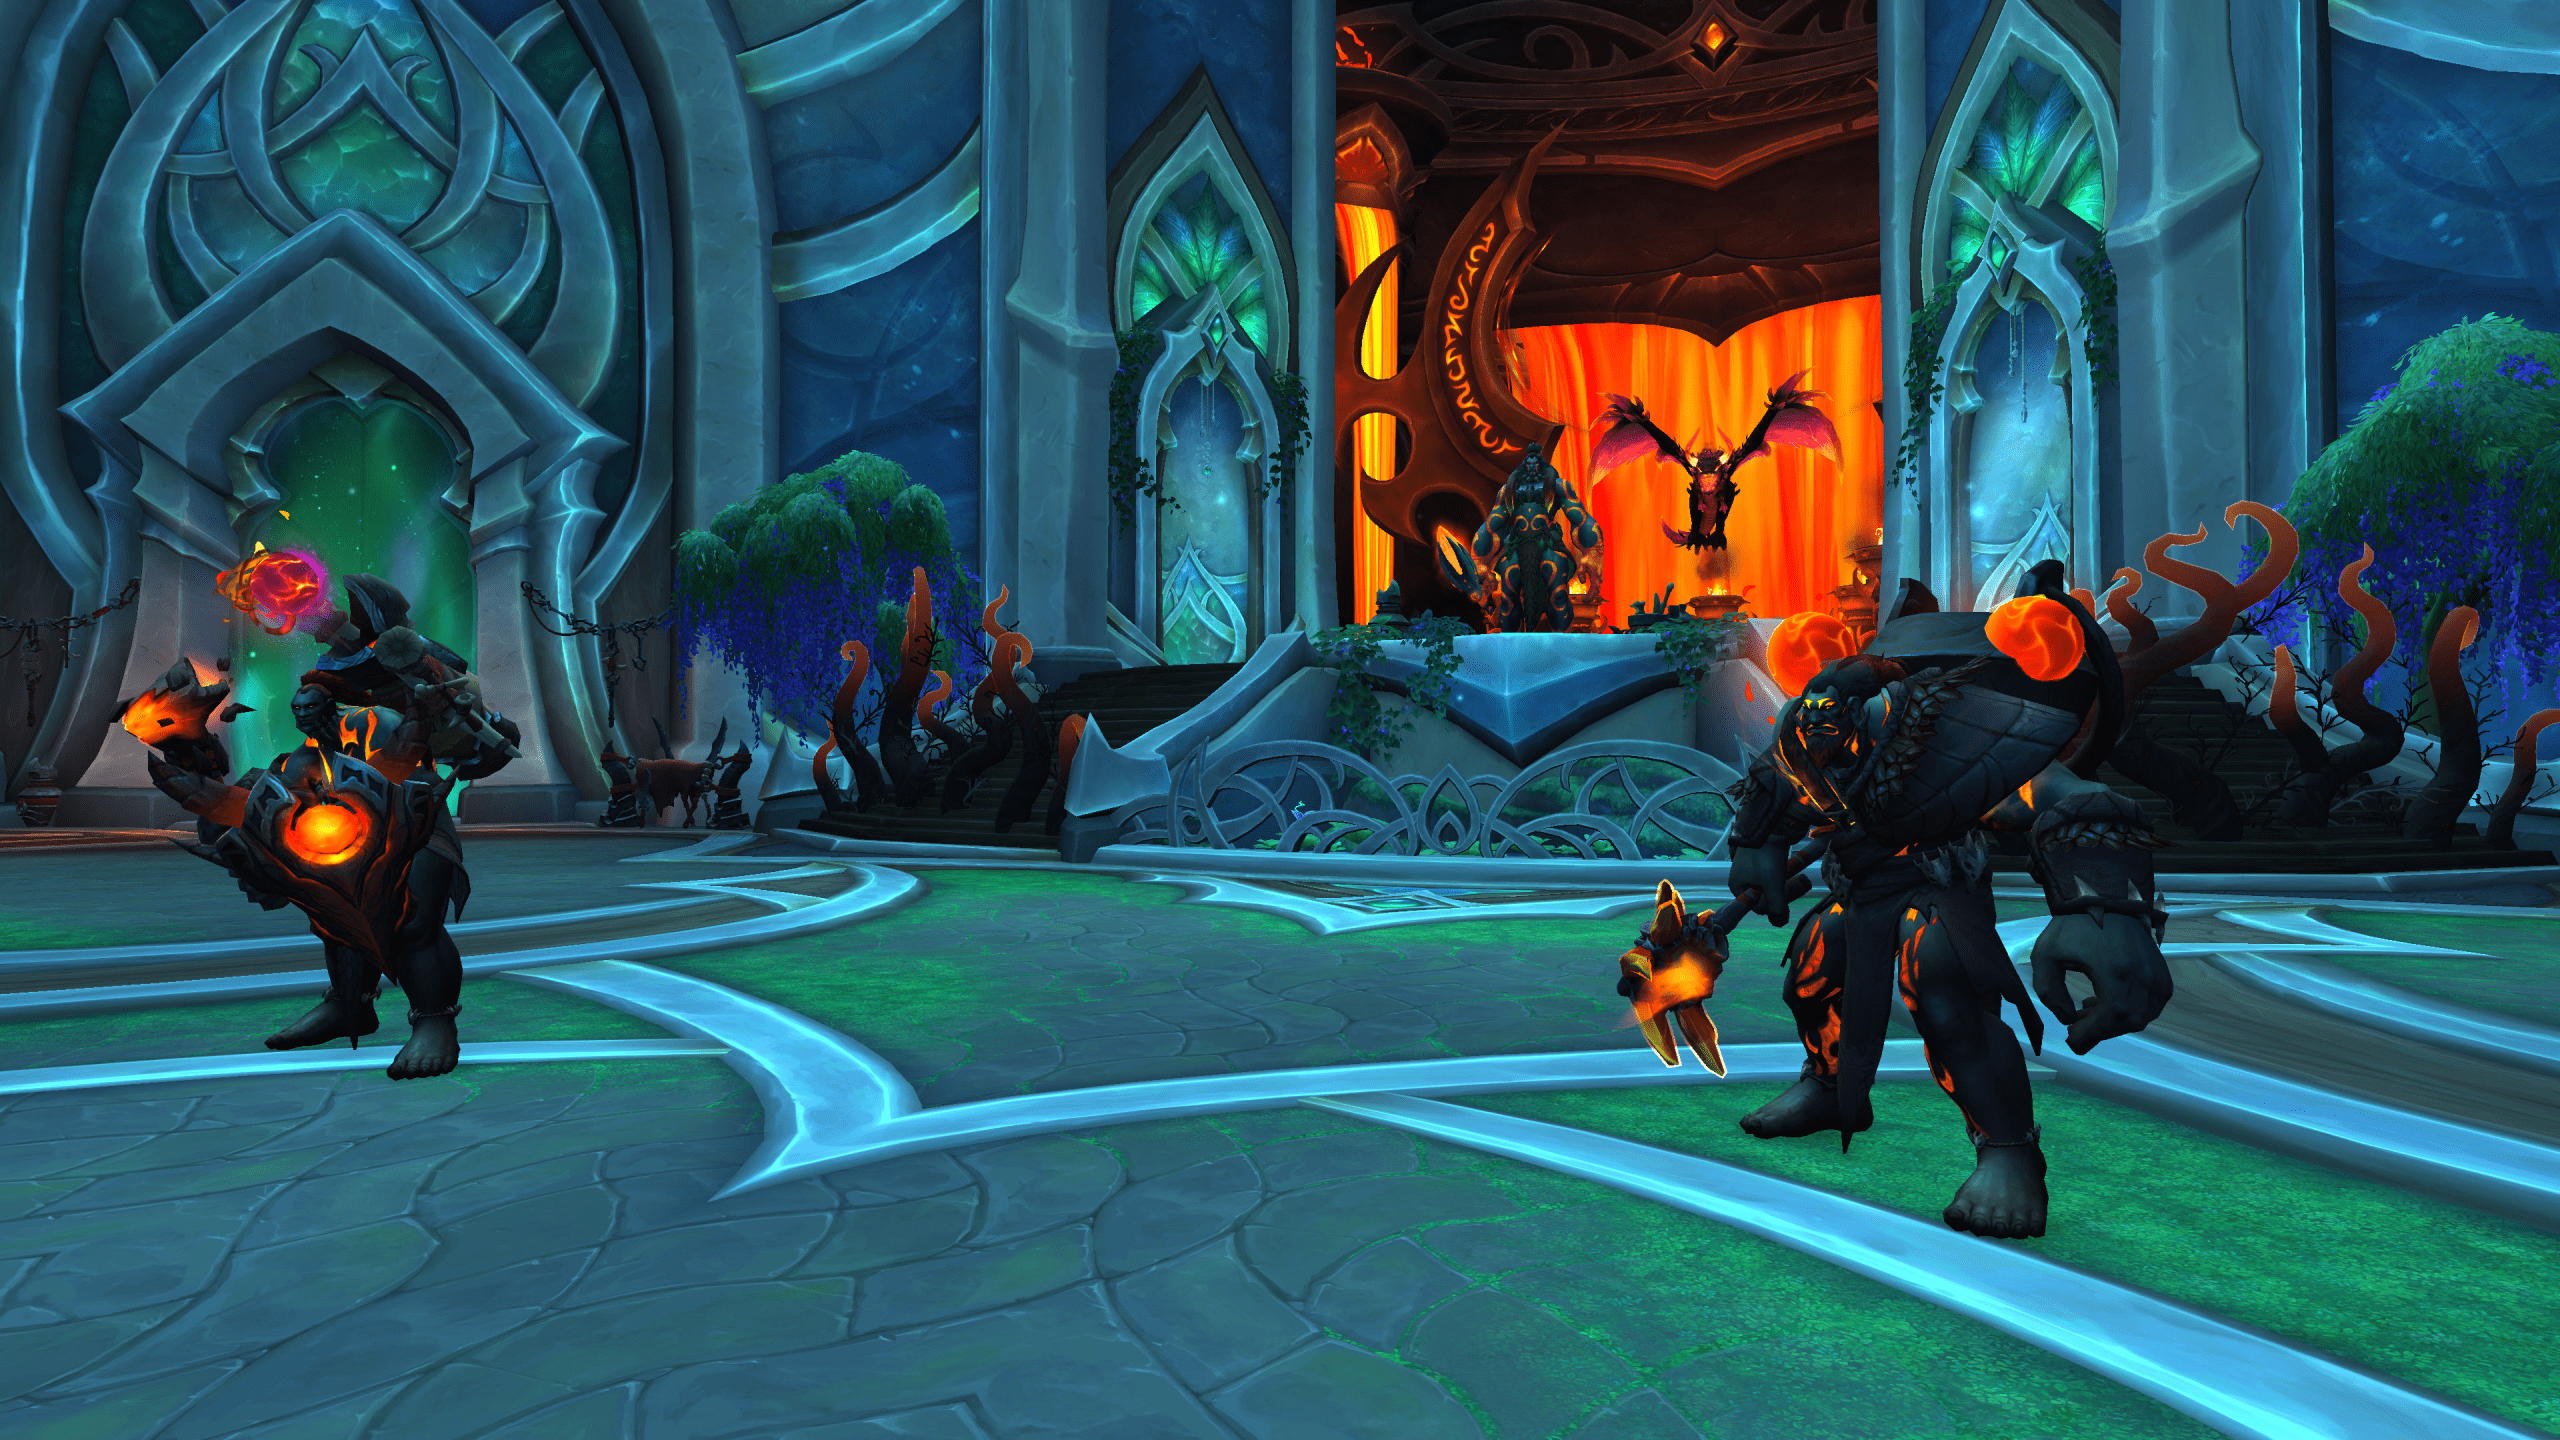
Fueled by a sadistic nature, Igria possesses the uncanny ability to craft formidable weaponry using the agonized screams of her foes. Within the lush confines of the Emerald Dream, this tormentor strives to broaden her arsenal.
Adding a few words on Amirdrassil, the Dream’s Hope strategy and Igira specifically, you want to keep in mind this is a single-target fight. The main threats during this encounter are DoT and Cleave abilities. That is why having Priest’s Mass Dispel can help you greatly throughout the battle. We recommend that you use the following Igira the Cruel raid setup when fighting this boss:
- 2 Tanks;
- 4 Healers;
- 14 DPS.
Igira the Cruel Abilities
| Shared Agony | Targets the nearest player in proximity to the active tank, ideally the off tank. However, in the absence of nearby players, it will strike the current tank, but with increased intensity. |
|---|---|
| Blistering Spear | A group of players will be marked with sizable circles that detonate, inflicting moderate damage and leaving hazardous puddles upon impact. The marked player is also tethered and drawn towards the puddle until the Spear is shattered. |
| Twisting Blade | Igira targets a random player, directing three blades in their direction. Each blade inflicts moderate damage upon impact with any affected players, but they are relatively easy to evade. |
| Marked for Torment – Intermission |
Igira forcibly pushes players away while designating three weapons. Before the intermission concludes, it is imperative that players thoroughly absorb at least one of these weapons; otherwise, the boss will trigger a raid wipe. Should players position themselves within one of the weapon circles, they will gradually diminish its size. The rate of reduction varies depending on the number of players inside. Additionally, those who participate in soaking will acquire a debuff that heightens the damage received from future soaking attempts. |
| Hacking Torment | This ability designates a circle on the active tank, necessitating soaking to distribute the incoming damage. Upon activation, all players within the circle will become stunned for a duration of 10 seconds, while those positioned outside will sustain a moderate and continuous DoT effect. |
| Slicing Torment | Swiftly teleports to various players' positions, inflicting substantial damage and emitting shadowy waves that similarly deal a significant amount of damage upon impact. |
| Flaying Torment | Imposes an absorb effect on all players, which detonates and inflicts moderate damage if not promptly dispelled. However, if the absorb is successfully removed, the affected player will release several shadow orbs that deal moderate damage to anyone struck by them. |
| Harvest of Screams | Following every intermission phase, the boss's damage output will escalate by 10%. |
Igira the Cruel Strategy & Tactics
This part of Amirdrassil, the Dream’s Hope tactics is a bit tricky, as you need to divide your raid into 3 groups and assign people to a specific weapon. While you can try your own combinations, we highly recommend that you stick to the following order when soaking the weapons:
- Slicing;
- Flaying;
- Hacking.
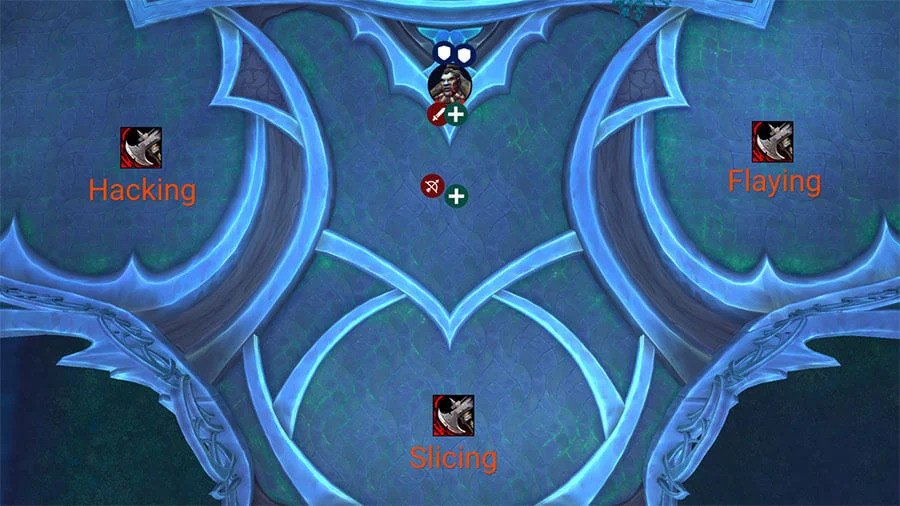
During the Fighting Phase, you are to deal with Shared Agony to avoid random deaths. It is also essential to get rid of Blistering Spear ASAP while placing the circles close to the boss. This will let you have additional cleave damage. Finally, be aware of Twisting Blade, as they can deal devastating damage if not dodged.
Also, watch out for the boss’s energy bar, as once it reaches 100, the Intermission Phase will commence. Here is our Amirdarssil, the Dream’s Hope quick guide specifically for this part of the battle. During this stage, ensure a group of people assigned to Slicing, for example, start running to the weapon to soak it.
The designated group should huddle closely and move collectively in a single direction within the shrinking weapon's circle, all the while avoiding the hazardous puddles. Depending on what difficulty you are playing, it could prove beneficial to assign a player with magical immunity to each group. This precaution ensures that soaking can continue even if the entire circle becomes inundated with puddles.
Once the Intermission Phase is over, prepare to witness and counter the boss’s new ability. The latter hinges on the weapon you soaked last:
- Slicing
The boss will leap to the locations of a couple of players (2 in total), and your primary task is to skillfully evade this maneuver. Exercise caution when the boss returns, as there's still a risk of getting struck by Shared Agony during this phase.
- Flaying
When you are targeted with a heart symbol above your head, the strategy is straightforward: gather closely behind the boss and activate your healing cooldowns. This approach ensures that once the absorb effect dissipates, all players will simultaneously propel the orbs away from themselves, and the tight stacking prevents anyone from being struck by the orbs.
- Hacking
It's advisable to assign players with immunity and stun-removal abilities to assist in soaking the tank circle, followed by a Mass Dispel. This strategy effectively minimizes the number of debuffs afflicting the raid and mitigates the damage incurred from the tank circle.
Browse our hottest WoW Boosting services
Volcoross
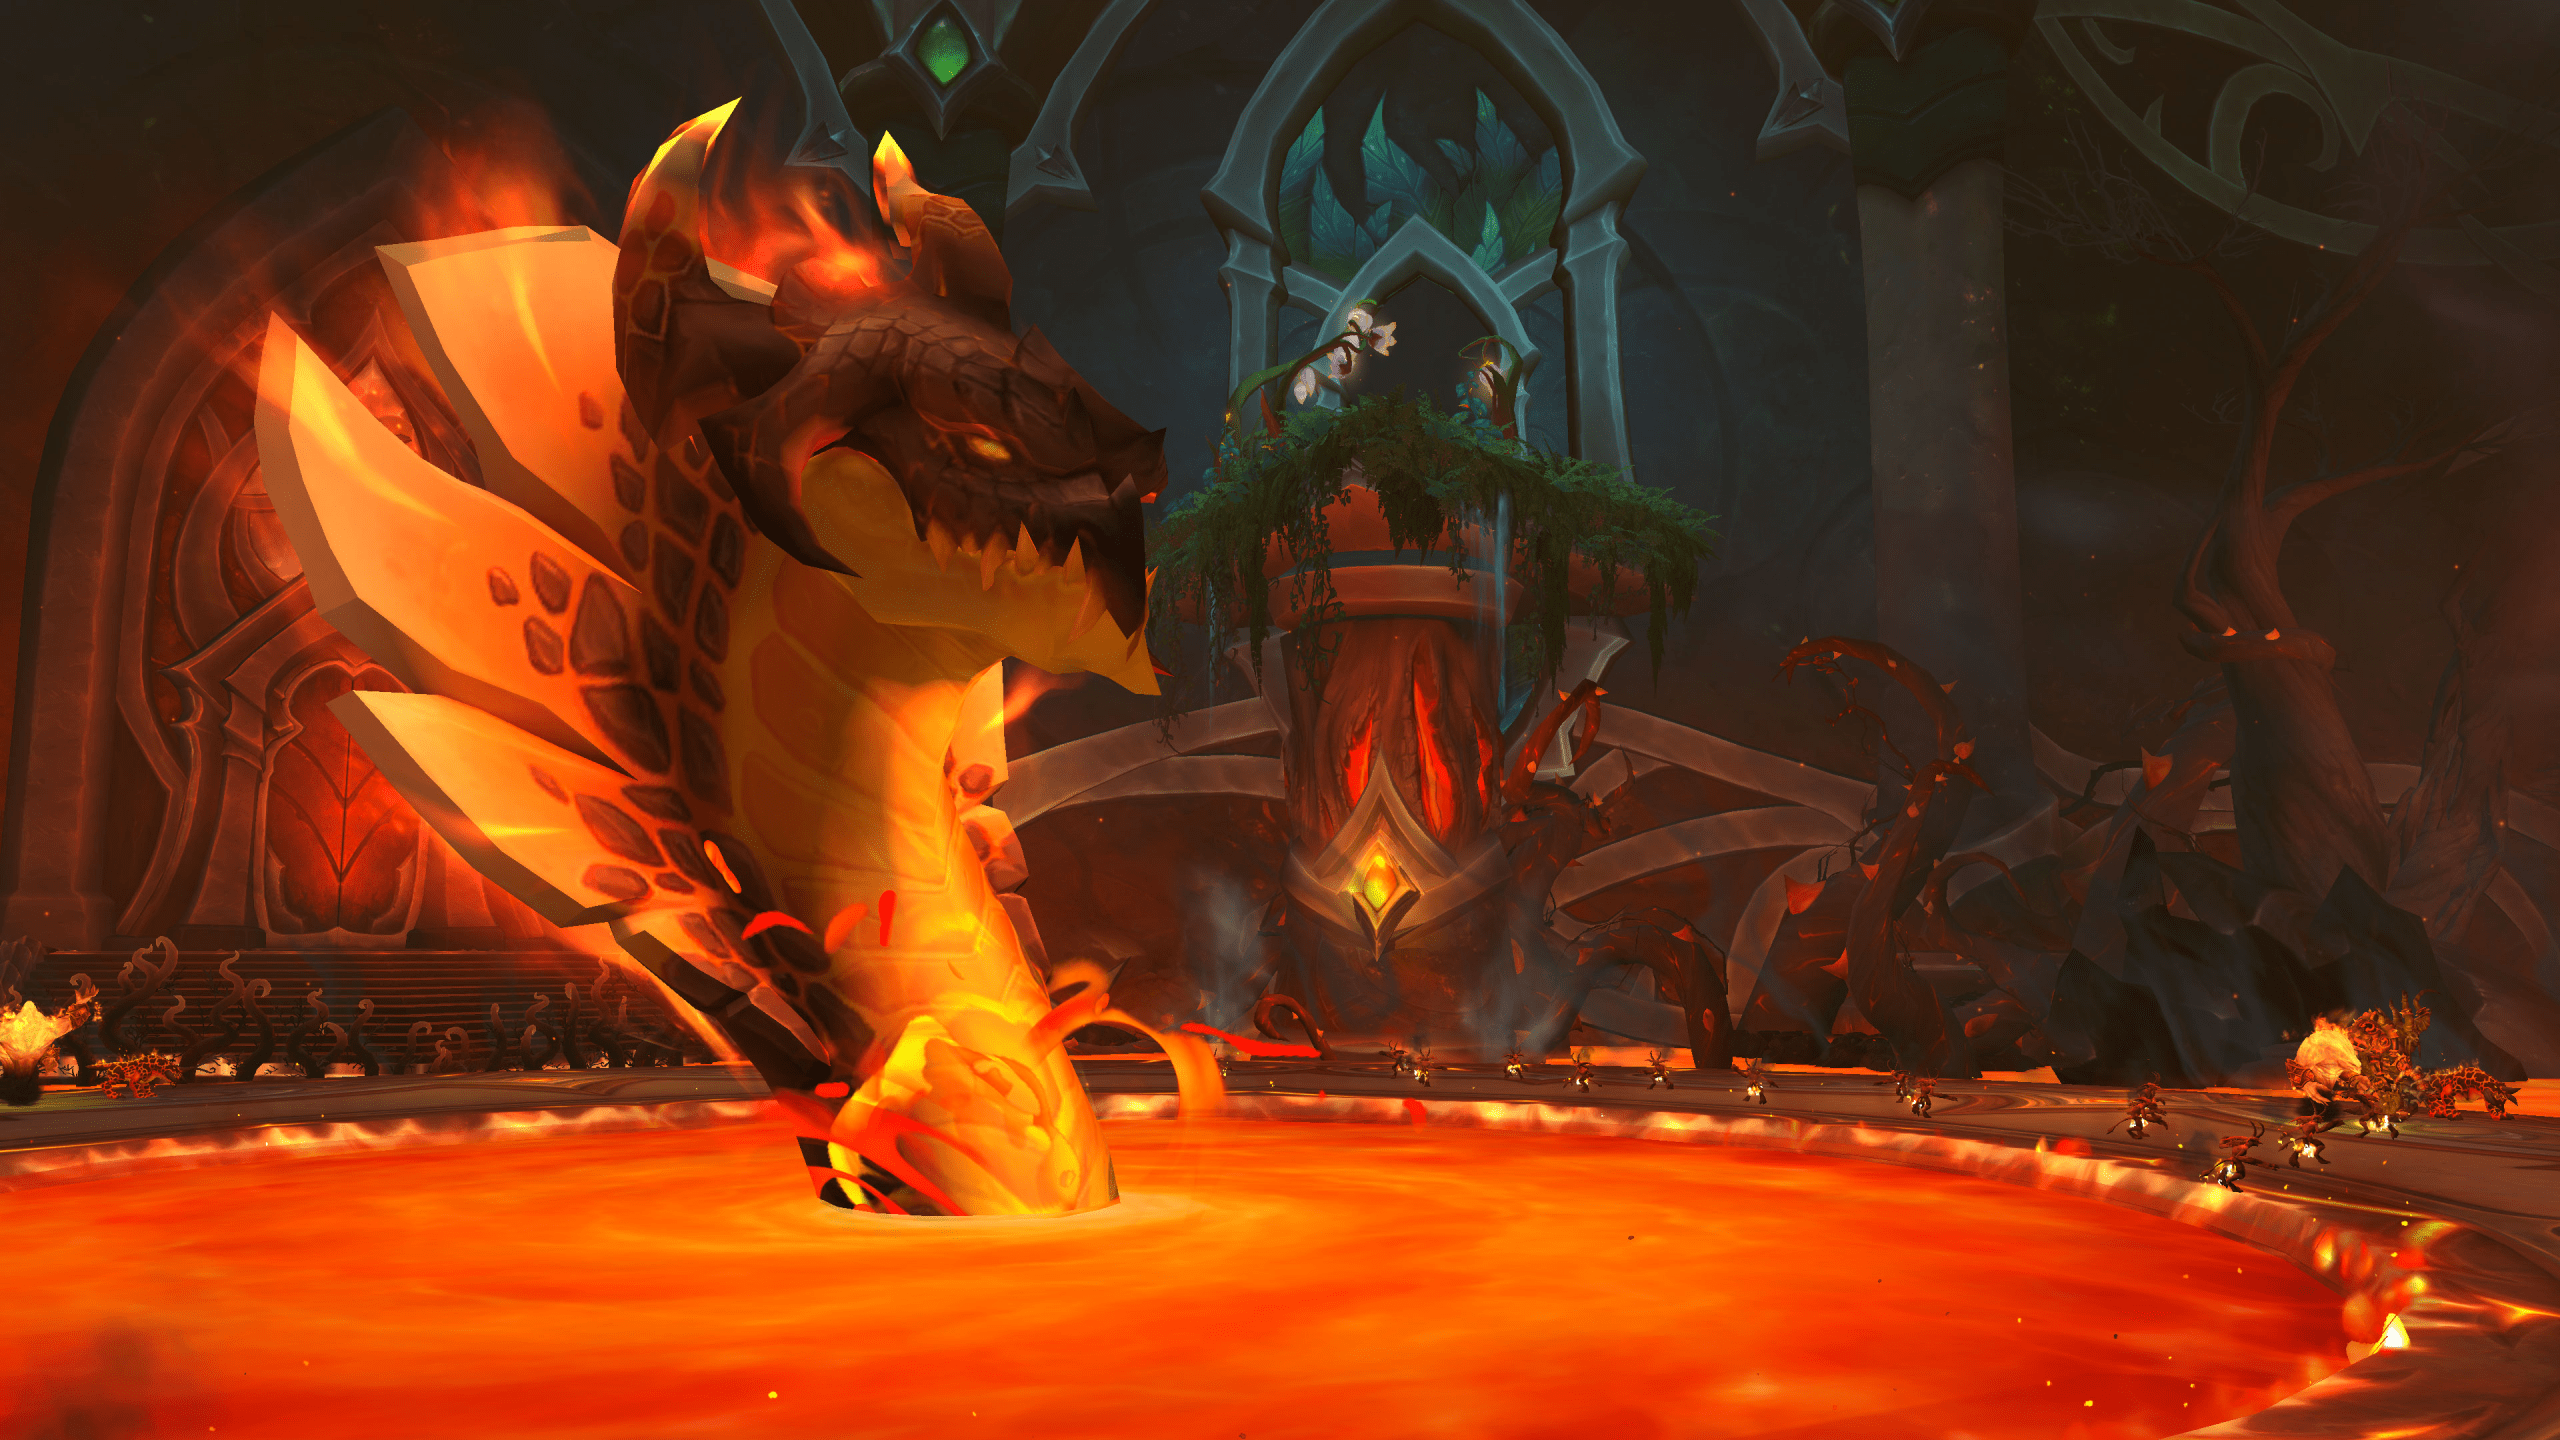
Legend has it that Volcoross, the colossal lava serpent, spans such immense proportions that no creature has ever endured long enough to witness his complete form. This gargantuan serpent now encircles itself around the very heart of the Emerald Dream, poised to consume it entirely.
The encounter acts as a single-target fight. To ensure you gain the upper hand, we recommend that you use the following Volcoross raid setup when facing off against him:
- 2 Tanks;
- 4 Healers;
- 14 DPS.
Volcoross Abilities
| Serpent's Fury | Emits unavoidable beams directed at each player, dealing moderate damage every 0.5 seconds over a duration of 5 seconds. Additionally, several players will be impacted by Coiling Flames. |
|---|---|
| Coiling Flames | Affects multiple players with circles that deal minimal damage to anyone within them. However, as the circles shrink, the damage inflicted increases. These circles persist for 10 seconds before transitioning to a different target. |
| Flood of the Firelands | When the boss accumulates 100 energy, he immerses himself in the magma, unleashing two colossal globs of lava. These must be soaked by the entire raid to distribute the damage. If it does not hit a minimum of 4 players, it results in severe damage to the entire raid and blankets the entire area with Hellboil. |
| Hellboil | Magma-laden ground that imposes moderate damage upon those within its vicinity. If it engulfs the entire arena, it triggers an enrage effect. |
| Volcanic Disgorge | Swirling eruptions that deal significant damage if not successfully avoided. |
| Scorchtail Crash |
This menacing ability begins with a looming shadow casting over a specific area, often where several players are clustered. After a brief delay, the boss hammers his tail into that region, inflicting fatal damage on anyone caught in the impact zone. Furthermore, this shadow releases multiple magma blobs that must be deftly evaded, as they carry a potent punch, dealing high damage to anyone they strike. |
| Molten Venom | A DoT effect specifically targeting tanks, which also raises the damage taken from Cataclysm Jaws by 50%. Tanks should initiate a swap when they accumulate the second stack of this debuff for optimal management. |
| Cataclysm Jaws | A straightforward mechanic focused on the current tank, delivering a devastating blow of massive physical damage along with moderate fire damage. |
| Serpent's Wrath (Enrage) | Should the entire area become engulfed by Hellboil (magma coverage), the boss will activate his enrage ability, intensifying every 0.5 seconds and posing an imminent threat of rapidly wiping out the raid. |
| Combusting Rage (Soft Enrage) | In the absence of a target within melee range, the boss inflicts moderate damage upon the entire raid every second. |
Volcoross Strategy & Tactics
Unlike most of the other single-target fights, you have to split your raid into 2 equal groups. This is a must-have thing to do due to the boss’ Flood of the Firelands ability. You never know what side of the platform will be hit by it, and if you do not soak damage, Volcoross will get into an enraged state.
- Flood of the Firelands 1st Wave:
When Volcoross accumulates 100 energy, he submerges, causing two circles to appear near the raid's position. Here is the plan: Group 1 and Group 2 should step up to soak their designated circles while deploying some defensive abilities for added protection.
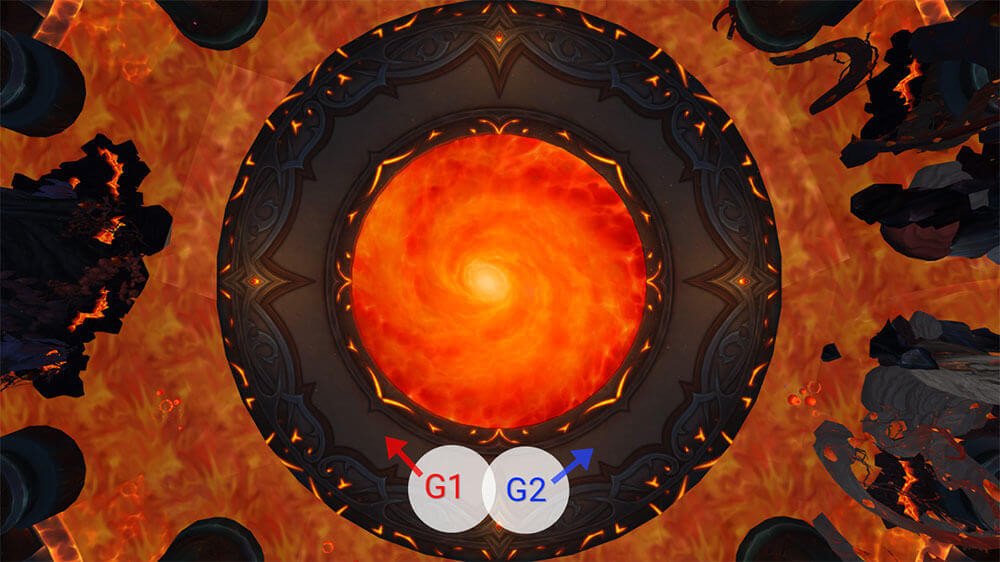
Once the soak is complete, each group should swiftly relocate to their assigned sides. The areas that were soaked will now be cloaked in searing magma.
- Flood of the Firelands 2nd Wave:
Upon the boss's second ascent to 100 energy, you will encounter a distinct challenge. Both soak locations will now be situated far apart from each other, owing to the lava covering the prior soak zone.
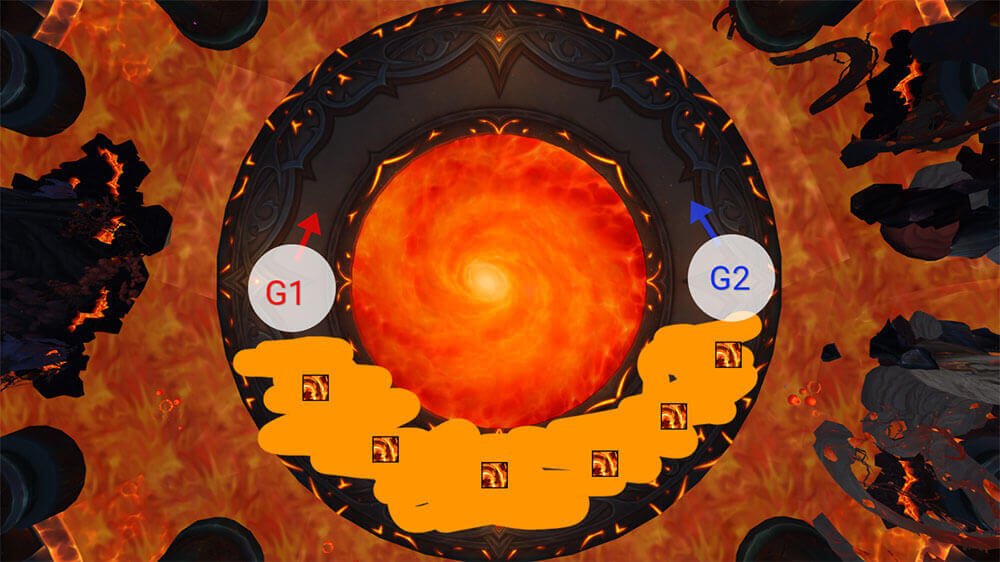
- Flood of the Firelands 3rd Wave:
Upon successfully completing this soak, the entire terrain will be blanketed in magma, thereby triggering Serpent's Wrath.
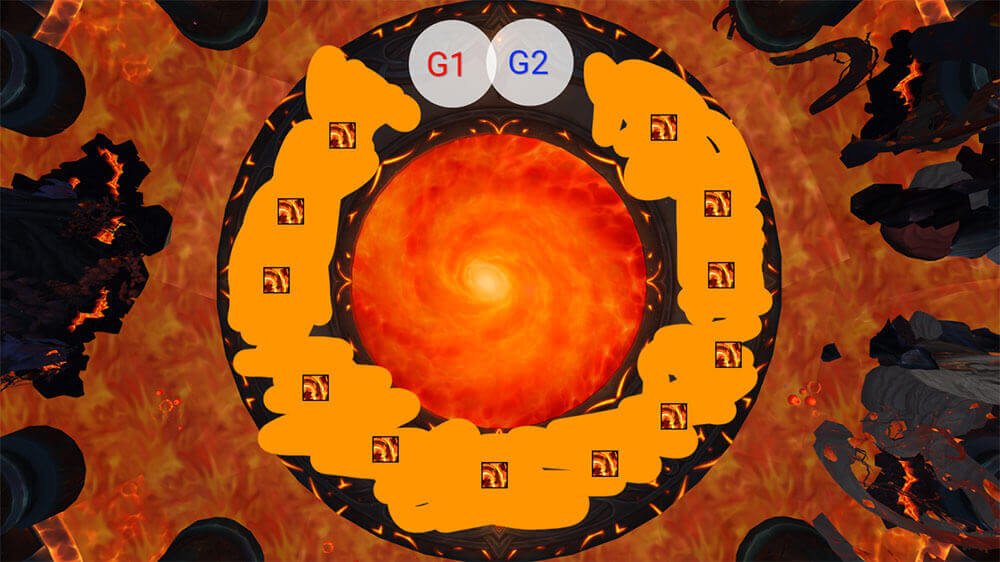
At this stage, your primary task remains soaking the two massive circles, but thereafter, it is a race to eliminate the boss, as the raid's survival window narrows considerably.
With the exception of this critical task, the majority of other abilities revolve around evading hazardous elements and avoiding circle impacts. It is crucial to underscore the importance of sidestepping the lethal shadows during Scorchtail Crash.
For healers, consistent vigilance during the Serpent's Fury cast is imperative, as it inflicts substantial damage to the entire raid over a 5-second duration while introducing additional circles.
Council of Dreams
The Council of Dreams stands resolute in their roles as protectors. Pip employs deadly cunning to bewilder his adversaries, Urctos relies on sheer strength to obliterate his foes, and Aerwynn harnesses her wisdom and craftiness to lead the council and shape the battlefield.
This encounter represents a three-boss fight where you will face off against Urctos, Aerwynn, and Pip. Each boss features unique abilities and requires you to counter them accordingly. Do remember that to kill Council of Dreams, you will need to defeat all three bosses simultaneously. To make your life easier, make sure you have enough DoT classes in your raid. In general, the Council of Dreams raid setup is pretty much standard:
- 2 Tanks;
- 4 Healers;
- 14 DPS.
Urctos Abilities
| Blind Rage |
When Urctos reaches 100 energy, he will unleash a minor raid-wide damage wave, which intensifies with each subsequent tick until successfully interrupted. If not disrupted within 20 seconds, he will enter an enraged state, causing his damage output to skyrocket by a staggering 500%, ultimately leading to a catastrophic wipe. This perilous ability can be interrupted by Pip's Polymorph Bomb. |
|---|---|
| Barreling Charge |
Urctos makes a furious charge towards the current tank, striking everyone in his path. Furthermore, he inflicts significant raid-wide damage, with the severity decreasing for each player he manages to hit during the charge. We strongly advise having at least 2 players in the path of each charge to mitigate the damage. Players struck by this charge must exercise caution for the next minute due to the Trampled debuff, avoiding any subsequent charges to maintain their safety. |
| Agonizing Claws | Urctos executes a frontal cleave targeting the present tank, delivering a substantial dose of damage. It is crucial to sidestep this attack and, following each cast, promptly initiate a tank swap to distribute the incoming damage effectively. |
Aerwynn Abilities
| Constricting Thicket |
When the boss’s energy reaches 100, she unleashes her entangling vines, causing gradual but minor sustained damage to all affected targets and impeding their movement speed by 10%. This slow effect escalates with each passing moment. If allowed to persist for 20 seconds without interruption, it leads to a total wipe, akin to Urctos' devastating ability. However, one can interrupt it by letting Urctos hit her with his charge. |
|---|---|
| Noxious Blossom | Beware of virulent green flowers that emit toxins; unless you possess protective shielding, like a duck or a personal protective bubble, it is best to steer clear of them. |
| Poisonous Javelin | Multiple players will be afflicted with a DoT effect, causing minor initial damage upon impact and then inflicting low damage every second over the course of 10 seconds. When this effect expires, it releases a moderate burst of damage to all those within a 10-yard radius. |
Pip Abilities
| Song of the Dragon | When Pip accumulates 100 energy, he initiates a mesmerizing song that envelops each player in a bubble. To dissolve this bubble, players must endure approximately 170k damage from the Green Toxic Flowers, typically requiring about 2 seconds of exposure to them. Failing to break the bubble within 20 seconds results in all affected players suffering moderate continuous damage and becoming stunned for 15 seconds. |
|---|---|
| Polymorph Bomb |
Affecting a random selection of players, this ability transforms them into ducks for a duration of 12 seconds. While in duck form, your available actions are limited to two abilities: Quack! for a speed boost and Preen for dispelling effects. To activate Preen, you must consume two flowers. Upon the expiration of your polymorph or when it's dispelled using Preen, anyone within a 7-yard radius will also undergo the transformation into a duck. Use this to your advantage to turn Urctos into a duck when you need to interrupt his Blind Rage to save your raid from being wiped. |
| Emerald Winds | Unleashes gusts of emerald-infused air that forcefully propel players backward, simultaneously inflicting moderate damage upon them. |
All three bosses have one ability in common - Rebirth. When bosses initiate the Rebirth spell at 1% HP, they can restore themselves to 50% health if the casting is successful. To prevent this, it is crucial to coordinate your efforts and bring all three bosses down to 1% health roughly simultaneously.
Council of Dreams Strategy & Tactics
The bosses maintain independent health pools, and only Urctos (Bear) can be relocated or tanked. Consequently, effective coordination and clear communication are essential to ensure all three bosses approach the 1% health mark in close proximity. To optimize your strategy, it is advisable NOT to make Urctos your primary target, as you will be able to him when dealing damage to other bosses for approximately 90% of the encounter duration. Therefore, consider commencing the fight with Hero/Lust focused on either Pip or Aerwynn.
Before the encounter begins, it is crucial to pre-assign a minimum of 6-8 individuals who will strategically position themselves for Urctos' Barreling Charge, with a rotation of 2 players for each charge. This approach effectively reduces the overall raid-wide damage. Other players can assist as well and may inadvertently become targets, but the key is to avoid consecutive hits by the same player. Melee characters are often the most suitable candidates for this role.
Lastly, ensure that your raid is appropriately pre-spread before initiating the encounter, as nearly every boss ability necessitates this positioning, such as dealing with Poisonous Javelin and duck circles, for instance.
NOTE: If there are no available flowers for consumption, your duck form will naturally dissipate after 12 seconds. It is imperative to ensure that no other players are in close proximity when this transformation ends.
While in duck form, you benefit from immunity to nature damage, rendering it unnecessary to evade the green circles.
Tanks must diligently position Urctos to face away from the rest of the group continuously, as his frontal attack can inflict fatal damage in a single blow!
During Heroic Council of Dreams encounters, bosses follow a predetermined energy order, with ample time intervals separating them:
- Urctos;
- Aerwynn;
- Pip.
As Urctos approaches 100 energy, duck players should strategize. If you have just transformed into a duck, refrain from immediately dispelling it. Instead, wait for Urctos' Blind Rage cast and then transform him into a goose. Melee and tank players should be mindful of the approaching duck, promptly moving away from Urctos until the coast is clear.
As Aerwynn nears 100 energy, your tank must be keenly aware of her placement. She initiates her cast, ensnaring all players with green vines. After that, it is followed by Barreling Charge from Urctos. With only one opportunity to hit the target, there is limited time to aim, and a missed shot will likely lead to a complete wipe.
As Pip approaches 100 energy, it is crucial for everyone to gather near nearby flowers. When you receive the bubble, promptly position yourself within the flowers until it dissipates. Ensure you are in good health before the Song of the Dragon cast begins, as you will have an enduring absorb shield and won't be able to receive healing until it vanishes.
Larodar, Keeper of the Flame
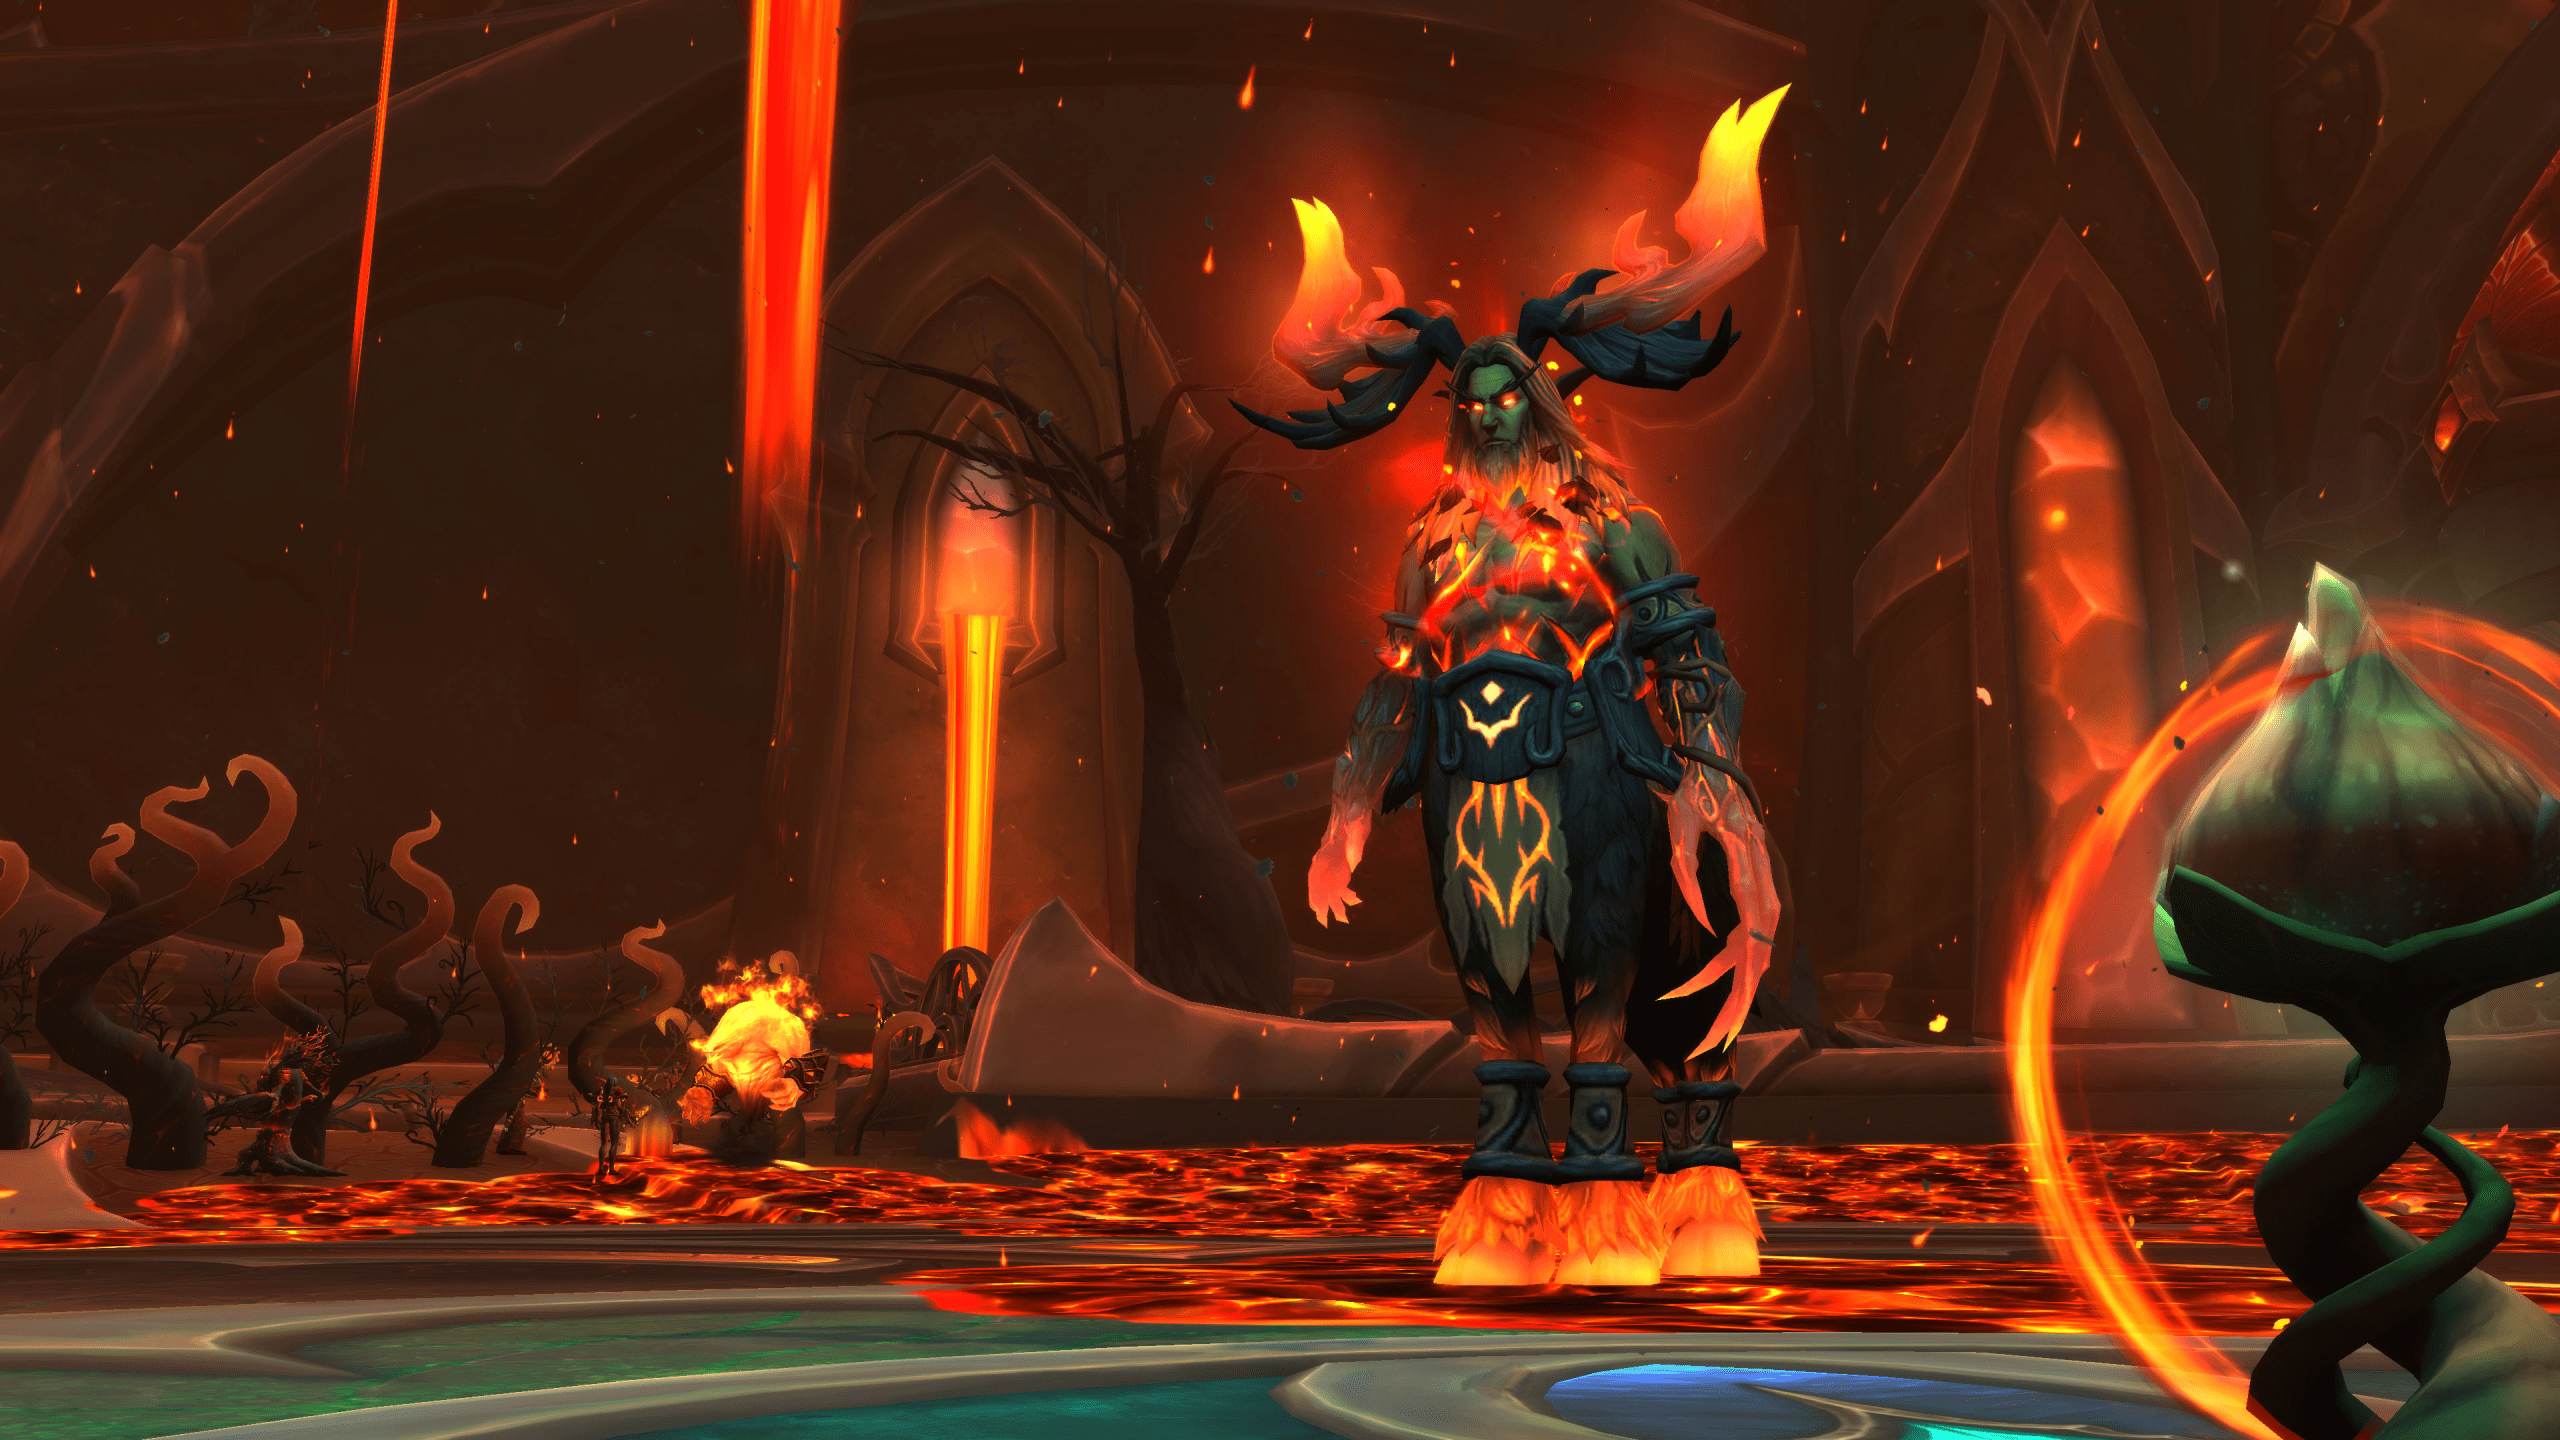
Continuing our Amirdrassil, the Dream’s Hope boss order, once a loyal guardian of the grove, Larodar succumbed to the corrupting influence of flames. Now, this warped protector is determined to lay waste to the Emerald Dream and anyone who dares to oppose his malevolent intent.
Despite being a single-target encounter, your healers will not have a single second to rest. This is a super demanding boss in terms of healing. Therefore, you might want to experiment with your party comps several times before succeeding in this battle. To ensure you have a higher chance of winning, we recommend that you use the following Larodar raid setup:
- 2 Tanks;
- 5 Healers;
- 13 DPS.
Larodar, Keeper of the Flame Abilities
The boss features different abilities, depending on what stage of the fight you are currently at. In total, there are 2 stages and the intermission between them.
- Phase 1
| Seed of Life | The central mechanic of the encounter revolves around a seed positioned in the middle of the room, which must be charged using Treants. Once it accumulates sufficient energy, the seed should be employed to eliminate the fiery puddles scattered throughout the room. |
|---|---|
| Treants |
Three Fiery Treants will emerge in proximity to the boss, and they should be tanked and dealt with. These Treants have the capacity to propagate extra fire puddles and initiate an interruptible ability named Fiery Flourish. Upon their defeat, they transform into Charred Treants that require healing to return to full health. Once healed, they will proceed towards the center of the room and initiate the process of charging the seed. Abilities like Life-Grip and Rescue can also be employed to expedite their relocation to the central area. |
| Scorching Roots |
Scorching Roots are small ground roots that select a random player to fixate upon. Getting struck by Scorching Roots inflicts damage and imposes a rooting effect on the player until it is dispelled. When these roots are defeated, they transform into Charred Bramble, akin to the Treants. They must be healed promptly before Larodar accumulates 100 energy, as failure to do so will result in a wipe. Once healed, the Charred Bramble changes into a Life-Tree, which reduces the damage received from Raging Inferno by 90%, but this damage reduction only applies when standing within the green circle it creates. |
| Furious Charge | The boss targets the current tank and charges them, dealing significant physical damage along with additional magic damage. The amount of damage taken is inversely proportional to the distance from the boss. The charge also inflicts substantial damage on the entire raid, but this damage can also be mitigated by maintaining a moderate distance, with around 15-20 yards being a suitable range during PTR testing. |
| Blazing Thorns | These are star-shaped, small swirls positioned around the boss that must be evaded. At the end of each line, a Blazing Coalescence orb materializes, which should be collected before reaching Larodar. Picking up these orbs inflicts minor damage to the player but provides a 20% boost in critical chance for 10 seconds. |
| Raging Inferno | At 100 energy, Larodar initiates the channeling of Raging Inferno for several seconds, causing fatal damage to anyone not within the Bramble Barrier (the green tree). |
| Combusting Presence | Inevitable raid-wide damage that intensifies with each successive Raging Inferno cast. |
| Burning Ground | Flaming pools that appear sporadically around the boss and the adds, which can be eradicated using Seed of Life. |
- Phase 2
| Falling Embers | Three small circles, each requiring one player to soak, or else they will inflict moderate raid-wide damage and confer a stack of Searing Ash to everyone. |
|---|---|
| Flash Fire | Multiple players receive a moderately strong absorb shield lasting 8 seconds. These shields must be healed before they expire. If they do expire, the affected player will detonate, causing minor damage to those within an 8-yard radius. Furthermore, it stuns the player for 20 seconds, but this effect can be removed with a dispel. |
| Fire Whirl | Numerous fire tornadoes traverse the area, requiring players to avoid them. |
| Smoldering Backdraft | A Tank frontal attack that must be evaded. Being struck by this attack results in a 100% reduction in healing received for 18 seconds and inflicts moderate damage over time. Nevertheless, affected players can leech health from allies within 6 yards. |
| Ashen Treant | Treants will appear throughout the room, leaving fire puddles in their wake as they move or perish. When defeated, they explode, causing moderate damage to anyone within a 3-yard radius. |
| Searing Ash | This is raid-wide damage that increases in intensity every 12 seconds. |
Larodar, Keeper of the Flame Strategy & Tactics
- General Strategy
This is a challenging encounter for healers, so it is a good idea to try different healing compositions. Having a Shadow Priest switch to Holy as the 5th or 6th healer can be quite valuable, as Guardian Spirit is an excellent spell to have in this fight.
Before diving into the detailed fight explanation, let's first focus on the Seed of Life mechanic. It is worth noting that the exact mechanics might be subject to change when the encounter goes live, and we will update the guide with accurate information.
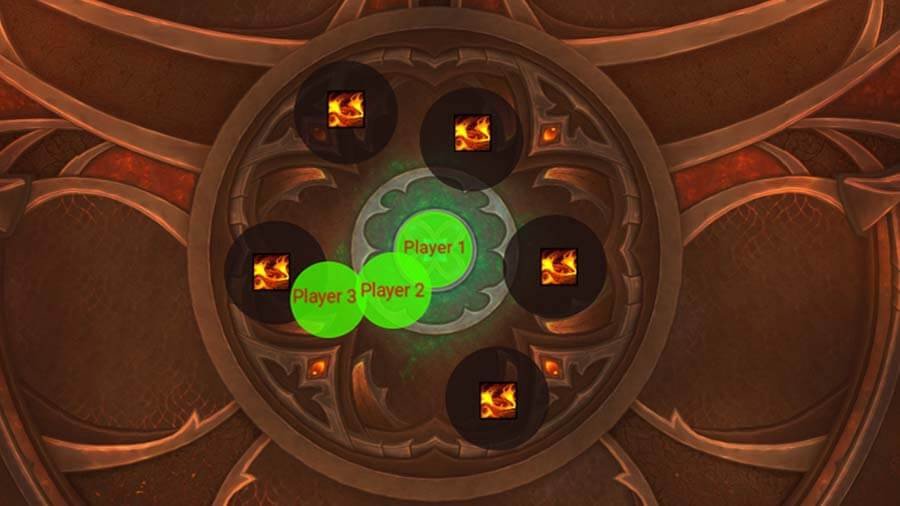
The seed can be activated at any point when it has more than 0 energy.
Player 1 should position themselves in the center of the room and activate the seed. This action will create a small green circle around Player 1. Any player passing through this green circle will transform into Player 2.
Now with two players possessing large green circles, it is crucial for these circles to remain in contact at all times to keep the link intact.
Player 2, who now holds the small circle, must be joined by another player running through it to become Player 3. Player 3 gains the ability to clear ground puddles by passing through them.
When all three players are connected, it is essential to maintain that connection. As you move across the map, all three players must travel in the same direction. The simplest approach is for Player 1 and Player 2 to follow Player 3 closely.
Note: The link can also be established if all three players activate the seed in the middle of the room.
- Phase 1
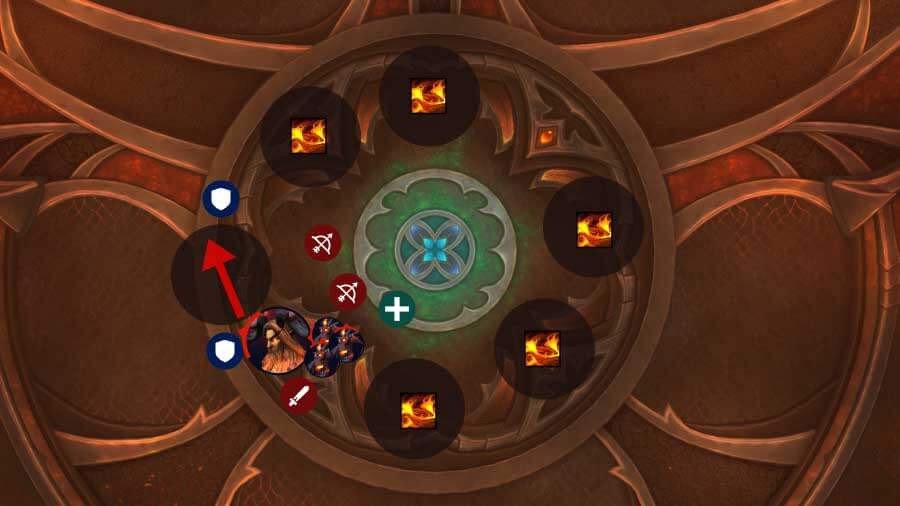
Commence the battle by positioning the boss in a corner amid the existing fire puddles, as there will be multiple fiery patches on the ground before the encounter begins.
The aim is to have the boss fill the gap with the Blazing Thorns cast, which results in additional fire puddles, and then he will charge the other tank, organically moving the raid to another "clear" area of the room. This setup also ensures there is ample distance for the charge to deal minimal damage. Remember to collect the orbs following each Blazing Thorns cast.
Fiery Treants will spawn shortly after the fight begins. Prioritize eliminating them as swiftly as possible.
In this battle, it is essential to prioritize handling adds and environmental hazards over the boss. Delaying the elimination of the adds can lead to greater difficulties managing fire puddles and surviving the Raging Inferno.
After the Fiery Treants are vanquished, it is crucial for healers to promptly heal them. You can utilize abilities like Life-Grip and Rescue to reposition them in the middle of the room, as these walking trees tend to be rather sluggish. When they are fully healed and stationed in the center, they will channel their energy into the Seed of Life.
Assign three groups of three players, preferably ranged, to handle the Seed. You can initiate the ritual when the seed has around 10 energy, which is nearly instant. There's no need for specific energy management; focus on channeling as much as possible. This approach will help clear most of the area of fire puddles, providing more space to survive the intermission.
Around 30 Boss energy, Scorching Roots will emerge and lock onto a player. Swiftly eliminate these roots to grant healers ample time to restore their health before the Raging Inferno cast at 100 energy.
The roots possess a substantial amount of health that requires healing. Assign healer cooldowns such as Guardian Spirit, Ascendance, or similar abilities that offer potent spot healing.
When Larodar's energy reaches 100, it is imperative for everyone to stand inside the green circle to withstand the Raging Inferno. Although you will still sustain significant damage, be sure to employ personal defensive abilities and raid-wide cooldowns.
Phase 1 will continue to repeat until you reach 40% boss health or experience the 3rd Raging Inferno cast. It is important to note that each iteration of Phase 1 inflicts more damage than the previous one, thanks to the increasing Combusting Presence stacks.
PRO TIP: Try to lower Larodar's health to 41% and then cease your damage output until he initiates the Raging Inferno cast. Resume your assault midway through the cast, ensuring that he completes his Raging Inferno and falls under 40% health, effectively providing a free percentage gain.
- Intermission
Everything unfolds rapidly during this phase, making it one of the swiftest Intermissions in recent memory. The moment you notice that the intermission has been initiated, disperse promptly and deploy defensives and raid cooldowns.
Be ready to evade any fire puddles heading towards Larodar, and ensure that no one is positioned within 3 yards of your location.
When the channel concludes, Phase 2 will commence.
- Phase 2
Ensure that all your damage cooldowns are readily available, as you will initiate the encounter with Heroism/Bloodlust and unleash your firepower on the boss.
Early in Phase 2, three Falling Embers will appear, each of which must be soaked by a single player.
Furthermore, several players will receive an Absorb Shield called Flash Fire. It is crucial to heal them before they explode, which occurs after 8 seconds.
Ashen Treants will advance toward Larodar from the sides. Ranged players should switch to these treants, as they detonate within a 3-yard radius. Thus, stacking them on top of the boss may not be the best strategy, particularly if you have melee players. You also have the option to crowd-control some of these adds.
Dodge tornadoes and the frontal cone attack. If the tank is struck by the frontal attack, they should move into the melee stack to leech health from them.
In essence, Phase 2 is a burn phase where your primary concerns are hitting soak targets and ensuring that healers can manage the absorb shield. The adds themselves do not pose a significant threat, and even if they reach melee, you can monitor their health and step away when they are close to death. The soft enrage via Searing Ash can be mitigated by adding extra healers to the group.
Nymue, Weaver of the Cycle
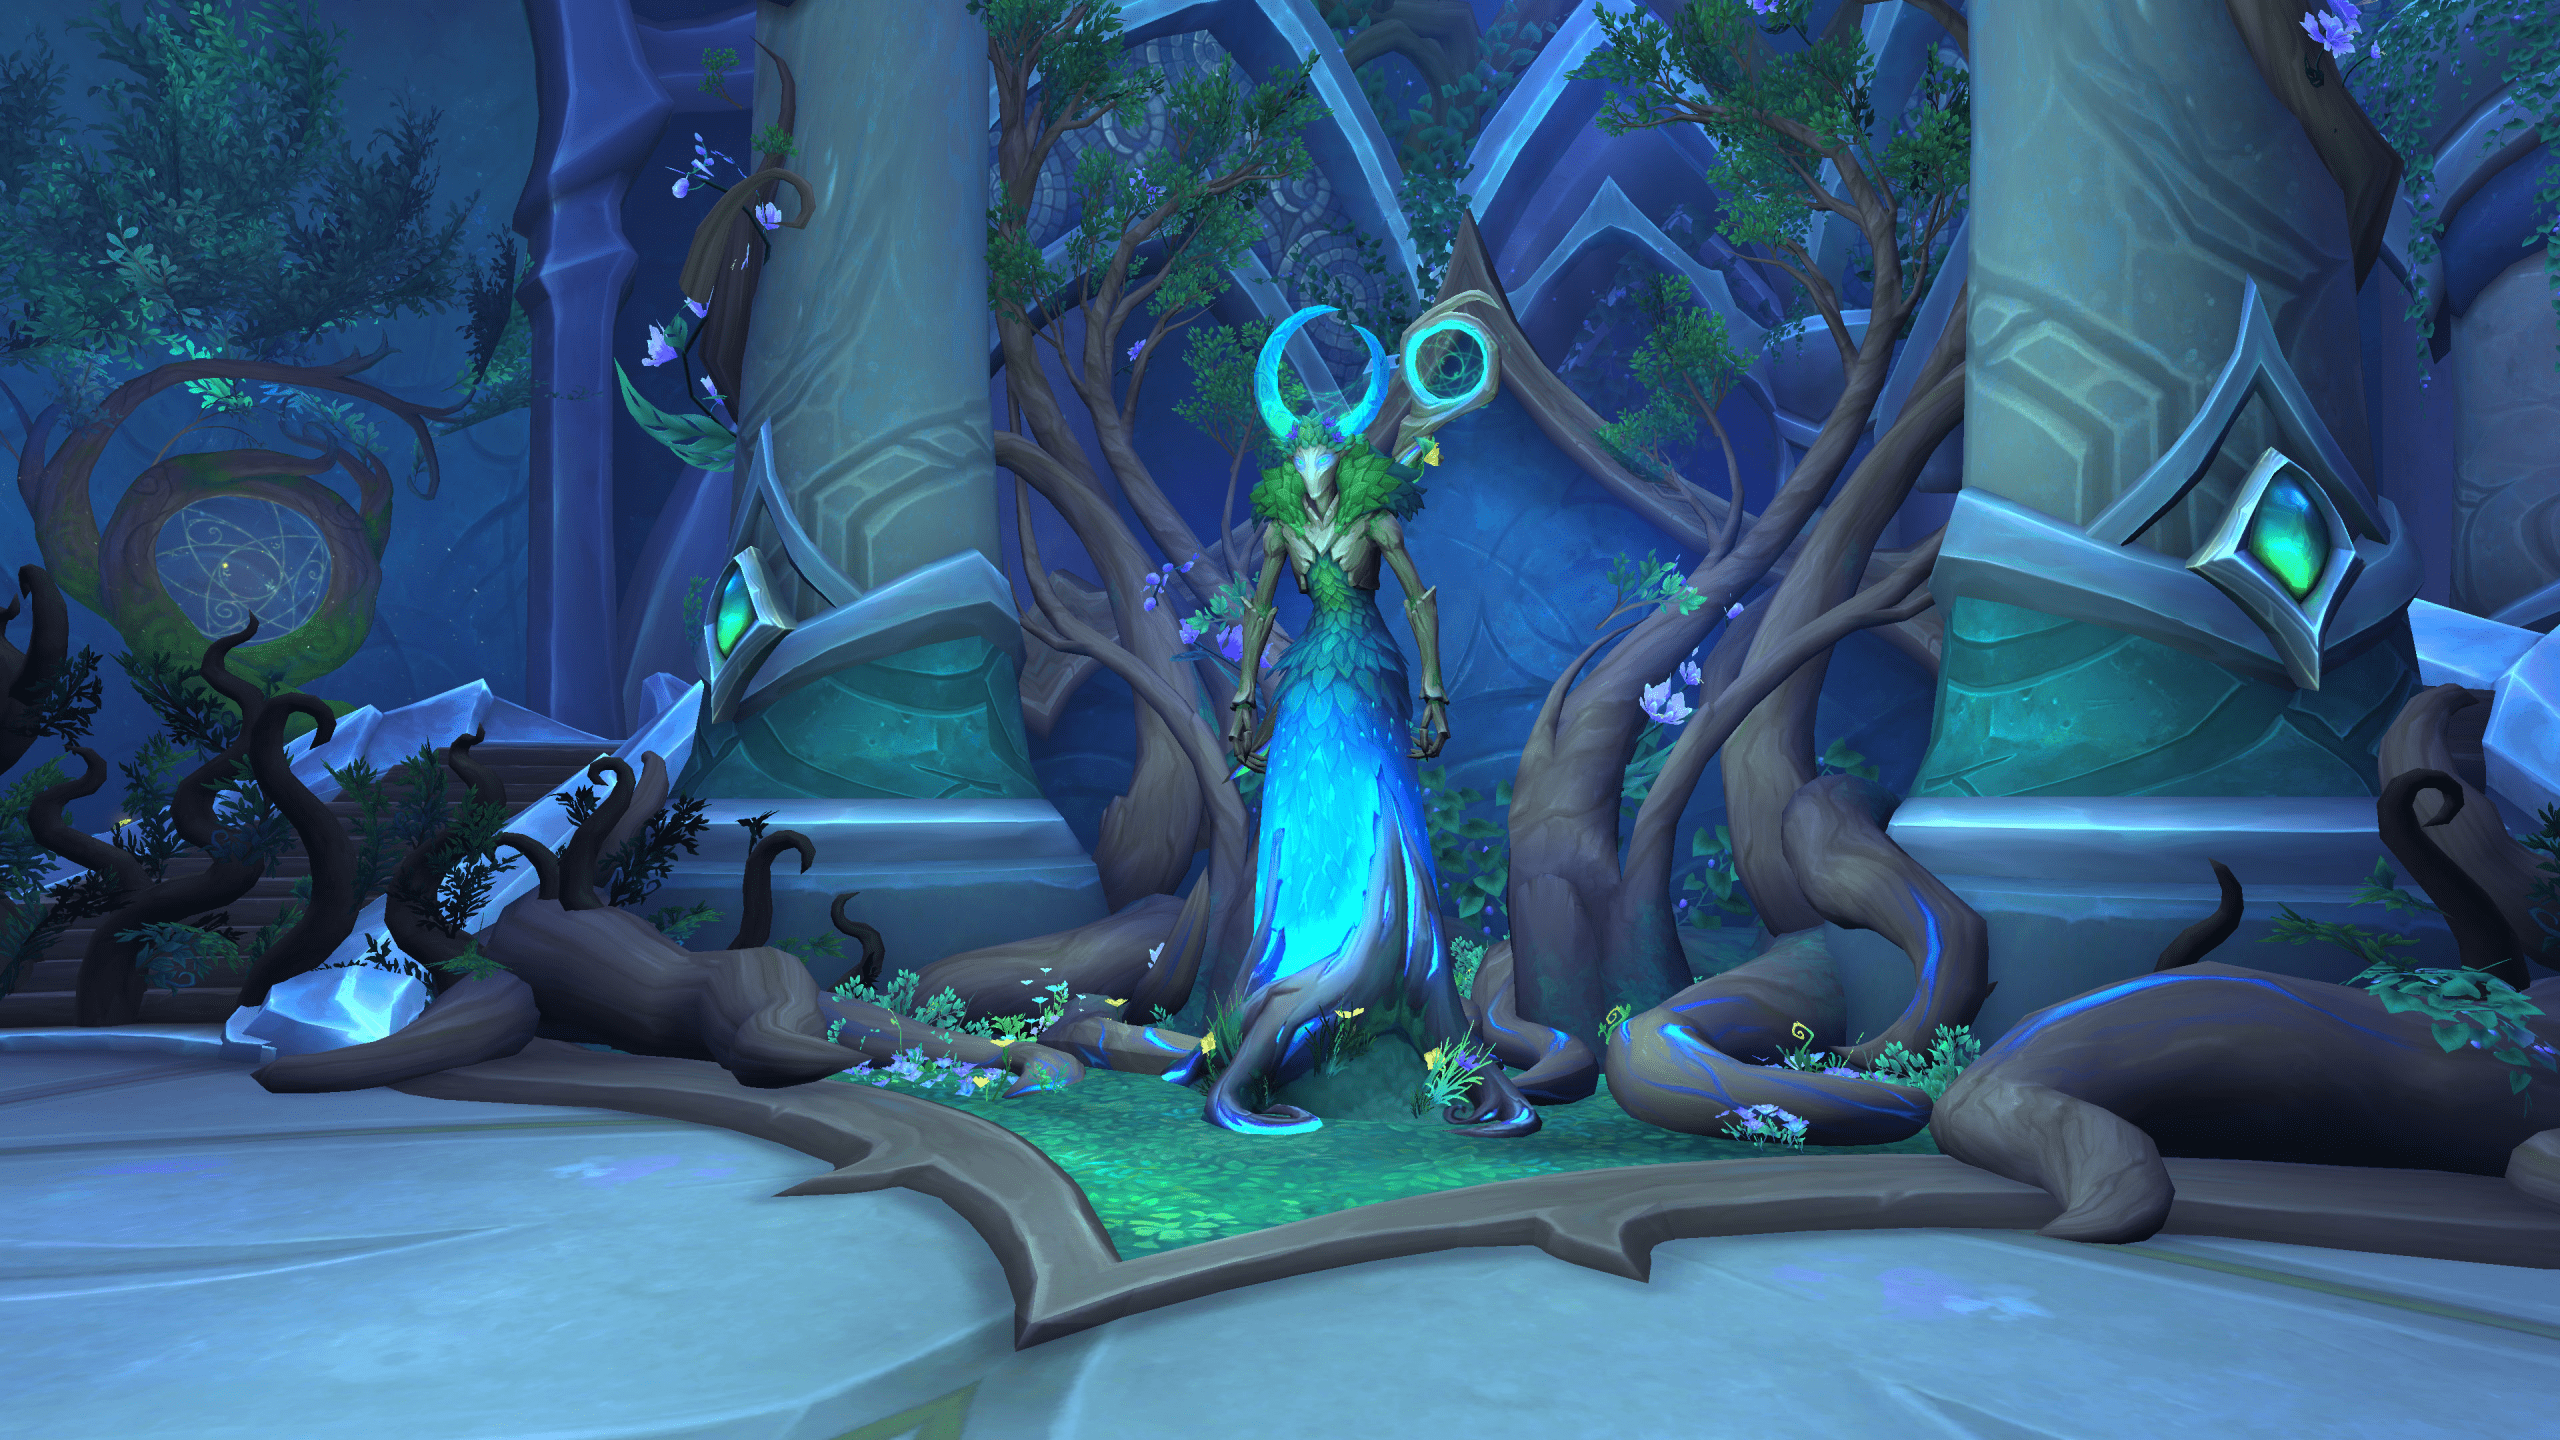
Eonar positioned Nymue, as well as Freya, within the lush expanse of this realm during the creation of the Emerald Dream. Within the Wellspring Temple, they undertake the crucial task of upholding and safeguarding the harmonious organization of the Dream, intricately weaving its natural landscapes into complex, interconnected patterns.
Despite seeming as a relatively easy single-target encounter, the fight against Nymue is extremely tricky. During it, you will have to maintain a thin balance between dodging her deadly spells while also not crossing the lines you see all around the area. As always, we recommend that you use the following Nymue raid setup in this battle:
- 2 Tanks;
- 4 Healers;
- 14 DPS.
Nymue, Weaver of the Cycle Abilities
| Continuum |
When the boss reaches 100 energy, she becomes immune and inflicts minor damage upon the raid. Furthermore, she summons x2 Cycle Wardens, who administer slight raid-wide damage and cast Nature Volley, dealing moderate damage to random targets if not disrupted. It is worth noting that the damage from Cycle Wardens escalates by 10% with each occurrence of this intermission. |
|---|---|
| Verdant Matrix | Stepping across the floor lines results in players immediately receiving a minor amount of damage and acquiring a slight, recurring DoT effect that persists for 6 seconds. |
| Inflorescence | As players traverse through the grassy terrain, they become immune to Verdant Matrix damage and receive a substantial 45% boost to their movement speed, but this effect is exclusive to the grassy area. |
| Threads of Life | In this perilous scenario, three daggers materialize, each selecting a random player as its target. When a dagger connects with its intended target, it inflicts moderate damage upon everyone it strikes, forcefully knocking them back. However, if the dagger successfully reaches its primary target without intersecting any lines, it detonates, delivering a substantial burst of damage to the player and propelling them backward. |
| Violent Flora | These prominent ground swirls initially require players to skillfully evade them. However, once they disperse, leaving behind a grassy area, players can utilize it to obtain immunity to Verdant Matrix damage, allowing them to safely cross the lines without harm. |
| Weaver's Burden | The Tank becomes afflicted with a minor, recurring DoT effect that culminates in a detonation after 12 seconds, unleashing a substantial raid-wide damage blast that diminishes in potency with greater distance. Additionally, it heightens Nature damage vulnerability by 100% for 30 seconds, a condition known as Woven Resonance. |
| Threaded Blast | This ability inflicts a formidable dose of Physical damage along with moderate Nature damage to the tank. It is imperative for tanks affected by Woven Resonance to avoid being struck by this attack. |
| Viridian Rain | An inescapable yet bearable instance of low-grade raid-wide damage that endures for 6 seconds. However, its intensity amplifies progressively following each intermission. |
Nymue, Weaver of the Cycle Strategy & Tactics
- Phase 1
Neither the boss nor the cycle wardens during the intermission can be repositioned, so it is advisable to divide the raid into two evenly balanced groups for a smoother and swifter intermission. Each group should prioritize taking up positions on their designated side of the room.
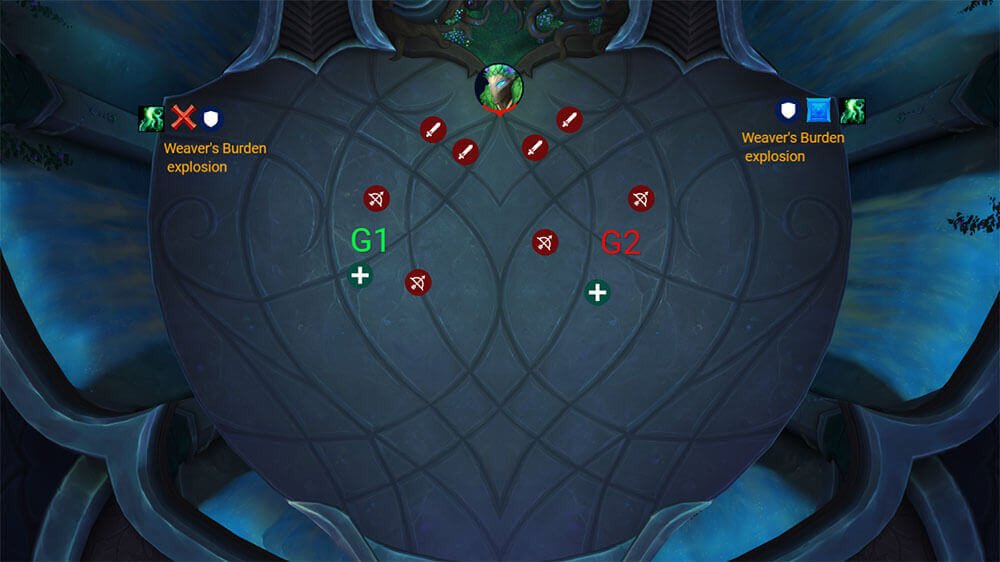
Players must exercise caution to minimize unnecessary movement. As illustrated in the image above, the entire map is crisscrossed with lines that inflict damage when crossed. Nevertheless, certain abilities will necessitate movement despite this challenge.
- Violent Flora - These sizable swirling patterns pose a dodging challenge, but it is crucial to skillfully evade them without intersecting any lines. The subsequent growth of grass is advantageous and allows you to traverse the lines without incurring damage.
- Threads of Life - Typically, a dagger materializes in close proximity to its designated player, often within the same area where you presently stand. Consequently, it is advisable to steer clear of the small squares on the map to prevent the dagger from manifesting on top of you. Your primary objective here is to ensure that the dagger crosses the line before reaching your location. Attempting to outpace or evade it in another manner is not viable.
The optimal scenario entails crossing a line while traversing through the grass, allowing the dagger to follow you into that area. It is important to note that the dagger itself does not interact with the grass. This approach minimizes damage taken and is the preferred method.
Alternatively, when grass is not available, you can opt to run through a line, absorb the damage, and then take the hit from the dagger. This strategy should be employed when grass is not accessible, as it is an inherent aspect of the encounter.
Regardless of the chosen method, the key imperative is ensuring that the dagger crosses a line before reaching you.
For tanks, it is crucial to swiftly move away when afflicted with Weaver's Burden and be vigilant about your health upon returning. You will suffer a 100% increase in Nature damage and endure a ticking DoT effect. During your return journey, you will be traversing numerous lines, each dealing Nature damage.
Ultimately, as the boss reaches 100% energy, the intermission phase commences.
- Intermission
Every participant must swiftly proceed to their designated sides as the intermission initiates. It is crucial to note that during this brief period, the lines temporarily vanish, causing no harm, only to reappear shortly after. It is paramount for the Tank to arrive first, as the Cycle Warden will instantly engage the closest player in melee range.
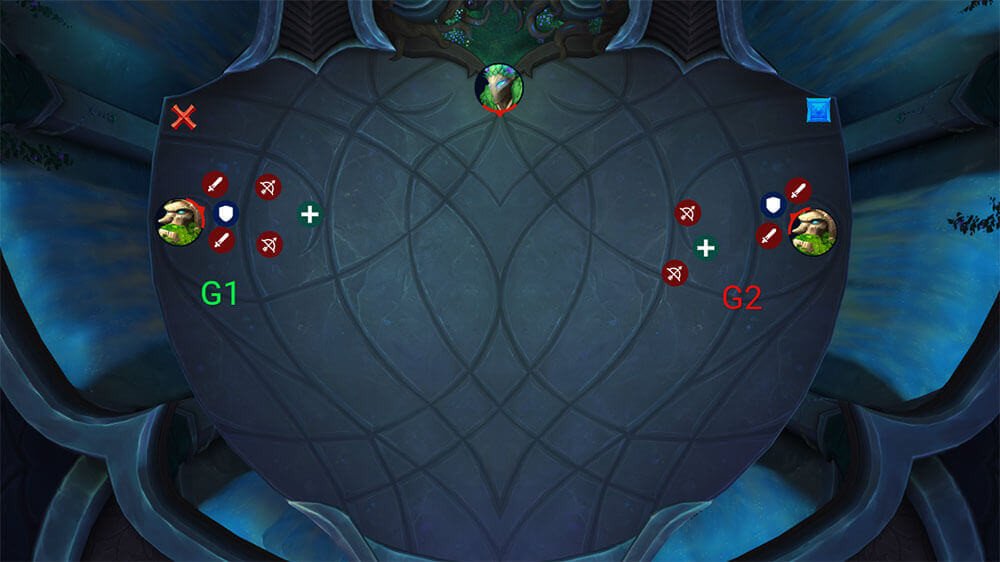
Establishing a kick rotation to consistently interrupt Nature Volley and eliminating both Wardens expediently will facilitate the transition back to Phase 1.
While journeying back to the boss, the lines will once again become active. Ensure you are not at critically low health before crossing; there is no need to rush. If your health is low, wait for healing before crossing the lines.
The encounter then repeats, but owing to the effects of Continuum, expect to witness more frequent casts of Viridian Rain and Violent Flora. Furthermore, it appears to accelerate the boss's energy accumulation, potentially leading Nymue to reach the intermission faster following each Continuum cast.
Smolderon
In his newfound role as the Firelord, Smolderon harnesses the formidable might of the Firelands to both extend his dominion and engulf the Emerald Dream in all-consuming flames.
The fight against Smolderon represents a single-target encounter yet you should not expect it to be easy. In fact, facing off against Smolderon is extremely difficult and you can be punished for any. To make your life easier, we highly recommend that you use the following Smolderon raid setup:
- 2 Tanks;
- 4 Healers;
- 14 DPS.
Smolderon Abilities
| Brand of Damnation |
At the core of this encounter lies a multifaceted ability that incorporates several components. The current tank is designated by a conspicuous large circle that necessitates soaking by all players lacking the Overheated debuff. When soaked, all affected players receive a substantial absorb shield that requires subsequent healing. After being healed, each player leaves behind a circle on the ground, which detonates after a brief duration, inflicting significant damage to anyone within its blast radius. Furthermore, this ability brands each player with Emberscar's Mark, rendering them incapable of soaking this ability until the next Phase 1. However, it bestows advantageous buffs during the intermission. Brand of Damnation must successfully impact at least four players to prevent Smolderon from obtaining a 10% damage amplification buff. |
|---|---|
| Searing Aftermath | The Tank who endured the impact of Brand of Damnation, unlike other affected players who receive absorb shields, will be afflicted with the Searing Aftermath debuff. This debuff culminates in a potent explosion after 6 seconds, inflicting substantial damage that diminishes with greater distance. To mitigate damage to the raid, the affected tank should swiftly move away from the group. |
| Overheated |
Simultaneously, Brand of Damnation will select half of the raid as its targets during its activation. These marked players, designated as Overheated, are exempt from soaking the Brand. Instead, they must deliberately disperse to prevent the inadvertent damage caused by the Overheated circles. Following a duration of 10 seconds, these players detonate, releasing Fire tornadoes in their vicinity, which must be evaded by the rest of the raid. Please note that you cannot be afflicted by the Overheated debuff twice within the same Phase 1. |
| Lava Geysers | These are unpredictable swirls that necessitate swift evasion and leave fiery puddles upon the ground. They compel your raid to remain closely grouped for the most part, acting as bait to keep the area relatively unobstructed. |
| Blistering Heat | This is an inescapable damage-over-time effect that intensifies with each subsequent intermission, inflicting steadily increasing damage to affected targets. |
Smolderon Strategy & Tactics
- Phase 1
Initiate the encounter with the entire raid group assembled in close proximity to the room's perimeter. Maintain this position throughout the battle and shift along the room's edge only when compelled to do so by the presence of magma puddles.
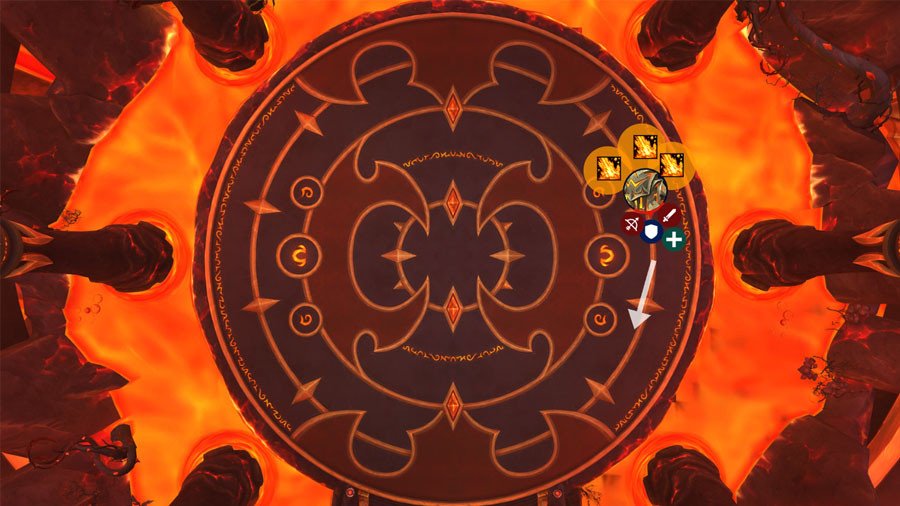
One-half of the raid will be afflicted with Overheated, rendering them unable to absorb the Tank circle in Brand of Damnation. These players should promptly distance themselves from the raid to avoid triggering tornadoes upon exploding. The specifics of the tornado patterns and the quantity produced remain uncertain in the current version of the encounter, but potential strategies may emerge to address this mechanic.
Meanwhile, the other half of the raid not afflicted by Overheated must swiftly converge on the tank and deploy their personal damage reduction cooldowns. Utilizing abilities such as AMZ, Barrier, Darkness, or Spirit Link is highly recommended in this context. Ensure that these cooldowns are assigned to available raid members.
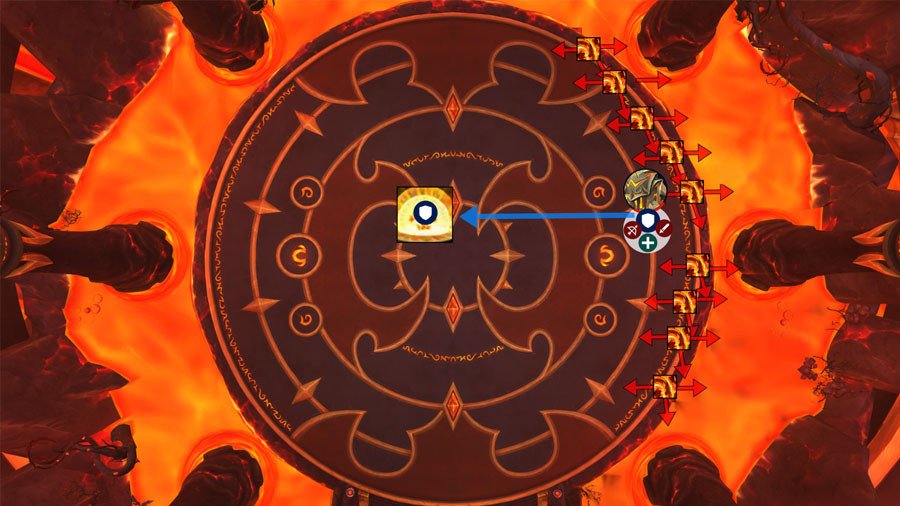
To manage Overheated targets, instruct them to cling to the room's periphery. This tactic ensures that several tornadoes are directed off the map, resulting in far fewer obstacles to evade, as opposed to dispersing around the boss and relying on favorable outcomes.
Given that the circle inflicts moderate damage, you can condense around two players within the same area to reduce the required space.
Following the soak, the raid remains stationary until they generate the circles on the ground, which occurs after the absorption effect dissipates. It is simply a matter of sidestepping out of their path.
The Tank should swiftly navigate toward the room's center to detonate with the Searing Aftermath debuff.
This combination is repeated, with the twist that the participants who absorbed the tank circle in the initial cast now experience Overheated, and those initially affected by Overheated are responsible for soaking the tank's circle instead.
- Intermission
Following Smolderon's second combo, the encounter enters the intermission phase.
During this phase, all players are knocked backward, away from the center, and each generates several orbs, typically around five. These orbs are produced by the participants who executed the tank soak, which, ideally, should encompass the entire raid.
Each orb grants a 20% increase in damage dealt and a 10% boost to healing output for 20 seconds. Importantly, these bonuses stack. However, note that the duration cannot be extended by delaying orb pickup. Consequently, the goal is to gather all orbs swiftly. Nevertheless, it is essential to monitor your health, as each orb inflicts minor damage upon collection. If your health is critically low, avoid collecting all orbs simultaneously.
It is worth mentioning that players can only view and interact with their own orbs; no one else can manipulate orbs belonging to other players.
If an orb makes contact with the boss, it confers a 1% damage increase to him for the remainder of the encounter.
As players pick up orbs and engage in damage-dealing or healing activities, they must also navigate a dance mechanic akin to the one seen in the Soulrender Dormazain encounter within the Sanctum of Domination.
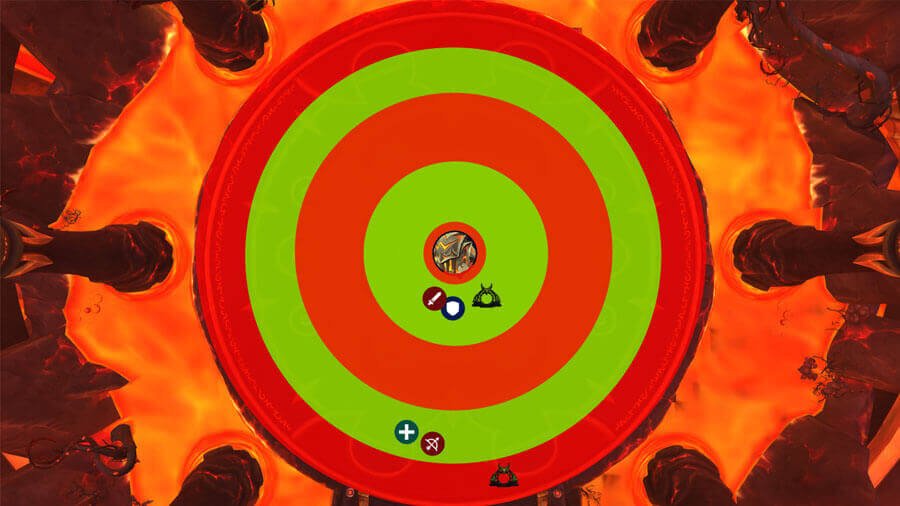
Throughout the intermission, the safe areas shift dynamically, necessitating rapid reflexes, the utilization of speed-enhancing abilities, Warlock gateways, and any other tools at your disposal to remain within the secure zones.
Following the intermission, you revert to Phase 1, essentially repeating your initial actions. However, Smolderon's damage output is now increased by 10%, and he receives an additional 1% damage boost for each orb that was not soaked during the intermission!
Towards the end of the encounter, it is prudent to forgo soaking the final set of orbs and instead let them buff the boss by 10%, particularly if the raid's overall health is unstable. However, it is crucial to ensure the tank survives this attack, and deploying robust external cooldowns and Blessing of Protection will be instrumental in achieving this goal.
Tindral Sageswift, Seer of the Flame
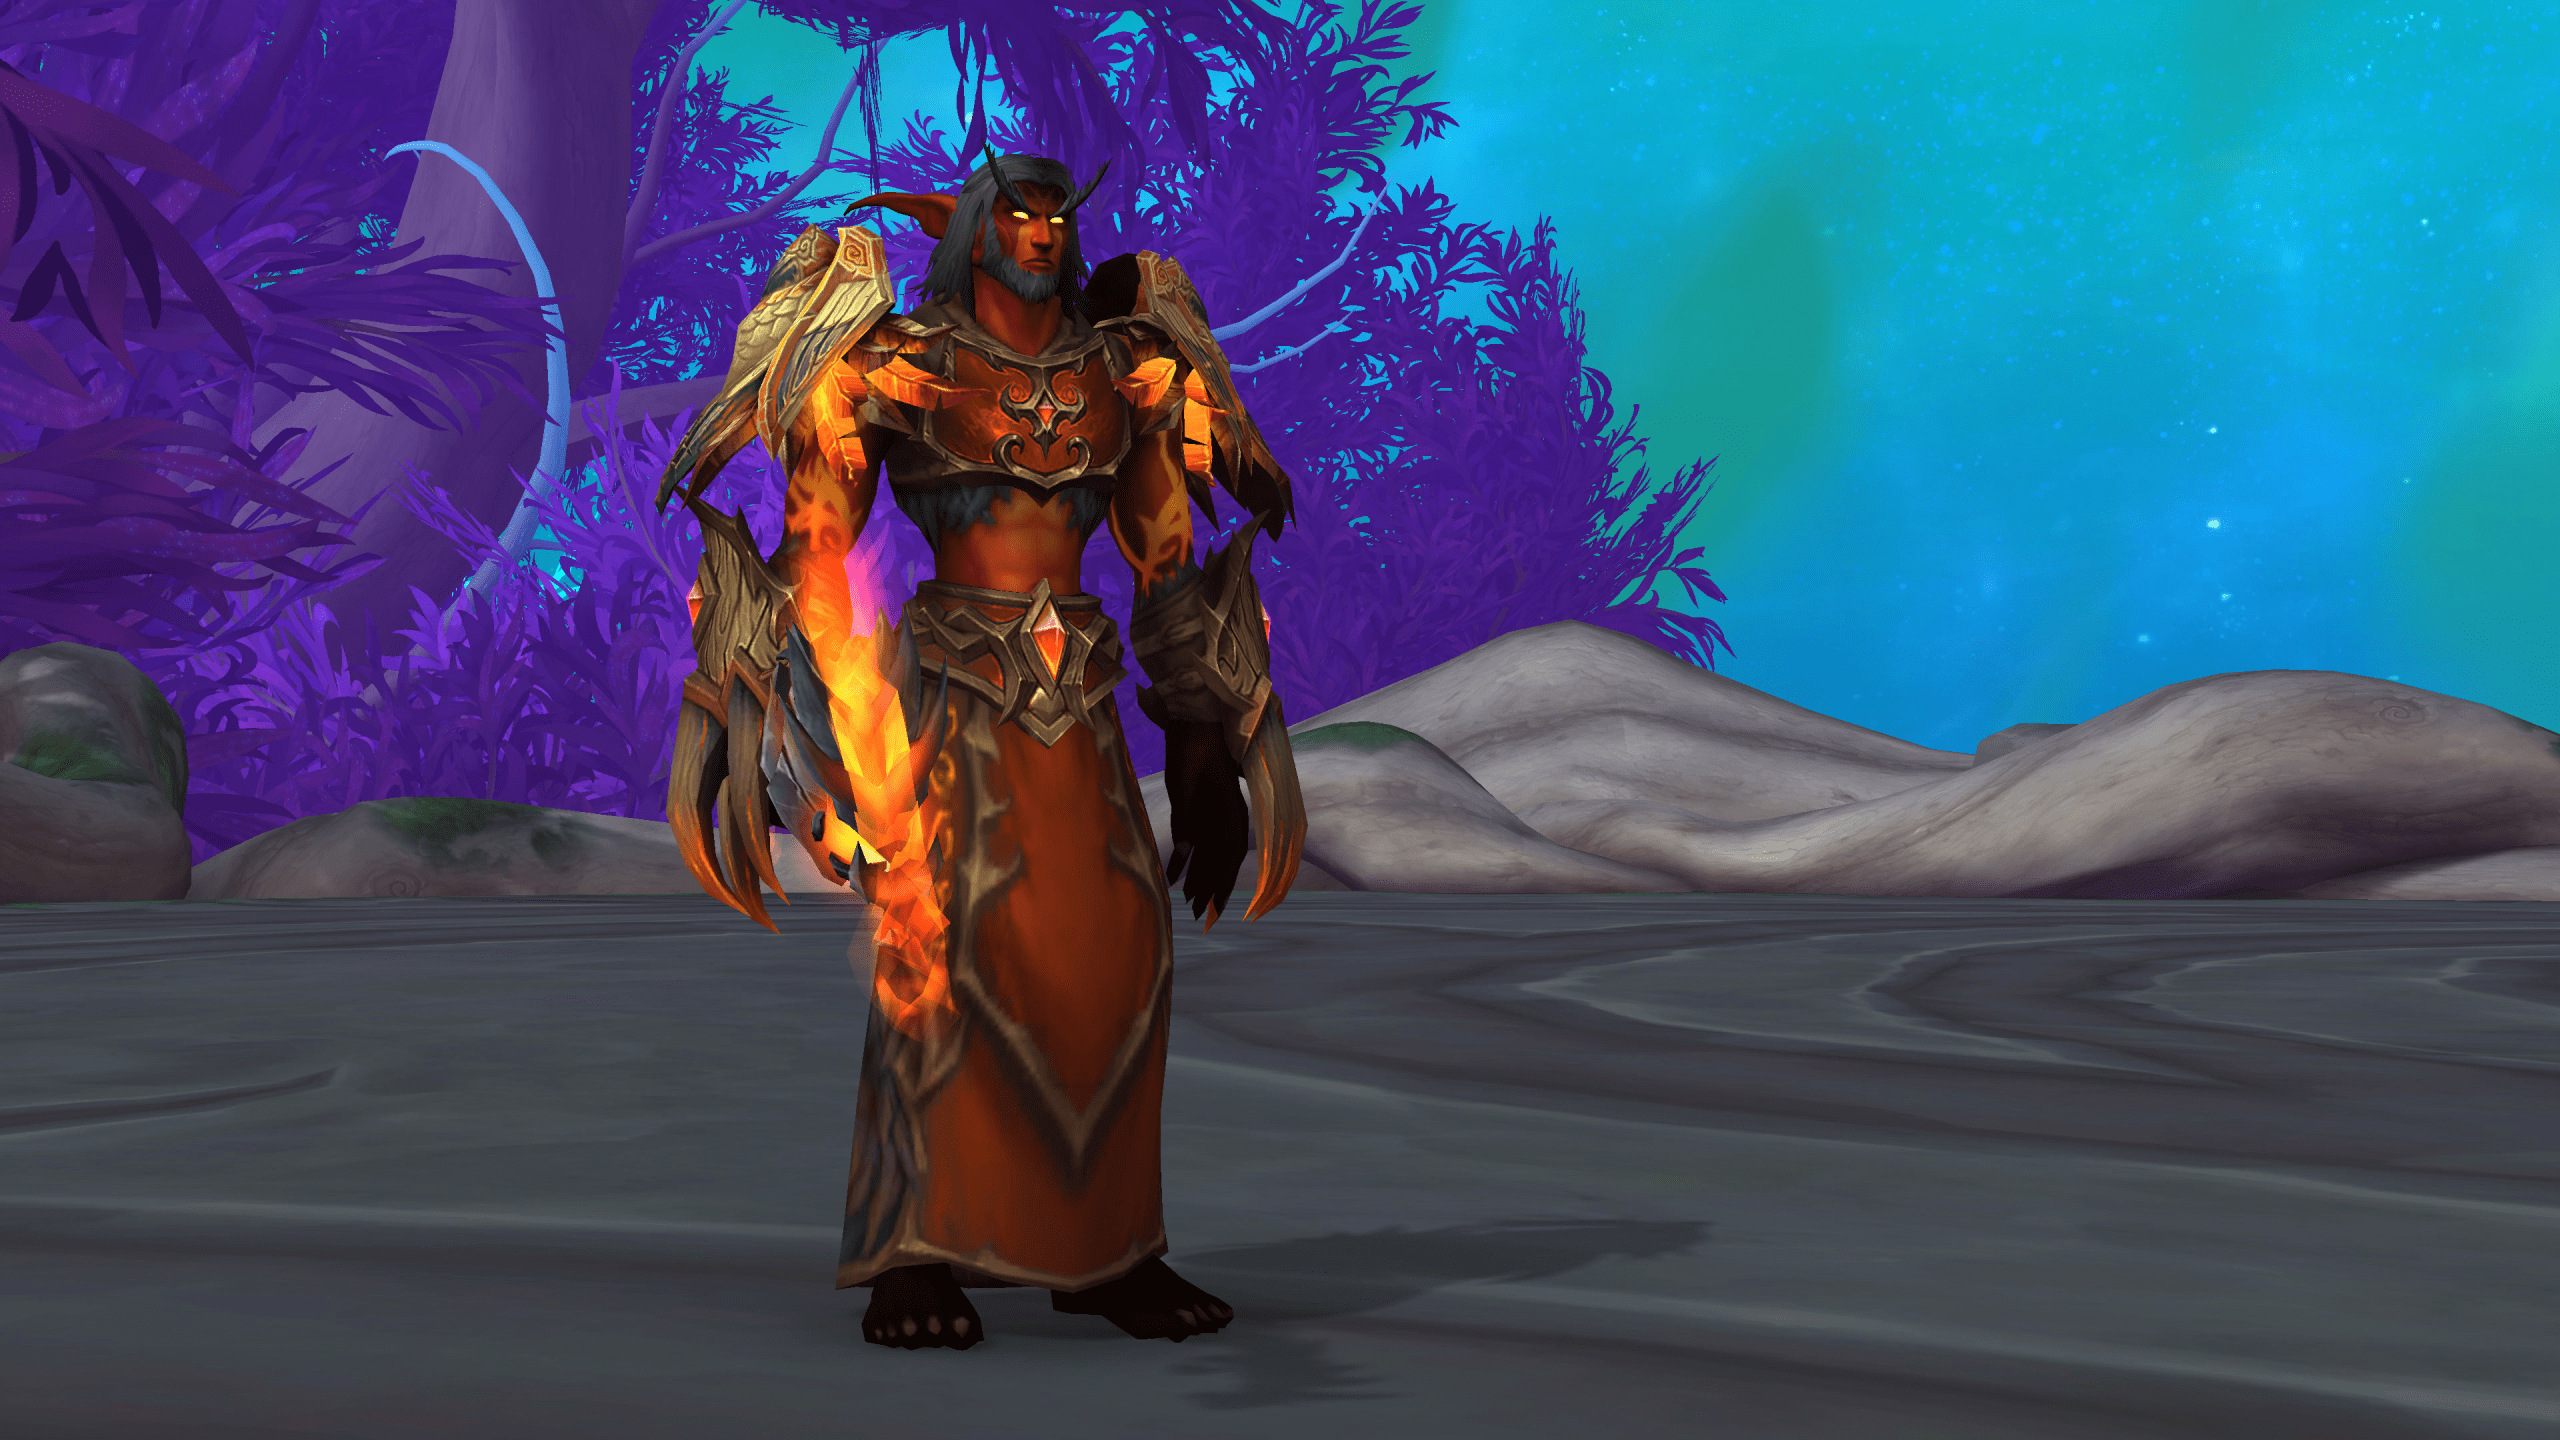
Driven by an unrelenting fixation on restoring immortality to the kaldorei, Tindral Sageswift forged an alliance with Fyrrak. Just as Fyrrak's triumph seemed imminent, the Seer of Flame now stands in opposition to Azeroth's champions, determined to witness the rebirth of Amirdrassil amidst a fiery inferno.
This is the pre-last boss you are going to face before encountering Fyrakk himself. Speaking of Tindral, this is a single-boss fight where you will have to fight against one of the strongest enemies in this raid. To ensure you have a higher chance for success, we recommend that you use the following Tindral Sageswift raid setup in this battle:
- 2 Tanks;
- 5 Healers;
- 13 DPS.
Tindral Sageswift Abilities
During this fight, you will encounter a large variety of abilities. Depending on what form Tindral is in, you will have to counter a different set of skills.
- Tindral Sageswift Form
| Mass Entanglement |
Each player is marked with a small circle that detonates after 6 seconds, inflicting moderate damage on all players within a 3-yard radius. Furthermore, the affected player becomes rooted and takes minor damage every second until the roots are eliminated or removed. All abilities that can break roots are effective in this case. |
|---|---|
| Falling Star | Deals moderate damage to the entire raid and generates swirling patterns that must be avoided. |
| Fiery Growth |
Selects 3 players and envelops them with large circles, causing moderate damage each second over 20 seconds. When dispelled, it creates a fire puddle on the ground and eliminates the damage-over-time effect. Position yourself away from the main group (either behind or toward the center) to receive dispels, and avoid clustering with other players. |
| Blazing Mushroom |
Generates a substantial mushroom that must be absorbed by the tanks. These mushrooms detonate after 3 seconds, causing fatal harm to the entire raid if left unsoaked. Soaking a mushroom enhances the damage taken from another mushroom by 500% for 3 seconds. Tanks should take turns absorbing mushrooms. For instance, the primary tank deals with Mushrooms 1 and 3, while the off-tank manages Mushrooms 2 and 4. |
| Searing Wrath | Basic DoT effect that accumulates with each melee strike. It is recommended to switch tanks when the damage becomes excessive to ensure survival. |
| Flame Surge | Players standing along the edge of the map will suffer a significant amount of damage per second. |
| Supernova | Enormous protective barrier inflicting minor damage to all players every 2 seconds. If not dispelled within 30 seconds, it will detonate, causing a raid wipe. |
- Searing Moonkin Form
| Sunflame | Inescapable solar beam striking all players, dealing minor damage. |
|---|---|
| Fire Beam | Fires a powerful beam at the platform, causing substantial damage to players within its path. Furthermore, numerous smaller beams disperse in various directions, dealing heavy damage to any affected players. |
- Burning Treant Form
| Suppressive Ember | Numerous players receive a moderately sized absorb effect that accumulates stacks if not promptly healed. |
|---|---|
| Flaming Germination |
Creates a cluster of fiery mushrooms and ignites the platform, causing mild damage every second for 10 seconds. Players must stomp (move through) the mushrooms to prevent them from turning into Flaming Trees. Stomping a single mushroom deals slight damage to the player, and the effect accumulates. If a mushroom is not stomped within 10 seconds, it transforms into a Flaming Tree, which inflicts moderate damage on all players until it is eliminated. This can become challenging if numerous Flaming Trees emerge simultaneously. |
- Flaring Owl Form
| Empowered Feather | Tindral generates feathers that enable players to embark on dragon rides after interacting with them. |
|---|---|
| Dream Essence | Green orbs are dispersed throughout the air; when flying through one, the entire raid gains a 5% increase in Damage and Healing, with the effect stacking. These orbs also leave behind an Emerald Gale that bestows 3 Vigor to players passing through it. |
| Typhoon | A pushback mechanic that inflicts moderate damage to all players. |
| Scorching Plume | Fire orbs scattered in the air that, upon contact, deal moderate damage to players and remove 3 Vigor. |
Tindral Sageswift Strategy & Tactics
Heroic Tindral Sageswift is an extended encounter with three phases and two intermissions. The boss has a substantial set of abilities, but they can be remembered more easily by associating them with the form the boss is currently in.
Moreover, this battle will evaluate your dragon-riding abilities, so ensure that all players have their Dragon Riding keybindings set up and have unlocked Dragon Riding talents!
- Phase 1
Forms used: Tindral and Searing Moonkin Form
You can adapt the subsequent positioning on each platform throughout each phase.
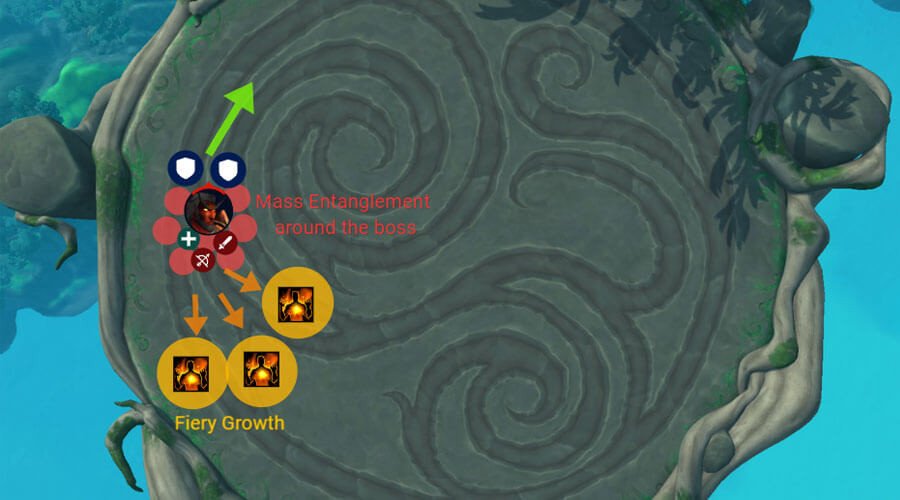
Begin by positioning the boss away from the room's edge to avoid Flame Surge.
The fight's outset is rapid, with abilities unfolding swiftly.
Tanks should address the initial set of Blazing Mushrooms. The boss will release four mushrooms at intervals of 3 seconds. Tanks need to coordinate who soaks first, and they should alternate for each subsequent mushroom. For instance, the main tank can handle the 1st and 3rd mushrooms, while the off-tank manages the 2nd and 4th. Utilize speed-enhancing abilities during this phase as reaching the mushrooms in time can be quite close.
Following this, Mass Entanglement will target all players almost immediately. To maximize AoE damage, place the circles as close to the boss as possible without overlapping with other players.
Players capable of preventing the roots or removing them instantly should take action to reduce the necessary DPS to free all the rooted players. It is important to note that some classes, such as Warlocks, should use abilities like Soulburn or Teleport before the roots are applied to become immune to them. Ensure that all players are freed from roots before Tindral casts Fire Beam. Otherwise, players won't be able to dodge it and are at risk of death.
Simultaneously, 3 players will be targeted by Fiery Growth. These players should either instantly remove the root themselves or receive externals such as Tiger's Lust or Hand of Freedom. The Fiery Growth DoT inflicts substantial damage, so dispel it as quickly as possible. After you are free from roots, move away from the raid (towards the middle or behind) and call for a dispel.
Be aware that the dispel leaves a fire puddle on the ground, so ensure that no one is standing nearby, as it deals a significant amount of damage. Once the Fire Beam is used (it always targets the boss or the largest groups of players), move away from the initial impact point, and then evade the circles.
Note: The smaller circles actually deal more damage than the larger impact swirl, so dodging them takes top priority.
Tindral will now cycle through all his abilities again until he has completed his entire set of abilities twice, or until he reaches a certain HP (the exact threshold will be updated when the raid goes live).
- Intermission 1
During the intermission, when Tindral transitions to his Flaring Owl form, he will drop feathers on the ground. Every player should pick up a feather, which grants the ability to use their Dragon Riding abilities, essentially allowing them to mount up.
Take to the skies and fly towards the next platform, collecting as many Dream Essences (Green Orbs) as possible. Picking up these orbs provides a 5% increase to the entire raid's damage and healing output and grants 3 Vigor to both you and any other players who pass through the orbs you collect.
However, the challenge is not as straightforward as it may seem. You will need to navigate through a perilous obstacle course of fire orbs scattered throughout the skies. These fire orbs will deal damage upon contact and strip you of 3 Vigor if you are hit. So, be nimble and watch out for these hazards as you collect the Dream Essences.
It appears that there's a cap of 10 stacks of Dream Essence, providing a total of 50% increased damage and healing for everyone during this phase.
Upon landing on the platform, Tindral will commence casting Supernova. This massive shield must be rapidly destroyed within a 30-second window. While the shield is active, the raid will continue to endure damage.
Once the shield is shattered, Phase 2 will begin.
- Phase 2
Forms used: Tindral and Burning Treant Form
In Phase 2, Tindral Sageswift retains his Tindral form but introduces a different order of abilities.
This time, the tank soak during roots occurs before dispels. This change affects the dynamic, as the players who drop fire when dispelled must return to the raid before roots are applied. Otherwise, they will become rooted outside of the raid, necessitating extra targeted DPS. This is less than ideal, as most externals will be used for tanks in this phase to ensure they are freed as soon as possible. A missed tank soak can lead to a raid wipe.
Assuming that the boss transitions into Searing Moonkin form shortly afterward, players will encounter the fire beam that spawns circles to dodge.
The core mechanic of this phase is the mushrooms. After completing the Tindral set of abilities, Tindral enters Burning Treant form and spawns numerous mushrooms around the map.
In this phase, your top priority is to collect all the mushrooms without fail.
Why? Failing to soak a mushroom will result in the spawn of a Burning Tree, which inflicts raid-wide damage until you leave the platform. With two trees up, they deal well over 200k raid-wide damage every 2 seconds. Thus, you must avoid them from spawning.
Now, you repeat the same process until Tindral completes his entire set of abilities twice or reaches a specific health threshold.
- Intermission 2
The intermission in Phase 2 appears identical to the first one, with the only change being Tindral shifting into Flaming Owl form. This could imply that there might be an extra ability to dodge during the flight or potentially increased damage taken during the flight, requiring a quick return to the platform.
Upon landing, you will encounter another Supernova shield to burn down, ushering in Phase 3.
- Phase 3
Forms used: Tindral, Burning Treant Form, and Searing Moonkin Form
Phase 3 is where the boss will use all his forms and abilities, creating a challenging sequence.
In this phase, it is crucial to use Heroism/Bloodlust and all available DPS cooldowns. However, expect tough overlaps between abilities. For instance, Tindral might cast his Fire Beam during the Tank soak, requiring the tank to absorb both the mushroom and the beam damage. This demands heavy external cooldowns and personal defensives.
Overlaps like small mushrooms and fire beams or roots will require a rapid response to prevent falling behind. This phase is a hectic burn phase, and you may not manage to soak every small mushroom. Your goal here is to focus on defeating the boss before mechanics overwhelm you.
Fyrakk the Blazing
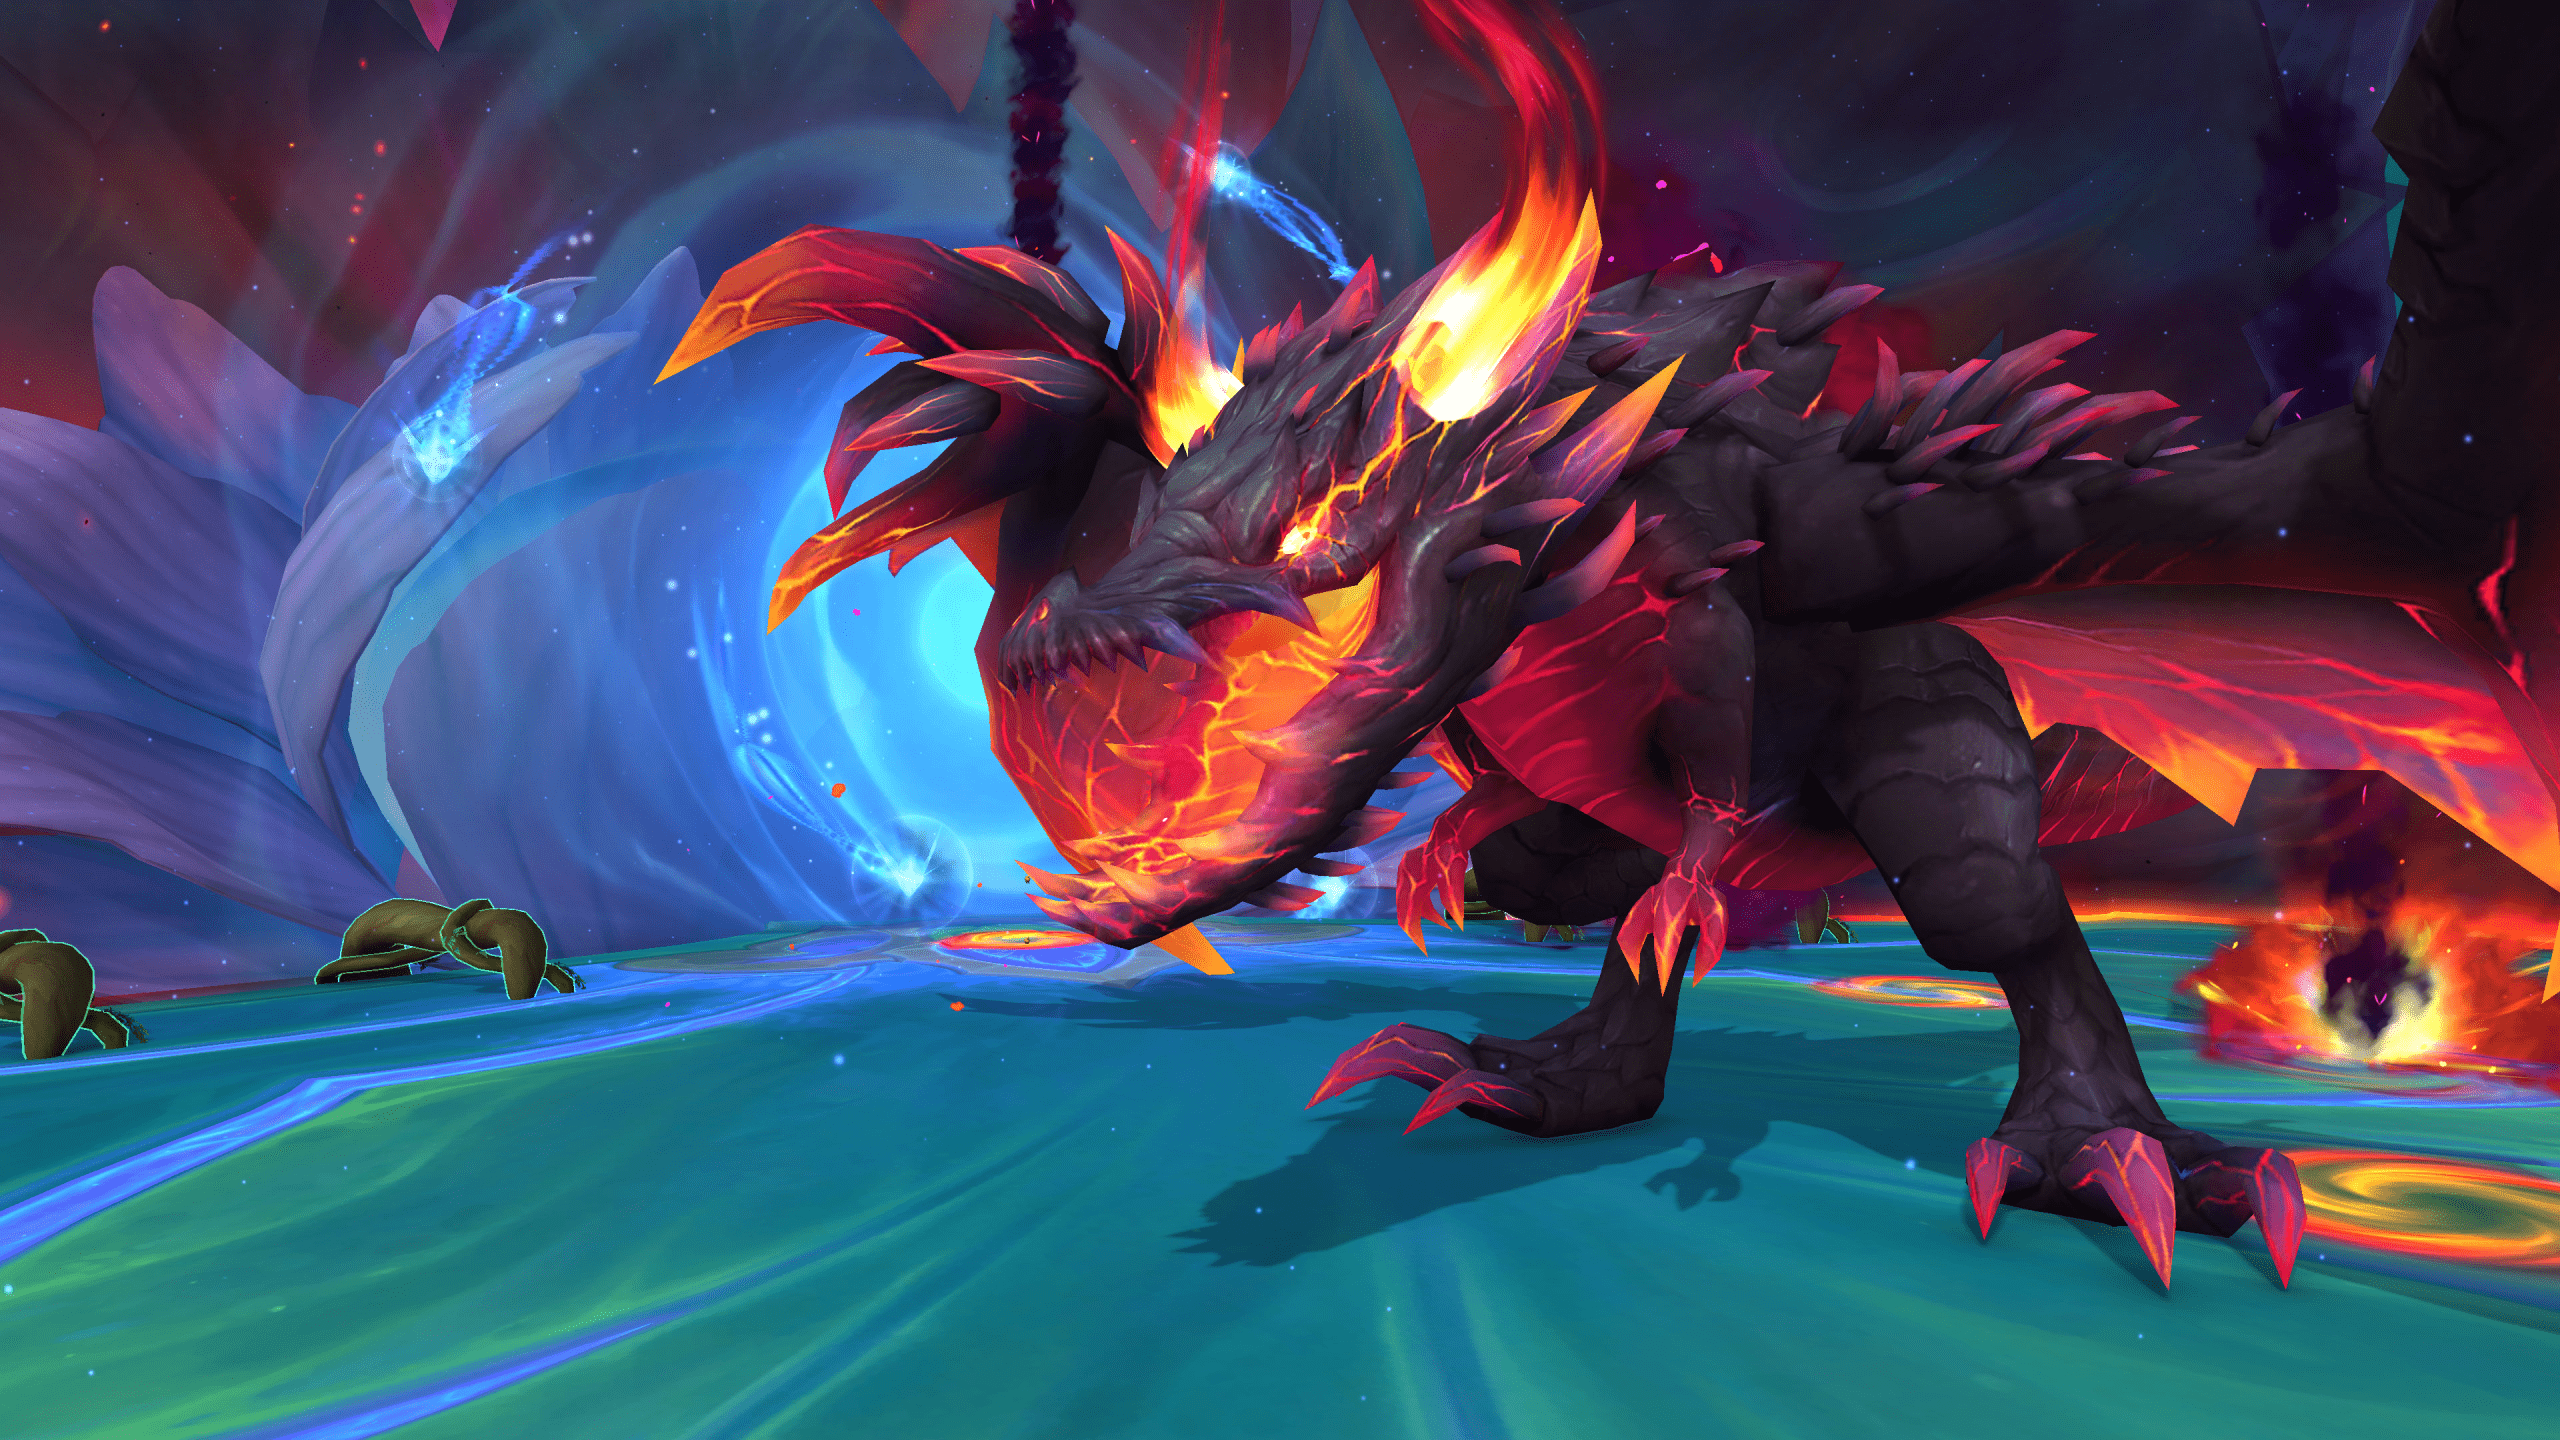
Brimming with the malevolent might of shadowflame and wielding the fabled axe known as Fur'alath, the Dream Reaper, Fyrrak, readies himself to consume the very energies of Amirdrassil, intent on reshaping the world through a fiery transformation.
Amirdrassil Loot & Rewards
In this section, you can find Amirdarssil quick guide covering possible loot and rewards you can get your hands on while participating in this raid. Do remember that the quality of your rewards gradually increases, depending on what difficulty level you have chosen. As expected, the devs have implemented higher ilvls of gear, such as:
| Raid Difficulty | Item Level |
| LFR | 441-450 |
| Normal | 454-463 |
| Heroic | 467-476 |
| Mythic | 480-489 |
Speaking of the rewards, let us start with the most precious one you can ever obtain from this raid - Fyr’alath, the Dream Render. This legendary two-handed axe is believed to be wielded by Fyrakk and that is why it possesses unseen might.
Other weapons include the following:
- Cruel Dreamcarver;
- Thorncaller Claw;
- [PH] Fyrakk Cantrip 1H Axe STR;
- [PH] Fyrakk Cantrip 1H Mace INT;
- [PH] Fyrakk Cantrip 2H Staff AGI.
Trinkets
Amirdrassil, the Dream’s Hope Tier Sets
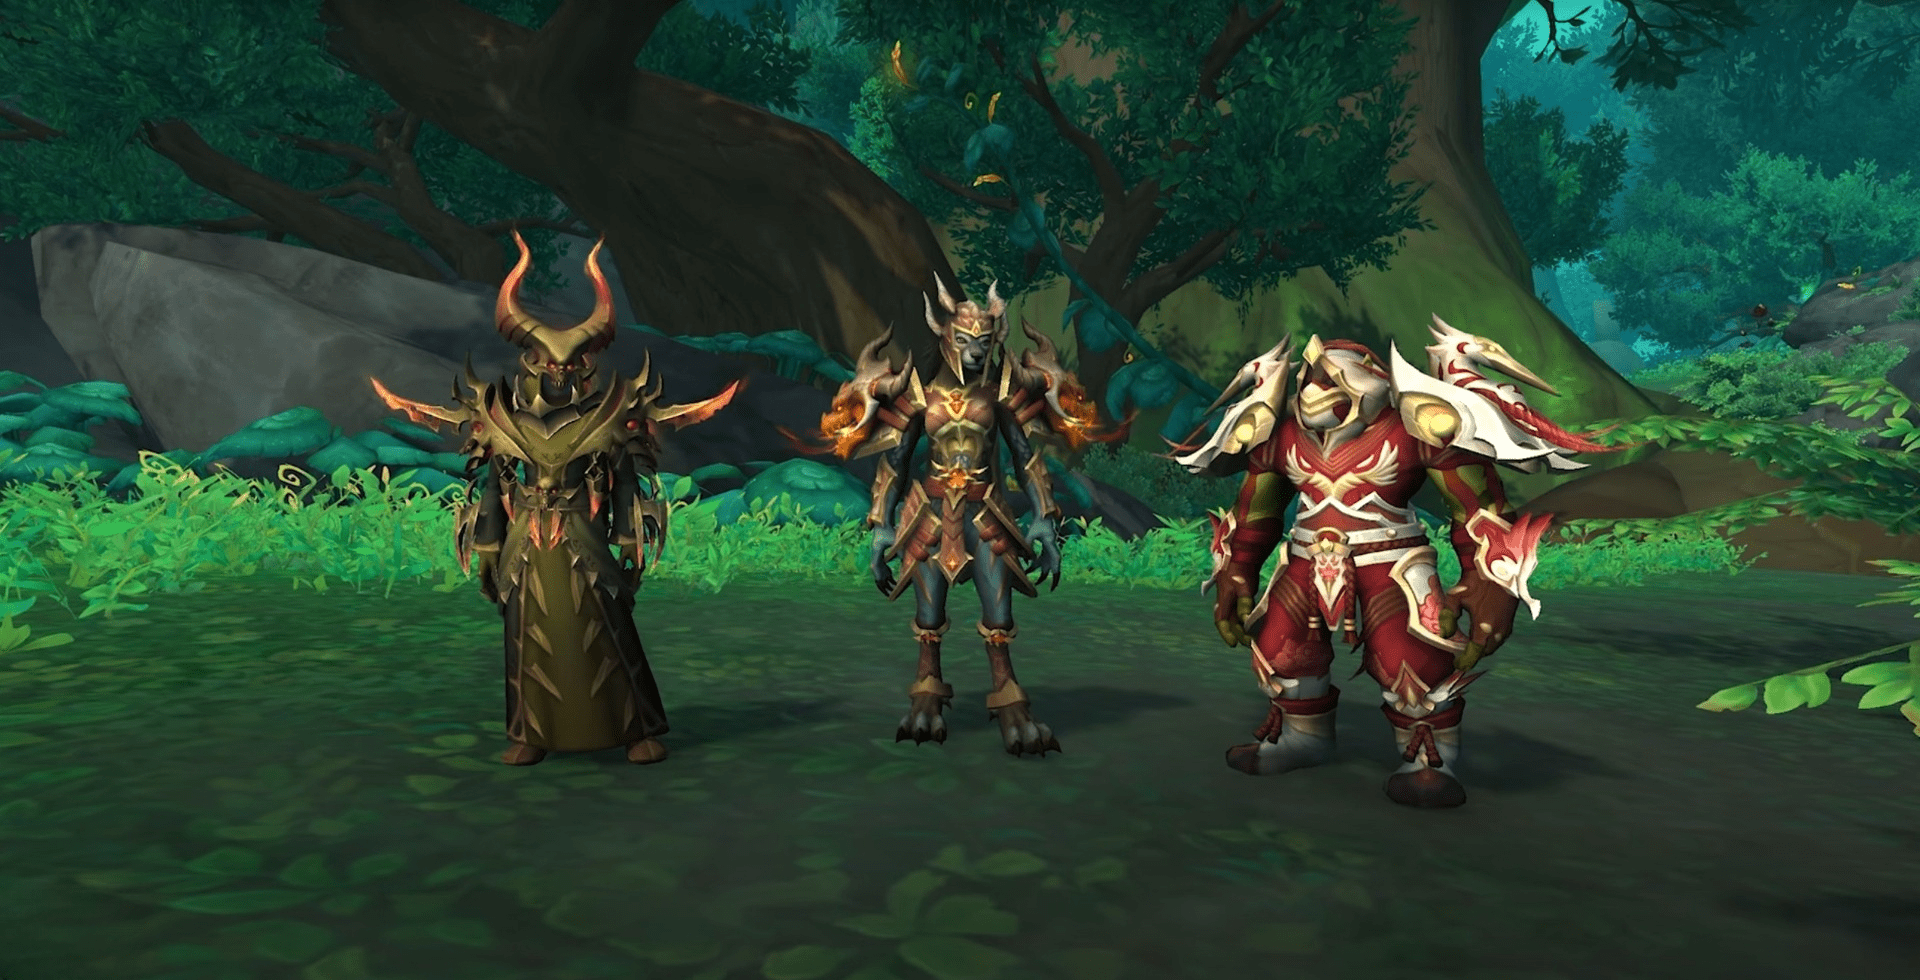
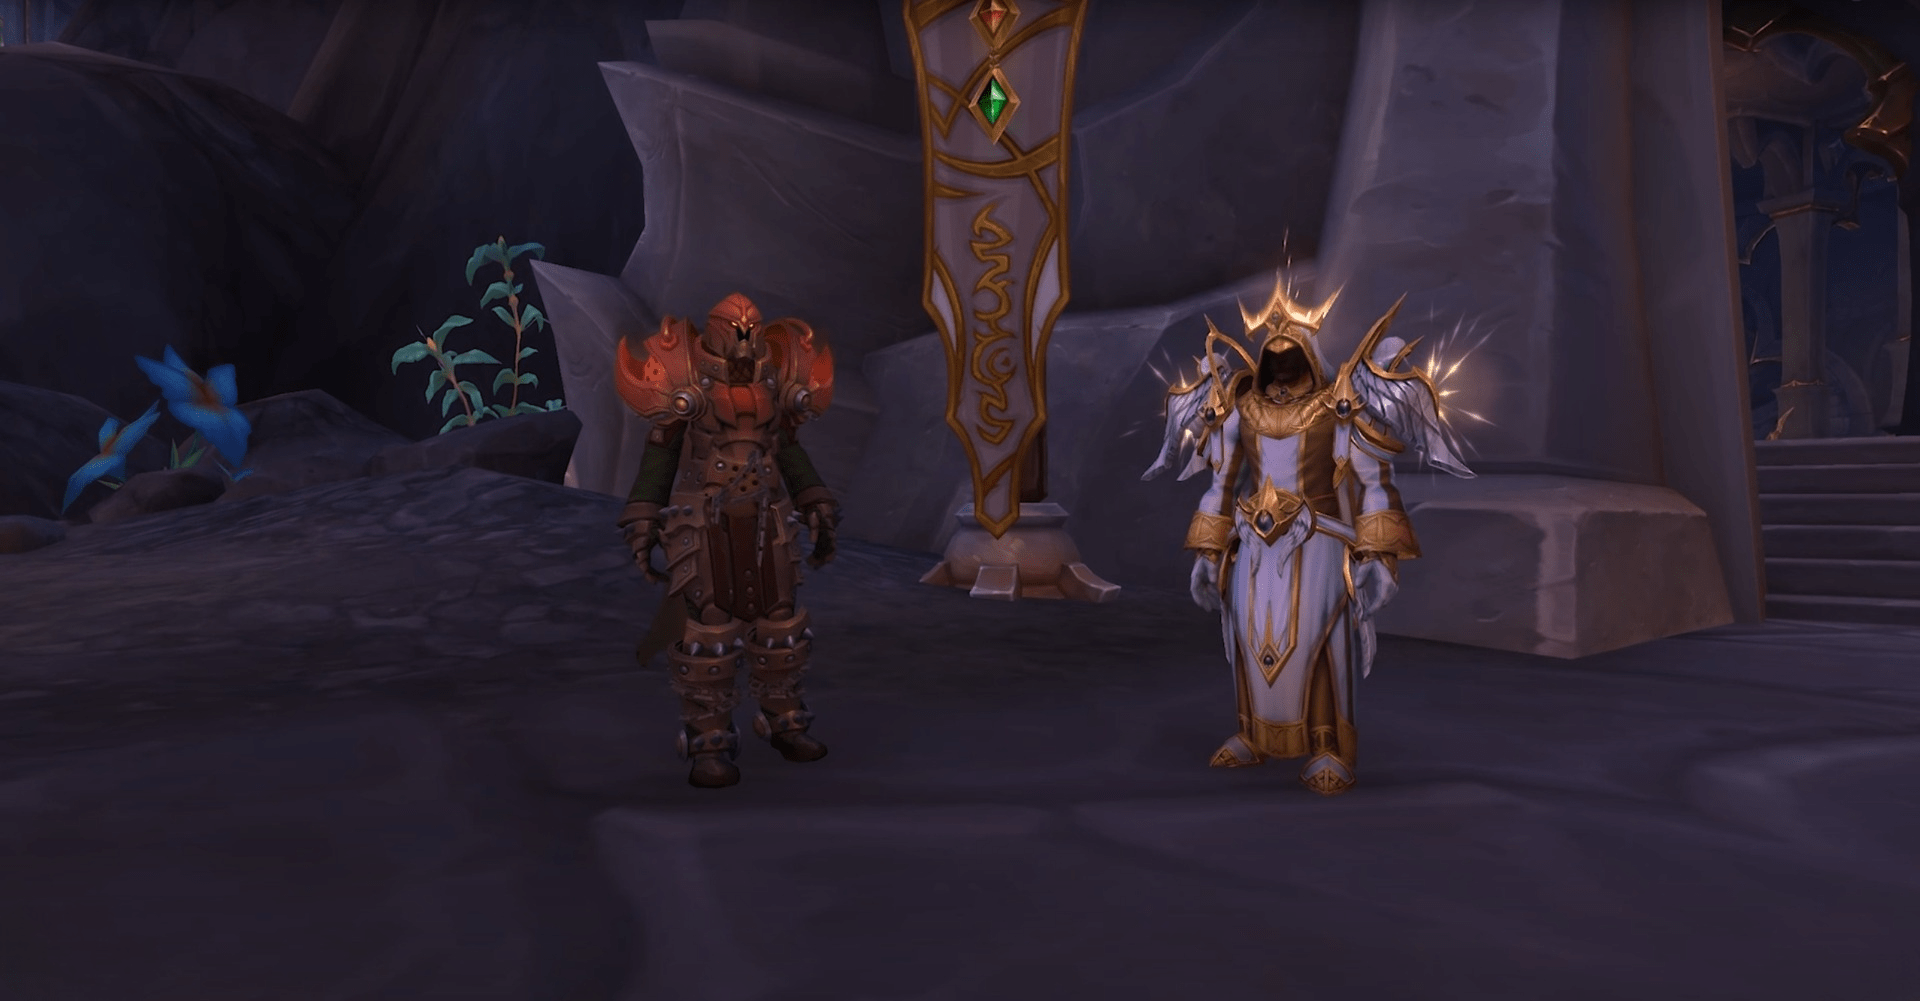
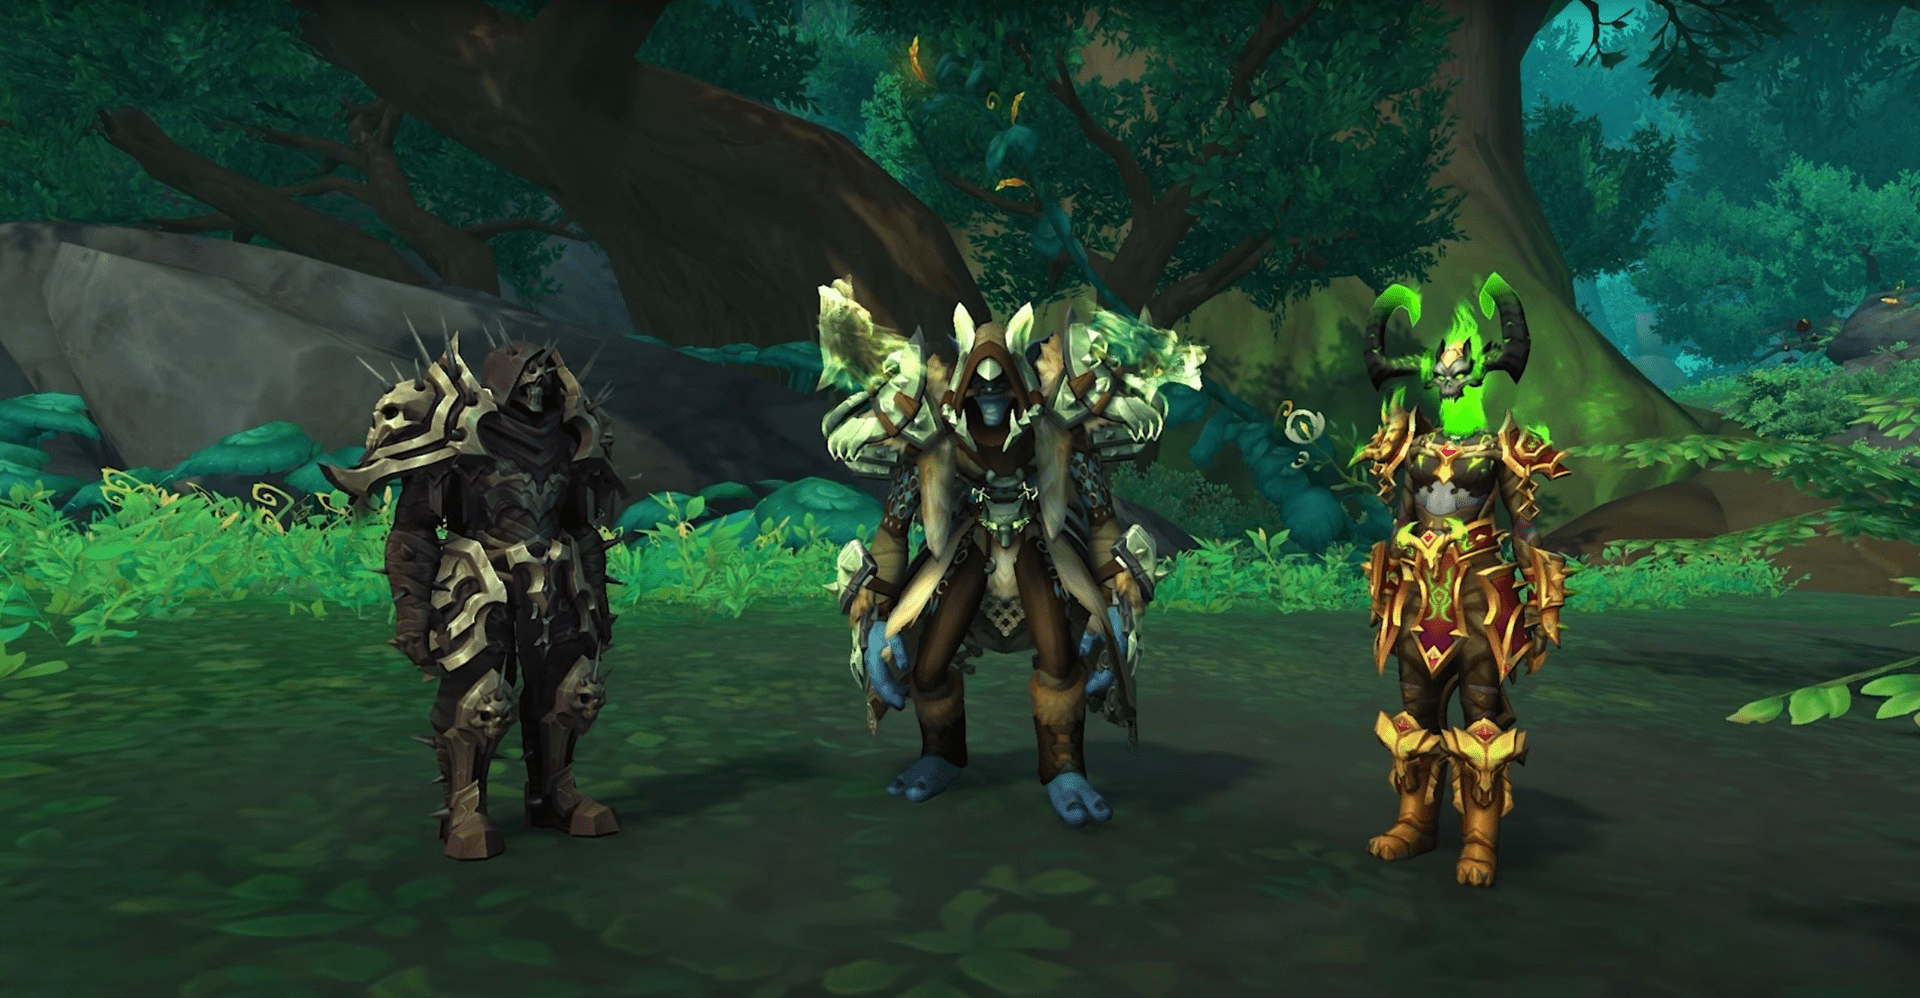
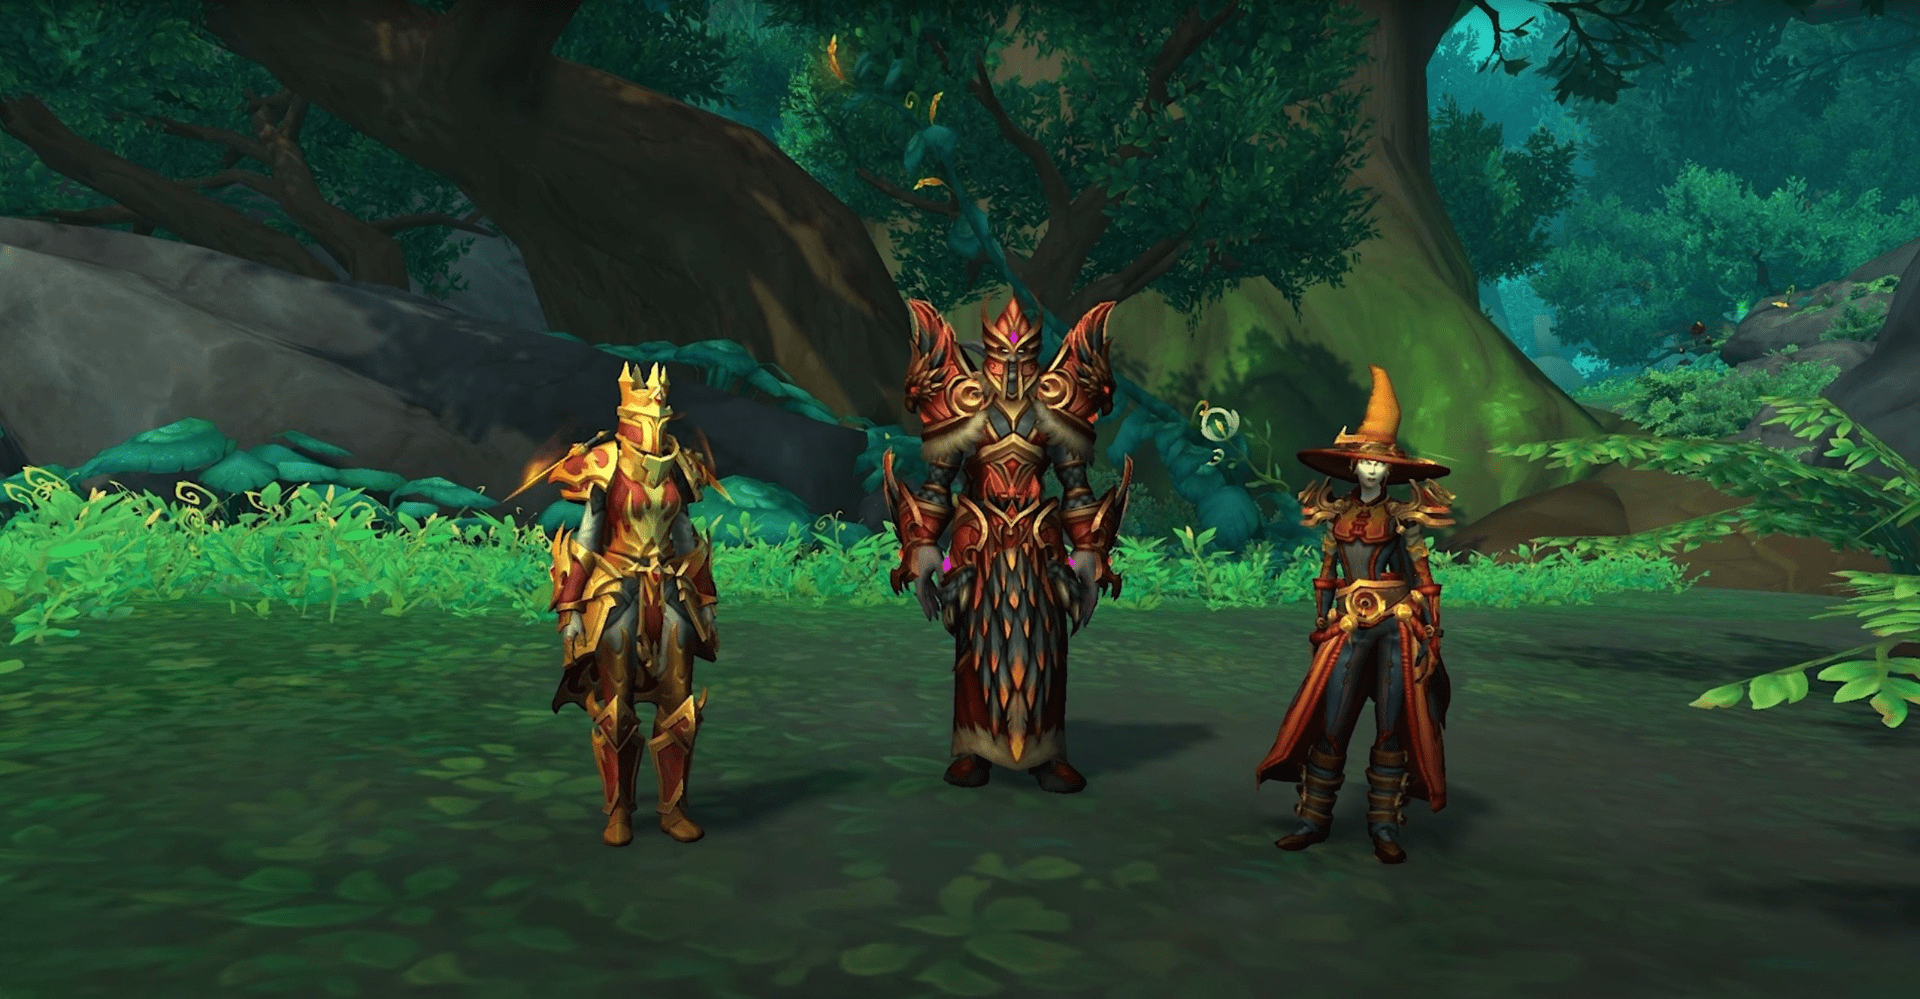
As always, WoW Amirdarssil, the Dream’s Hope features a range of tier sets available for all in-game classes. Below, you can find screenshots of all tier sets you can find in the upcoming Season 3. Do remember that the look of these sets can be slightly different, depending on what difficulty you are playing on - Normal, Heroic, or Mythic.
Let us have a brief look at what Amirdrassil, the Dream’s Hope drops you can expect to get from this raid:
Warlock, Hunter, and Monk
Warrior and Priest
Death Knight, Shaman, and Demon Hunter
Paladin, Druid, and Mage
Conclusion
To sum it up, navigating the challenges within the Amirdrassil raid requires precision, coordination, and adaptability. As adventurers, you have braved the dangers of the Emerald Dream, confronted formidable foes, and unraveled the mysteries of this captivating realm. With each encounter, you have honed your skills, learned from your experiences, and become stronger.
Remember to communicate effectively with your fellow raid members, utilize your unique abilities, and devise ingenious strategies to conquer the formidable foes that await you. The fate of Azeroth hangs in the balance, and it is your collective courage, determination, and teamwork that will ultimately decide the outcome. Make sure to check out our Amirdrassil, the Dream’s Hope guides for the latest updates and details, as well as boss tactics. May luck always be on your side, and we will see you in the game!
F.A.Q.
Where is the Amirdrassil, the Dream’s Hope?
You can enter the raid by making your path to Wellspring of Life. The easiest way to get there is to start off from the Wellspring Overlook flight point.
What item level should I be for Amirdrassil, the Dream’s Hope?
- LFR – 441-450;
- Normal – 454-463;
- Heroic – 467-476;
- Mythic – 480-489.
Is Amirdrassil, the Dream’s Hope hard?
While the success in the raid mainly depends on your player setup and how well you know the bosses’ mechanics, it does seem like Amirdrassil is a hard raid to complete.
How much loot drops from Amirdrassil, the Dream’s Hope?
Depending on what difficulty mode you have chosen to complete this raid on, you can hope to get gear all the way up to ilvl 489.
Who is the final boss in Amirdrassil?
Fyrakk the Blazing acts as the final boss in the Amirdrassil raid.
How many bosses are in Amirdarssil?
We have confirmed information about 9 bosses available in the Amirdarssil raid.
What is the hardest boss in Amirdrassil, the Dream’s Hope?
Being the final boss, Fyrakk the Blazing is also considered to be the hardest one to defeat.


