 Dallon Avery
Welcome, hunter! Whether you’re new to the Monster Hunter franchise or not, decorations may confuse you for a number of reasons. They are now two different categories of those and you don’t even start using them until later in the story.
With so many options, how do you know which decorations are actually worth slotting in? That’s where this Monster Hunter Wilds decorations guide comes in. We’ll break down the best weapon and armor decorations, explain how to farm them, and answer the most common questions hunters have about decorations.
If you want to skip the grind and get the best decorations fast, you can Buy Decorations Farm service at Skycoach. Their expert hunters will farm the rarest jewels for you, helping you build the perfect loadout without spending countless hours in high-rank hunts. Whether you need high-tier attack decorations or specialized utility skills, Skycoach provides a secure, efficient, and hassle-free way to enhance your hunter’s power—so you can focus on the thrill of the hunt!
Read our other articles:
- Artian Weapons Guide
- Multiplayer Guide
- Gearing Guide
- Best Builds for Each Weapon
- Best Settings Guide
- Beginner's Guide
Note: At Skycoach, you can Buy Monster Hunter Wilds Boost at the best prices with fast delivery. Use our special PROMO CODE (in green) hidden in this article for a 20% DISCOUNT.
Browse our hottest Monster Hunter Wilds Boosting services


Best Weapon Decorations
Let’s start with the MH Wilds best weapon decorations, which are all about enhancing your offense, efficiency, and overall combat power. Unlike armor decorations, which often focus on survivability and utility, weapon decorations are more aggressive, boosting attack power, elemental damage, sharpness management, and ranged effectiveness.
Each weapon in the game has slot levels that determine what kind of decorations you can equip. Higher-tier weapons tend to have more or better slots, allowing for even more customization. The goal is to pick decorations that complement your weapon type and playstyle, ensuring you get the most out of every attack.
Below, we’ll break down the best weapon decoration categories, list the top choices, and explain which weapons they work best on.
Sharpness & Charge-Based Enhancements
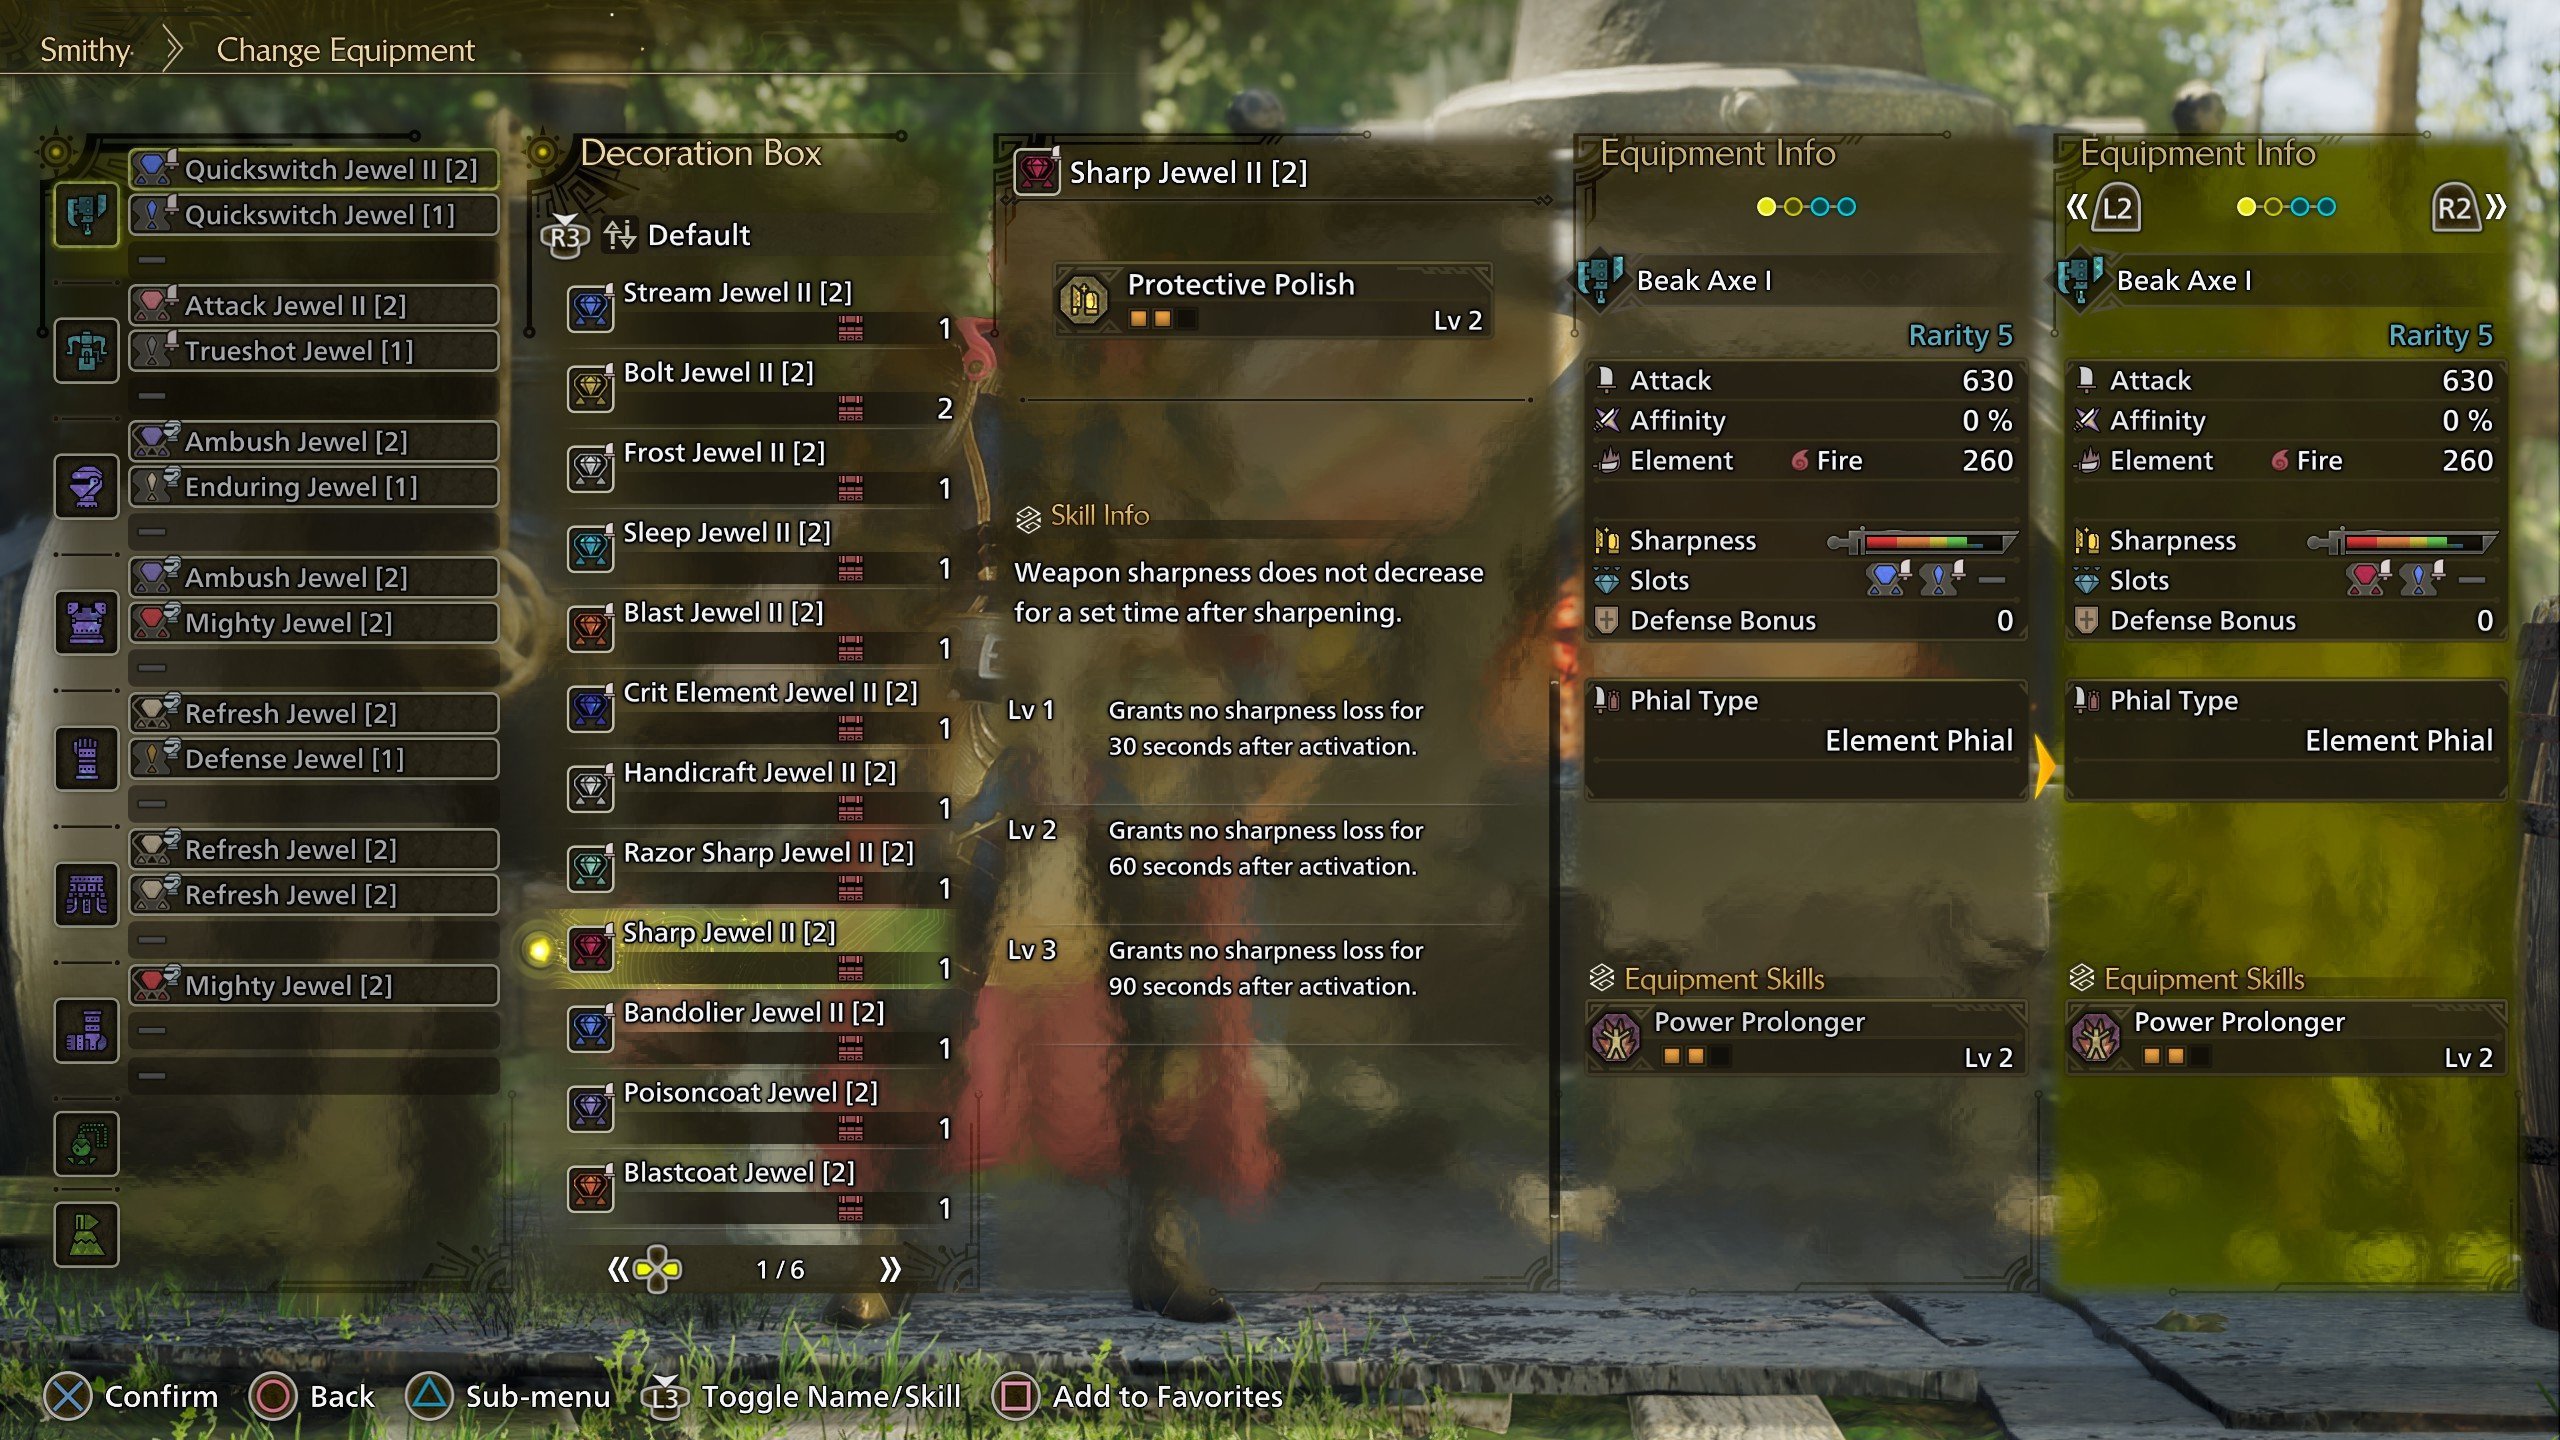
Best for: Melee weapons that rely on sharpness or charge attacks, such as Great Sword, Long Sword, Switch Axe, and Charge Blade. BLOG20
| Decoration | Skill Effect | Best Used On |
| Sharp Jewel | Protective Polish: Keeps weapons sharp longer | Great Sword, Dual Blades, Long Sword |
| Razor Sharp Jewel | Razor Sharp: Reduces sharpness loss | Most bladed weapons |
| Mastery Jewel | Master’s Touch: 80% chance to retain sharpness on crits | Crit-focused weapons like Dual Blades |
| Charge Jewel | Charge Master: Increases charge rate | Charge Blade, Great Sword, Hammer |
| Enhancer Jewel | Power Prolonger: Extends charge duration | Switch Axe, Charge Blade, Insect Glaive |
Melee weapons lose sharpness over time, and stopping mid-fight to sharpen with a long animation is be risky. Sharpness-related decorations are some of the Monster Hunter Wilds best decorations for melee weapons because they reduce how often you need to sharpen, keeping your DPS high. Meanwhile, charge-based weapons like Charge Blade and Hammer get huge benefits from faster charge times and prolonged charge durations.
Elemental Damage Boosters
Best for: Weapons that deal elemental damage, such as Dual Blades, Bow, Charge Blade, and Switch Axe.
| Decoration | Skill Effect | Best Used On |
| Blaze Jewel | Fire Attack: Boosts Fire damage | Fire-based weapons like Dual Blades, Bow |
| Bolt Jewel | Thunder Attack: Boosts Thunder damage | Thunder-element weapons |
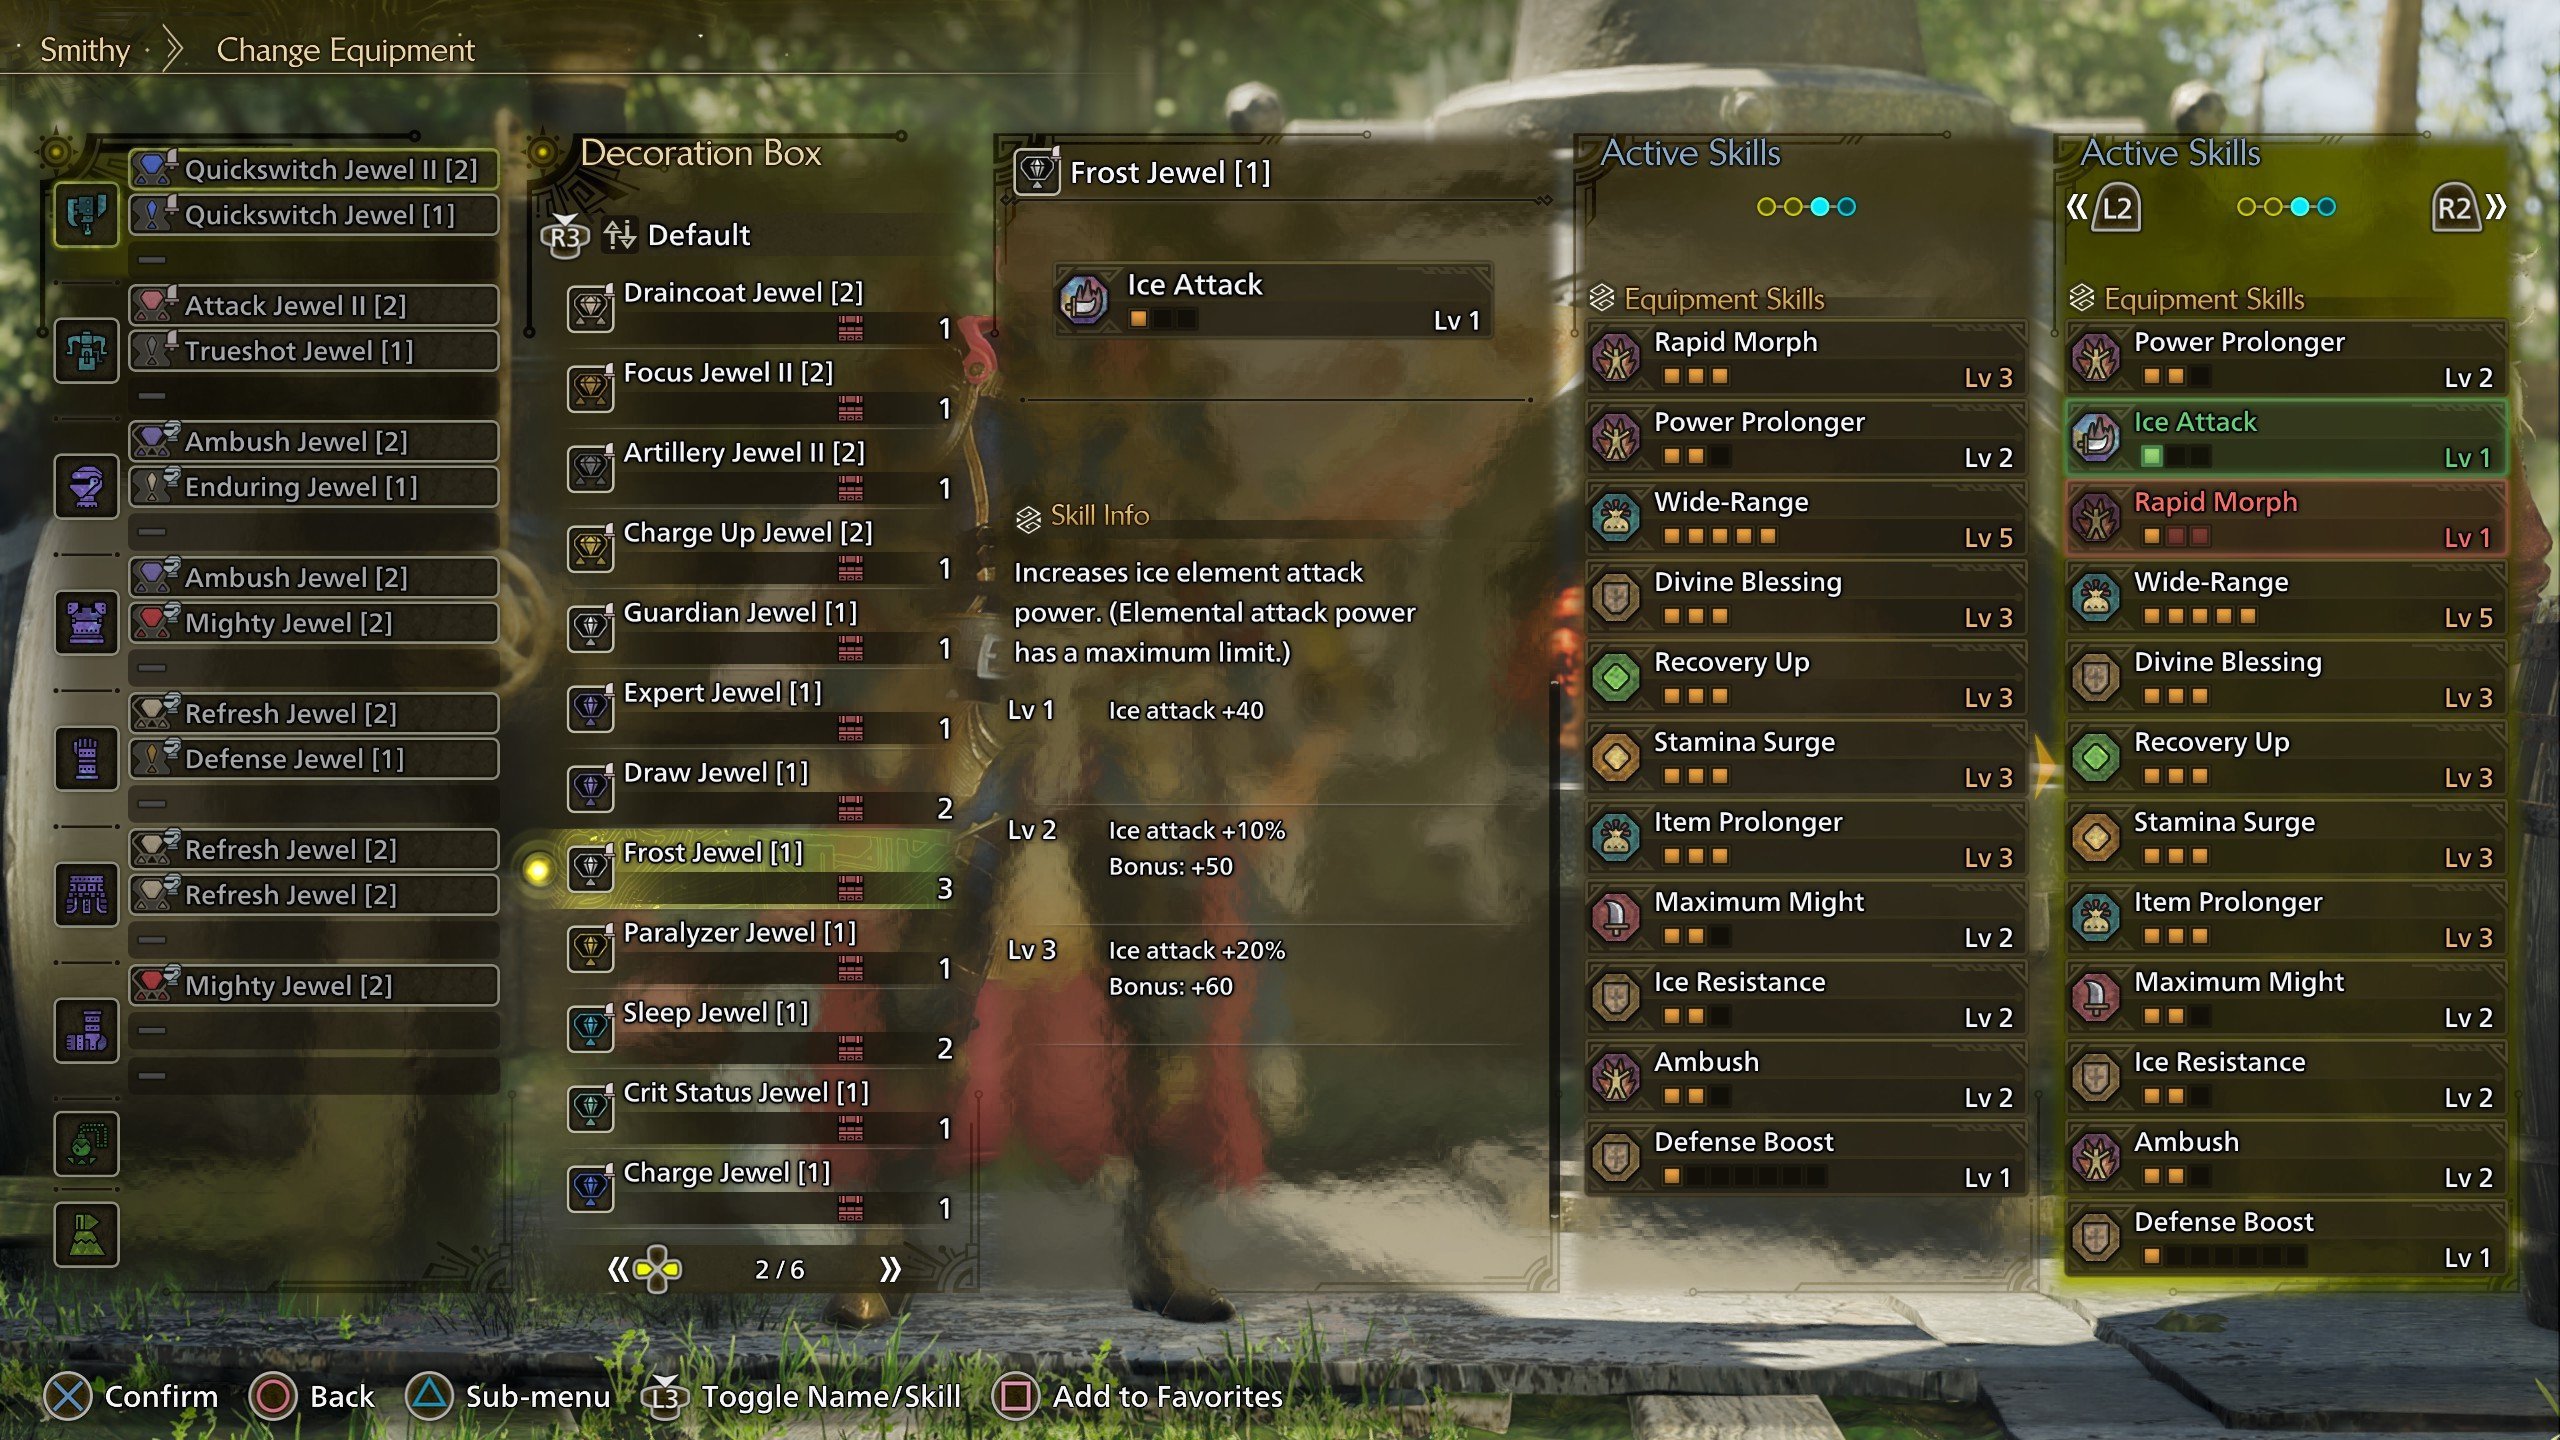
| Frost Jewel | Ice Attack: Boosts Ice damage | Ice-based weapons |
| Stream Jewel | Water Attack: Boosts Water damage | Water-element weapons |
| Dragon Jewel | Dragon Attack: Boosts Dragon damage | Dragon-element weapons like Charge Blade |
If your weapon has an elemental attribute, these decorations will significantly increase its effectiveness. This is especially important for fast-hitting weapons like Dual Blades or Bow, where elemental damage stacks quickly. Before a hunt, check the monster’s elemental weaknesses and adjust your decorations accordingly.
Ranged Weapon Optimizations
Best for: Bow and Bowguns, focusing on ammo efficiency, range, and damage.
| Decoration | Skill Effect | Best Used On |
| Bandolier Jewel | Tetrad Shot: Increases Affinity with ammo | Bowgun |
| Forceshot Jewel | Normal Shots: Boosts non-elemental ammo damage | Bow, Bowgun |
| Opener Jewel | Opening Shot: Increases first shot power and reload speed | Bowgun |
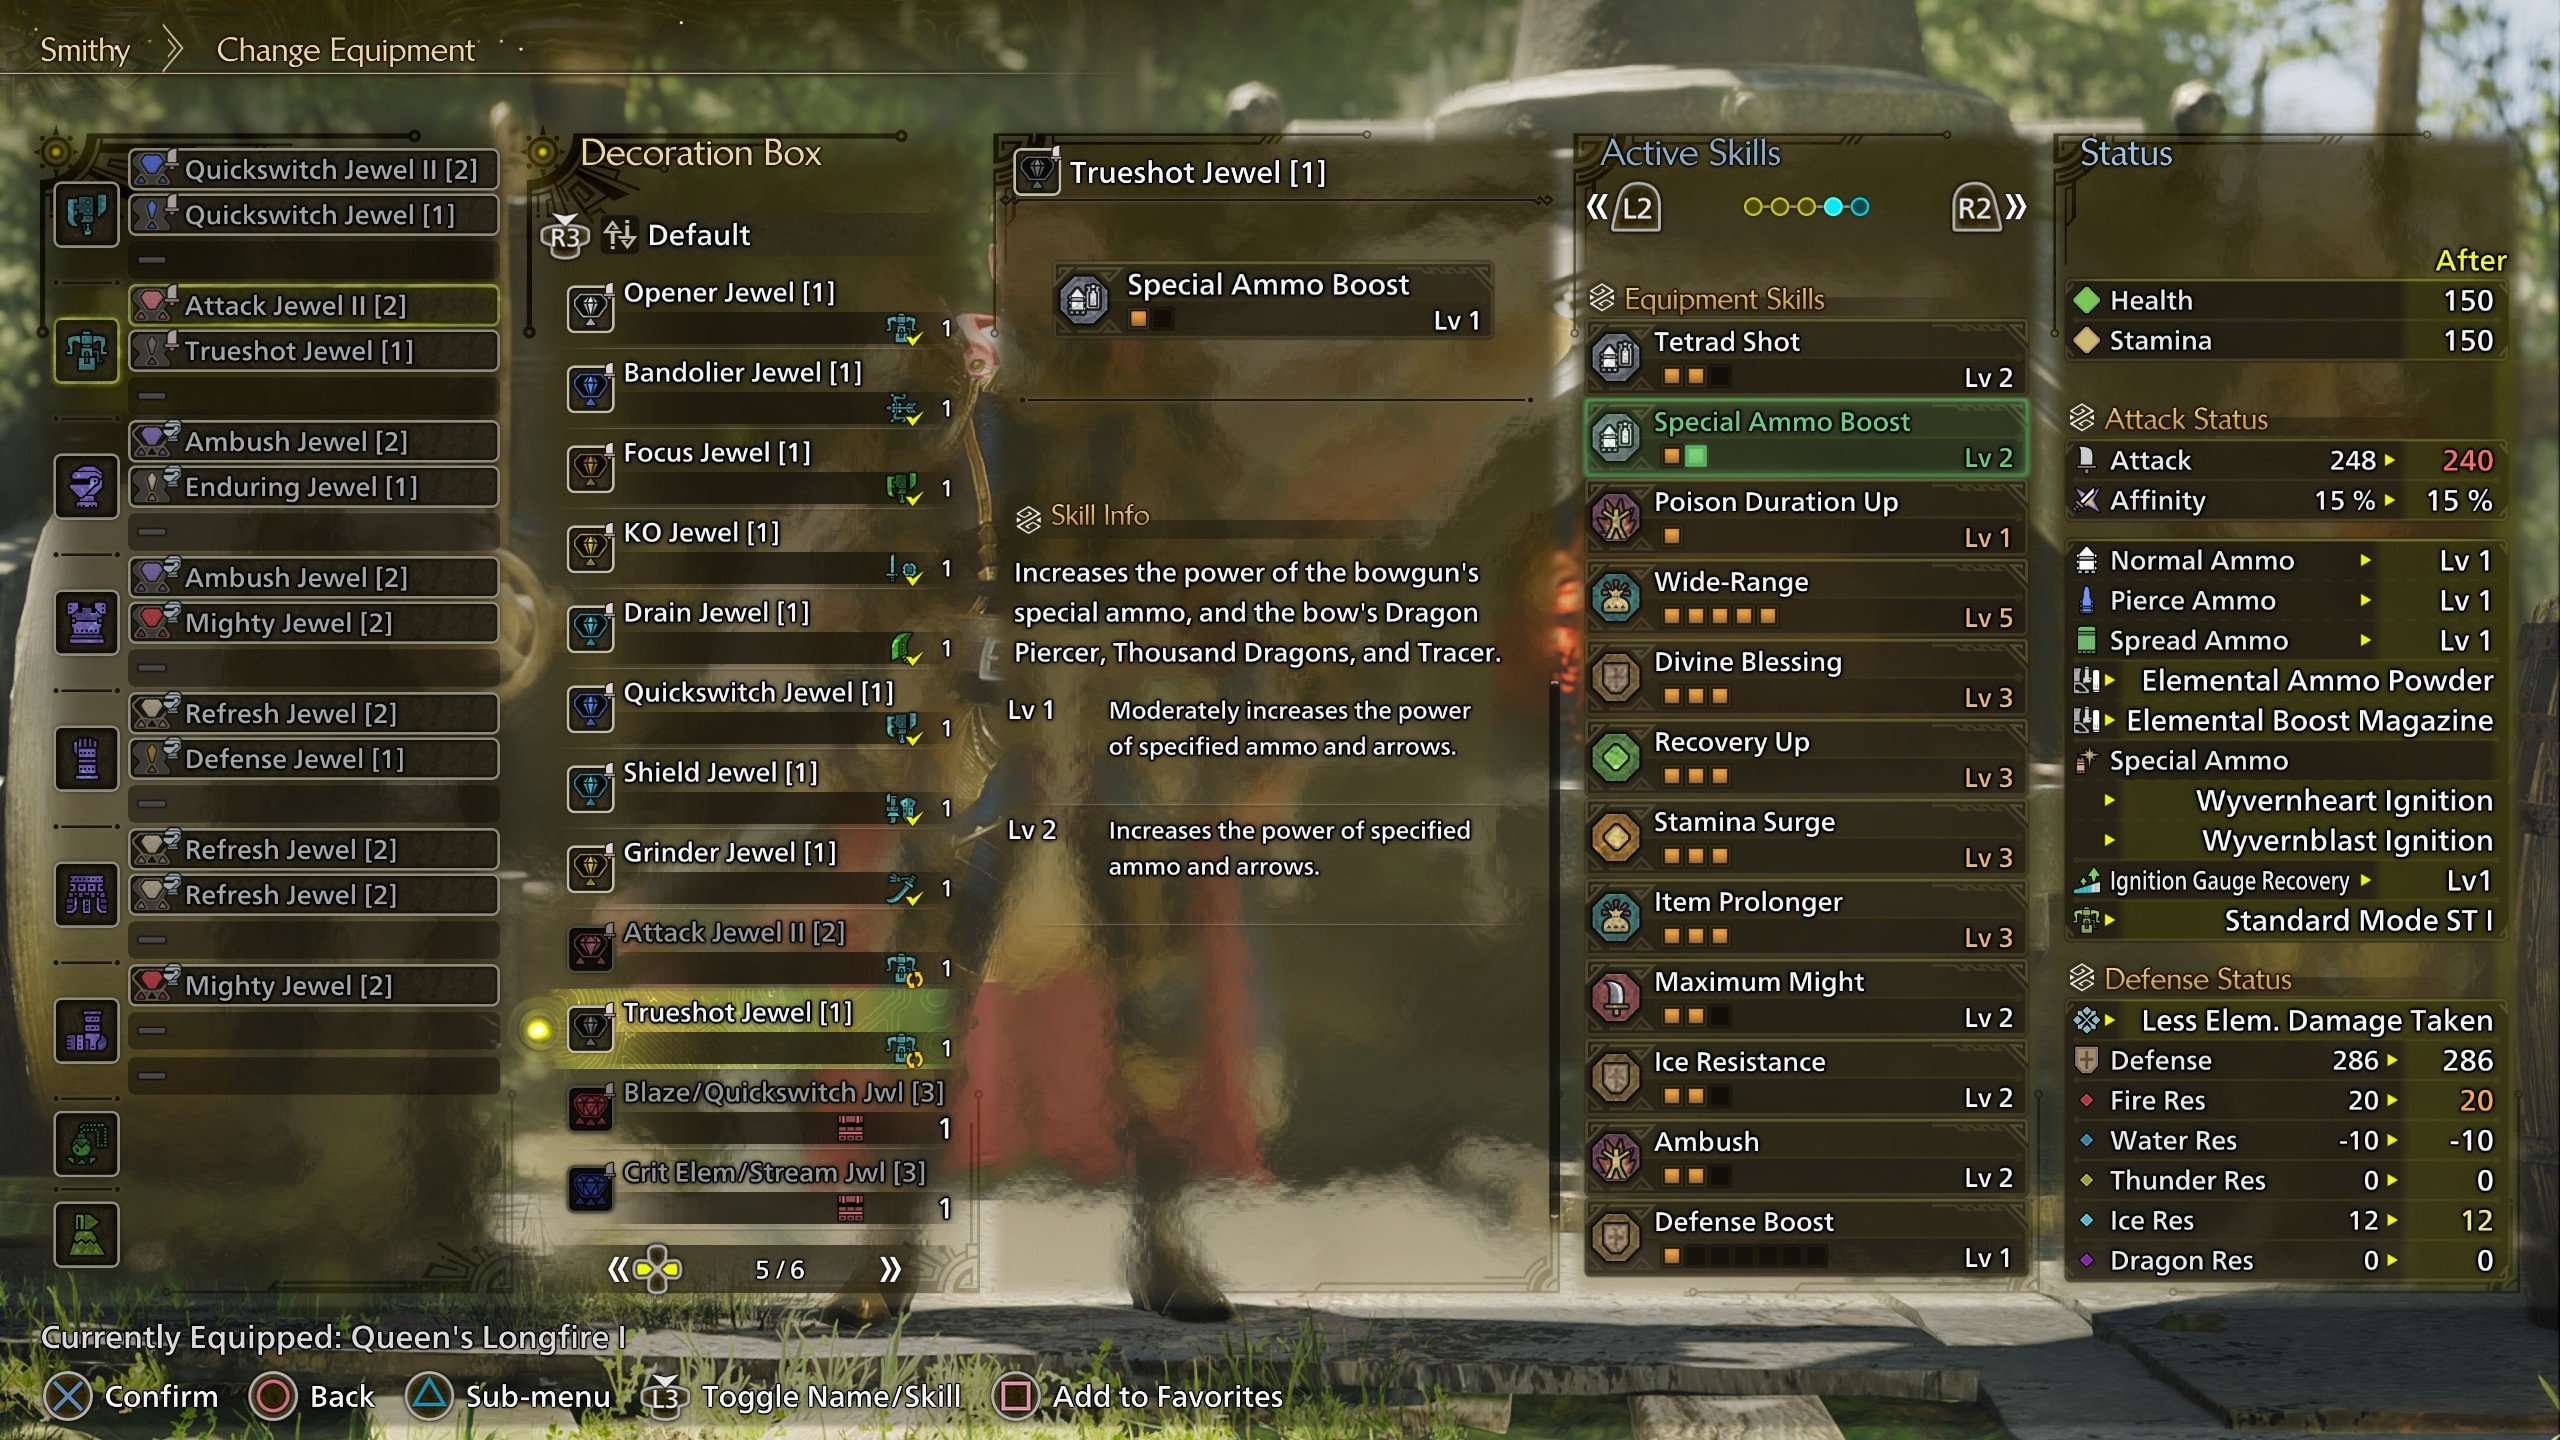
| Trueshot Jewel | Special Ammo Boost: Increases special ammo damage | Bow, Bowgun |
| Precise Jewel | Ballistics: Extends effective range | Bow, Bowgun |
Bow and Bowguns function very differently from melee weapons, relying on ammo management and positioning. These decorations help maximize your damage output, increase Affinity, and extend your range, allowing for more effective shots from a safer distance.
Raw Damage & Critical Hit Boosters
Best for: Any weapon looking to maximize raw attack power and crit damage.
| Decoration | Skill Effect | Best Used On |
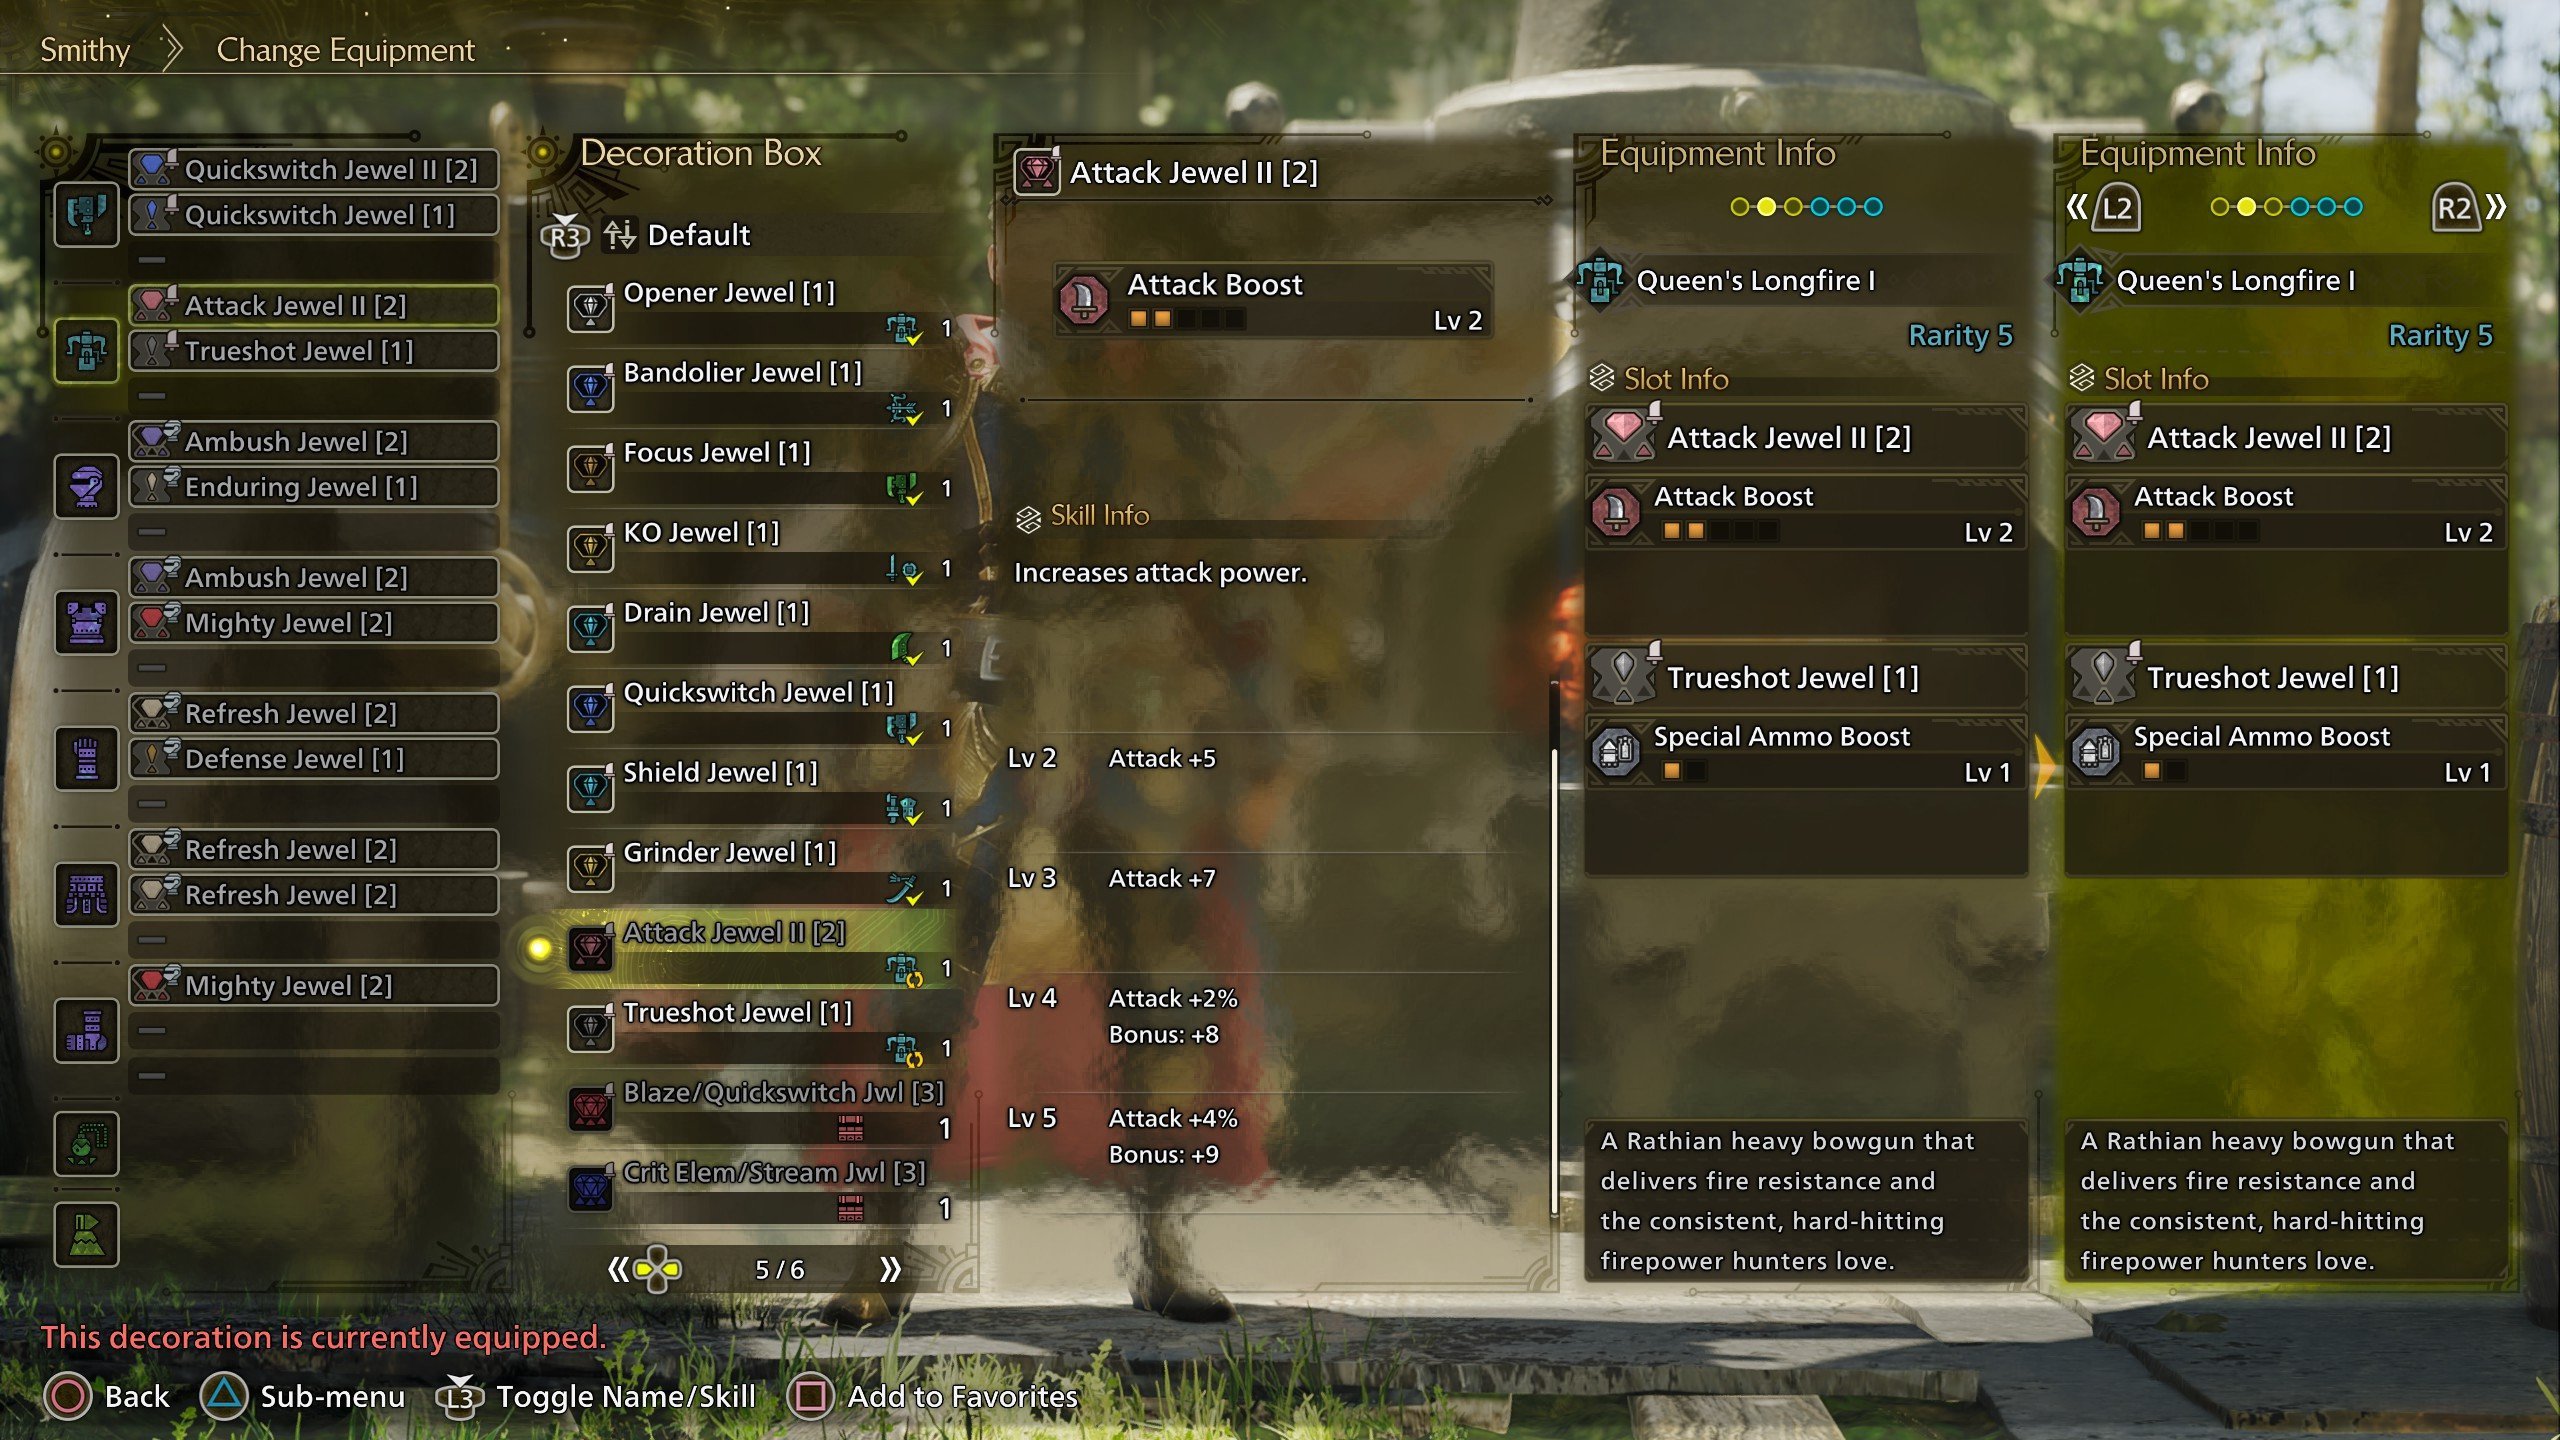
| Attack Jewel | Attack Boost: Increases attack power | All weapons |
| Critical Jewel | Critical Boost: Increases crit damage | High Affinity weapons |
| Expert Jewel | Critical Eye: Raises Affinity (crit rate) | Dual Blades, Long Sword |
| Crit Element Jewel | Critical Element: Boosts crit elemental damage | Elemental weapons |
If you just want to hit harder, these are the best decorations to slot in. Affinity-based weapons (Long Sword, Dual Blades) benefit greatly from Critical Eye and Critical Boost, while Attack Boost is universally good for all weapons.
Browse our hottest Monster Hunter Wilds Boosting services


Best Armor Decorations
Unlike weapon decorations, which focus on offensive power, sharpness, and elemental damage, MH Wilds best armor decorations are designed to improve survivability, utility, and resistances.
Key differences:
- Weapon Decorations → Mostly offensive, boosting raw attack, crit rate, sharpness, or elemental damage.
- Armor Decorations → Tend to be defensive or utility-based, helping with damage reduction, healing, resistances, and exploration.
- Slot Limitations → Some powerful skills are only found on armor decorations, while others only work on weapons (e.g., Sharpness boosts are for weapons, while Defensive skills belong to armor).
Now, let’s break down the best armor decorations by category.
Defensive Buffs – Take Less Damage & Survive Longer
Best for: Tanky builds, solo play, or aggressive hunters who take a lot of hits.
| Decoration | Skill Effect | Best For |
| Defense Jewel | Defense Boost – Increases armor defense | All builds |
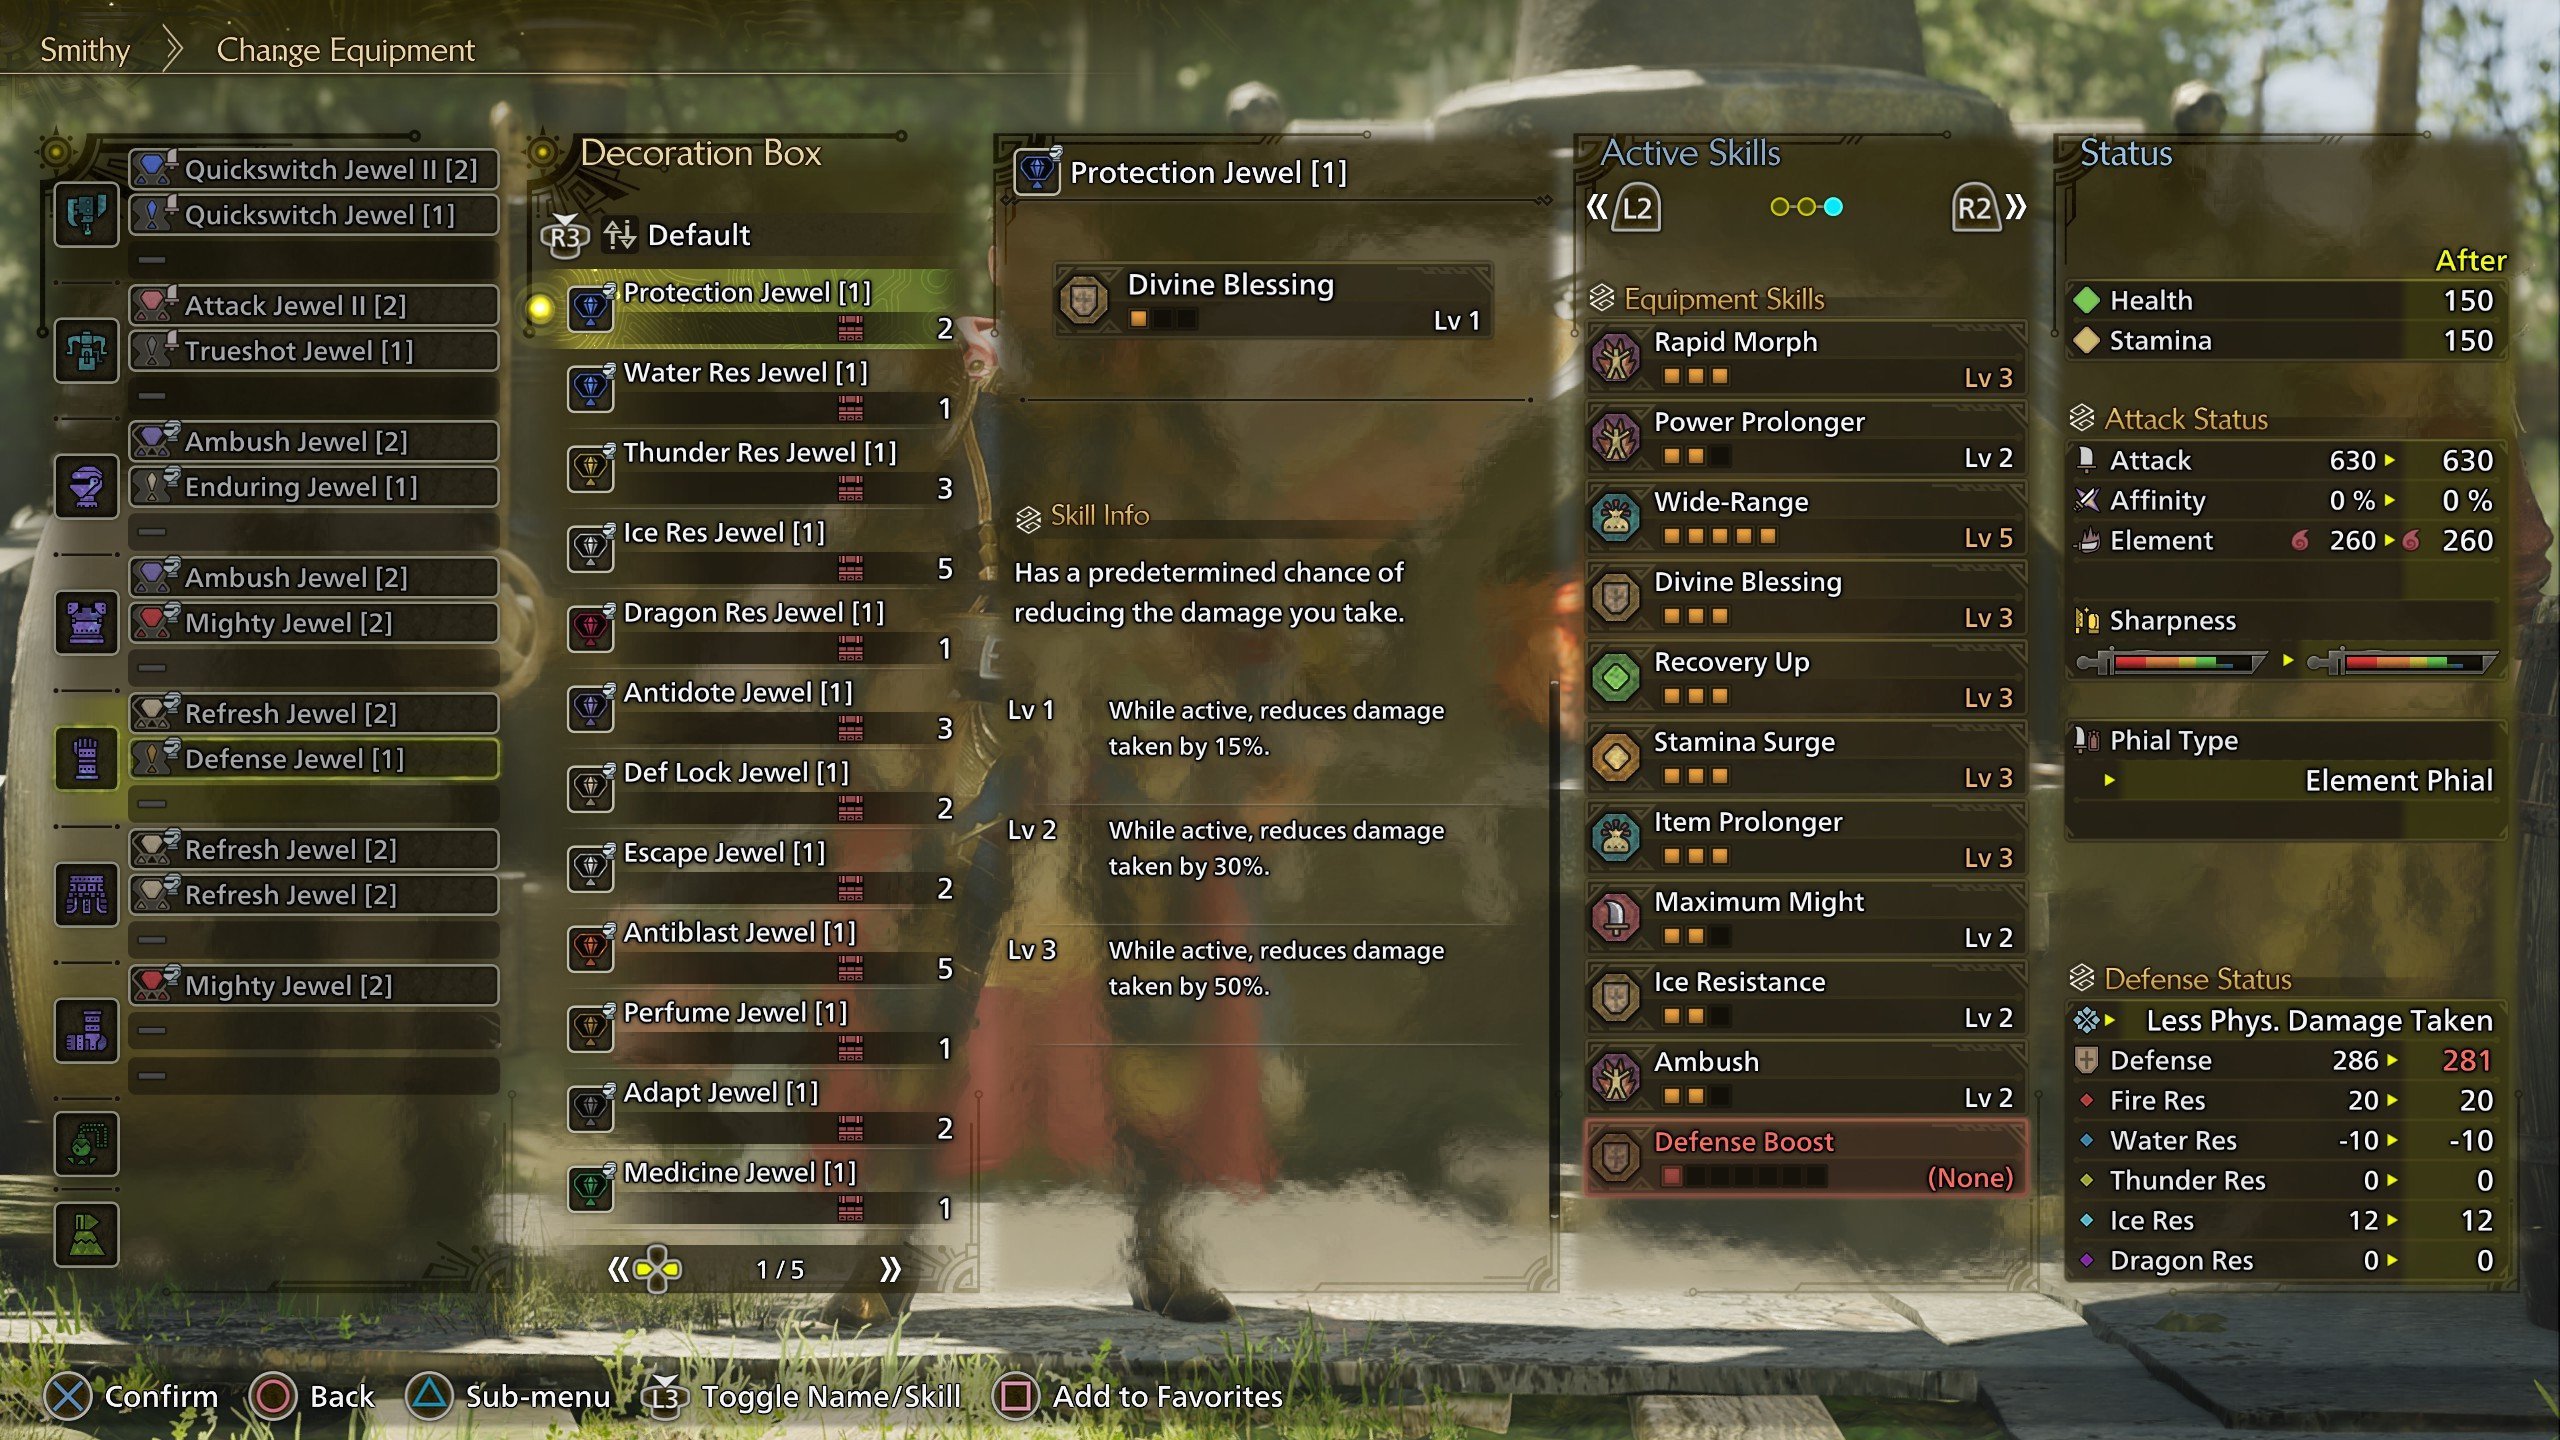
| Protection Jewel | Divine Blessing – Chance to reduce incoming damage | Tank builds |
| Potential Jewel | Heroics – Increases attack & defense at low HP | Risky, high-damage builds |
| Growth Jewel | Self-Improvement – Attack/defense increase over time | Longer hunts |
If you’re getting hit a lot, these decorations can reduce damage taken, boost your defense, and even reward risky play with Heroics. Divine Blessing has a chance to mitigate big hits, making it a top choice for tanky or solo hunters. BLOG20
Elemental Resistances – Reduce Monster Elemental Damage
Best for: Fighting monsters with strong elemental attacks (fire, ice, thunder, water, dragon).
| Decoration | Skill Effect | Best For |
| Fire Res Jewel | Fire Resistance – Reduces Fire damage | Fire monsters like Rathalos |
| Ice Res Jewel | Ice Resistance – Reduces Ice damage | Ice monsters like Blangonga |
| Thunder Res Jewel | Thunder Resistance – Reduces Thunder damage | Thunder monsters like Zinogre |
| Water Res Jewel | Water Resistance – Reduces Water damage | Water-based fights |
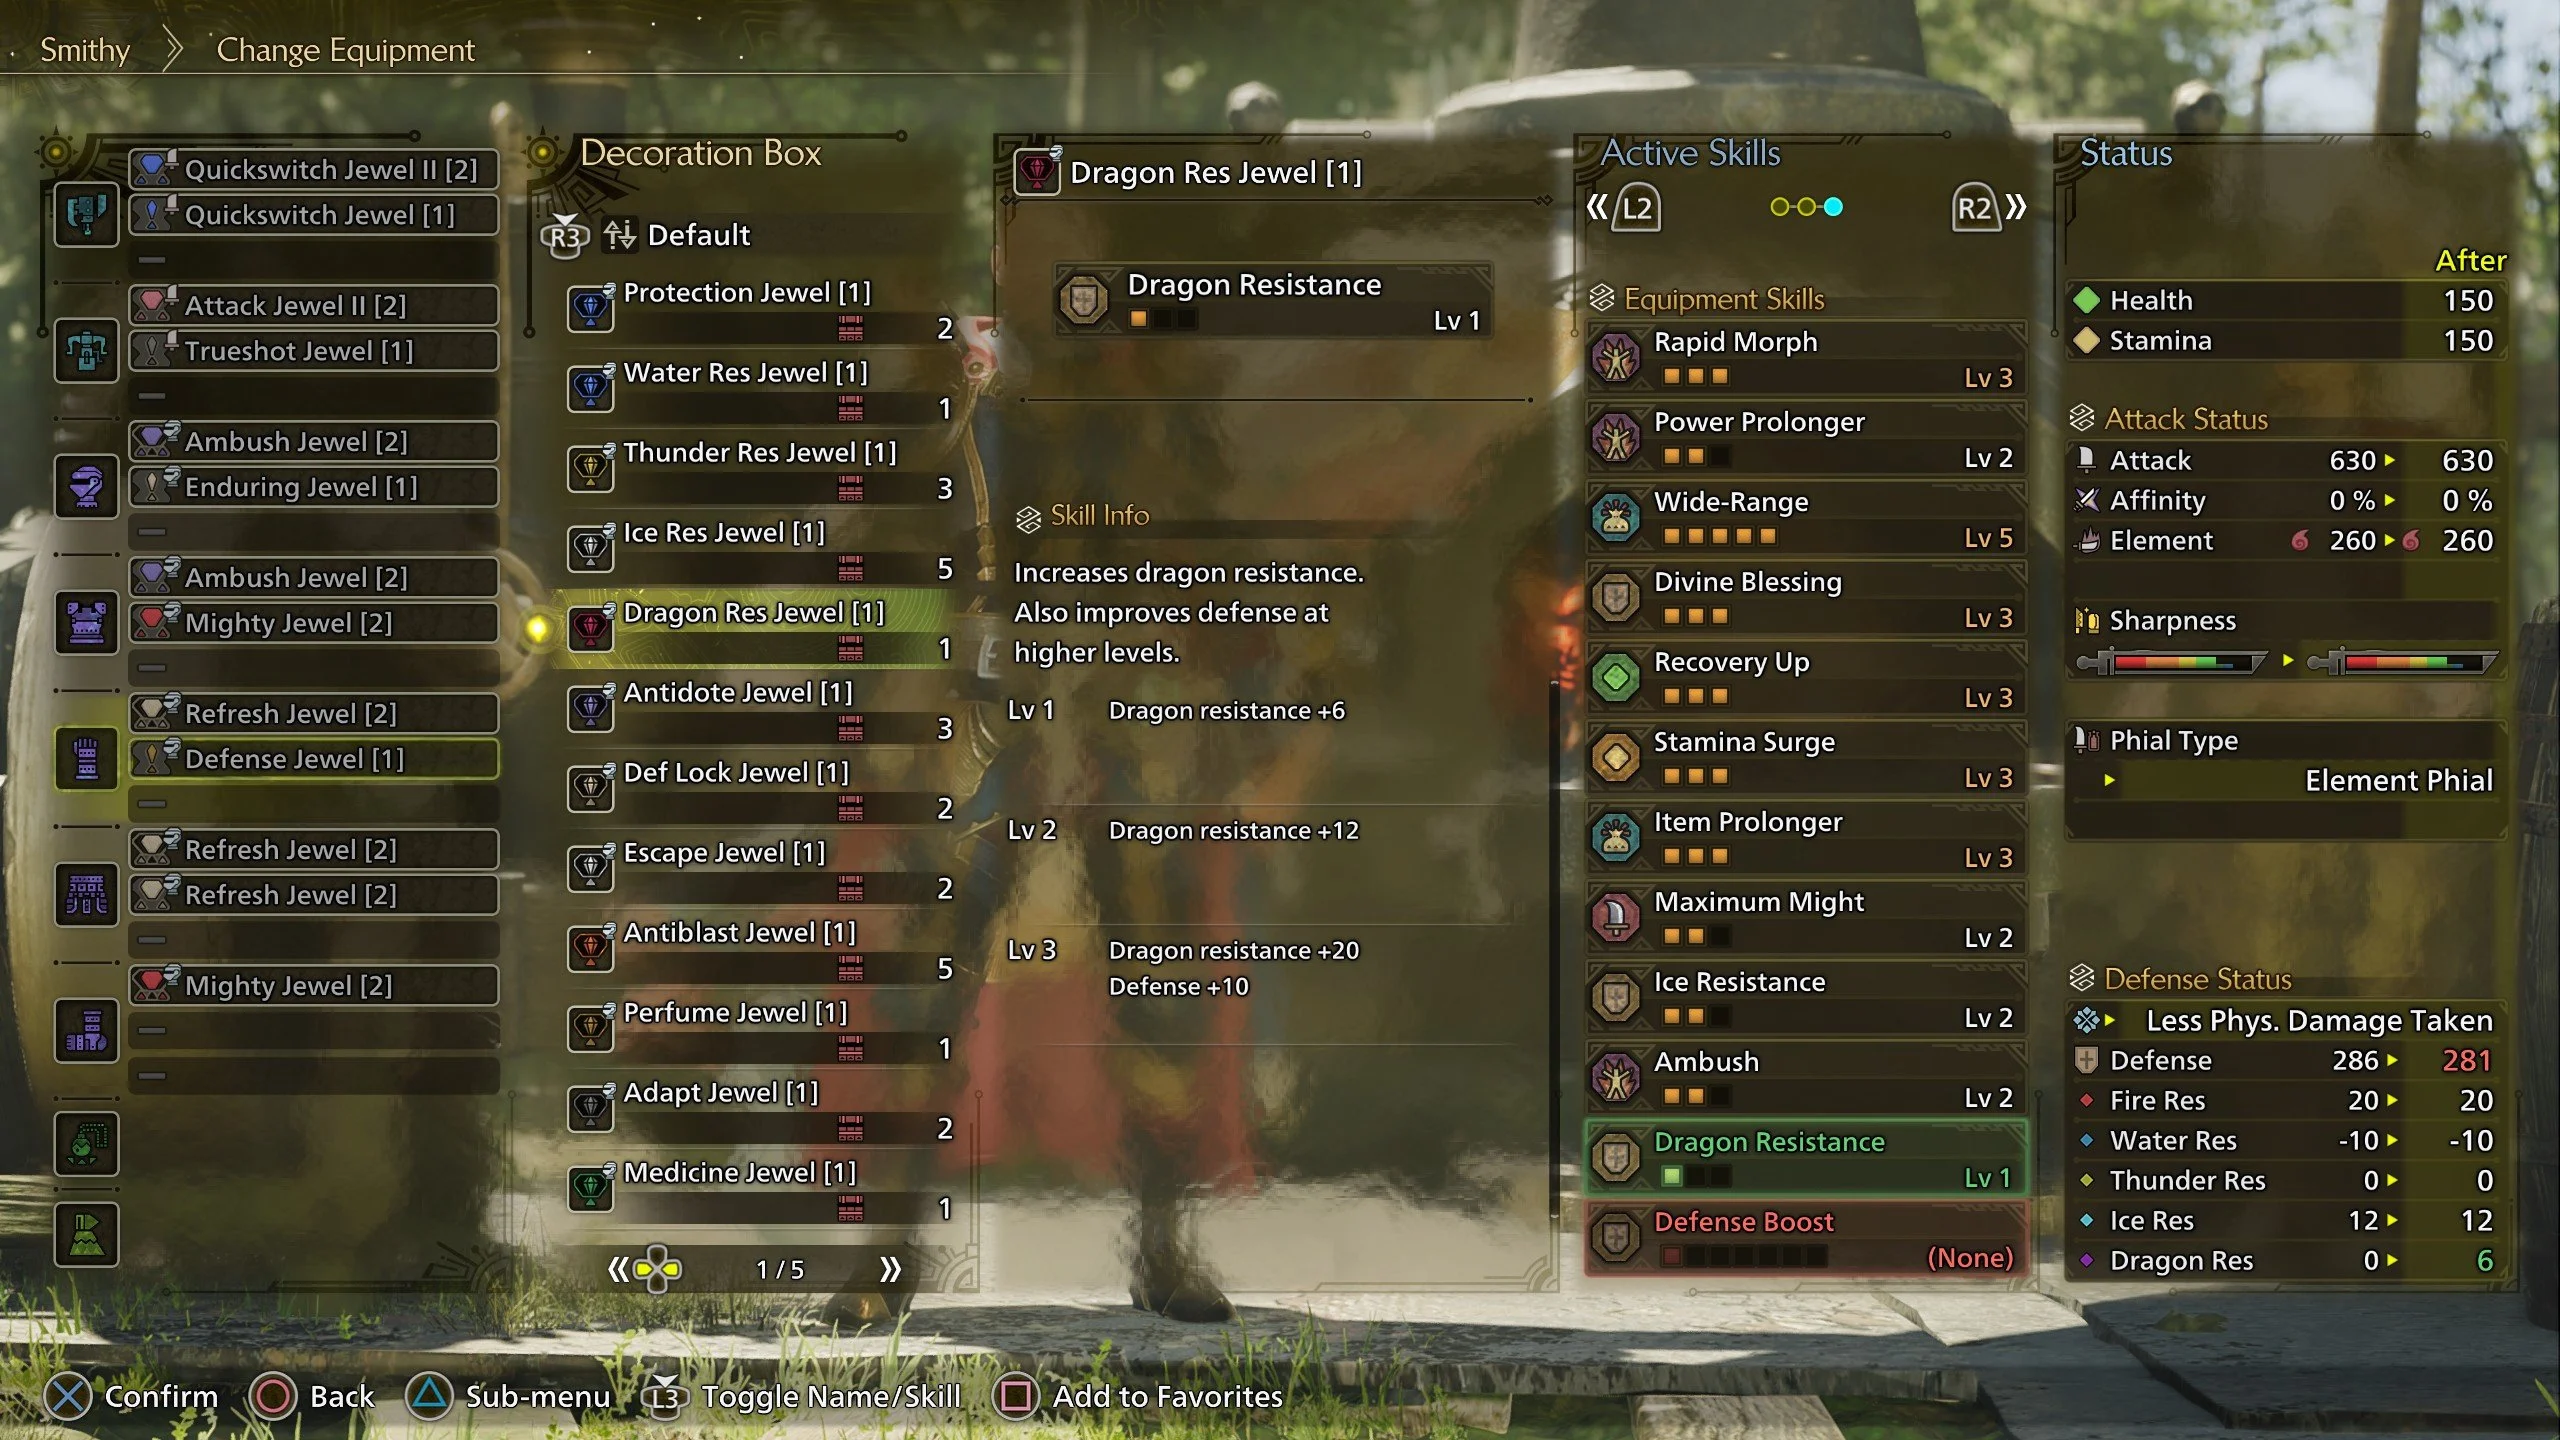
| Dragon Res Jewel | Dragon Resistance – Reduces Dragon attacks | Certain endgame monsters |
Monsters like Rey Dau, Uth Duna, and others can unleash devastating elemental attacks. It’s obvious that the best decorations for high rank Monster Hunter Wilds are the ones that provide elemental resistances, which can dramatically reduce damage taken and help you survive longer in tough fights.
Status Ailment Protection – Avoid Poison, Stuns & Debuffs

Best for: Hunts against status-heavy monsters (e.g., Nerscylla, Rathalos, Congalala).
| Decoration | Skill Effect | Best For |
| Antidote Jewel | Poison Resistance – Shortens poison duration | Fighting Rathalos, Pukei-Pukei |
| Escape Jewel | Bind Resistance – Reduces time trapped in webs or ice | Monsters like Nerscylla |
| Perfume Jewel | Stench Resistance – Prevents Stench (disables item use) | Fighting Congalala |
| Adapt Jewel | Adaptability – Negates need for Cool/Hot Drinks | Extreme temperature hunts |
Getting poisoned, paralyzed, or trapped can be a death sentence. These decorations cut down on status effects, letting you stay mobile and fight without interruptions.
Healing & Support – Recover Faster & Help Teammates

Best for: Co-op play and hunters who want more healing options.
| Decoration | Skill Effect | Best For |
| Medicine Jewel | Recovery Up – Increases healing from potions | All players |
| Satiated Jewel | Free Meal – Random chance to not consume an item | Farming & healing builds |
| Friendship Jewel | Wide-Range – Shares healing effects with teammates | Co-op support builds |
| Survival Jewel | Survival Expert – Boosts Vigorwasp healing effectiveness | Palico healing builds |
Want to heal faster or help your team stay alive? These decorations boost healing, increase item efficiency, and allow you to heal teammates. Wide-Range is essential for support players in multiplayer hunts.
Exploration & Gathering – More Resources, Less Hassle
Best for: Hunters who farm materials or play a more passive support role.
| Decoration | Skill Effect | Best For |
| Botany Jewel | Botanist – Increases plant collection | Herb & potion farming |
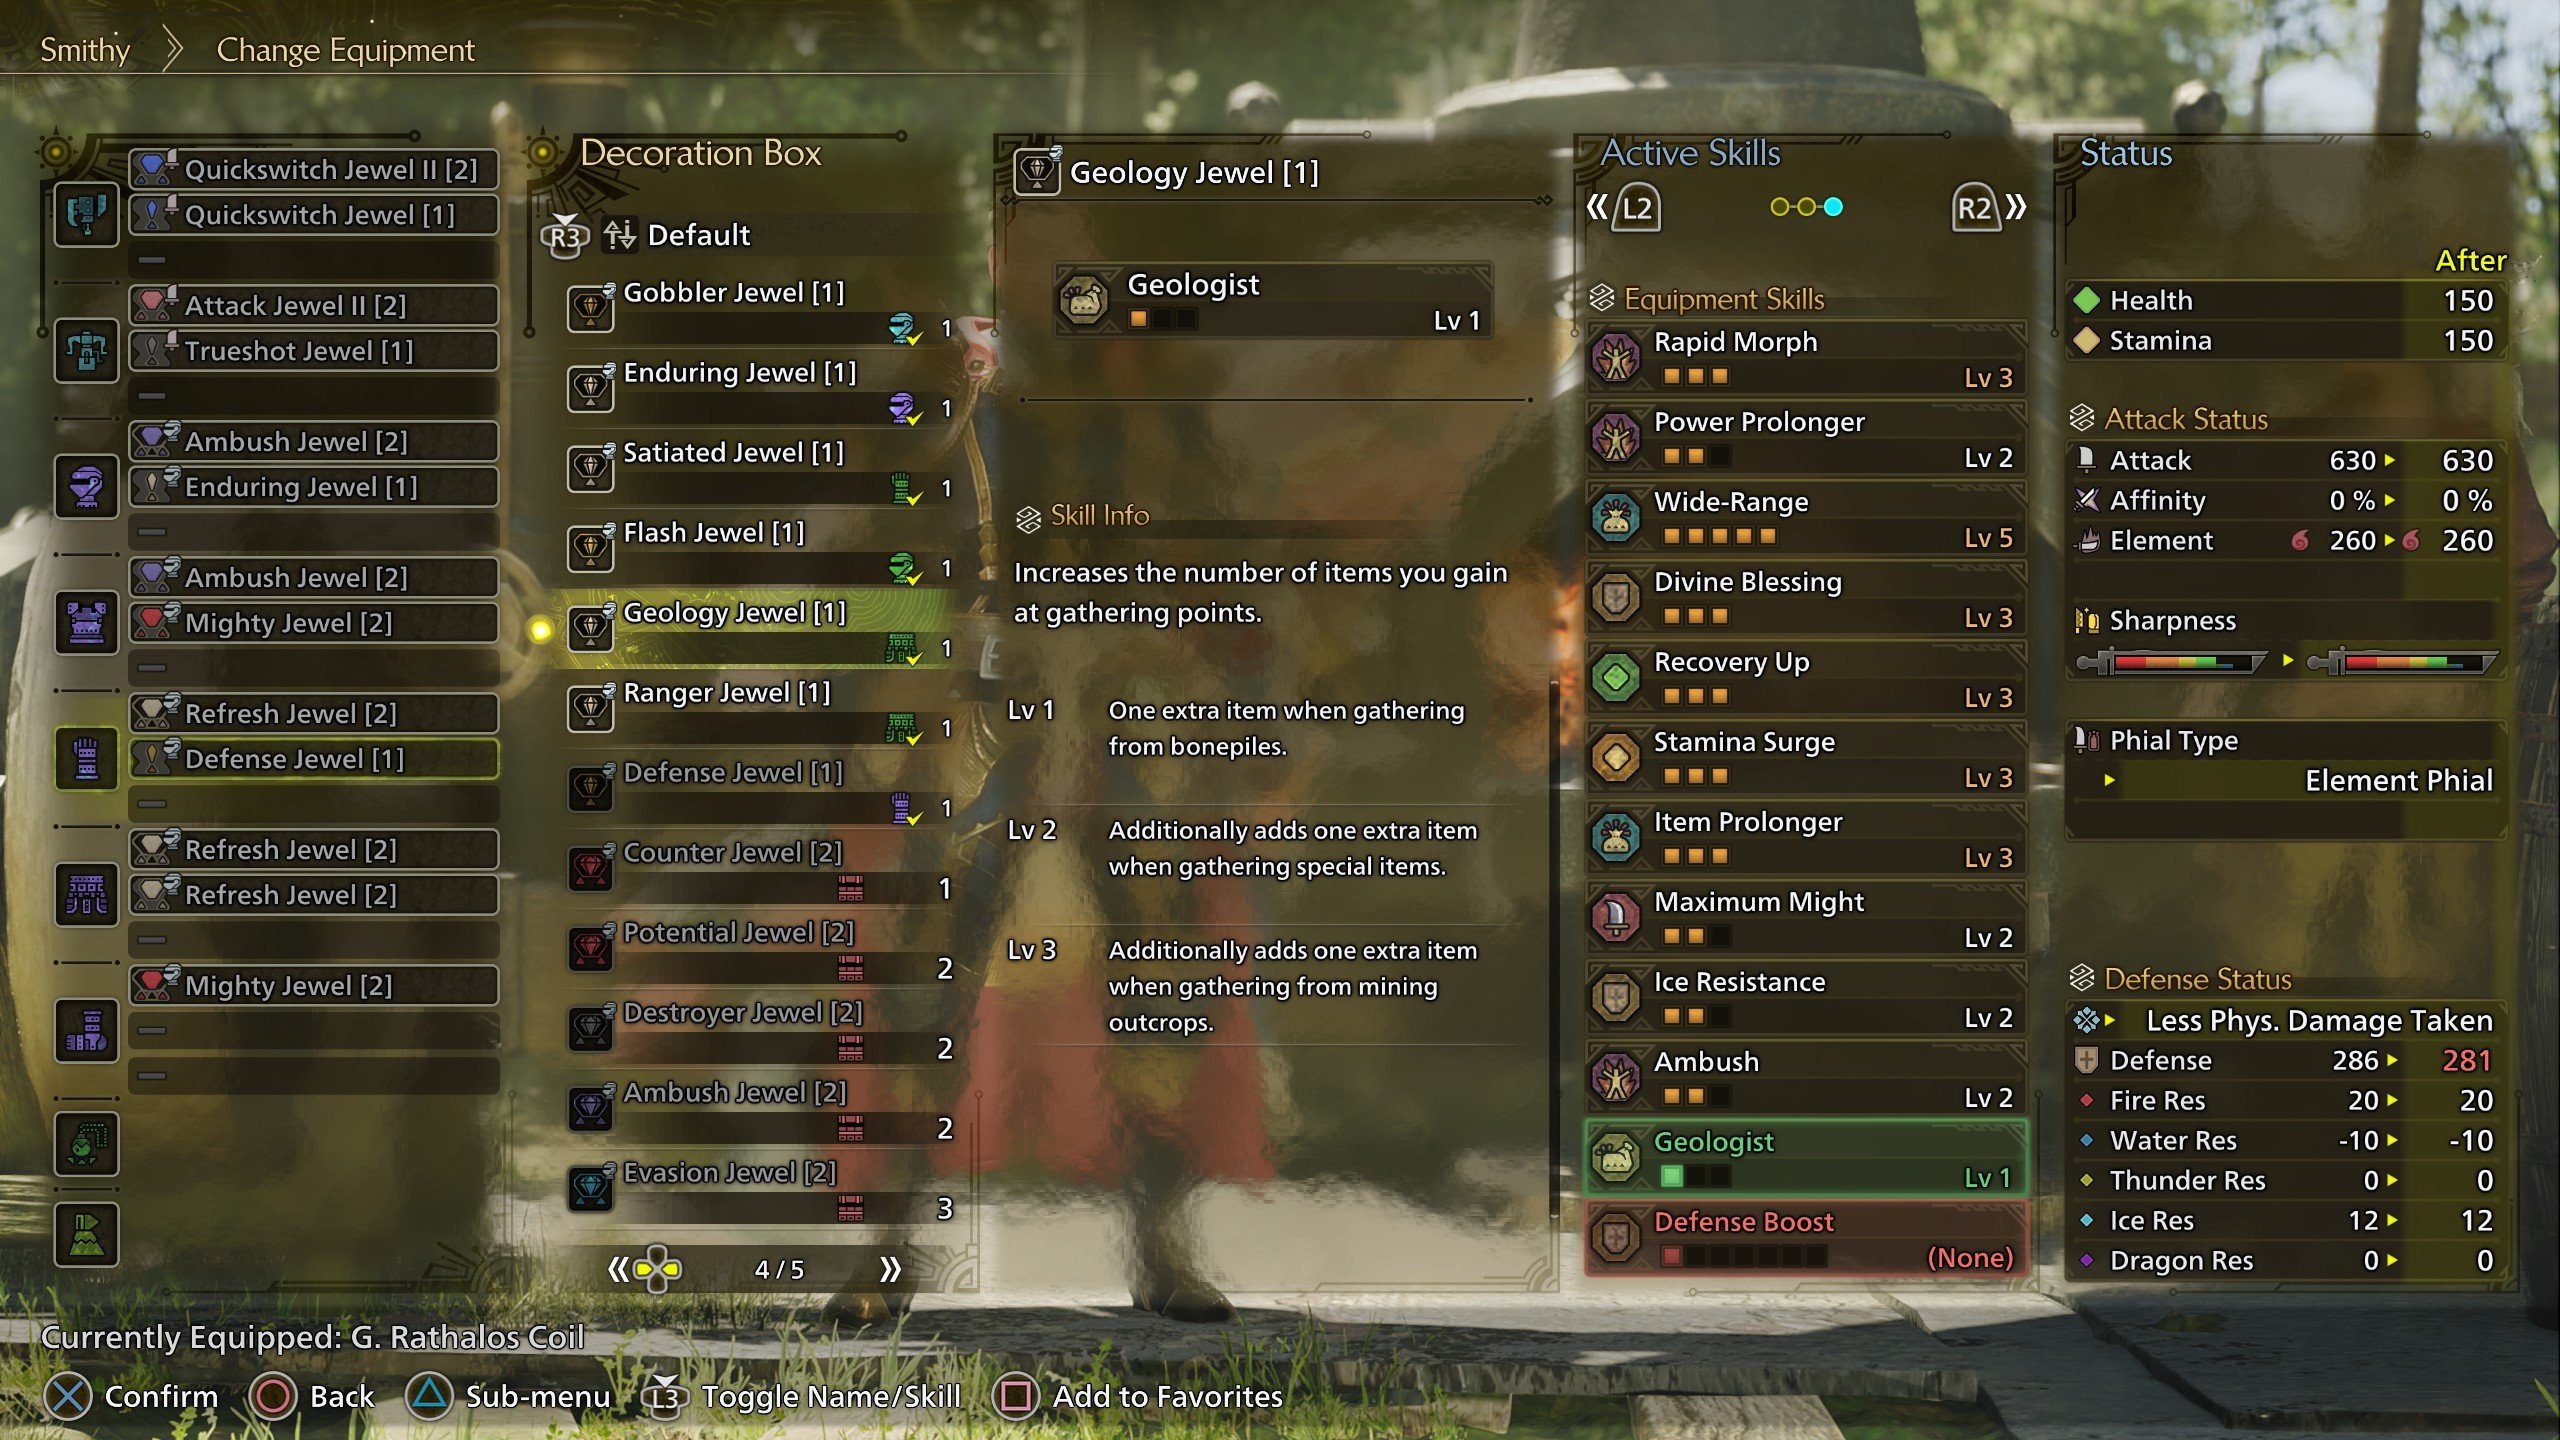
| Geology Jewel | Geologist – More ore/bone gathering | Mining/material farming |
| Ranger Jewel | Outdoorsman – Boosts food gathering | Food-based buffs |
| Specimen Jewel | Entomologist – Increases bug part drops | Farming Vespoids & bugs |
If you’re a resource-focused player, these decorations increase material yields and make farming easier. Geologist is especially useful for mining ore, while Botanist helps with crafting potions.
How to Unlock Tier 3 Decorations
Decorations come in three tiers, and each piece of equipment has specific slots where they can be placed. Higher-tier decorations provide stronger effects but require larger slots.
- Tier 1 Decorations – Basic but useful, often providing small stat boosts or simple skills. These can fit into any slot.
- Tier 2 Decorations – More specialized, often tied to specific playstyles or weapons. These require mid-to-high-tier slots.
- Tier 3 Decorations – The rarest and most powerful, usually offering major enhancements to damage, survivability, or utility. They can only fit into the largest slots.
Equipment with more or bigger decoration slots offers greater customization options, making them highly valuable for endgame builds. However, lower-tier decorations can be placed into higher-tier slots, allowing for some flexibility in how they are used.
Decorations aren’t available from the start in this game. You’ll need to progress through the game before you can start customizing your build with them. Here’s how to unlock decorations in Monster Hunter Wilds:
- Reach Oilwell Basin – Decorations become available once you unlock the third area, Oilwell Basin.
- Complete High-Rank Hunts – Decorations start appearing as quest rewards in high-rank hunts.
- Unlock the Melding Pot – You can craft specific decorations using rare materials once the Melding Pot becomes available.
- Farm High-Rank Monsters – Many decorations drop from monsters as rewards, especially in endgame content.
Once you’ve unlocked them, decorations can be slotted into weapons and armor, provided they have open slots.
Best Ways to Farm Decorations Efficiently
For hunters looking for Monster Hunter Wilds decoration farming methods, the best one is to focus on high-rank and endgame hunts, as these provide the best chances for valuable drops. Tempered investigations are particularly rewarding, as they offer a greater variety of high-level decorations.
Using the Melding Pot strategically is also key. Saving up rare materials and crafting specific decorations ensures that players get the ones they need without relying purely on luck. Keeping an eye on event quests is another good strategy, as these often have increased decoration rewards or exclusive jewels that can’t be obtained elsewhere. BLOG20
Since decorations play such a huge role in build optimization, investing time into farming them efficiently will help hunters maximize their potential. Whether through quest rewards, crafting, or event grinding, the right decorations can make all the difference in taking down the toughest monsters.
Conclusion
Decorations are one of the most powerful tools for customizing your build in Monster Hunter Wilds, but the best decorations aren’t the same for everyone. The right setup depends entirely on your weapon, playstyle, and hunt strategy. Whether you focus on raw damage, elemental attacks, survivability, or support, your ideal decorations will vary.
As you progress through high-rank hunts, tempered monsters, and Elder Dragons, you’ll collect a variety of decorations—some may fit perfectly into your build, while others might be better for different scenarios. Use the Melding Pot to craft key decorations, and keep an eye on event quests for rare jewels that can further refine your setup.
The key to mastering decorations is experimentation. Try different combinations, swap decorations between hunts, and tailor your gear to match your preferred hunting style. With the right mix, you’ll optimize your loadout for maximum efficiency, survival, and damage output—no matter how you choose to hunt!
F.A.Q.
How do I unlock decorations in Monster Hunter Wilds?
Decorations unlock once you reach Oilwell Basin, the game’s third area. After that, they can be obtained as quest rewards, monster drops, or crafted at the Melding Pot.
What’s the best way to farm high-tier decorations?
The best way to farm high-tier decorations is by completing high-rank tempered monster hunts. Elder Dragons and special event quests also have higher drop rates for powerful decorations.
What’s the difference between armor and weapon decorations in Monster Hunter Wilds?
Weapon decorations focus on offense, boosting attack power, critical hits, sharpness retention, and elemental damage. Armor decorations are more defensive or utility-based, improving resistances, survivability, healing, and gathering efficiency. Some armor decorations can still boost damage, but they typically support your overall build rather than directly affecting weapon performance.
What are the best decorations for high-rank in Monster Hunter Wilds?
- For Damage: Attack Boost, Critical Eye, Weakness Exploit, Critical Boost, Crit Element.
- For Survivability: Divine Blessing, Defense Boost, Elemental Resistances, Blight Resistance.
- For Ranged Weapons: Ballistics, Ammo Boost, Reload Speed.
- For Support & Healing: Wide-Range, Free Meal, Recovery Up.
- For Utility & Gathering: Botany, Geology, Survival.
How to upgrade decorations in Monster Hunter Wilds?
Decorations cannot be directly upgraded, but you can craft higher-tier decorations using rare materials at the Melding Pot. Additionally, high-rank armor sets come with better decoration slots, allowing you to equip stronger decorations as you progress.


