 Dallon Avery
Rust does not need an introduction. This game has expanded on every feature over the years, and it can be very intimidating to start playing, especially if you’re a solo player. If you heard anything about this game, you already know that Rust players know exactly how to raid bases, so you might have that fear about your base not surviving the first night you go offline. After all, there’s no worse feeling than coming back online the next day just to see the base you worked on the whole last day completely gone.
In this Rust solo base build guide, we’d like to give you a better fighting chance by showing you the 3 best solo base designs in Rust. These are low-maintenance bases that you can iterate on as you get more resources. And the most important feature of all these bases - they’re an absolute nightmare to raid. Notice how we don’t say they’re un-raidable, because nothing in this game is, but with these bases, you’ll at least have a chance to explore Rust beyond just sticking to your own four walls. At the end of the day, Rust is more just raiding; it’s about exploring the world and taking risks, which you can’t do if you’re too scared to leave your base.
All screenshots are made in Fortify to, hopefully, make it easier to follow the construction steps.
If you still struggle to make a base, check out the Rust Advanced Base service at Skycoach, which grants you a complete base you can use to survive in the game. It is made by professional Rust players and is suited to withstand any server and any amount of raids. Check out more information by clicking the link.
Note: At Skycoach, you can Buy Rust Boost at the best prices with fast delivery. Use our special PROMO CODE (in green) hidden in this article for a 20% DISCOUNT.
Browse our hottest Rust Boosting services:


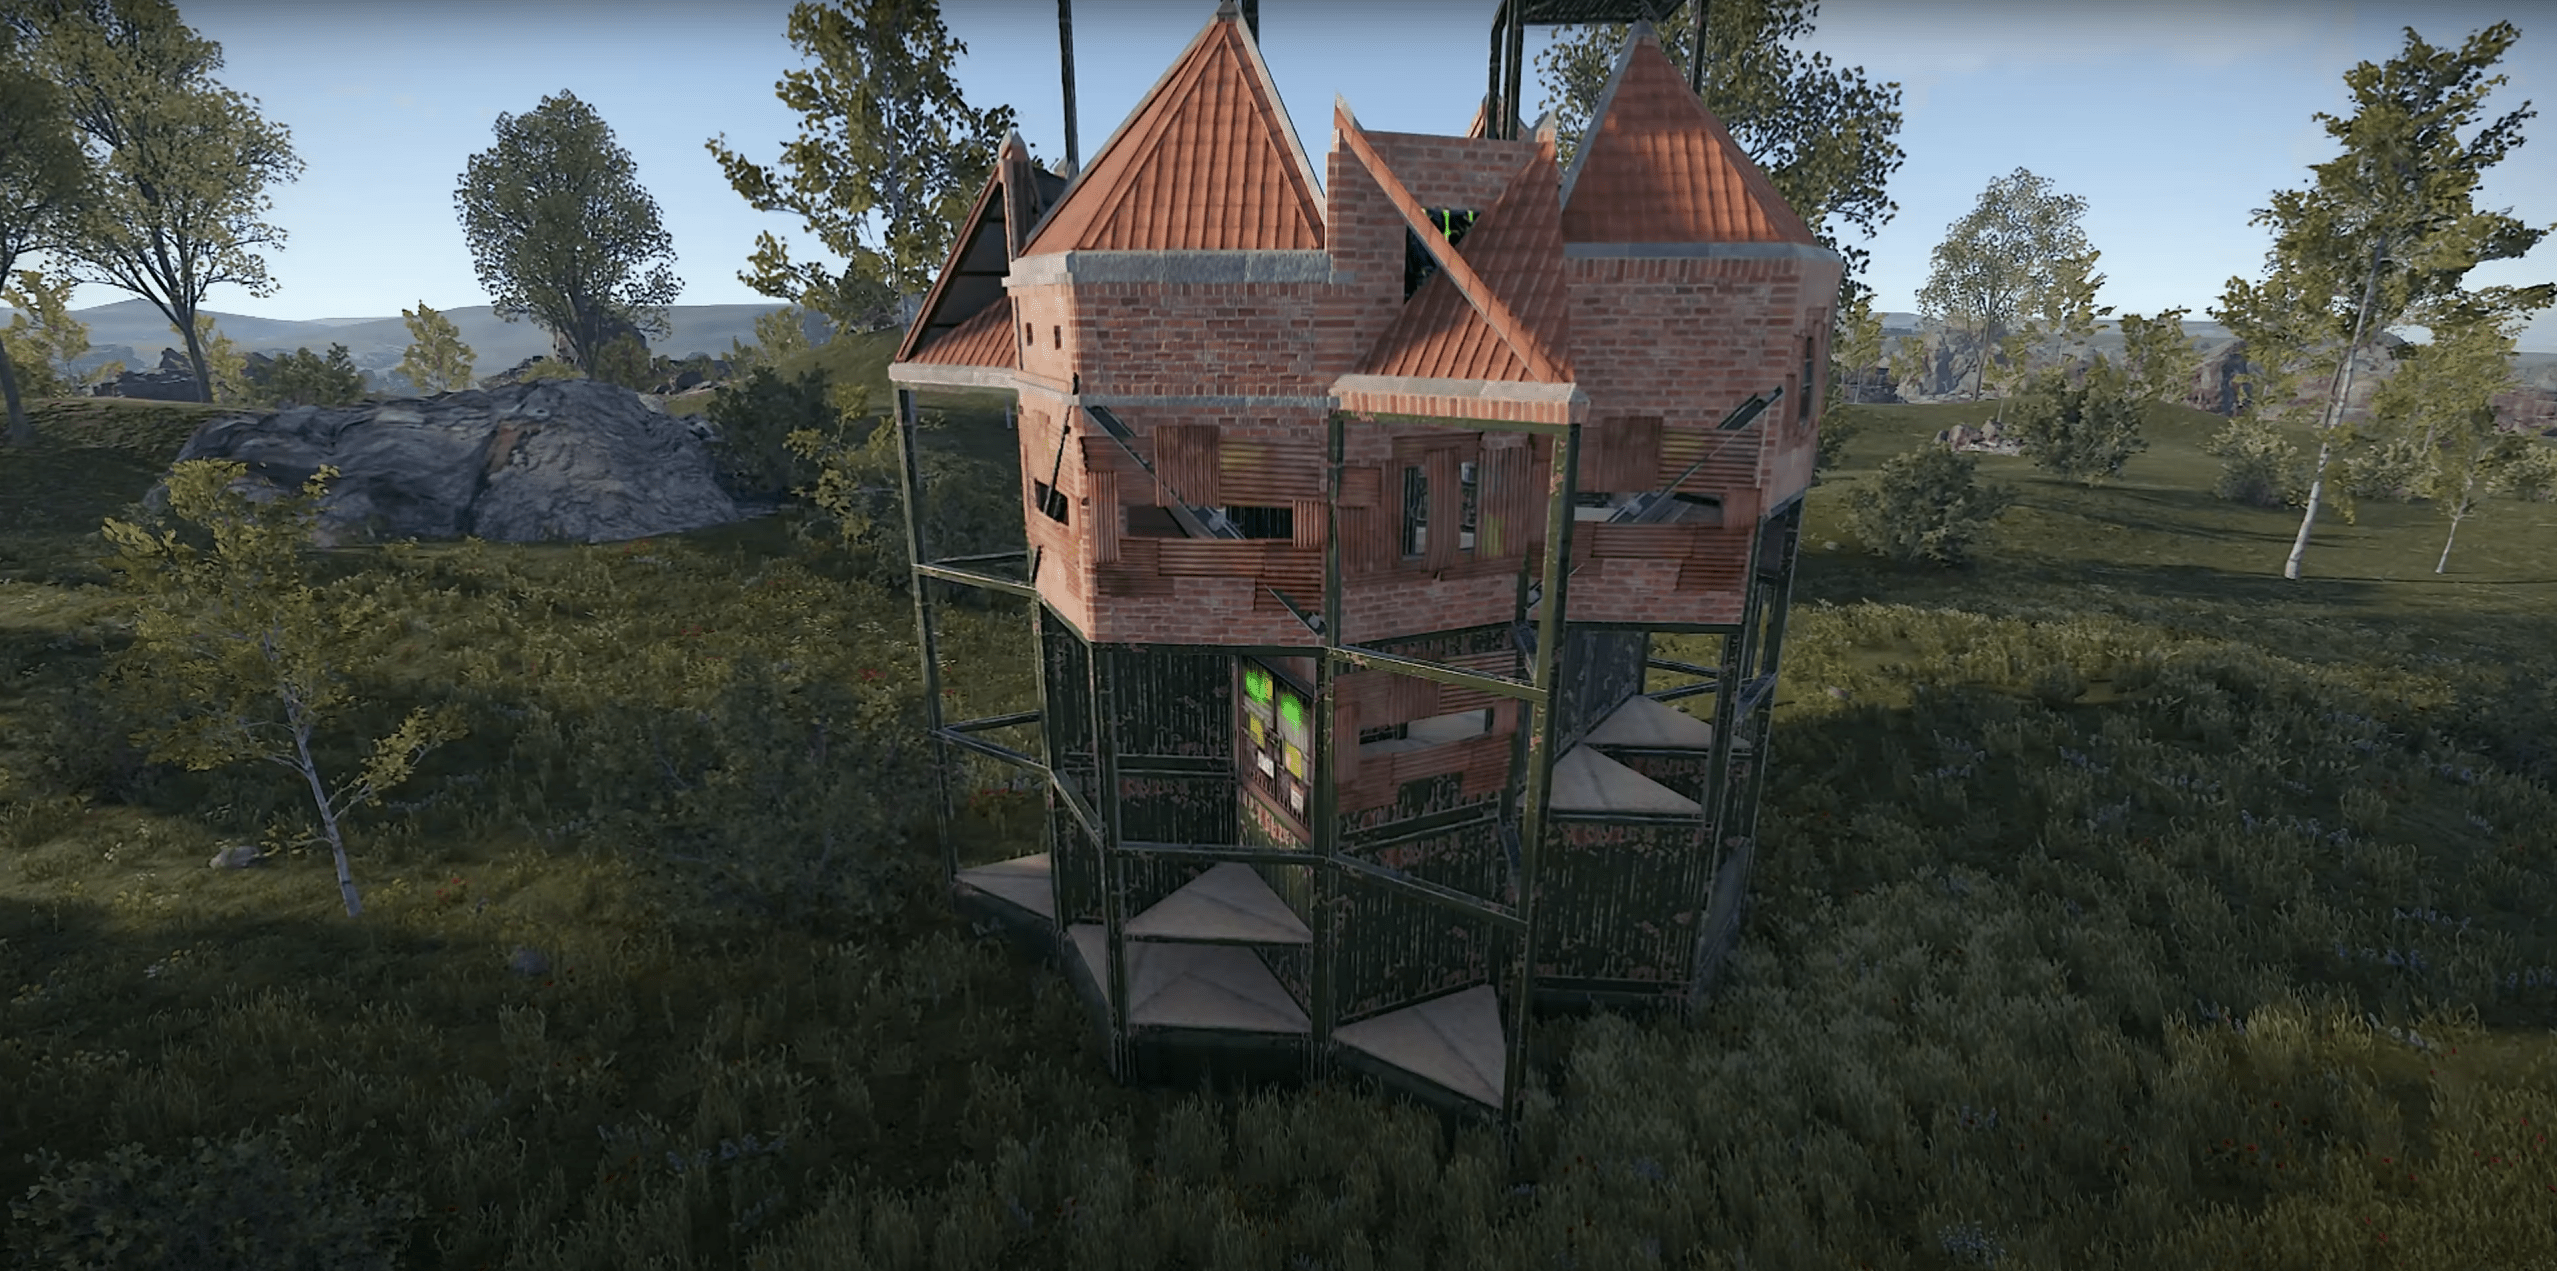
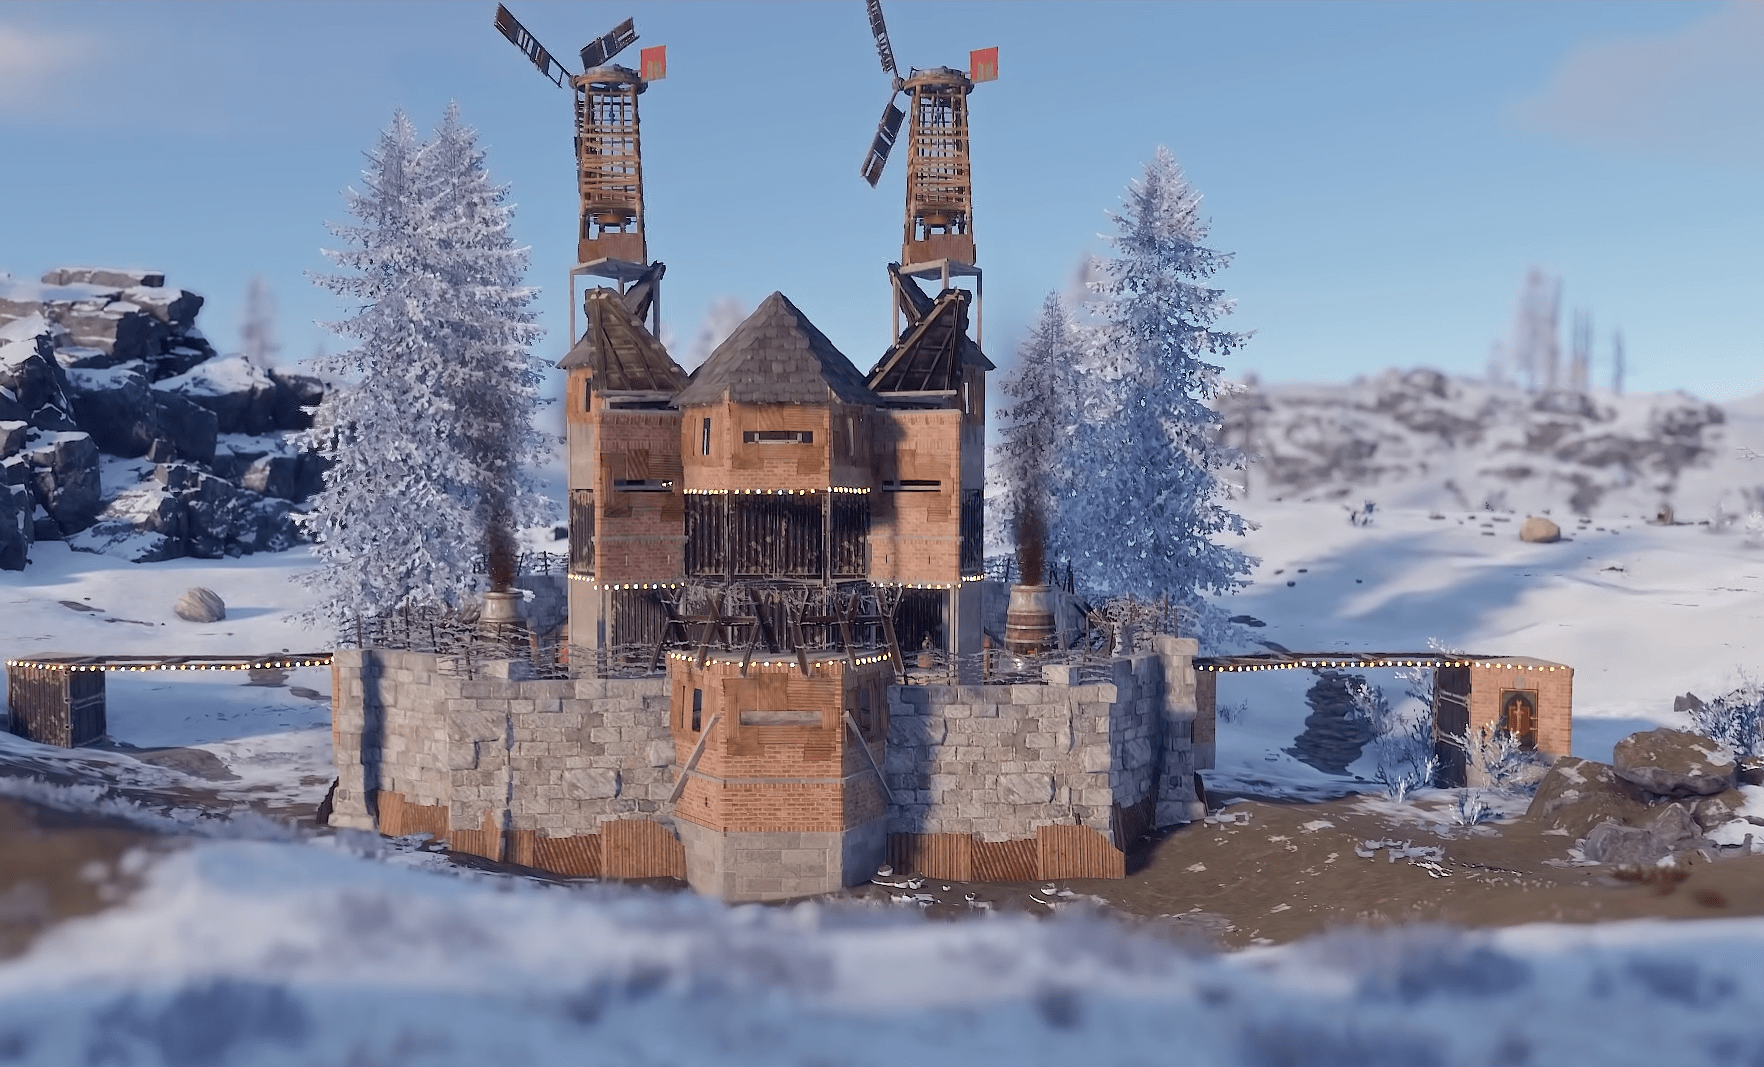
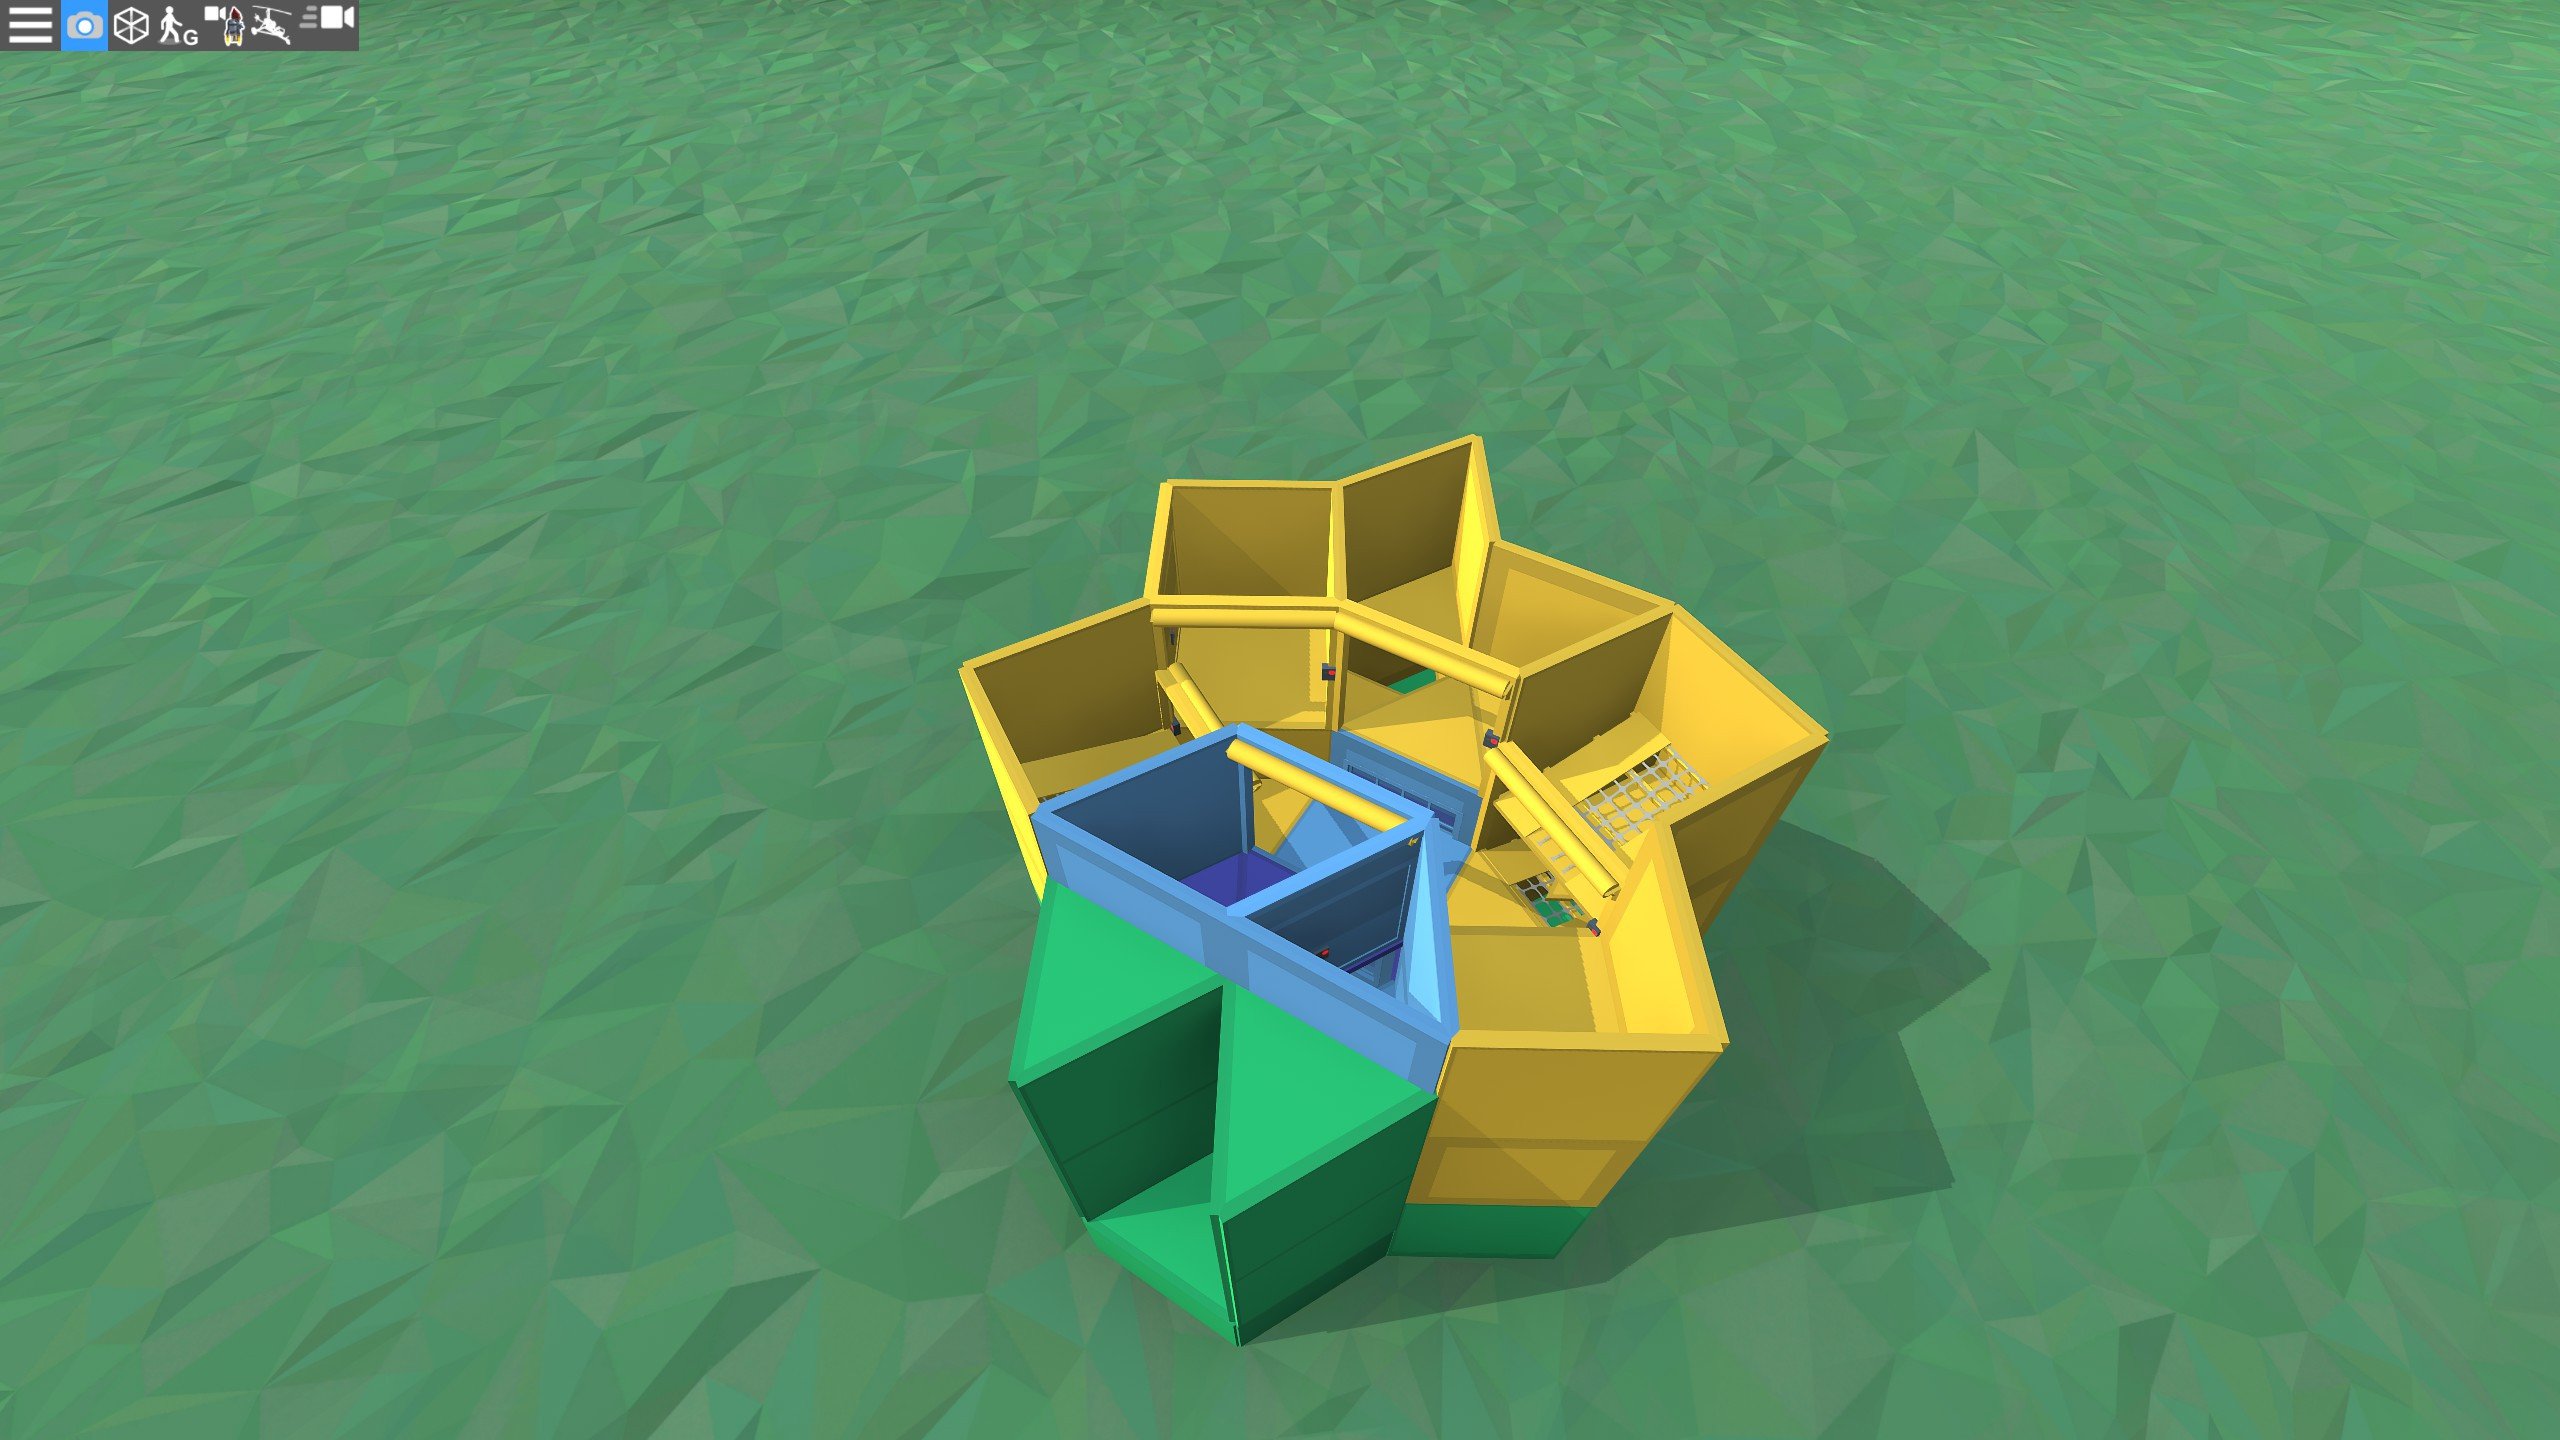
Base Design #1: The Compact Double-Bunker Base
As far as best solo base designs in Rust go, this compact solo/duo base design is built around efficiency, layered defense, and smart use of space. With two independently sealable bunkers, strong vertical protection, and a low-cost footprint, it gives you real durability with minimal grind. If you want a quick-to-build base that still holds up against raids, this one is a top-tier choice.
Key Stats:
- Estimated Build Cost: ~10,000 Stone, 8,000 Metal, 240 High Quality
- Upkeep Cost: Very Low
- Best For: Solo or Duo, Early to Mid Wipe
- Defensive Features: Two sealed bunkers, peeking windows, door airlock, shooting floor, compact core
This build is especially valuable for players who want to secure themselves fast, yet still have room for expandability and creative defense tools like peek windows and roof angles. Even though it's small, it's dense and functional — and includes features like a rooftop garden and 360° visibility.
Layout Overview
The entrance to this unraidable Rust base for solo is located on the roof and drops you directly into a two-door airlock with a peek window. This lets you safely check for door campers without exposing yourself.
The core of the base is deceptively roomy, offering a sleeping bag, beds, furnaces (both electric and standard), gun traps, a hidden TC, and two separate loot rooms — one in the upper level and one protected behind a sealed bunker.
What really makes this base stand out are its twin bunker systems. One is accessible via breakable foundation and roof, while the second uses spiral stairs to block entry. Both are easy to open from inside and make offline raiding expensive and inefficient.
The roof includes multiple sleeping bags, furnaces, and several peek angles that give you full coverage around the base. Better yet, these angles are designed so raiders can’t easily see you in return.
How to Build This Base
This build starts with a minimal footprint, then expands vertically and outward using a clever combination of soft-side control, bunker mechanics, and smart roof angles. Each stage builds on the last without tearing anything down. Here’s how to construct it, step by step.
Step 1 – Starter Core
Begin with your initial shelter — just enough to get protected, place a TC, and begin expanding.
- Start by placing a triangle foundation and a square foundation side-by-side.
- Enclose them with walls and ceilings.
- Add a double door frame on the right side and upgrade everything to stone (or wood, if resources are tight).
- Place your TC in the triangle and install a double door for access.
- In the square section, add a shelf (bamboo or default), place a couple of boxes or barrels, a furnace, and a sleeping bag.
- Cover your TC with a window frame for early protection.
With this setup, you’ll have a complete starter base that can quickly evolve into the full design.
Step 2 – Outer Shell & First Bunker Setup
Once the core is built, you’ll lay out the base’s main bunker area and entrance path.
Outside the entrance, place two triangle foundations, then one square foundation on the right.
Build a high triangle in front and a standard triangle to the side to create height layering.
Upgrade all surrounding foundations to stone, but leave the square foundation twig — this will be used to seal the first bunker.
Enclose the square with walls and ceilings, making sure to rotate walls so the hard sides face outward.
Add a wall frame and a double door to form the airlock.
Inside, place another sleeping bag, a workbench, and a furnace if needed.
At this point, you’ve formed the outer bunker structure and your main entry path.
Step 3 – Building the Second Floor
Now it's time to go vertical. This layer houses key defenses and access points. Here are some Rust base building tips for this:
- Use a spiral staircase to reach the next floor.
- Enclose the second floor with walls and ceilings.
- Add two double doors for internal routing.
- Begin upgrading interior walls and ceilings to metal or high quality, especially near the core.
- Inside the bunker area, place a square foundation beneath, then add a roof piece above it to serve as the bunker ceiling.
- Upgrade the roof to metal. Later, breaking the twig foundation below will open this bunker from the inside.
You now have your first fully functional, sealable bunker.
Step 4 – Main Loot Room & Second Bunker
This floor contains your main loot and additional defenses, including a second sealed space.
- Return to the first floor and finish off the interior layout.
- Place gun traps, add a workbench, and begin setting up your second bunker entrance.
- Build spiral stairs where shown in the original design. When the top step is upgraded, it will block the main path — sealing the room completely.
- Add a bamboo shelf and furnish the space with barrels, boxes, and another bed.
- Hide your TC behind a window for maximum obscurity.
At this point, your interior is nearly complete, with strong loot protection on both floors.
Step 5 – Roof & Shooting Floor
Now it’s time to add a hidden but powerful shooting floor that gives you vision without exposing yourself.
- Around the core, build low external walls to form the shooting layer boundary.
- Inside that, place three half walls, then add floor frames on top.
- Cover the entire layer with roof tiles to create sloped peek angles.
- On the roof, place two furnaces and multiple sleeping bags, along with windows for visibility around the base perimeter.
The shooting floor gives you a significant advantage during door camps or online raids, while keeping your body hidden from return fire.
Step 6 – Honeycombing & Final Reinforcements
Finish the base by layering in external protection and polishing off any remaining weak points, which is what the Rust honeycomb base design is about.
- Add honeycomb walls around the main core using stone or metal — metal is preferred if you can afford it.
- Build two additional honeycomb sections near the high triangle to strengthen the bunker.
- Upgrade all exposed ceilings and foundations around key areas to metal or HQM.
- Place extra electric furnaces, organize storage, and install deployables like drop boxes and sleeping bags.
- Don’t forget to install garage doors and embrasures where wall frames or windows exist.
With these reinforcements in place, the base is fully sealed, bunker-ready, and optimized for solo or duo survival.
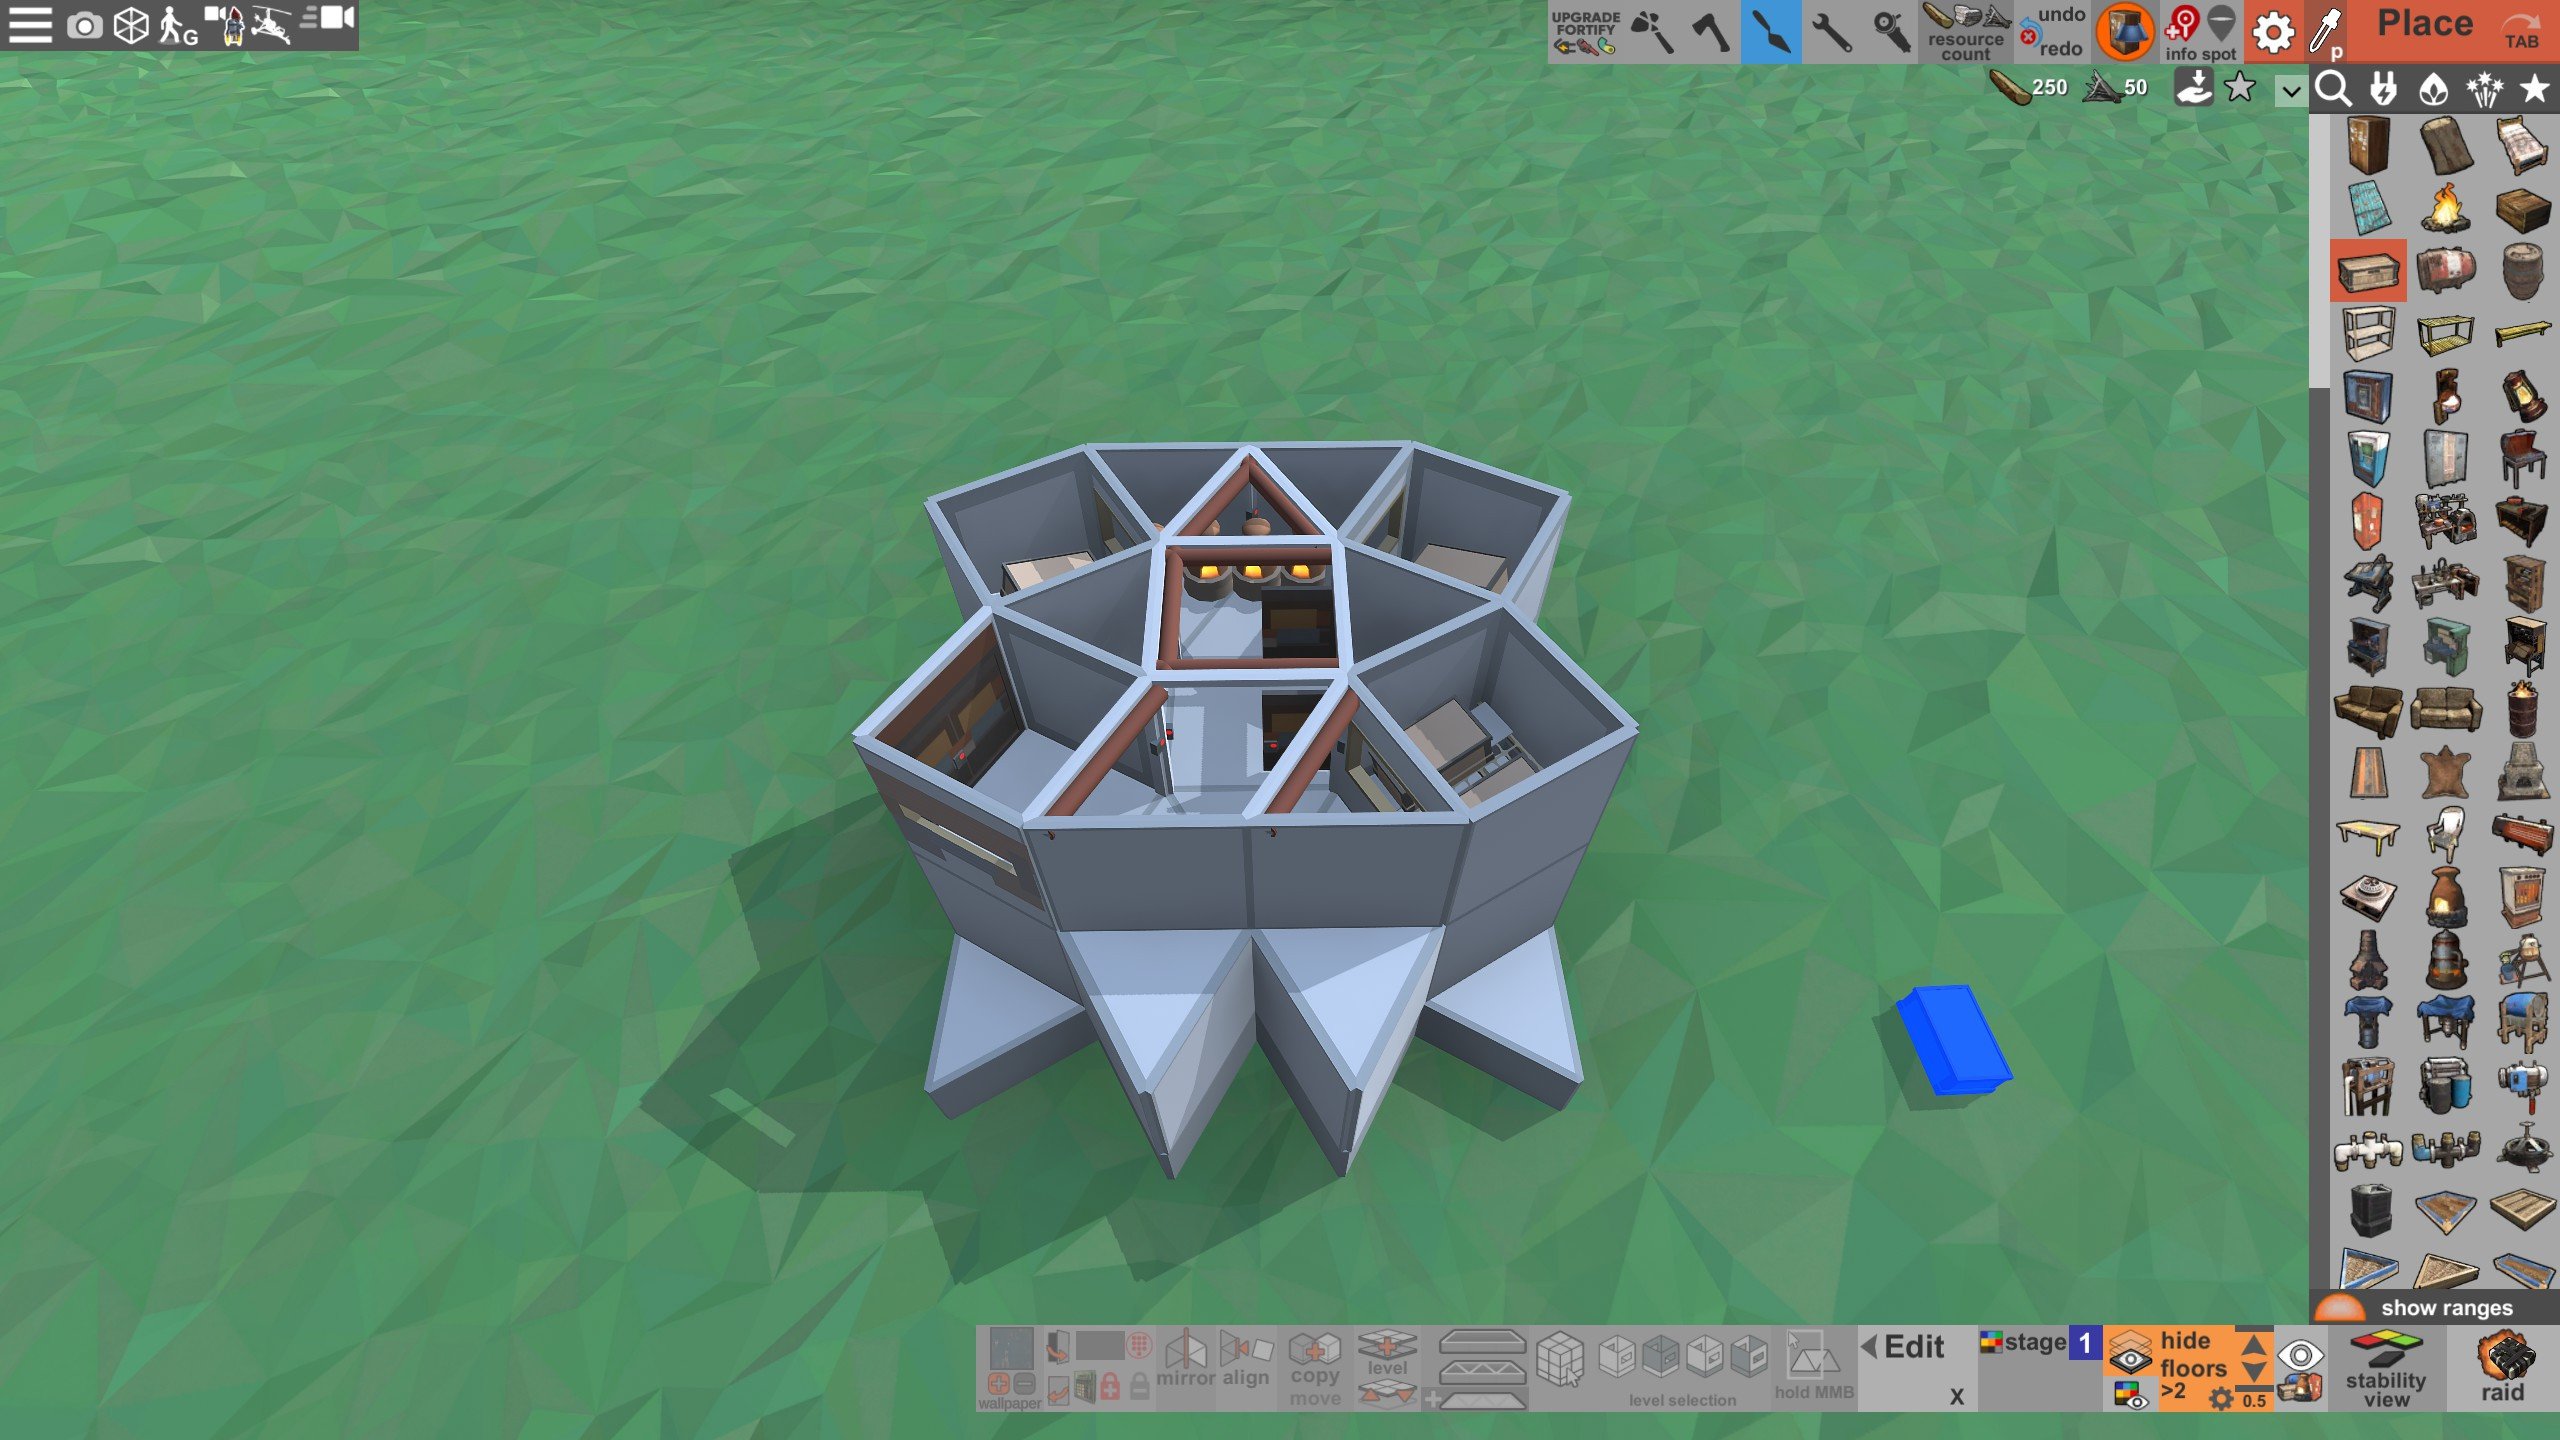
Base Design #2: The Cozy Symmetrical Solo Base
This Rust solo survival base design focuses on simplicity, comfort, and symmetry while still giving solo players a solid defensive edge. It’s a cheap but capable layout, with mirrored loot rooms, straightforward defenses, and a rooftop shooting floor that’s easy to build. For solos who want something fast, functional, and not overly complex, this is a great pick.
Key Stats:
- Estimated Build Cost: ~35k Metal, 16k Wood, 9k Stone, 120 HQM, 30 Gears
Upkeep Cost: Low - Best For: Solo Players, Early to Mid Wipe
- Defensive Features: Symmetrical layout, window airlock, eight-door core path, rooftop shooting angles
The base’s main appeal is its fully symmetrical design, which makes movement and defense predictable, and its loot path, which forces raiders through eight separate doors before they can reach your main storage. The entrance is positioned on the second floor for extra safety, and the shooting floor provides simple but effective coverage against close-range attackers.
Layout Overview
Entry is made through the second floor, using a semi-sealed path that leads into an initial loot room and a defensive window. This window is useful both early and late in the wipe, giving you a quick visual on the outside before committing to movement.
Inside, two identical loot rooms sit on either side of the entrance, making it quick to drop off gear after PvP and ensuring storage is always nearby. The main loot room is buried deep behind eight doors, making door raids impractical.
The shooting floor above is open and uncluttered, designed for speed rather than elaborate angles. Four roof access points allow quick repositioning during online defense, and the downward angles make it hard for close-range rushers to sneak up undetected.
How to Build This Base
The creator builds this base in a clear progression, starting from a small core and gradually expanding outwards while keeping the symmetry intact. Following this order will ensure you don’t have to undo work later.
Step 1 – Starter Core
Begin with a basic shelter that will serve as your central point for the entire wipe.
- Build a 1x1 layout with space for buffer rooms on either side.
- Place your TC, bed, furnace, and a few boxes for initial storage.
- Add walls, ceilings, and your first door, then upgrade to armored as resources allow.
- If you have DLC shelves, place them in corners to maximize storage space early on.
- Protect the TC with a window frame for additional security.
This gives you a safe starting point while keeping space for planned expansions.
Step 2 – Buffer Rooms and Entry
Once you’ve secured your starter, you can begin creating the symmetrical layout.
- Add buffer rooms on each side of the core for extra protection and loot space.
- Build the main entrance on the second floor, ensuring there’s a semi-sealed access point for safety.
- Include a window in the entry area for early defense and visibility.
- Upgrade key external walls to metal or armored if you can spare the resources.
- Keep the entrance airlocked so you can’t be rushed directly inside.
At this stage, you’ll have your layout framed and your entrance positioned for defense.
Step 3 – Loot Rooms and Core Path
Now it’s time to set up the heart of the base.
- Add two mirrored loot rooms flanking the entrance — these can serve as quick drop-off points.
- Start constructing the main loot path with eight doors between the entrance and the core.
- Upgrade each door to sheet metal or garage doors for maximum delay to raiders.
- Organize the core loot room with shelves, barrels, and boxes for optimal space usage.
- Keep the symmetry intact so movement is smooth in both directions.
With this setup, door raids become far more costly and time-consuming.
Step 4 – Shooting Floor and Roof Access
The final stage focuses on giving you good angles while keeping construction straightforward.
Build the shooting floor above the main core, keeping it simple for quick movement.
Add four roof access points so you can reposition fast during a raid.
Install gun traps at choke points to slow attackers.
Shape the roof for downward sight lines, making it harder for close-range threats to sneak up.
Place sleeping bags in key roof spots for immediate respawns during defense.
This completes the functional and defensive structure of the base.
Step 5 – Final Upgrades and Traps
With the layout finished, you can focus on reinforcing and fine-tuning.
- Upgrade all high-value walls and ceilings to armored.
- Place additional gun traps along the main loot path for extra stopping power.
- Double-check that all doors open inwards to prevent blocking during movement.
- Add deployables such as lockers, extra sleeping bags, and drop boxes near the entrance for rapid regear.
By keeping the design simple and symmetrical, you end up with a base that’s quick to build, easy to navigate, and time-consuming to raid.
Browse our hottest Rust Boosting services


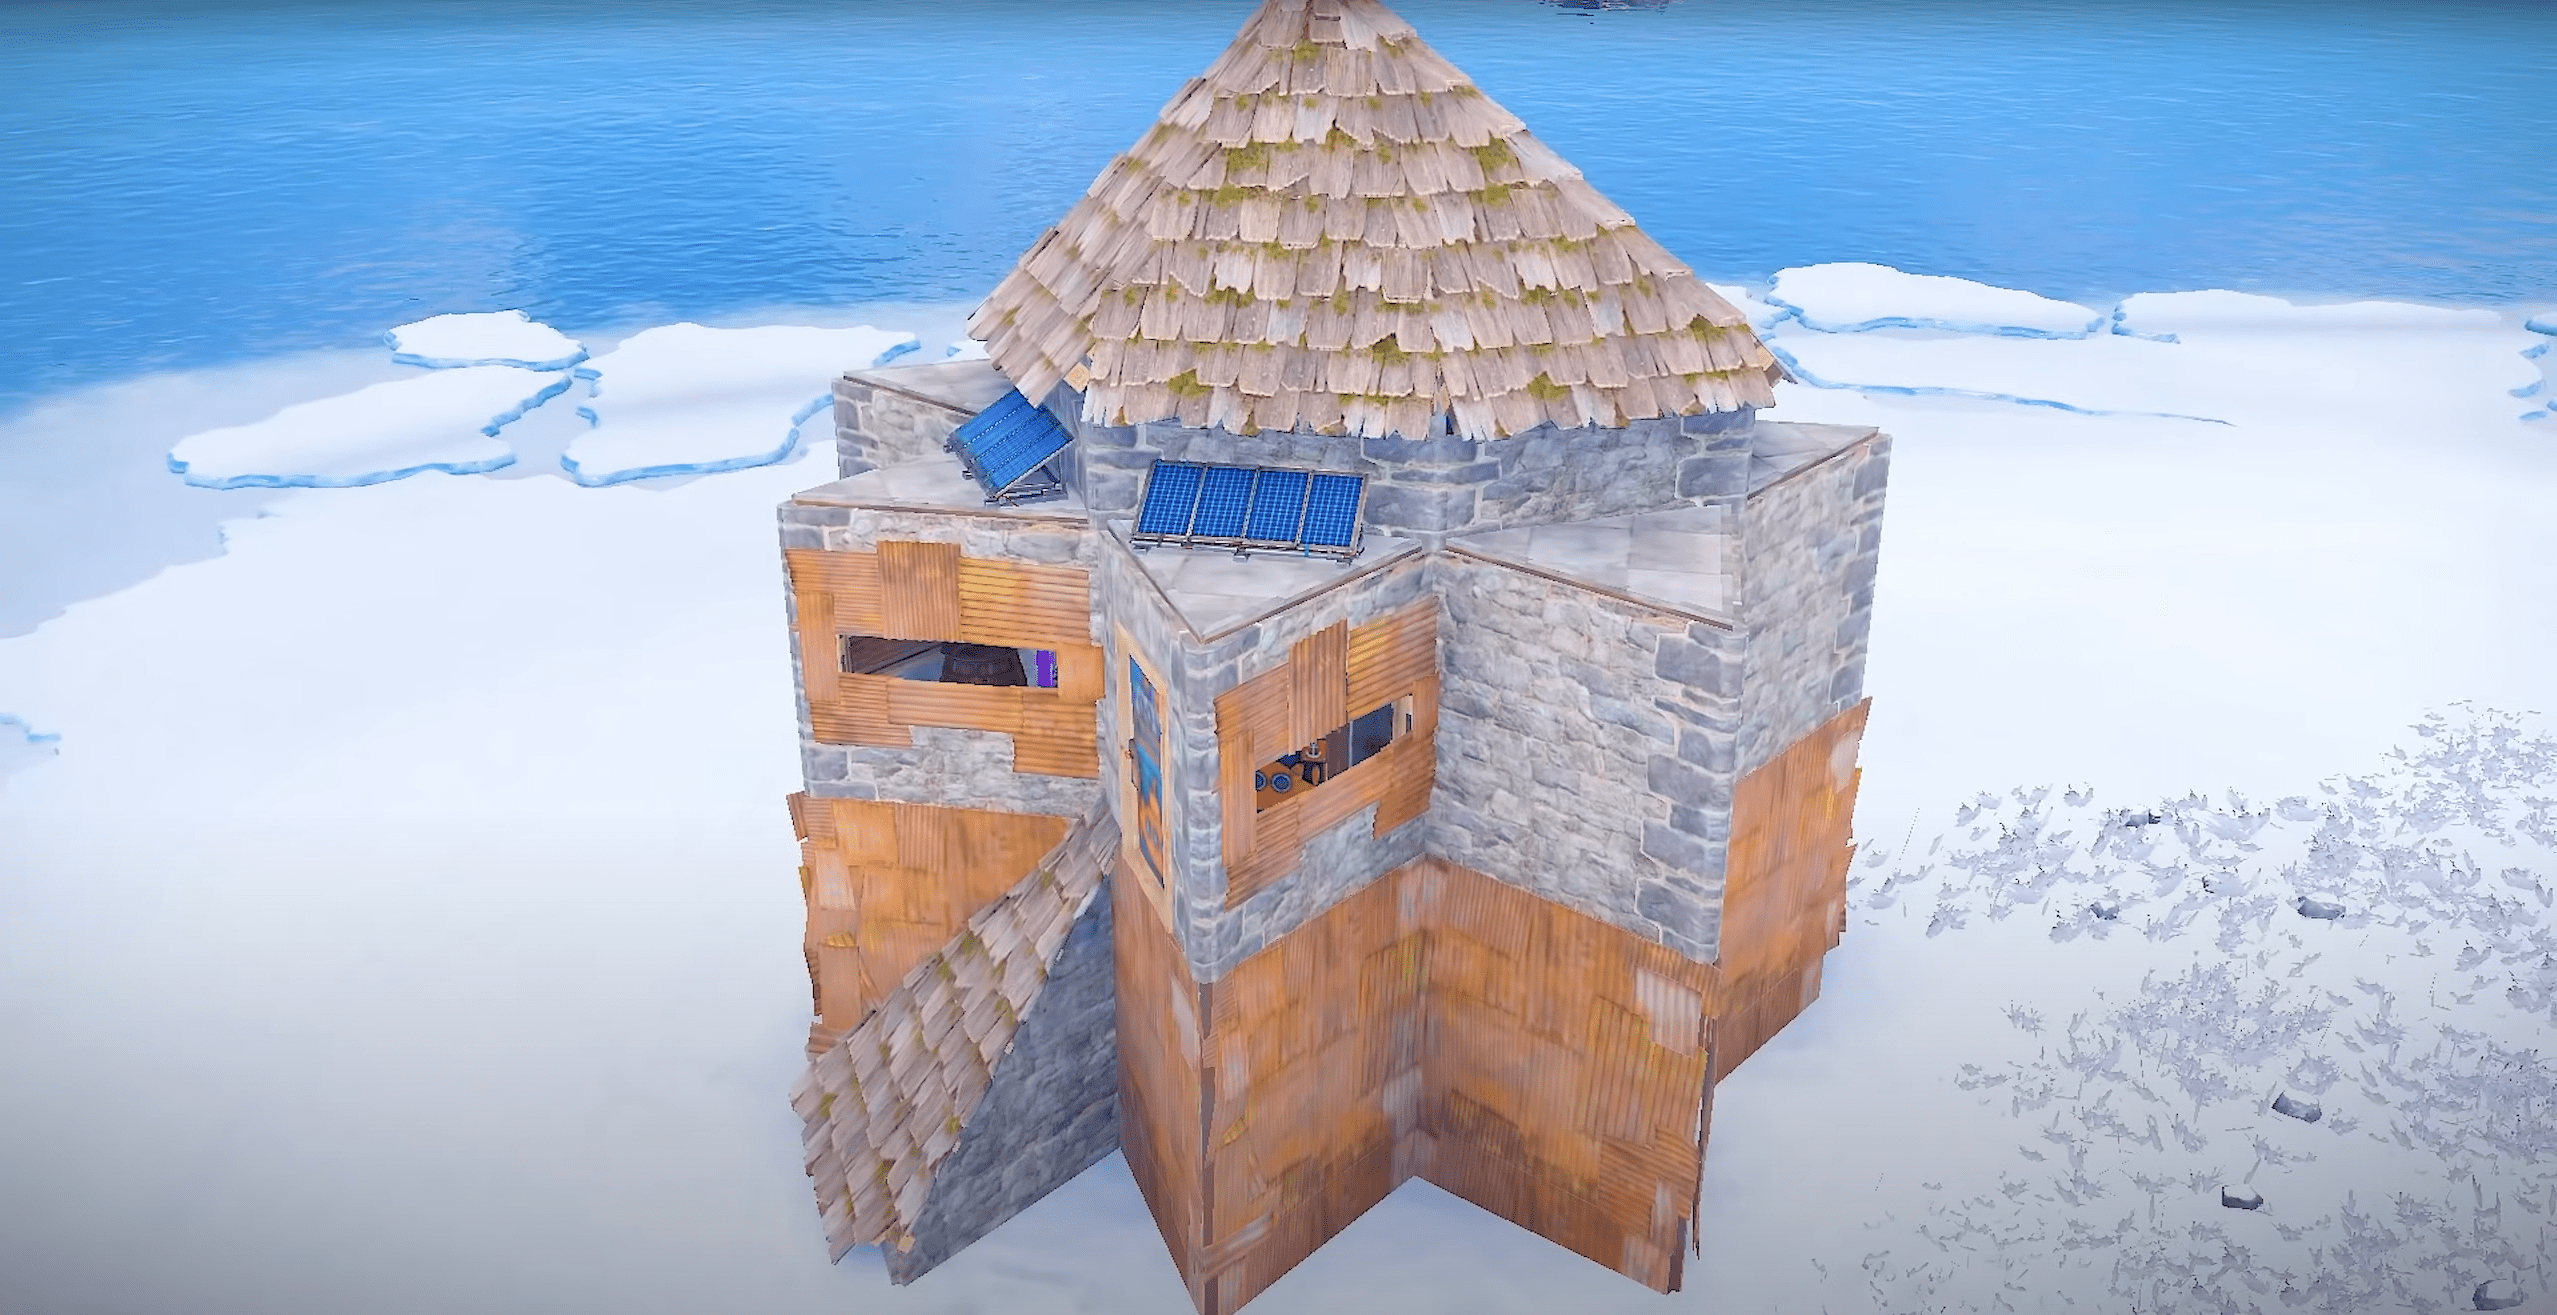
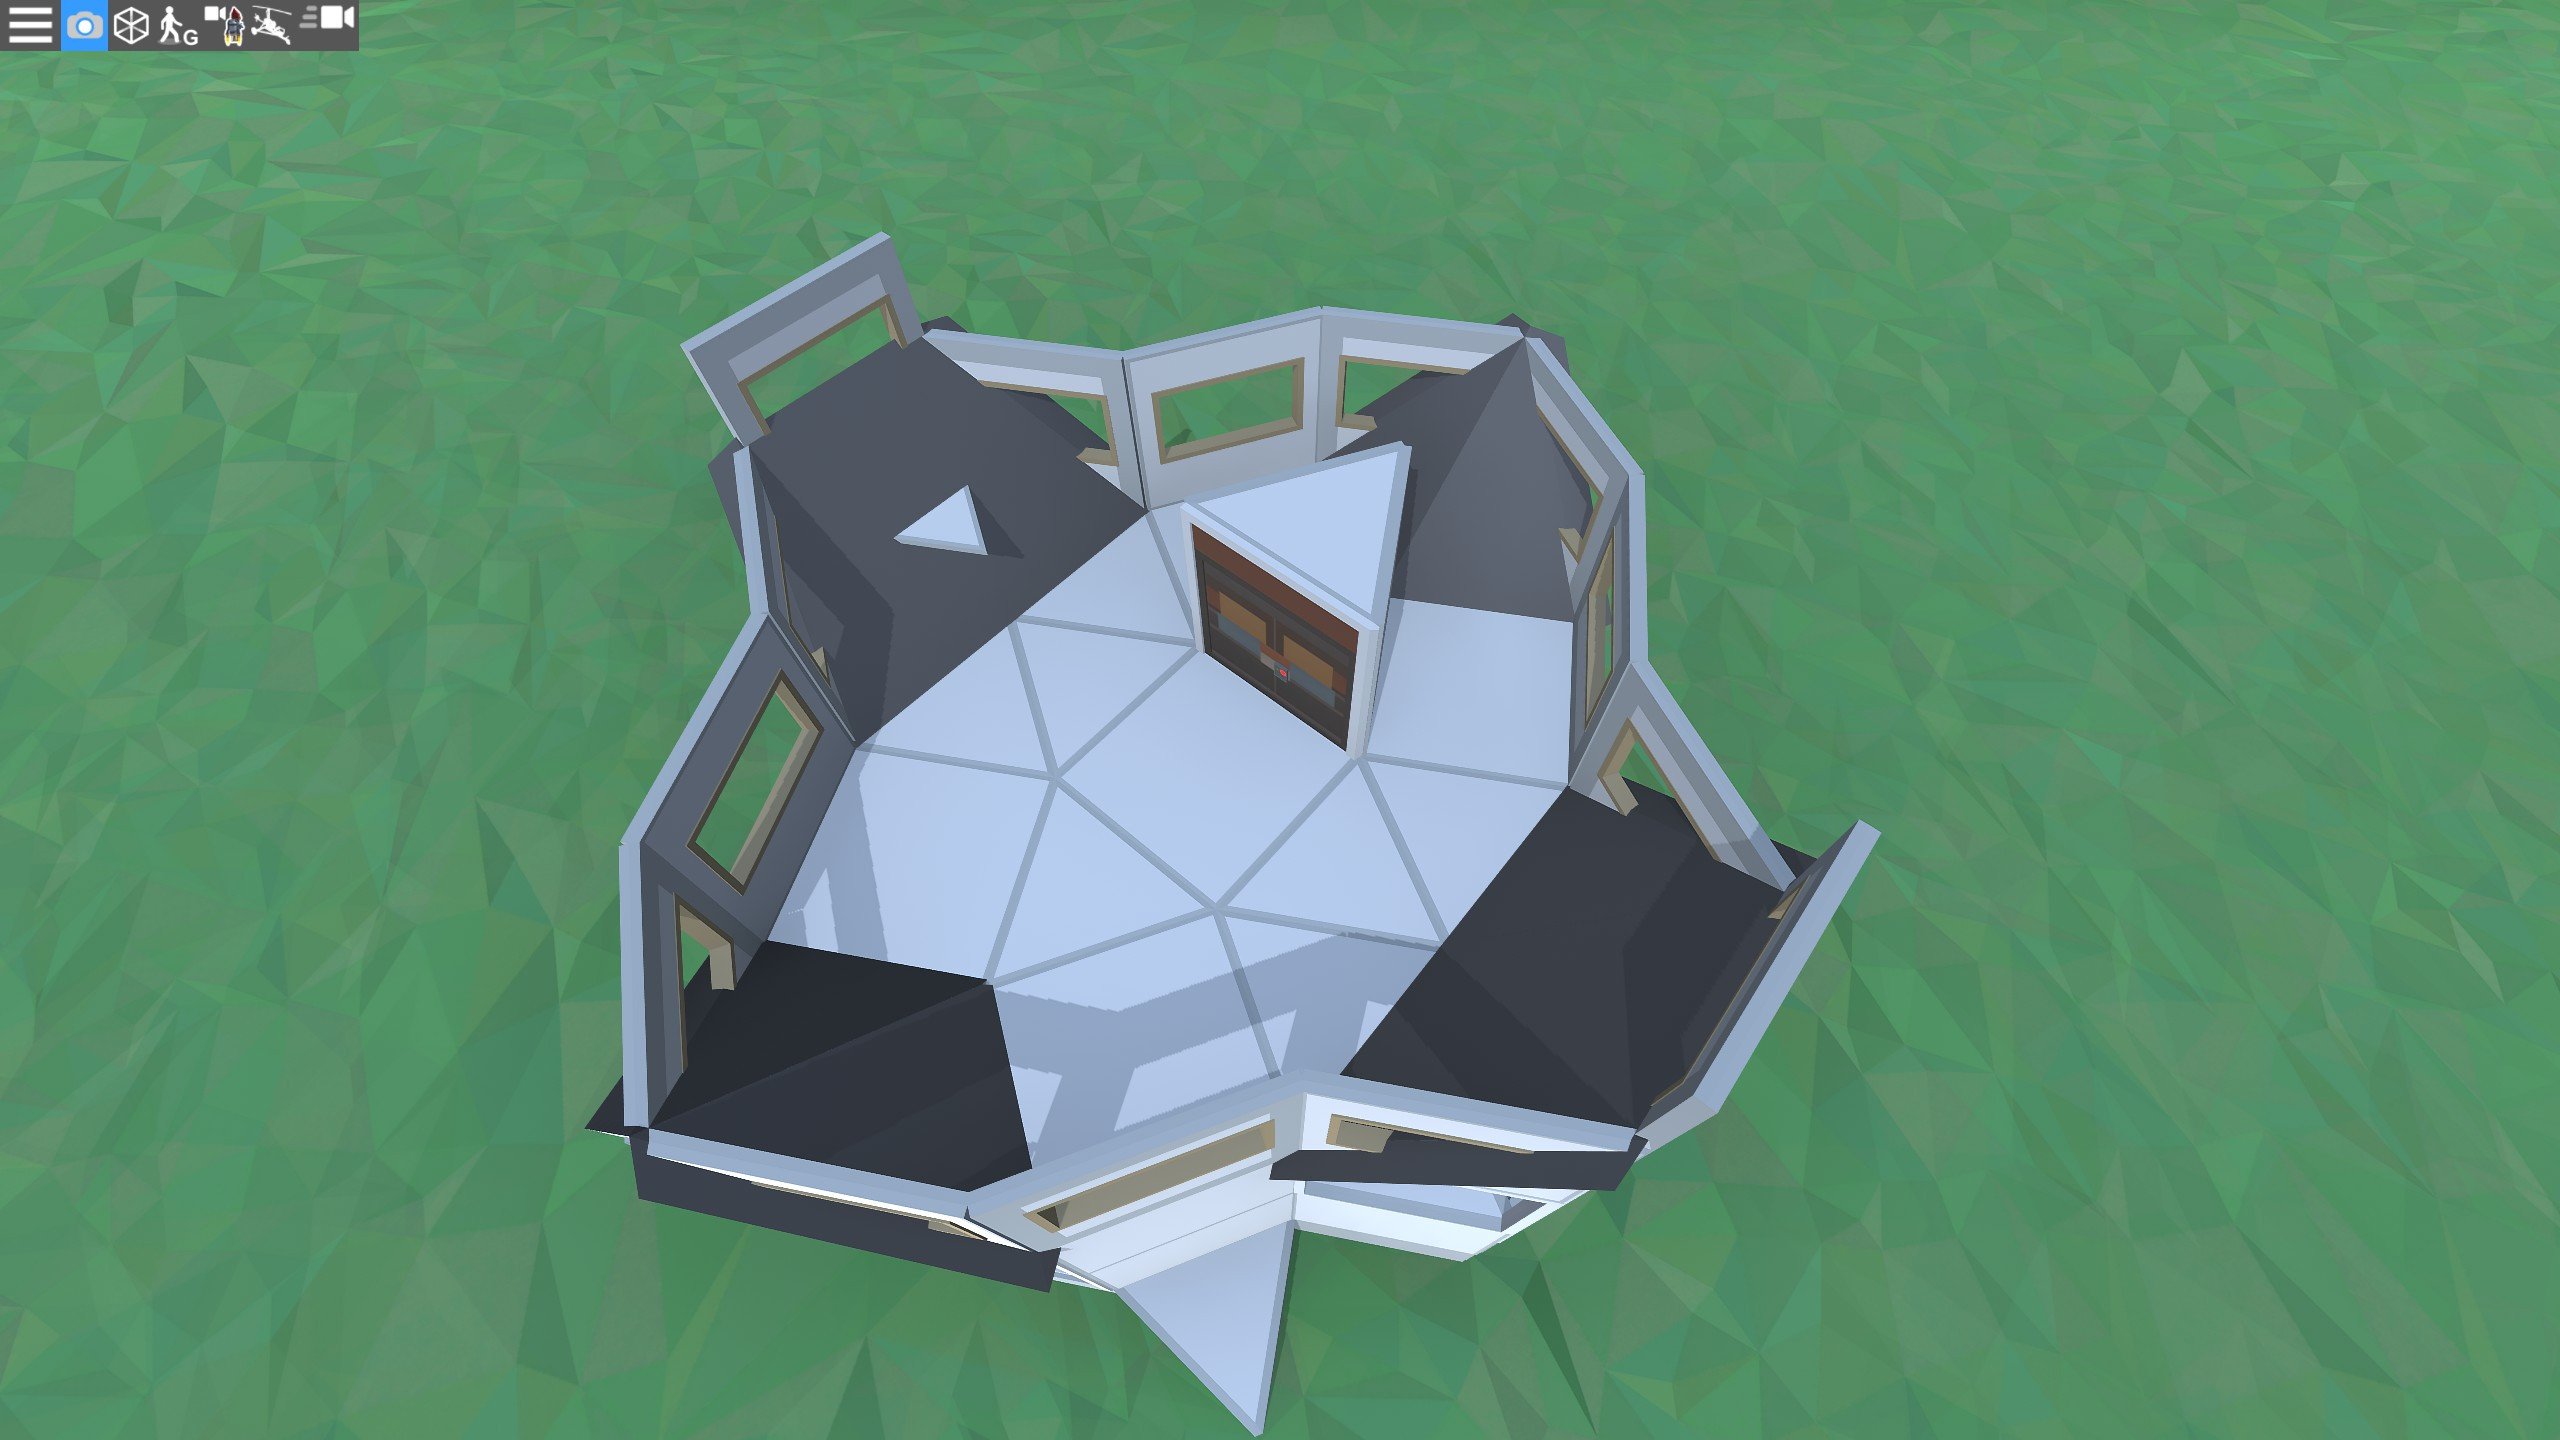
Base Design #3: Endgame Solo Fortress
This is a large, heavily fortified solo base designed for late-wipe dominance. It combines advanced defense features like a vending machine and TC bunker Rust bunker base design, panic rooms, triple-wall protection, and a pancake layer — all while keeping an open, functional core. This is a base for players who expect to be targeted and want to make every raid as costly as possible.
Key Stats:
- Estimated Build Cost: 45k Stone, 18k Metal, 479 HQM
- Upkeep Cost: ~11k Stone, 8k Metal, 126 HQM
- Best For: Solo, Mid to Late Wipe
- Defensive Features: Vending machine TC bunker, panic rooms, triple-wall protection, pancake layer, roof turrets, breach peaks
The layout is built around a symmetrical compound with multiple defensive layers. From the compound walls to the open core, every step of the raid path forces attackers through traps, peeks, and sealed areas. The vending machine bunker protects the TC in a way that makes splash damage ineffective, and the panic rooms allow you to secure loot even during an active raid.
Layout Overview
The base is surrounded by a spacious symmetrical compound with two gatehouses, each defended by turrets and airlocks with peek windows. Inside the compound, there’s space for large furnaces, oil refineries, or farming setups.
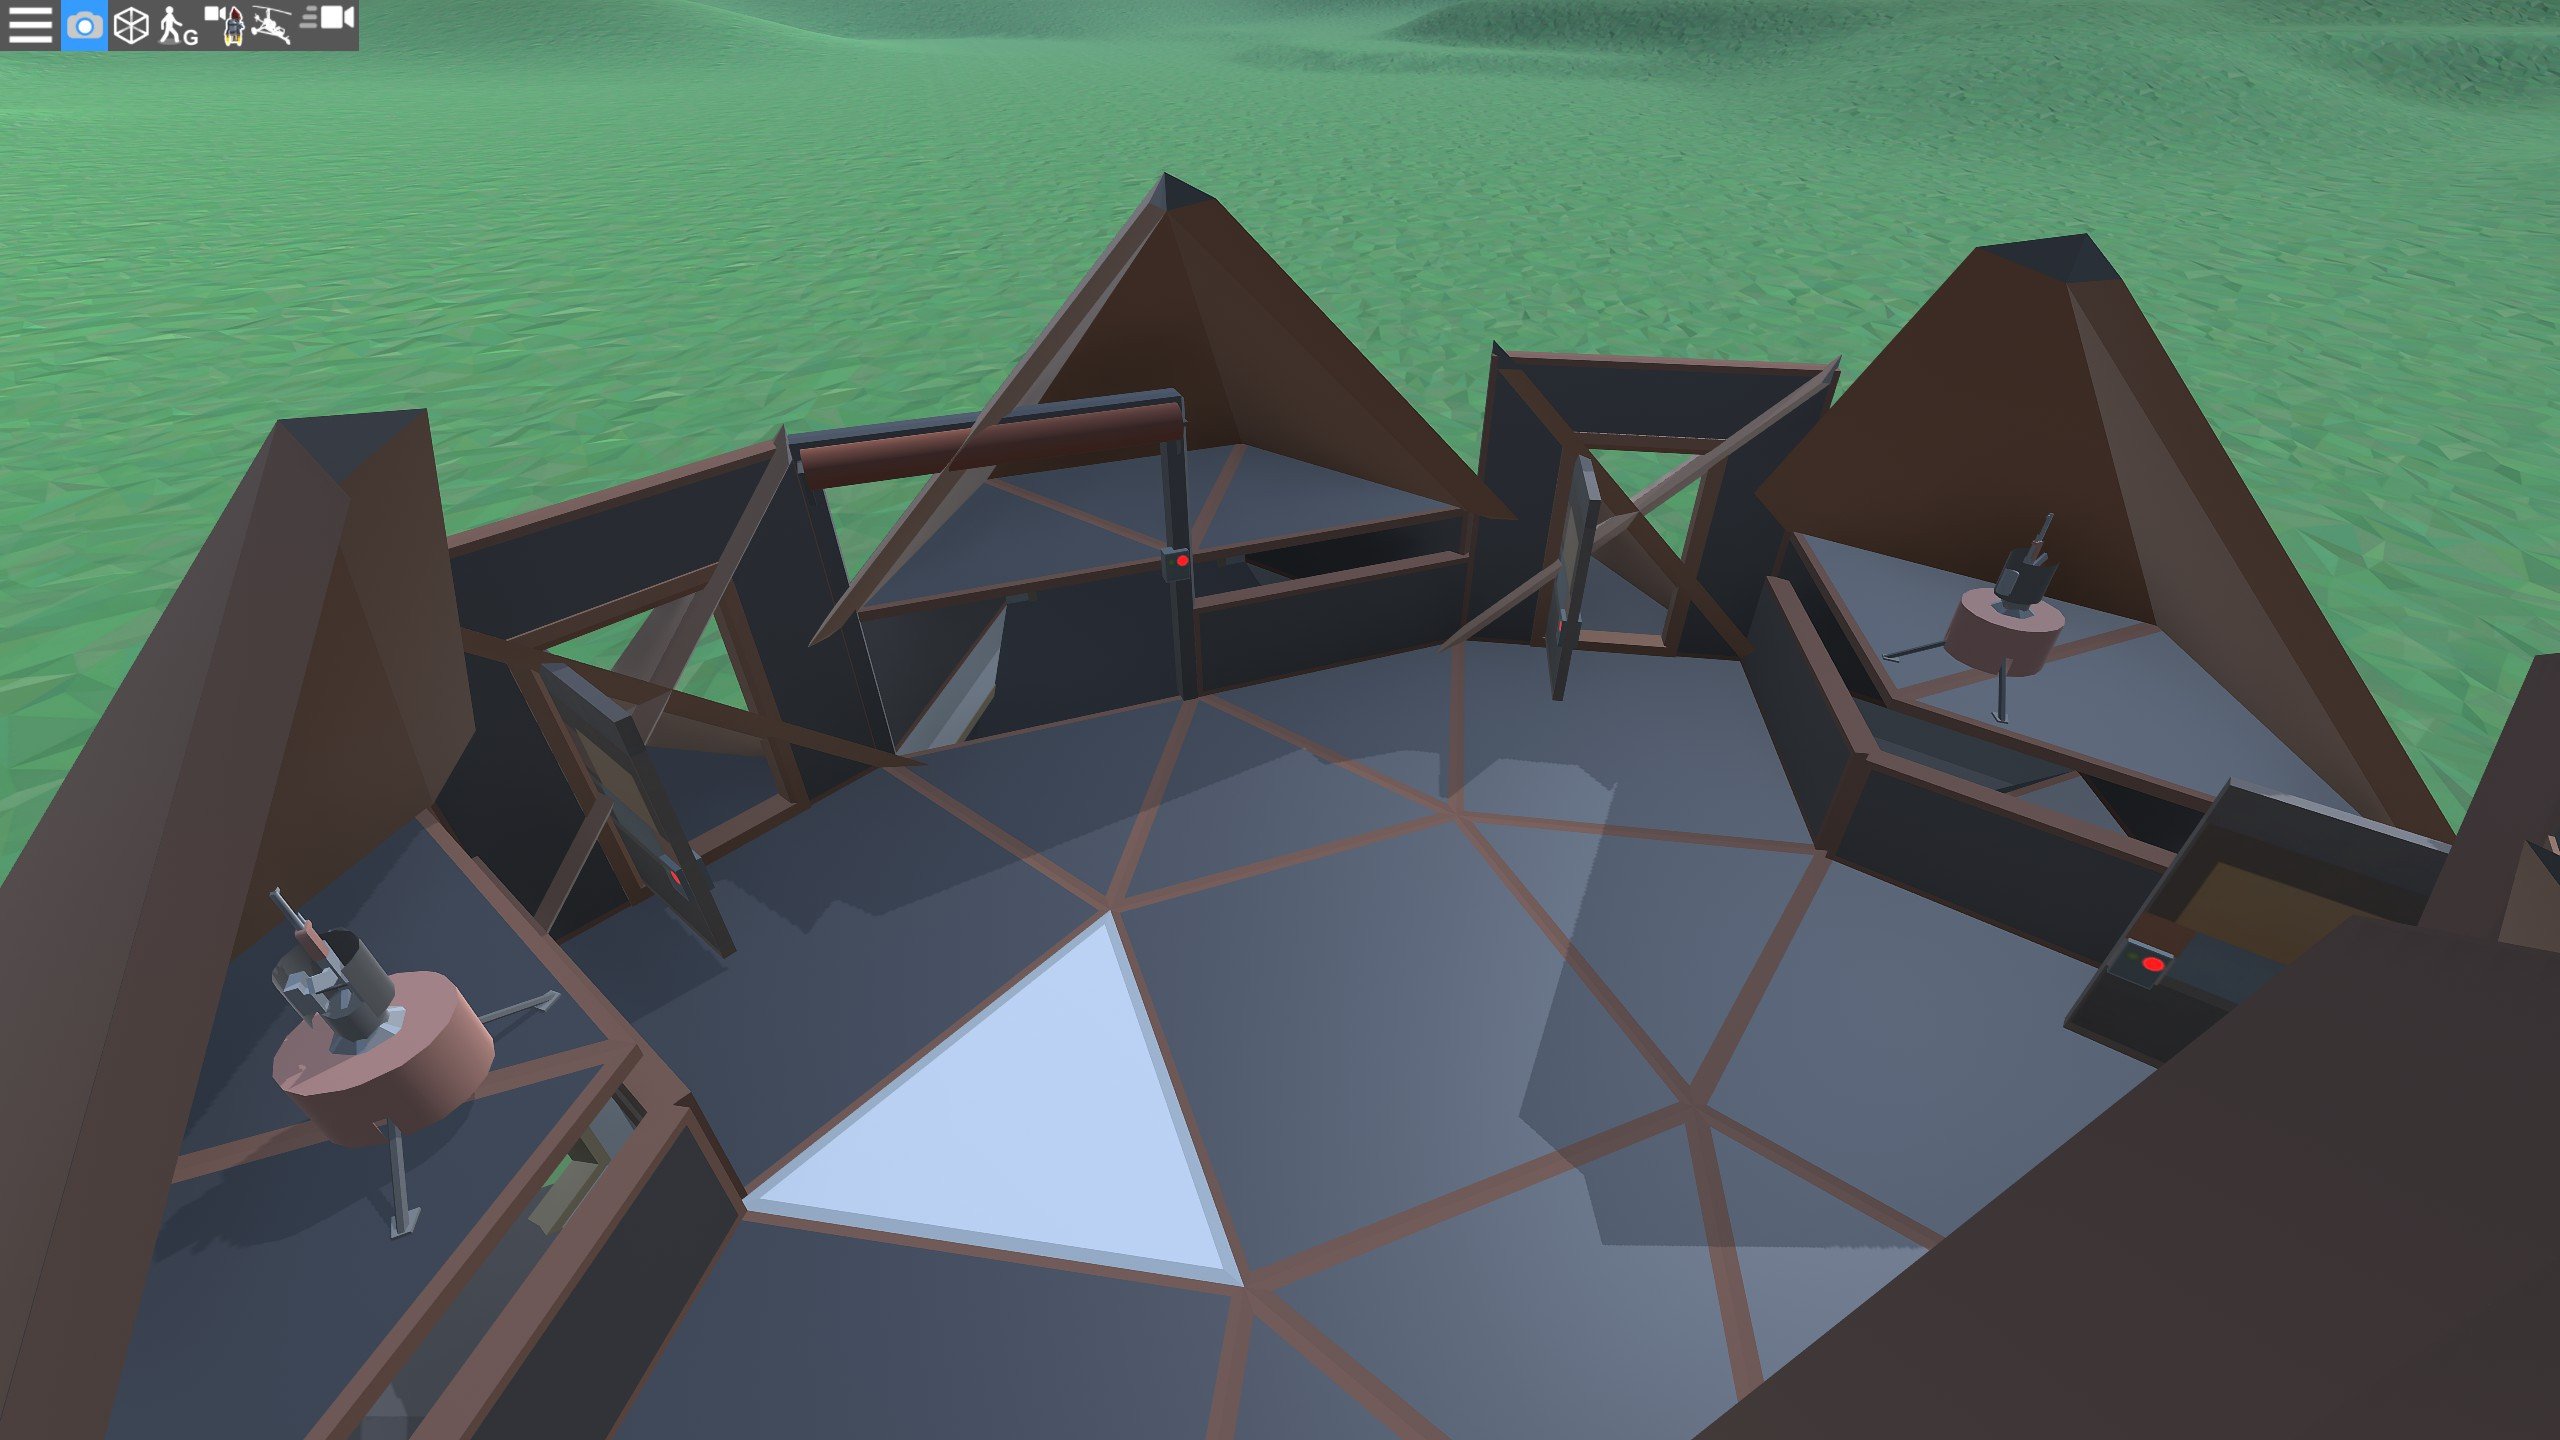
The main structure features a large open core containing beds, turrets, mixing tables, and storage. Around the core are multiple peek points facing both outward and inward — letting you counter raiders even if they take your shooting floor.
The TC is hidden behind a vending machine inside a bunker, making it extremely difficult to access. Two sealed panic rooms, each containing drop boxes and beds, give you a secure place to store loot during a raid. Above, the shooting floor offers roof peeks, turret placements, and angles for both long-range and close-range defense.
How to Build This Base
The creator builds The Beast in a structured order, starting with the core and bunker, then expanding outward into the compound. Following these steps will keep the build efficient.

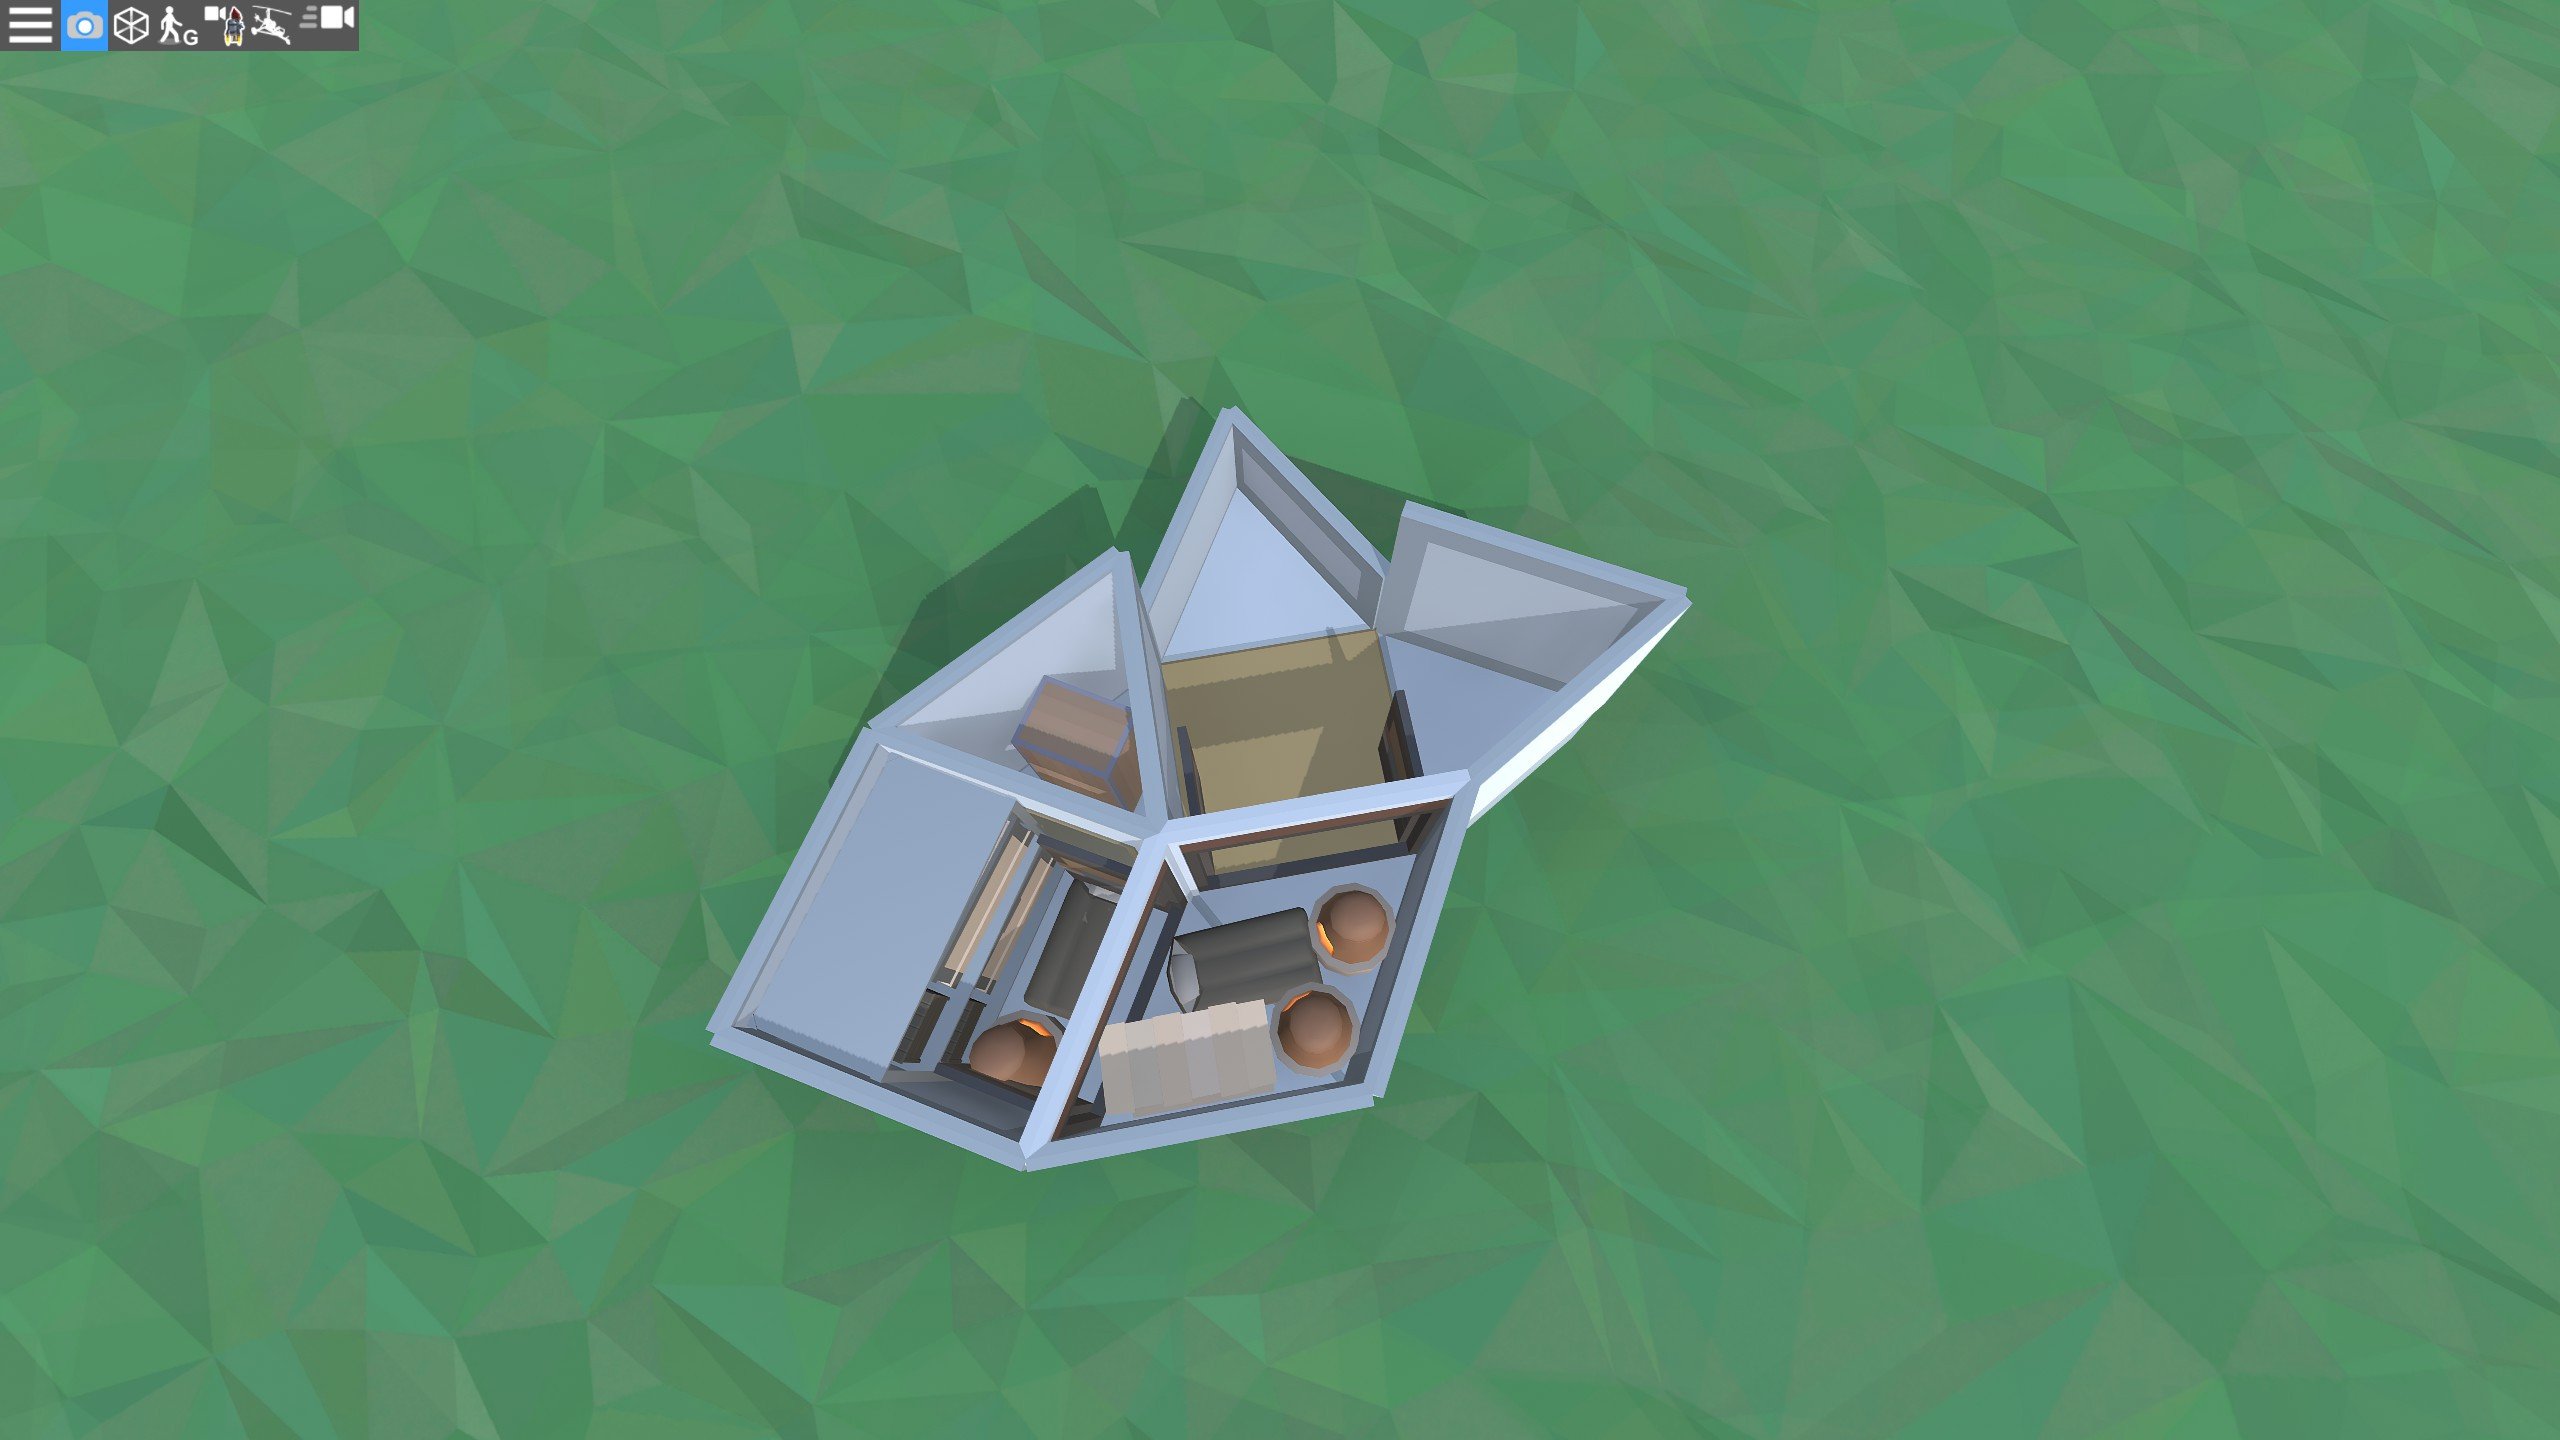
Step 1 – Starter Core and Bunker Setup
The very first part of the build lays down the foundation for the bunker and TC room.
- Place a square foundation in the center, then check if you can attach raised triangle foundations around it — they must be raised.
- Surround the square with triangle foundations and seal the layout with walls and ceilings.
- On one wall, place a wooden wall that will later be broken and replaced with a window.
- Add a twig doorway for TC placement. Align the TC so there’s a small gap between it and the doorway — not too large or the vending machine bunker won’t work.
- Fill the space with boxes, placing the middle one first and then the side ones for a cleaner fit.
- Add a workbench in front of the TC, beds beside it, and a shotgun trap for early defense.
- Upgrade the raised foundations to metal as soon as possible to prevent softsiding.
- For jumping up inside, use a thick triangle roof piece placed in the shown position.
With this, you have a functional starter with the bunker mechanics in place from the start.

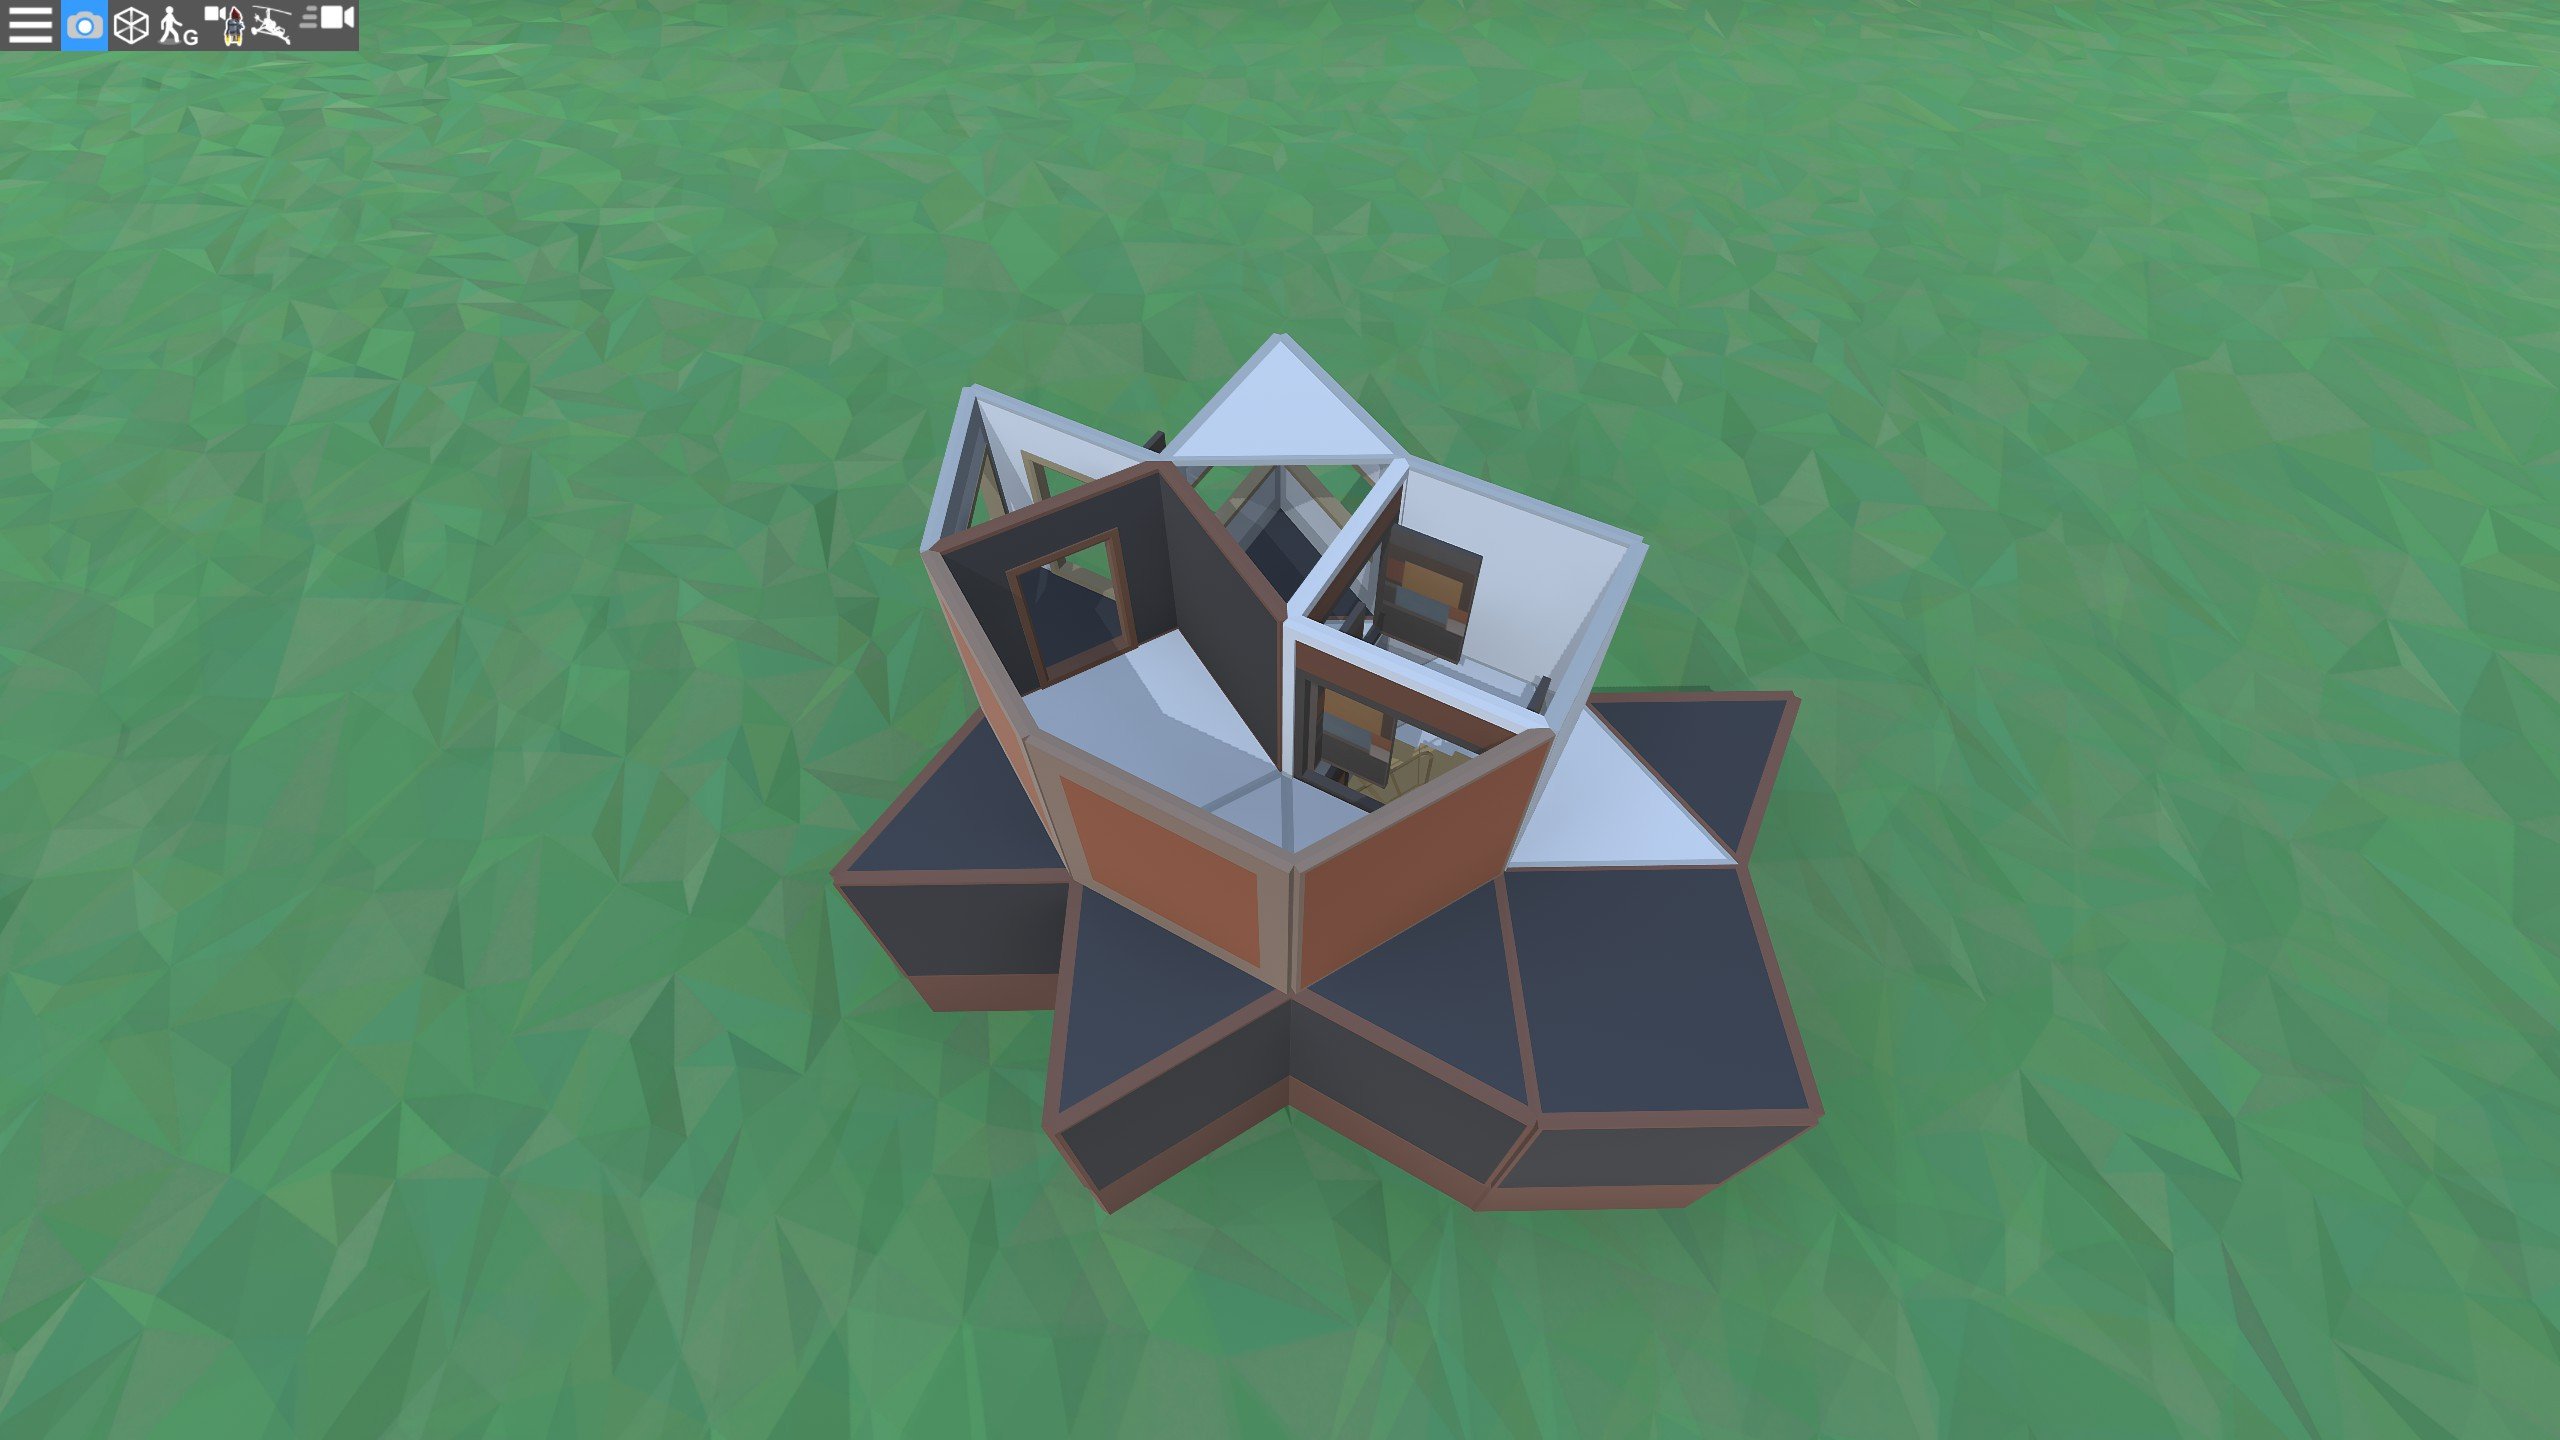
Step 2 – Breaking the Wall and Open Core Peaks
Now you’ll begin opening up the core and creating the first peek structures.
- Break the wooden wall from earlier with melee weapons and replace it with a window.
- Build open core peek angles and add a secret box compartment for hidden loot.
- Lock these boxes so only you can access them.
- Expand the entrance area to allow for better movement and early defense.
If you already have electrical furnaces, you can place a battery in the designated corner and the furnaces downstairs.
This stage gives you internal firing lines and your first hidden storage.
Step 3 – Early Honeycomb and TC Upgrades
Before going too far, you’ll reinforce the TC area and prepare for later stages.
- Honeycomb around the base, prioritizing the TC side.
- Upgrade the doorway in front of the TC before honeycombing, or you won’t be able to upgrade it later.
- Upgrade the floor above the TC to HQM, as it will be honeycombed and inaccessible afterward.
- Keep the main entrance foundations at stone for now.
These upgrades ensure your core is solid before moving up.
Step 4 – Building the Open Core and Panic Rooms
With the shell ready, you’ll now create the open core layout and secure panic rooms.
- Build the open core structure, upgrading parts to the final tier if resources allow (though it’s fine to wait).
- Place sleeping bags in the panic room spots now — they’ll be sealed in later.
- Seal two panic rooms, each with a bed and drop boxes. If solo, use one bag per room.
- Finish the loot rooms and keep the layout symmetrical for ease of navigation.
This is where the base gets its “cozy” open core look and additional loot safety.
Step 5 – Roof Jump-Ups and Sealing the Core
Next, add roof access and close off vulnerable points.
- Above the panic rooms, create two roof jump-ups and secure them with doors.
- Add shotgun traps to protect the jump-ups.
- Close the open core and begin placing deployables inside.
- Upgrade important sections to their final tier.
This locks down the interior and gives you fast vertical movement. The entrance is made of multiple spiral triangle platforms leading to the top floor on the opposite side of the core room.
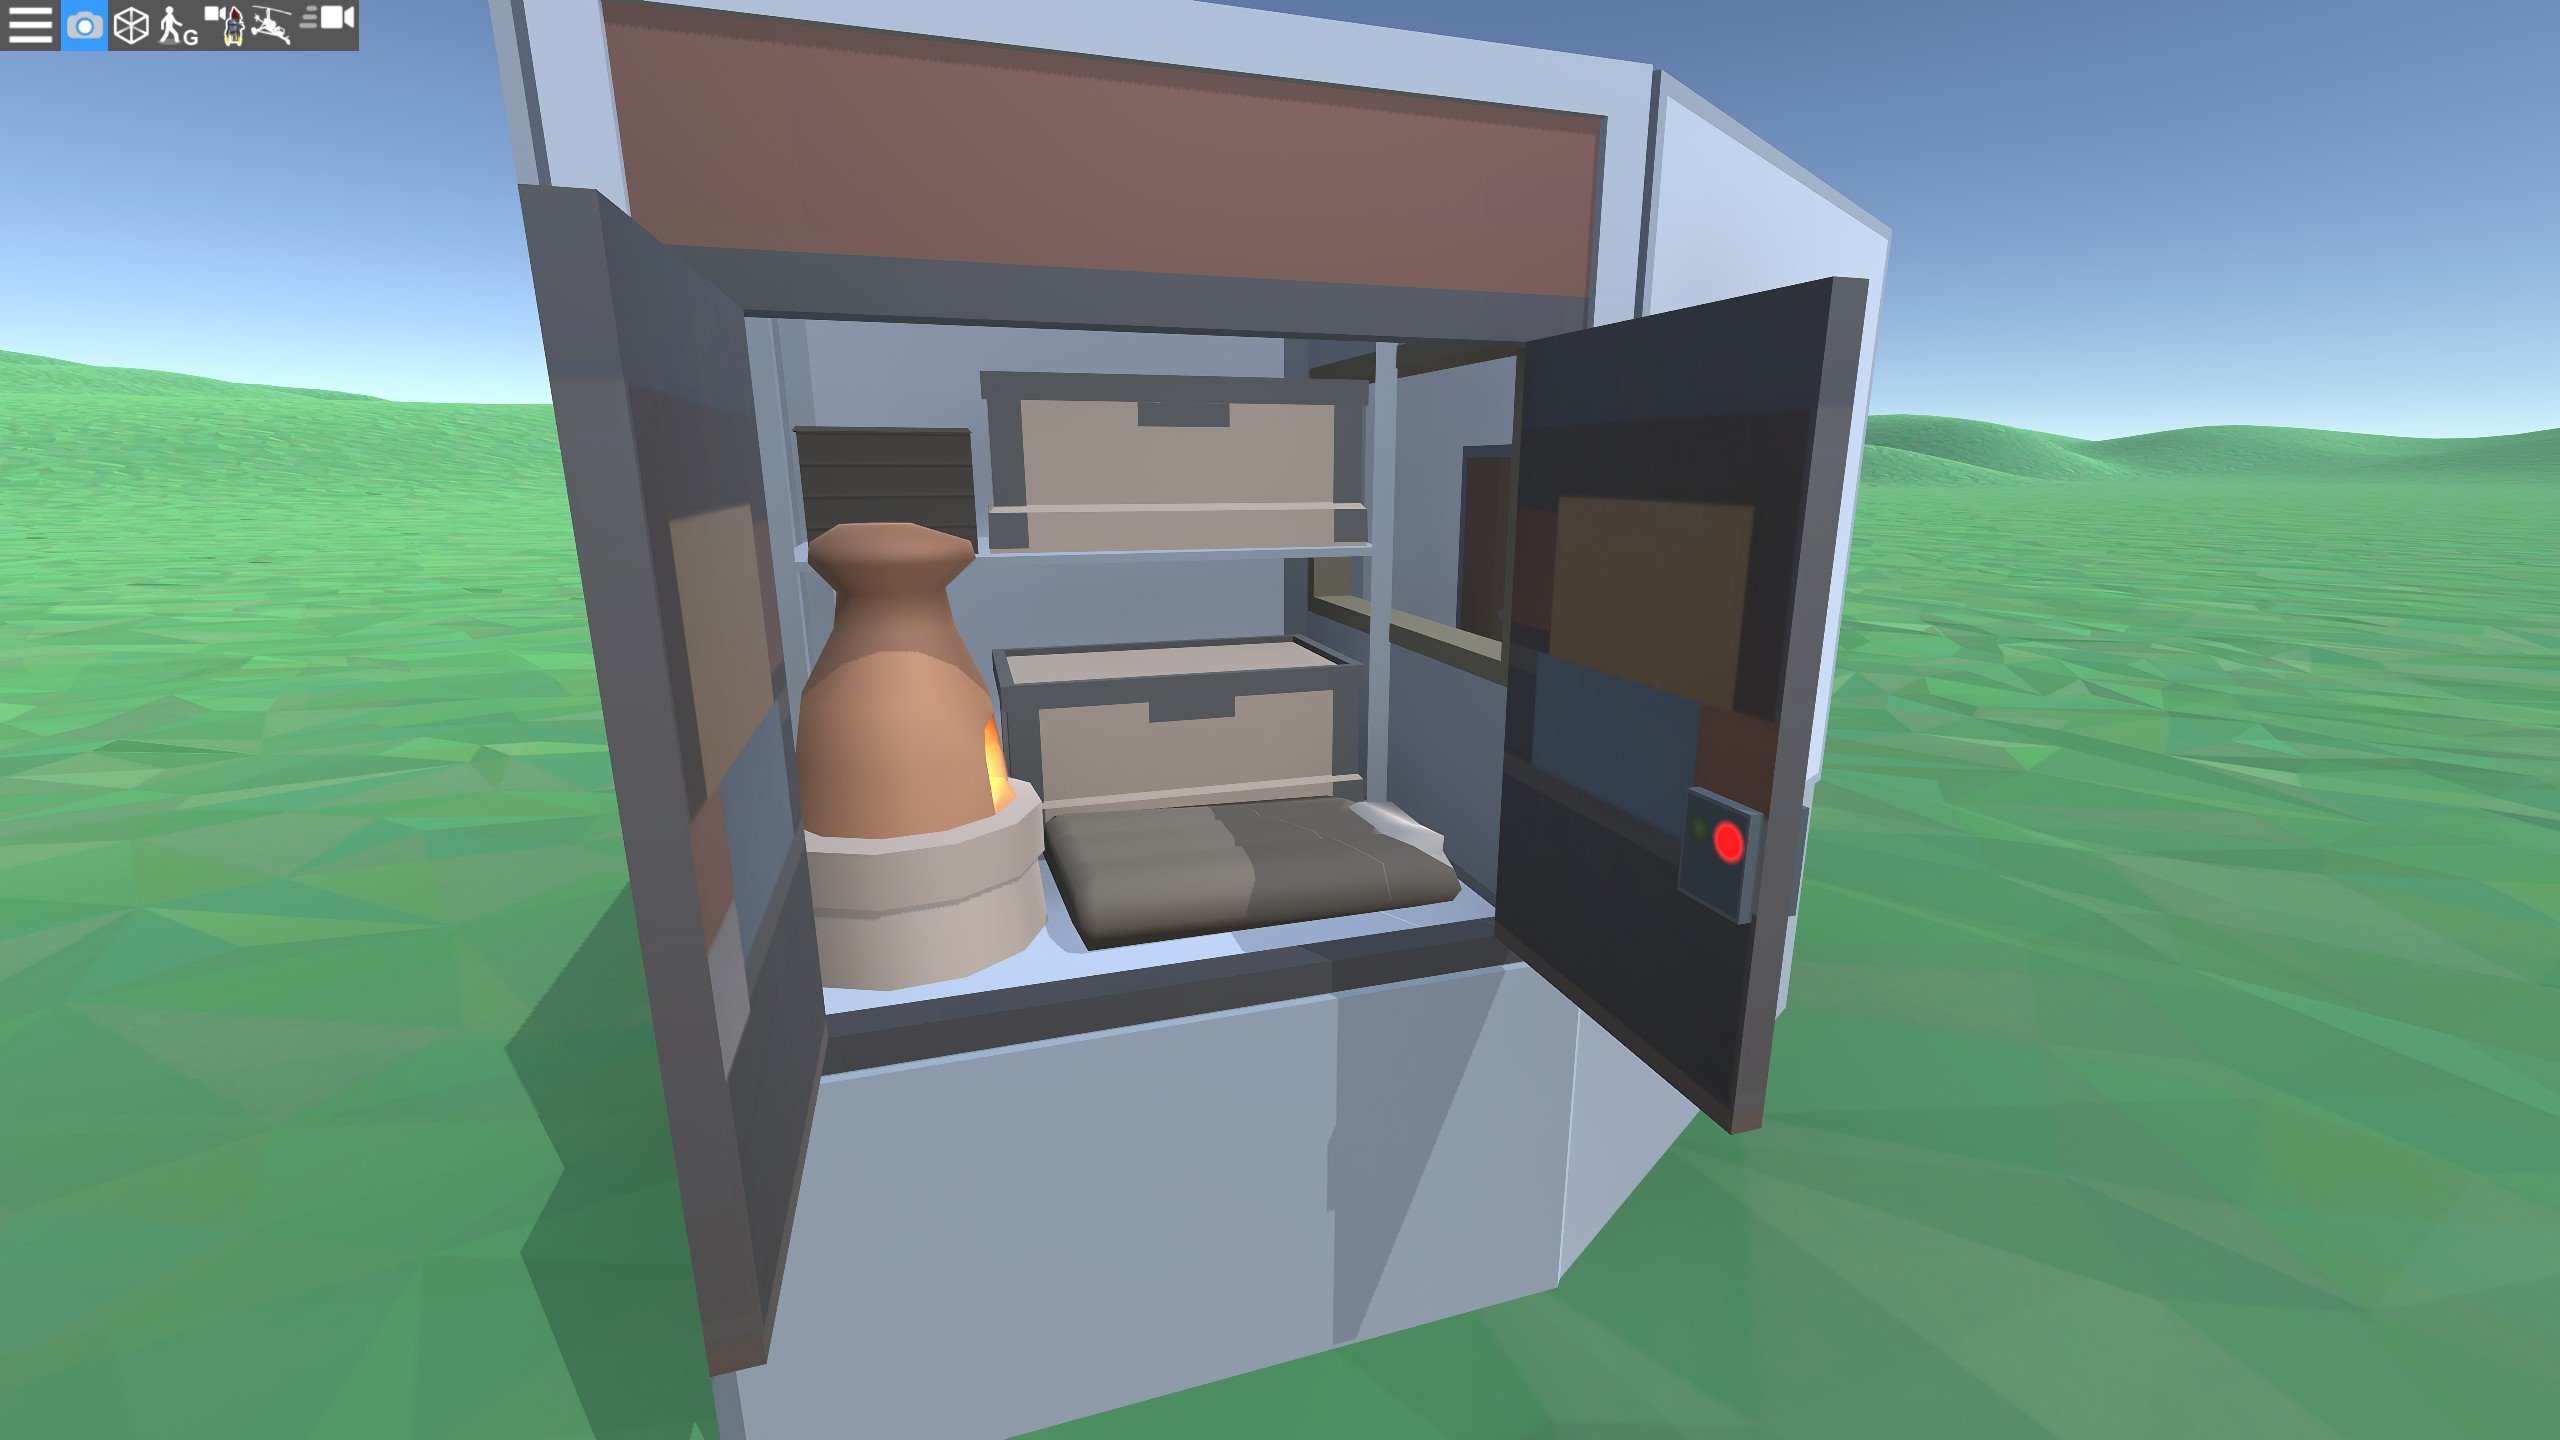
Step 6 – Vending Machine Bunker Installation
The vending machine bunker is one of this base’s strongest defensive features.
- Place the vending machine so its back faces the TC and push it as close as possible.
- Disable broadcasting so enemies can’t spot it easily.
- If the TC can’t be opened, put an item in the vending machine — this will allow access.
Move the battery to its main location and place a workbench in the open core. With this done, the TC is heavily protected against splash and direct entry.
Step 7 – Panic Room Finalization
Now finish the panic rooms with their drop box setups.
- In each room, place the first drop box on the left so it sticks out as a jump-up.
- Add a second drop box and a large box.
- Spawn inside to place another drop box from within.
- While two boxes fit, the creator prefers just one large box for simplicity.
Once complete, these rooms require significant raiding effort to access.
Step 8 – Main Entrance and More Honeycomb
Finish the main front entrance and strengthen the outer walls.
- Build a simple, secure front entrance as shown in the design.
- Honeycomb the base further for additional strength.
- At the back, create a fake entrance for a respawn room with lockers and beds.
- Optional: replace some honeycomb with wall frames for aesthetics.
This stage makes the outer shell more durable and adds a distraction point.
Step 9 – Roof Peeks, Embrasures, and Final Touches
Improve roof defense and finalize the main base before the compound.
- Upgrade selected floors to HQM.
- Place embrasures either inside or outside — inside gives a shooting gap advantage.
- Ensure embrasures are placed from outside where necessary.
- Add turrets and finalize any remaining upgrades.
Now the main base is ready for the compound.
Step 10 – Compound, Externals, and Breach Peaks
The final stage is building the outermost defenses.
- Build the external TCs starting from the base side: square → triangle → square → two triangles, then remove the two foundations.
- Construct the gatehouses with airlocks and turrets.
- On both sides, build out with three triangles, two squares, and two triangles for the breach peak sections.
- If the raised triangle foundation can’t be placed, use a half wall instead.
- Upgrade low walls to the correct skin for floor placement.
- Mirror the setup on the back side, then add turrets and barricades.
With the compound complete, The Beast is finished — a full-scale solo fortress with layered defenses from the outer walls to the hidden TC.
Conclusion
These bases were created by players with thousands of hours in the game. Each build is tested and raid-proof. Now, you might have noticed that some concepts are repeated in all of them – Honeycombing, TC placement, and the use of ramps for extra chest storage. If you’re somewhat new to the game, these things might not be familiar.
The more buffer structures you put around your base, the harder it is going to be to break in. Using triangle shapes for this is going to allow you to use more complex shapes that will take time to penetrate.
Another pretty cool concept is what I would call an indirect entrance. In all of these bases, you enter and go up to the top floor, and only then do you descend to reach the TP. When you make a traditional house-looking base, the TP is always within reach. In Rust, you have to put as many obstacles between that thing and your enemy as you can.
Final piece of advice – try building these bases on special servers that were created purely for building stuff. Or, host a local server, test things out there. Once you work out the order of things to build, you can start surprising your Rust neighbours on live servers. Good luck!
F.A.Q.
How to build an unraidable base in Rust?
There’s no such thing as a truly unraidable base in Rust. The best you can do is use layered defenses like bunkers, honeycomb, hidden loot rooms, and roof angles to make raiding costly and time-consuming.
How to prevent an offline raid in Rust as a solo player?
You can’t fully prevent offline raids, but you can make them less likely by:
- Using hidden loot rooms and bunkers
- Keeping upkeep high so decay never starts
- Building in low-traffic areas away from hot zones
Is building on water better in Rust?
Building on water can help avoid ground-based raids and limit approach angles. However, it also makes farming and expansion harder, and it’s not as resource-efficient as a well-designed land base.
How to protect my base from raiders in Rust?
Use a combination of honeycomb, armored doors, multiple airlocks, roof angles, traps, and turrets. Spread loot in different rooms to prevent losing everything in one breach.
How to honeycomb my base in Rust?
Honeycombing adds extra wall layers to slow raiders. Build additional wall segments around your core, leaving a gap between the main base and the outer layer, then seal it with ceilings.